2017 GMC SIERRA 1500 climate control
[x] Cancel search: climate controlPage 118 of 494
GMC Sierra/Sierra Denali Owner Manual (GMNA-Localizing-U.S./Canada/
Mexico-9955992) - 2017 - crc - 5/3/16
Instruments and Controls 117
Power Outlets
Power Outlets 12 Volt Direct
Current
Accessory power outlets can be
used to plug in electrical equipment,
such as a cell phone, MP3
player, etc.
The vehicle may have up to four
accessory power outlets.
Vehicles with a Center Console
.One or two in front of the
cupholders on the center
console.
. One inside the center console.
. One on the rear of the center
console.
Vehicles with Bench Seats
. One on the center stack below
the climate control system.
. One or two in the storage area
on the bench seat.
Lift the cover to access and replace
when not in use. The power outlets on the center
stack and in front of the cupholders
are powered at all times. The power
outlets inside the storage area and
on the rear of the console are
powered when the ignition is in ON/
RUN or ACC/ACCESSORY,
or when RAP is active.
{Warning
Power is always supplied to the
outlets. Do not leave electrical
equipment plugged in when the
vehicle is not in use because the
vehicle could catch fire and cause
injury or death.
Caution
Leaving electrical equipment
plugged in for an extended period
of time while the vehicle is off will
drain the battery. Always unplug
electrical equipment when not in
use and do not plug in equipment
that exceeds the maximum
15 amp rating.Certain power accessory plugs may
not be compatible with the
accessory power outlet and could
overload vehicle or adapter fuses.
If a problem is experienced, see
your dealer.
When adding electrical equipment,
be sure to follow the proper
installation instructions included with
the equipment. See
Add-On
Electrical Equipment 0334.
Caution
Hanging heavy equipment from
the power outlet can cause
damage not covered by the
vehicle warranty. The power
outlets are designed for
accessory power plugs only, such
as cell phone charge cords.
Page 146 of 494
GMC Sierra/Sierra Denali Owner Manual (GMNA-Localizing-U.S./Canada/
Mexico-9955992) - 2017 - crc - 5/3/16
Instruments and Controls 145
Battery Voltage and
Charging Messages
BATTERY LOW START
VEHICLE
When the vehicle’s battery is
severely discharged, this message
will display and four chimes will
sound. Start the vehicle
immediately. If the vehicle is not
started and the battery continues to
discharge, the climate controls,
heated seats, and audio systems
will shut off and the vehicle may
require a jump start. These systems
will function again after the vehicle
is started.
BATTERY SAVER ACTIVE
This message displays when the
battery voltage drops below
expected levels and features are
disabled. Turn off all unnecessary
accessory features.
SERVICE BATTERY
CHARGING SYSTEM
On some vehicles, this message
displays if there is a problem with
the battery charging system. Under
certain conditions, the charging
system light may also turn on in the
instrument cluster. See Charging
System Light 0132. Driving with this
problem could drain the battery.
Turn off all unnecessary
accessories. Have the electrical
system checked as soon as
possible. See your dealer.
TRANSPORT MODE ON
This message is displayed when the
vehicle is in transport mode. Some
features can be disabled while in
this mode, including Remote
Keyless Entry (RKE), remote start,
and the vehicle alarm system. Take
the vehicle to your dealer for service
to turn transport mode off.
Brake System Messages
BRAKE FLUID LOW
This message is displayed when the
brake fluid level is low. See Brake
Fluid 0365.
SERVICE BRAKE ASSIST
This message may be displayed
when there is a problem with the
brake boost assist system. When
this message is displayed, the brake
boost assist motor might be heard
operating and you might notice
pulsation in the brake pedal. This is
normal under these conditions. Take
the vehicle to your dealer for
service.
SERVICE TRAILER BRAKE
SYSTEM
On vehicles with the Integrated
Trailer Brake Control (ITBC) system,
this message displays and a chime
may sound when there is a problem
with the ITBC system.
When this message displays, power
is no longer available to the trailer
brakes.
Page 158 of 494
GMC Sierra/Sierra Denali Owner Manual (GMNA-Localizing-U.S./Canada/
Mexico-9955992) - 2017 - crc - 5/3/16
Instruments and Controls 157
Maximum Startup Volume
This feature sets the maximum
startup volume. If the vehicle is
started and the volume is greater
than this level, the volume is
adjusted to this level. To set the
maximum startup volume, turn the
MENU knob or press + or−to
increase or decrease.
Audio Cue Volume
This feature sets the volume of
audio files played at system startup
and shutdown.
Select On, then press + or −to
increase or decrease the volume.
Vehicle
Select and the following may
display:
. Climate and Air Quality
. Collision/Detection Systems
. Comfort and Convenience
. Lighting
. Power Door Locks
. Remote Lock, Unlock, Start Climate and Air Quality
Select and the following may
display:
.
Auto Fan Max Speed
. Auto Rear Defog
Auto Fan Max Speed
This feature will set the maximum
auto fan speed.
Select Low, Medium, or High.
Auto Rear Defog
This feature will automatically turn
on the rear defogger when it is cold
outside.
Select Off or On.Collision/Detection Systems
Select and the following may
display:
. Alert Type
. Park Assist
Alert Type
This feature will set crash alerts to
beeps or seat vibrations. This
setting affects all crash alerts including Forward Collision, Lane
Departure Warning, and Parking
Assist alerts.
Select Beeps or Safety Alert Seat.
Park Assist
If equipped, this feature can assist
in backing up and parking the
vehicle. See
Assistance Systems for
Parking or Backing 0291.
Select Off, On, or On with Towbar.
Comfort and Convenience
Select and the following may
display:
. Auto Memory Recall
. Easy Exit Options
. Chime Volume
. Reverse Tilt Mirror
. Auto Mirror Folding
Auto Memory Recall
This feature automatically recalls
the current driver ’s previously stored
1 or 2 button positions when
entering the vehicle. See Memory
Seats 054.
Page 175 of 494
GMC Sierra/Sierra Denali Owner Manual (GMNA-Localizing-U.S./Canada/
Mexico-9955992) - 2017 - crc - 5/3/16
174 Lighting
Lighting Features
Entry Lighting
Some exterior lamps and the interior
lamps turn on briefly at night, or in
areas with limited lighting, when
K
is pressed on the Remote Keyless
Entry (RKE) transmitter. When a
door is opened, the interior lamps
come on if the dome lamp control is
in the DOOR position. After about
30 seconds the exterior lamps turn
off. Entry lighting can be disabled
manually by changing the ignition
out of the OFF position, or by
pressing the RKE transmitter
Q
button.
This feature can be changed. See
“Vehicle Locator Lights”under
Vehicle Personalization 0155.
Exit Lighting
Some exterior lamps and the interior
lamps come on at night, or in areas
with limited lighting when the key is
removed from the ignition. The
exterior and interior lamps remain
on for a set amount of time and then automatically turn off. The interior
lamps do not come on if the dome
lamp control is in the Off position.
The exterior lamps turn off
immediately by turning the exterior
lamps control off.
This feature can be changed. See
Vehicle Personalization
0155.
Battery Load
Management
The vehicle has Electric Power
Management (EPM), which
estimates the battery's temperature
and state of charge. It then adjusts
the voltage for best performance
and extended life of the battery.
When the battery's state of charge
is low, the voltage is raised slightly
to quickly bring the charge back up.
When the state of charge is high,
the voltage is lowered slightly to
prevent overcharging. The voltmeter
gauge or the voltage display on the
Driver Information Center (DIC),
if equipped, may show the voltage moving up or down. This is normal.
If there is a problem, an alert will be
displayed.
The battery can be discharged at
idle if the electrical loads are very
high. This is true for all vehicles.
This is because the generator
(alternator) may not be spinning fast
enough at idle to produce all the
power that is needed for very high
electrical loads.
A high electrical load occurs when
several of the following are on, such
as: headlamps, high beams, fog
lamps, rear window defogger,
climate control fan at high speed,
heated seats, engine cooling fans,
trailer loads, and loads plugged into
accessory power outlets.
EPM works to prevent excessive
discharge of the battery. It does this
by balancing the generator's output
and the vehicle's electrical needs.
It can increase engine idle speed to
generate more power, whenever
needed. It can temporarily reduce
the power demands of some
accessories.
Page 185 of 494
GMC Sierra/Sierra Denali Owner Manual (GMNA-Localizing-U.S./Canada/
Mexico-9955992) - 2017 - crc - 5/3/16
184 Infotainment System
Phone :Touch to activate the
phone features (if equipped). See
Bluetooth (Voice Recognition - Base
Radio) 0216 orBluetooth
(Infotainment Controls - Base
Radio) 0212 orBluetooth
(Overview) 0210 orBluetooth
(Infotainment Controls - Base Radio
with Touchscreen) 0220.
Projection : Touch to access
supported devices when connected.
See USB Port (Base Radio) 0193
or USB Port (Base Radio with
Touchscreen) 0196.
Settings : Touch to access the
Personalization menu. See Vehicle
Personalization 0155.
Climate : Touch to access the
Climate menu. See Dual Automatic
Climate Control System 0231.
OnStar : If equipped, touch to
access the OnStar menu. See
OnStar Overview 0471.Software Updates
See the websites for more
information.
Website Information
In the U.S., see www.gmc.com
In Canada, see www.gmc.gm.ca
In Mexico, www.gmc.com.mx
Radio
AM-FM Radio (Base
Radio)
Playing the Radio
While on the audio main page,
press the RADIO button repeatedly
to cycle through the available
sources AM, FM, and SiriusXM
®(if
equipped) or press the MEDIA
button repeatedly to cycle through
the available sources Bluetooth
®
Audio (if equipped), USB, and AUX.
The steering wheel controls can
also be used to adjust the volume.
See Steering Wheel Controls 0113.
AM, FM, or SiriusXM (If Equipped)
To select AM, FM, or SiriusXM (if
equipped), press the RADIO button
to toggle to the desired broadcast
source.
Page 197 of 494
GMC Sierra/Sierra Denali Owner Manual (GMNA-Localizing-U.S./Canada/
Mexico-9955992) - 2017 - crc - 5/3/16
196 Infotainment System
4. Turn MENU to highlight andpress to select the song from
the list to begin playback.
Albums: 1. Turn MENU to highlight and press to view the albums
stored on the device.
2. Turn MENU to highlight and press to select an album name
to view a list of all songs on the
album.
3. Turn MENU to highlight and press to select the song from
the list to begin playback.
Genres: 1. Turn MENU to highlight and press to view the genres stored
on the device.
2. Turn MENU to highlight and press to select a genre name
to view a list of artists of that
genre.
3. Turn MENU to highlight and press to select to view albums
by that artist. 4. Turn MENU to highlight and
press to select an album to
view songs.
5. Turn MENU to highlight and press to select the song from
the list to begin playback.
Songs: 1. Turn MENU to highlight and press to view a list of all songs
stored on the device.
2. Turn MENU to highlight and press to select the song from
the list to begin playback.
USB Port (Base Radio
with Touchscreen)
Using the USB Port
The infotainment system can play
music by connecting an auxiliary
device to the USB port.
USB Support
If equipped, the USB connector is in
the center stack below the climate
controls, and uses the USB 2.0
standard. USB Supported Devices
.
USB Flash Drives
. Portable USB Hard Drives
Not all iPods and USB drives are
compatible with the USB port.
Make sure the iPod has the latest
firmware from Apple
®for proper
operation. iPod firmware can be
updated using the latest iTunes
®
application. See www.apple.com/
itunes.
For help with identifying your iPod,
go to www.apple.com/support.
The USB port can play both lower
and upper case .mp3, .wma, .ogg,
and .wav files stored on a USB
storage device.
Supported Apple
®Devices
To view supported devices in U.S.,
see www.my.gmc.com\learn.
To view supported devices in
Canada, see www.gmcowner.ca.
To view supported devices in
Mexico, see your dealer for details.
Page 232 of 494
GMC Sierra/Sierra Denali Owner Manual (GMNA-Localizing-U.S./Canada/
Mexico-9955992) - 2017 - crc - 5/3/16
Climate Controls 231
Climate Controls
Climate Control Systems
Dual Automatic ClimateControl System . . . . . . . . . . . . . 231
Air Vents
Air Vents . . . . . . . . . . . . . . . . . . . . . 234
Maintenance
Passenger Compartment AirFilter . . . . . . . . . . . . . . . . . . . . . . . . 235
Service . . . . . . . . . . . . . . . . . . . . . . . 236
Climate Control Systems
Dual Automatic Climate Control System
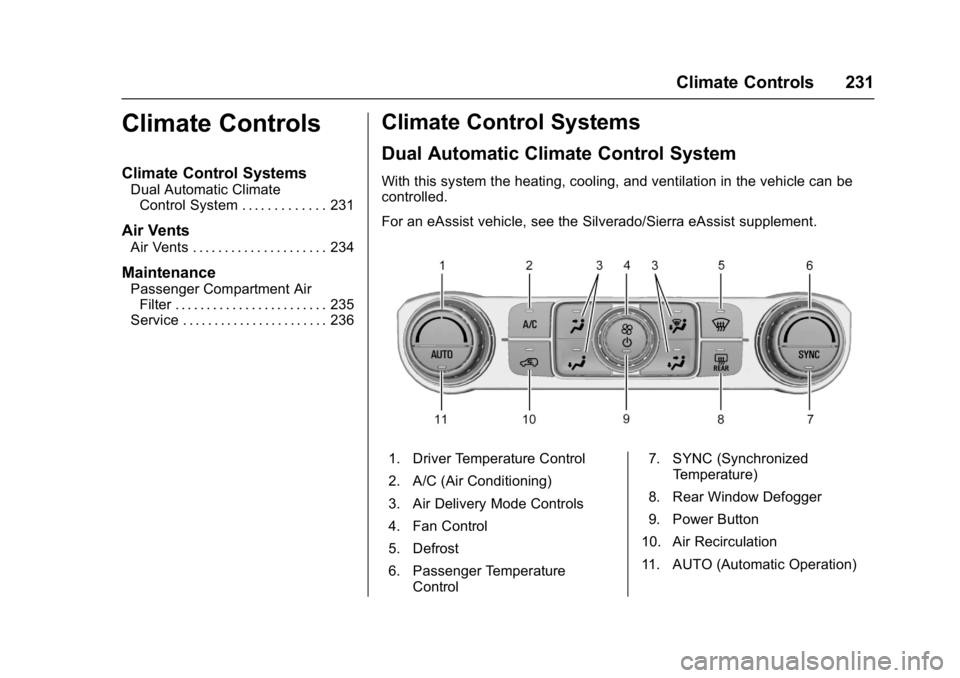
With this system the heating, cooling, and ventilation in the vehicle can be
controlled.
For an eAssist vehicle, see the Silverado/Sierra eAssist supplement.
1. Driver Temperature Control
2. A/C (Air Conditioning)
3. Air Delivery Mode Controls
4. Fan Control
5. Defrost
6. Passenger Temperature
Control 7. SYNC (Synchronized
Temperature)
8. Rear Window Defogger
9. Power Button
10. Air Recirculation
11. AUTO (Automatic Operation)
Page 233 of 494
GMC Sierra/Sierra Denali Owner Manual (GMNA-Localizing-U.S./Canada/
Mexico-9955992) - 2017 - crc - 5/3/16
232 Climate Controls
Automatic Operation
The system automatically controls
the fan speed, air delivery, air
conditioning, and recirculation in
order to heat or cool the vehicle to
the desired temperature.
When the indicator light is on, the
system is in full automatic operation.
If the air delivery mode or fan
setting is manually adjusted, the
auto indicator turns off and displays
will show the selected settings.
To place the system in
automatic mode:1. Press AUTO.
2. Set the driver and passenger temperature.
To find your comfort setting,
start with 22 °C (72 °F) and
allow the system time to
stabilize. Then adjust the
temperature as needed for best
comfort.
To improve fuel efficiency and to
cool the vehicle faster, recirculation
may be automatically selected in
warm weather. The recirculation light will not come
on when automatically controlled.
Press
@to manually select
recirculation; press it again to select
outside air.
Do not cover the solar sensor on the
top of the instrument panel near the
windshield. This sensor regulates
air temperature based on sun load.
See “Sensors” later in this section.
Manual Operation
O:Press to turn the climate control
system on or off. Outside air still
enters the vehicle, and is directed to
the floor. This direction can be
changed by pressing the air
delivery mode.
9: Turn clockwise or
counterclockwise to increase or
decrease the fan speed. Press the
knob to turn the fan off.
Press AUTO to return to automatic
operation. Driver and Passenger
Temperature Control :
The
temperature can be adjusted
separately for the driver and
passenger.
Turn the knob clockwise or
counterclockwise to increase or
decrease the driver or passenger
temperature setting.
SYNC : Press to link the passenger
temperature setting to the driver
setting. The SYNC indicator light will
turn on. When the passenger setting
is adjusted, the SYNC indicator light
is off.
The driver side or passenger side
temperature display shows the
temperature setting increasing or
decreasing.
Air Delivery Mode Control :
Press
Y,\,[, or-to change
the direction of the airflow. An
indicator light comes on in the
selected mode button.