2017 GMC ACADIA LIMITED Info center
[x] Cancel search: Info centerPage 149 of 339

GMC Acadia Limited Owner Manual (GMNA-Localizing-U.S.-10283134) -
2017 - crc - 3/30/16
148 Lighting
When the ignition is on, illuminated
entry is inactive, which means the
courtesy lamps will not come on
unless a door is opened.
Delayed Entry Lighting
Delayed entry lighting illuminates
the interior for a period of time after
all the doors have been closed.
The ignition must be off for delayed
entry lighting to work. Immediately
after all the doors have been closed,
the delayed entry lighting feature
continues to work until one of the
following occurs:
.The ignition is in ON/RUN.
. The doors are locked.
. An illumination period of about
25 seconds has elapsed.
If during the illumination period a
door is opened, the timed
illumination period is canceled and
the interior lamps remain on.
Delayed Exit Lighting
Delayed exit lighting illuminates the
interior for a period of time after the
key is removed from the ignition.
The ignition must be off for delayed
exit lighting to work. When the key
is removed, interior illumination
activates and remains on until one
of the following occurs:
. The ignition is in ON/RUN.
. The power door locks are
activated.
. An illumination period of
20 seconds has elapsed.
If during the illumination period a
door is opened, the timed
illumination period will be canceled
and the interior lamps will remain on
because a door is open.
Parade Dimming
This feature automatically prohibits
the dimming of the instrument panel
displays in daylight while the
headlamps are on so that the
displays are still able to be seen.
Battery Load
Management
The vehicle has Electric Power
Management (EPM) that estimates
the battery's temperature and state
of charge. It then adjusts the voltage
for best performance and extended
life of the battery.
When the battery's state of charge
is low, the voltage is raised slightly
to quickly bring the charge back up.
When the state of charge is high,
the voltage is lowered slightly to
prevent overcharging. If the vehicle
has a voltmeter gauge or a voltage
display on the Driver Information
Center (DIC), you may see the
voltage move up or down. This is
normal. If there is a problem, an
alert will be displayed.
The battery can be discharged at
idle if the electrical loads are very
high. This is true for all vehicles.
This is because the generator
(alternator) may not be spinning fast
enough at idle to produce all of the
power needed for very high
electrical loads.
Page 150 of 339

GMC Acadia Limited Owner Manual (GMNA-Localizing-U.S.-10283134) -
2017 - crc - 3/30/16
Lighting 149
A high electrical load occurs when
several of the following are on, such
as: headlamps, high beams, rear
window defogger, climate control fan
at high speed, heated seats, engine
cooling fans, trailer loads, and loads
plugged into accessory power
outlets.
EPM works to prevent excessive
discharge of the battery. It does this
by balancing the generator's output
and the vehicle's electrical needs.
It can increase engine idle speed to
generate more power whenever
needed. It can temporarily reduce
the power demands of some
accessories.
Normally, these actions occur in
steps or levels, without being
noticeable. In rare cases at the
highest levels of corrective action,
this action may be noticeable to the
driver. If so, a DIC battery voltage
and charging message displays, it is
recommended that the driver reduce
the electrical loads as much as
possible. SeeBattery Voltage and
Charging Messages 0124 and
Driver Information Center
(DIC) 0116.Battery Power Protection
This feature helps prevent the
battery from being drained, if the
interior courtesy lamps or reading
lamps are accidentally left on. If any
of these lamps are left on, they
automatically turn off after
10 minutes, if the ignition is off. The
lamps will not come back on again
until one of the following occurs:
.
The ignition is turned on.
. The exterior lamps control is
turned off, then on again.
The headlamps will time out after
10 minutes, if they are manually
turned on while the ignition is on
or off.
Page 169 of 339

GMC Acadia Limited Owner Manual (GMNA-Localizing-U.S.-10283134) -
2017 - crc - 3/31/16
168 Driving and Operating
Tire and Loading Information
Label
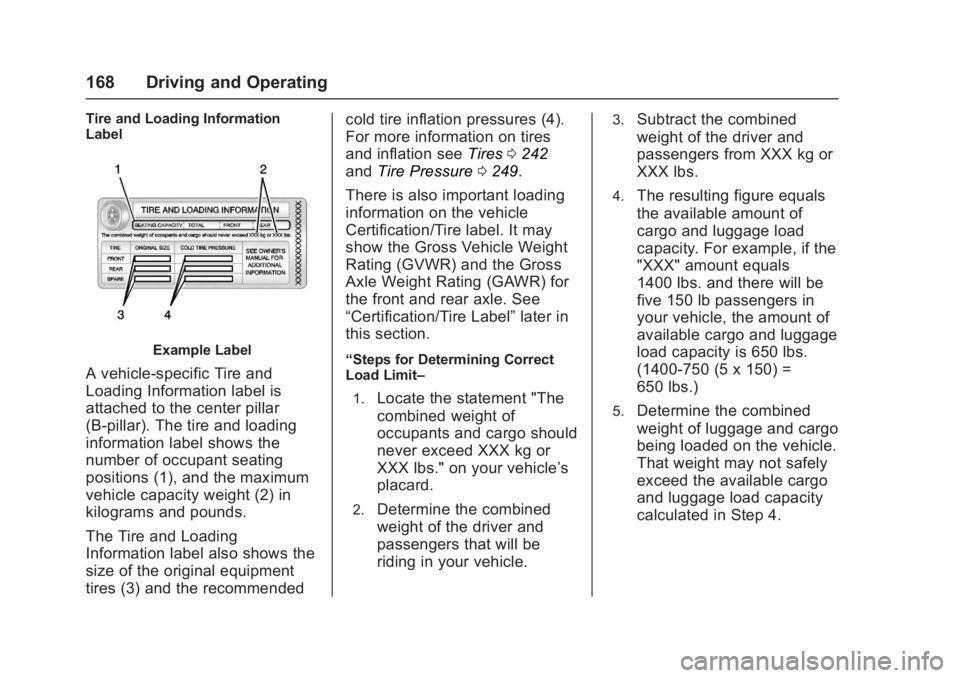
Example Label
A vehicle-specific Tire and
Loading Information label is
attached to the center pillar
(B-pillar). The tire and loading
information label shows the
number of occupant seating
positions (1), and the maximum
vehicle capacity weight (2) in
kilograms and pounds.
The Tire and Loading
Information label also shows the
size of the original equipment
tires (3) and the recommendedcold tire inflation pressures (4).
For more information on tires
and inflation see
Tires0242
and Tire Pressure 0249.
There is also important loading
information on the vehicle
Certification/Tire label. It may
show the Gross Vehicle Weight
Rating (GVWR) and the Gross
Axle Weight Rating (GAWR) for
the front and rear axle. See
“Certification/Tire Label” later in
this section.“Steps for Determining Correct
Load Limit–
1.
Locate the statement "The
combined weight of
occupants and cargo should
never exceed XXX kg or
XXX lbs." on your vehicle’s
placard.
2.Determine the combined
weight of the driver and
passengers that will be
riding in your vehicle.
3.Subtract the combined
weight of the driver and
passengers from XXX kg or
XXX lbs.
4.The resulting figure equals
the available amount of
cargo and luggage load
capacity. For example, if the
"XXX" amount equals
1400 lbs. and there will be
five 150 lb passengers in
your vehicle, the amount of
available cargo and luggage
load capacity is 650 lbs.
(1400-750 (5 x 150) =
650 lbs.)
5.Determine the combined
weight of luggage and cargo
being loaded on the vehicle.
That weight may not safely
exceed the available cargo
and luggage load capacity
calculated in Step 4.
Page 171 of 339

GMC Acadia Limited Owner Manual (GMNA-Localizing-U.S.-10283134) -
2017 - crc - 3/31/16
170 Driving and Operating
Example 3
1.Vehicle Capacity Weight
for Example 3 = 453 kg
(1,000 lbs).
2.Subtract Occupant
Weight @ 91 kg
(200 lbs) × 5 = 453 kg
(1,000 lbs).
3.Available Cargo Weight
= 0 kg (0 lbs).
Refer to the vehicle's tire and
loading information label for
specific information about the
vehicle's capacity weight and
seating positions. The combined weight of the driver, passengers,
and cargo should never exceed
the vehicle's capacity weight.
Certification/Tire Label
Label Example
A vehicle-specific Certification/
Tire label is attached to the
center pillar (B-pillar).
The label may show the size of
the vehicle's original tires and
the inflation pressures needed to
obtain the gross weight capacity
of the vehicle. The label shows
the gross weight capacity of the
vehicle. This is called the GrossVehicle Weight Rating (GVWR).
The GVWR includes the weight
of the vehicle, all occupants,
fuel, and cargo.
The Certification/Tire label may
also show the maximum weights
for the front and rear axles,
called the Gross Axle Weight
Rating (GAWR). To find out the
actual loads on the front and
rear axles, weigh the vehicle at
a weigh station. Your dealer can
help with this. Be sure to spread
the load equally on both sides of
the centerline.
CautionOverloading the vehicle may
cause damage. Repairs would not
be covered by the vehicle
warranty. Do not overload the
vehicle.
Page 182 of 339

GMC Acadia Limited Owner Manual (GMNA-Localizing-U.S.-10283134) -
2017 - crc - 3/31/16
Driving and Operating 181
To use this feature:1. Move the shift lever to L (Low).
2. Press + (Plus) or −(Minus) on
the shift lever to increase or
decrease the gear range
available.
When you shift from D (Drive) to
L (Low), the transmission will shift to
a pre-determined lower gear range.
The highest gear available for this
pre-determined range is displayed
next to the L in the DIC. See Driver
Information Center (DIC) 0116. The
number displayed in the DIC is the
highest gear that the transmission
will be allowed to operate in. This
means that all gears below that number are available. For example,
when 4 (Fourth) is shown next to the
L, 1 (First) through 4 (Fourth) gears
are automatically shifted by the
vehicle. The transmission will not
shift into 5 (Fifth) until the + (Plus)
button is used or you shift back into
D (Drive).
While in L (Low), the transmission
will prevent shifting to a lower gear
range if the engine speed is too
high. You have a brief period of time
to slow the vehicle. If vehicle speed
is not reduced within the time
allowed, the lower gear range shift
will not be completed. You must
further slow the vehicle, then press
the
−(Minus) button to the desired
lower gear range.
Automatic Engine Grade Braking is
not available when the ERS is
active. It is available in D (Drive) for
both normal and Tow/Haul Mode.
While using the ERS, cruise control
and the Tow/Haul Mode can be
used. See “Tow/Haul Mode”
following.
Tow/Haul Mode
_
Mode : If equipped with Tow/
Haul mode, the button is on the
center stack under the climate
controls.
Press the button to activate the
system. Press it again to deactivate
the system. This feature can assist
when towing or hauling a
heavy load.
When Tow/Haul is activated, the
Tow/Haul symbol will come on in the
instrument cluster. See Driving
Characteristics and Towing
Tips 0200.
Automatic Engine Grade
Braking
Automatic Engine Grade Braking
assists when driving on a downhill
grade. It maintains vehicle speed by
automatically implementing a shift
schedule that uses the engine and
the transmission to slow the vehicle.
The system will automatically
command downshifts to reduce
vehicle speed, until the brake pedal
is no longer being pressed.
Page 186 of 339

GMC Acadia Limited Owner Manual (GMNA-Localizing-U.S.-10283134) -
2017 - crc - 3/31/16
Driving and Operating 185
vehicle wheel brakes to assist the
driver in keeping the vehicle on the
intended path.
If cruise control is being used and
traction control or StabiliTrak begins
to limit wheel spin, cruise control will
disengage. Cruise control may be
turned back on when road
conditions allow.
Both systems come on
automatically when the vehicle is
started and begins to move. The
systems may be heard or felt while
they are operating or while
performing diagnostic checks. This
is normal and does not mean there
is a problem with the vehicle.
It is recommended to leave both
systems on for normal driving
conditions, but it may be necessary
to turn TCS off if the vehicle gets
stuck in sand, mud, ice, or snow.
SeeIf the Vehicle Is Stuck 0167
and “Turning the Systems Off and
On” later in this section.
The indicator light for both systems
is in the instrument cluster. This
light will:
.
Flash when TCS is limiting
wheel spin.
. Flash when StabiliTrak is
activated.
. Turn on and stay on when either
system is not working.
If either system fails to turn on or to
activate, a message displays in the
Driver Information Center (DIC),
and
dcomes on and stays on to
indicate that the system is inactive
and is not assisting the driver in
maintaining control. The vehicle is
safe to drive, but driving should be
adjusted accordingly.
If
dcomes on and stays on:
1. Stop the vehicle. 2. Turn the engine off and wait
15 seconds.
3. Start the engine.
Drive the vehicle. If
dcomes on
and stays on, the vehicle may need
more time to diagnose the problem.
If the condition persists, see your
dealer.
Turning the Systems Off
and On
The button for TCS and StabiliTrak
is on the center stack.
Caution
Do not repeatedly brake or
accelerate heavily when TCS is
off. The vehicle driveline could be
damaged.
Page 188 of 339

GMC Acadia Limited Owner Manual (GMNA-Localizing-U.S.-10283134) -
2017 - crc - 3/31/16
Driving and Operating 187
+RES :If there is a set speed in
memory, press briefly to resume to
that speed or press and hold to
accelerate. If cruise control is
already active, use to increase
vehicle speed.
SET– :Press briefly to set the
speed and activate cruise control.
If cruise control is already active,
use to decrease vehicle speed.
[: Press to disengage cruise
control without erasing the set
speed from memory.
Setting Cruise Control
If
Iis on when not in use, SET–
or +RES could get pressed and go
into cruise when not desired.
Keep
Ioff when cruise is not
being used.
The cruise control light on the
instrument cluster comes on after
the cruise control has been set to
the desired speed.
1. Press
Ito turn the cruise
control system on.
2. Get up to the desired speed. 3. Press and release SET–.
4. Remove foot from the
accelerator.
Resuming a Set Speed
If the cruise control is set at a
desired speed and then the brakes
are applied or
[is pressed, the
cruise control is disengaged without
erasing the set speed from memory.
Once the vehicle reaches 40 km/h
(25 mph) or more, press +RES. The
vehicle returns to the previously set
speed.
Increasing Speed While Using
Cruise Control
If the cruise control system is
already activated:
. Press and hold +RES until the
desired speed is reached, then
release it.
. To increase vehicle speed in
small increments, press +RES
briefly. For each press, the
vehicle goes about 1.6 km/h
(1 mph) faster. The speedometer reading can be
displayed in either English or metric
units. See
Driver Information Center
(DIC) 0116. The increment value
used depends on the units
displayed.
Reducing Speed While Using
Cruise Control
If the cruise control system is
already activated:
. Press and hold SET– until the
desired lower speed is reached,
then release it.
. To slow down in small
increments, press SET– briefly.
For each press, the vehicle goes
about 1.6 km/h (1 mph) slower.
The speedometer reading can be
displayed in either English or metric
units. See Driver Information Center
(DIC) 0116. The increment value
used depends on the units
displayed.
Page 190 of 339

GMC Acadia Limited Owner Manual (GMNA-Localizing-U.S.-10283134) -
2017 - crc - 3/31/16
Driving and Operating 189
The RVC system is designed to
help the driver when backing up by
displaying a view of the area behind
the vehicle. When the driver shifts
the vehicle into R (Reverse), the
video image automatically appears
on the infotainment screen. Once
the driver shifts out of R (Reverse),
the screen will go back to the last
screen that had been displayed,
after a delay.
The RVC display remains on after
shifting out of R (Reverse) for
approximately 10 seconds. Return to
the previous screen sooner by
performing one of the following:
.Press a hard key on the
infotainment system.
. Shift into P (Park).
. Reach a vehicle speed of
8 km/h (5 mph).
Symbols and Guidelines
The RVC system may have a
feature that lets the driver view
caution symbols on the RVC screen
while using the RVC. The Rear Parking Assist (RPA) system must
not be disabled to use these
symbols. See
Parking Assist 0190.
The caution symbols appear when
an object has been detected by the
RPA system. The symbol may cover
the object when viewing the RVC
screen.
The RVC system may have a
guideline overlay that can help the
driver align the vehicle when
backing into a parking spot.
To turn the symbols and guidelines
on or off: 1. Shift into P (Park).
2. Press Settings on the Home screen of the infotainment
system.
3. Select Display and then Rear Camera.
4. Select Symbols or Guidelines. When a checkmark appears
next to the item, it is on.
Rear Cross Traffic Alert (RCTA)
On vehicles with RCTA, a red
warning triangle with an arrow may
also display on the RVC screen to warn of traffic coming from either
direction, behind the vehicle. When
an object is detected, three beeps
sound on the left or right side,
depending on the direction of the
detected vehicle. This system
detects objects coming from up to
20 m (65 ft) from the left or right side
behind the vehicle.
Use caution while backing up when
towing a trailer, as the RCTA
detection zones that extend out
from the back of your vehicle do not
move further back when a trailer is
towed.
The RCTA system can be disabled
through the Driver Information
Center (DIC). See
Driver
Information Center (DIC) 0116.
Rear Vision Camera Location
The camera is located above the
license plate.
The area displayed by the camera is
limited and does not display objects
that are close to either corner or
under the bumper. The area
displayed can vary depending on
vehicle orientation or road