2017 GMC ACADIA LIMITED height
[x] Cancel search: heightPage 13 of 339

GMC Acadia Limited Owner Manual (GMNA-Localizing-U.S.-10283134) -
2017 - crc - 3/30/16
12 In Brief
4. Stow the mini-latch in theholder in the headliner.
5. Pull up on the release lever onthe back of the seat. 6. Push the seatback forward to
lay flat.
See Third Row Seats 051.
Heated and Cooled Front
Seats
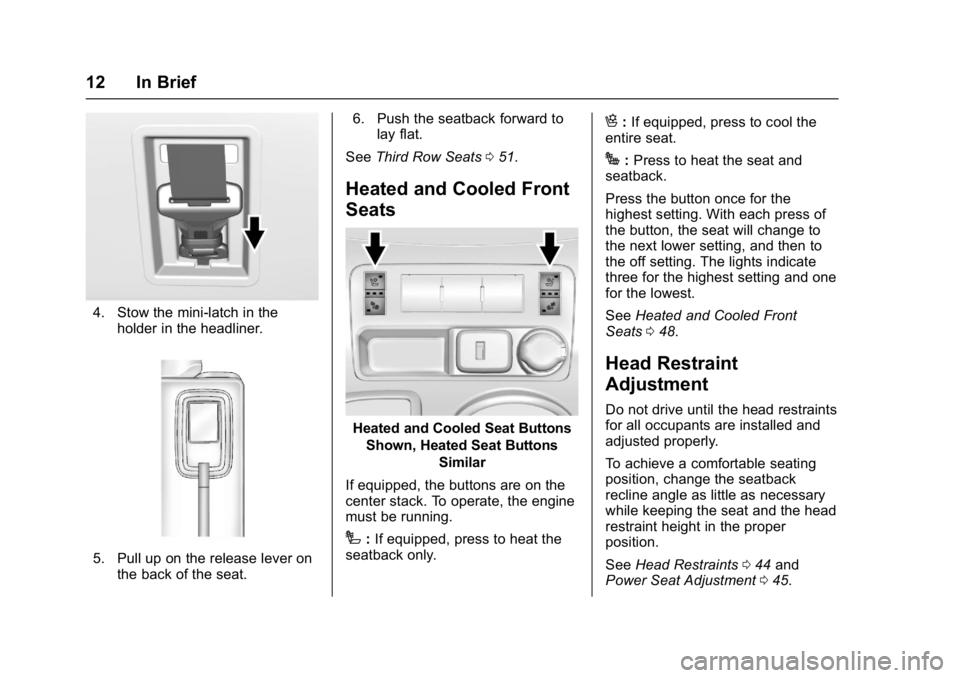
Heated and Cooled Seat Buttons
Shown, Heated Seat Buttons Similar
If equipped, the buttons are on the
center stack. To operate, the engine
must be running.
I: If equipped, press to heat the
seatback only.
H: If equipped, press to cool the
entire seat.
J: Press to heat the seat and
seatback.
Press the button once for the
highest setting. With each press of
the button, the seat will change to
the next lower setting, and then to
the off setting. The lights indicate
three for the highest setting and one
for the lowest.
See Heated and Cooled Front
Seats 048.
Head Restraint
Adjustment
Do not drive until the head restraints
for all occupants are installed and
adjusted properly.
To achieve a comfortable seating
position, change the seatback
recline angle as little as necessary
while keeping the seat and the head
restraint height in the proper
position.
See Head Restraints 044 and
Power Seat Adjustment 045.
Page 45 of 339

GMC Acadia Limited Owner Manual (GMNA-Localizing-U.S.-10283134) -
2017 - crc - 3/30/16
44 Seats and Restraints
Head Restraints
Front Seats
{Warning
With head restraints that are not
installed and adjusted properly,
there is a greater chance that
occupants will suffer a neck/
spinal injury in a crash. Do not
drive until the head restraints for
all occupants are installed and
adjusted properly.
The vehicle's front seats have
adjustable head restraints in the
outboard seating positions.
Adjust the head restraint so that the
top of the restraint is at the same
height as the top of the occupant's
head. This position reduces the
chance of a neck injury in a crash.To raise or lower the head restraint,
press the button located on the side
of the head restraint, and pull up or
push the head restraint down, and
release the button. Pull and push on
the head restraint after the button is
released to make sure that it is
locked in place.
To adjust the head restraint forward,
grasp the head restraint and pull
forward until the desired locking
position is reached.
To adjust the head restraint
rearward, press the button located
on the side of the head restraint,
and push the head restraint
rearward until the desired locking
Page 57 of 339

GMC Acadia Limited Owner Manual (GMNA-Localizing-U.S.-10283134) -
2017 - crc - 3/30/16
56 Seats and Restraints
2. Pick up the latch plate and pullthe belt across you. Do not let
it get twisted.
The lap-shoulder belt may lock
if you pull the belt across you
very quickly. If this happens, let
the belt go back slightly to
unlock it. Then pull the belt
across you more slowly.
If the shoulder portion of a
passenger belt is pulled out all
the way, the child restraint
locking feature may be
engaged. If this happens, let
the belt go back all the way
and start again.3. Push the latch plate into thebuckle until it clicks.
Pull up on the latch plate to
make sure it is secure. If the
belt is not long enough, see
Safety Belt Extender 060.
Position the release button on
the buckle so that the safety
belt could be quickly unbuckled
if necessary.
4. If equipped with a shoulder belt height adjuster, move it to the
height that is right for you. See
“Shoulder Belt Height Adjuster”
later in this section for
instructions on use and
important safety information.5. To make the lap part tight, pullup on the shoulder belt.
It may be necessary to pull the
stitching on the safety belt
through the latch plate to fully
tighten the lap belt on smaller
occupants.
Page 58 of 339

GMC Acadia Limited Owner Manual (GMNA-Localizing-U.S.-10283134) -
2017 - crc - 3/30/16
Seats and Restraints 57
To unlatch the belt, push the button
on the buckle. The belt should
return to its stowed position. Slide
the latch plate up the safety belt
webbing when the safety belt is not
in use. The latch plate should rest
on the stitching on the safety belt,
near the guide loop on the side wall.
Always stow the safety belt slowly.
If the safety belt webbing returns
quickly to the stowed position, the
retractor may lock and cannot be
pulled out. If this happens, pull the
safety belt straight out firmly to
unlock the webbing, and then
release it. If the webbing is still
locked in the retractor, see your
dealer.Before a door is closed, be sure the
safety belt is out of the way. If a
door is slammed against a safety
belt, damage can occur to both the
safety belt and the vehicle.
Shoulder Belt Height Adjuster
The vehicle has a shoulder belt
height adjuster for the driver and
front outboard passenger seating
positions.
Adjust the height so the shoulder
portion of the belt is on the shoulder
and not falling off of it. The belt
should be close to but not
contacting the neck. Improper
shoulder belt height adjustment
could reduce the effectiveness of
the safety belt in a crash. See
How
to Wear Safety Belts Properly 054.
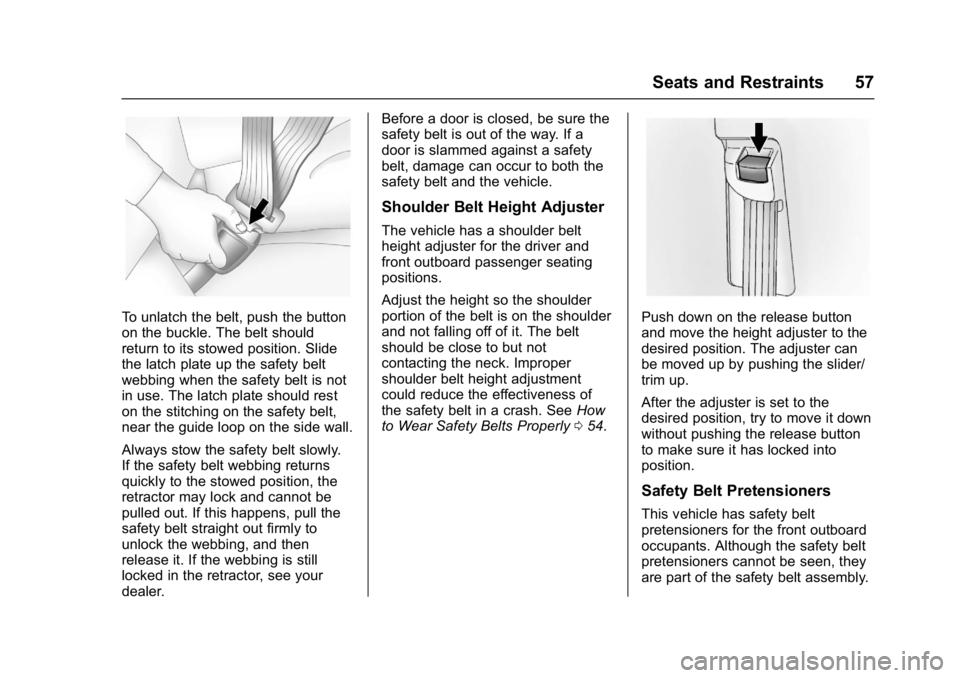
Push down on the release button
and move the height adjuster to the
desired position. The adjuster can
be moved up by pushing the slider/
trim up.
After the adjuster is set to the
desired position, try to move it down
without pushing the release button
to make sure it has locked into
position.
Safety Belt Pretensioners
This vehicle has safety belt
pretensioners for the front outboard
occupants. Although the safety belt
pretensioners cannot be seen, they
are part of the safety belt assembly.
Page 73 of 339

GMC Acadia Limited Owner Manual (GMNA-Localizing-U.S.-10283134) -
2017 - crc - 3/30/16
72 Seats and Restraints
Servicing the
Airbag-Equipped Vehicle
Airbags affect how the vehicle
should be serviced. There are parts
of the airbag system in several
places around the vehicle. Your
dealer and the service manual have
information about servicing the
vehicle and the airbag system. To
purchase a service manual, see
Service Publications Ordering
Information0313.
{Warning
For up to 10 seconds after the
vehicle is turned off and the
battery is disconnected, an airbag
can still inflate during improper
service. You can be injured if you
are close to an airbag when it
inflates. Avoid yellow connectors.
They are probably part of the
airbag system. Be sure to follow
proper service procedures, and
make sure the person performing
work for you is qualified to do so.
Adding Equipment to the
Airbag-Equipped Vehicle
Adding accessories that change the
vehicle's frame, bumper system,
height, front end, or side sheet
metal may keep the airbag system
from working properly.
The operation of the airbag system
can also be affected by changing
any parts of the front seats, safety
belts, airbag sensing and diagnostic
module, steering wheel, instrument
panel, roof-rail airbag modules,
ceiling or pillar garnish trim,
overhead console, front sensors,
side impact sensors, airbag wiring,
or the front center console if the
vehicle has a front center airbag.
Your dealer and the service manual
have information about the location
of the airbag sensors, sensing and
diagnostic module, and airbag
wiring.
In addition, the vehicle has a
passenger sensing system for the
front outboard passenger position,
which includes sensors that are part
of the passenger's seat. The passenger sensing system may not
operate properly if the original seat
trim is replaced with non-GM
covers, upholstery, or trim, or; with
GM covers, upholstery, or trim
designed for a different vehicle. Any
object, such as an aftermarket seat
heater or a comfort-enhancing pad
or device, installed under or on top
of the seat fabric, could also
interfere with the operation of the
passenger sensing system. This
could either prevent proper
deployment of the passenger
airbag(s) or prevent the passenger
sensing system from properly
turning off the passenger airbag(s).
See
Passenger Sensing
System 068.
If the vehicle has rollover roof-rail
airbags, see Different Size Tires
and Wheels 0258 for additional
important information.
If you have to modify your vehicle
because you have a disability and
you have questions about whether
the modifications will affect the
vehicle's airbag system, or if you
have questions about whether the
airbag system will be affected if the
Page 75 of 339

GMC Acadia Limited Owner Manual (GMNA-Localizing-U.S.-10283134) -
2017 - crc - 3/30/16
74 Seats and Restraints
The manufacturer instructions that
come with the booster seat state the
weight and height limitations for that
booster. Use a booster seat with a
lap-shoulder belt until the child
passes the fit test below:
.Sit all the way back on the seat.
Do the knees bend at the seat
edge? If yes, continue. If no,
return to the booster seat.
. Buckle the lap-shoulder belt.
Does the shoulder belt rest on
the shoulder? If yes, continue.
If no, try using the rear safety
belt comfort guide, if available.
See “Rear Safety Belt Comfort
Guides” underLap-Shoulder Belt
0 55. If a comfort guide is not
available, or if the shoulder belt
still does not rest on the
shoulder, then return to the
booster seat.
. Does the lap belt fit low and
snug on the hips, touching the
thighs? If yes, continue. If no,
return to the booster seat. .
Can proper safety belt fit be
maintained for the length of the
trip? If yes, continue. If no,
return to the booster seat.
Q: What is the proper way to wear safety belts?
A: An older child should wear a
lap-shoulder belt and get the
additional restraint a shoulder
belt can provide. The shoulder
belt should not cross the face or
neck. The lap belt should fit
snugly below the hips, just
touching the top of the thighs.
This applies belt force to the
child's pelvic bones in a crash.
It should never be worn over the
abdomen, which could cause
severe or even fatal internal
injuries in a crash.
Also see “Rear Safety Belt Comfort
Guides” underLap-Shoulder
Belt 055.
According to accident statistics,
children are safer when properly
restrained in a rear seating position. In a crash, children who are not
buckled up can strike other people
who are buckled up, or can be
thrown out of the vehicle. Older
children need to use safety belts
properly.
{Warning
Never allow more than one child
to wear the same safety belt. The
safety belt cannot properly spread
the impact forces. In a crash, they
can be crushed together and
seriously injured. A safety belt
must be used by only one person
at a time.
Page 78 of 339

GMC Acadia Limited Owner Manual (GMNA-Localizing-U.S.-10283134) -
2017 - crc - 3/30/16
Seats and Restraints 77
Child restraints are devices used to
restrain, seat, or position children in
the vehicle and are sometimes
called child seats or car seats.
There are three basic types of
child restraints:
.Forward-facing child restraints
. Rearward-facing child restraints
. Belt-positioning booster seats
The proper child restraint for your
child depends on their size, weight,
and age, and also on whether the
child restraint is compatible with the
vehicle in which it will be used.
For each type of child restraint,
there are many different models
available. When purchasing a child
restraint, be sure it is designed to be
used in a motor vehicle. If it is, the
restraint will have a label saying that
it meets federal motor vehicle safety
standards. The restraint
manufacturer's instructions that
come with the restraint state the
weight and height limitations for a
particular child restraint. In addition, there are many kinds of restraints
available for children with special
needs.
{Warning
To reduce the risk of neck and
head injury in a crash, infants and
toddlers should be secured in a
rear-facing child restraint until age
two, or until they reach the
maximum height and weight limits
of their child restraint.
{Warning
A young child's hip bones are still
so small that the vehicle's regular
safety belt may not remain low on
the hip bones, as it should.
Instead, it may settle up around
the child's abdomen. In a crash,
the belt would apply force on a
body area that is unprotected by
any bony structure. This alone
could cause serious or fatal
(Continued)
Warning (Continued)
injuries. To reduce the risk of
serious or fatal injuries during a
crash, young children should
always be secured in appropriate
child restraints.
Child Restraint Systems
Rear-Facing Infant Seat
A rear-facing child restraint provides
restraint with the seating surface
against the back of the infant.
Page 124 of 339

GMC Acadia Limited Owner Manual (GMNA-Localizing-U.S.-10283134) -
2017 - crc - 3/30/16
Instruments and Controls 123
Metric
Format Three : This display
includes all the information in
Format One along with a circular
tachometer, but without outside air
temperature.
All formats will show the
Turn-By-Turn navigation information
and provide details about the next
driving maneuver to be made. When
you near your destination, the HUD
will display a distance bar that will
fill in the closer you get to your
destination. All navigation
information is provided to the HUD
by the navigation radio, if equipped.
Care of the HUD
Clean the inside of the windshield
as needed to remove any dirt or film
that could reduce the sharpness or
clarity of the HUD image. To clean the HUD lens, use a soft,
clean cloth that has household glass
cleaner sprayed on it. Wipe the
HUD lens gently, then dry it. Do not
spray cleaner directly on the lens
because the cleaner could leak into
the unit.
HUD Troubleshooting
Check that:
.
Nothing is covering the
HUD lens.
. HUD brightness setting is not
too dim or too bright.
. HUD is adjusted to the proper
height.
. Polarized sunglasses are
not worn.
. Windshield and HUD lens are
clean.
If the HUD image is not correct,
contact your dealer.
The windshield is part of the HUD
system. See Windshield
Replacement 0230.
Vehicle Messages
Messages are displayed on the DIC
to notify the driver that the status of
the vehicle has changed and that
some action may be needed by the
driver to correct the condition.
Multiple messages may appear one
after another.
Some messages may not require
immediate action, but you can press
any of the DIC buttons on the
instrument panel to acknowledge
that you received the messages and
to clear them from the display.
Some messages cannot be cleared
from the DIC display because they
are more urgent. These messages
require action before they can be
cleared. You should take any
messages that appear on the
display seriously and remember that
clearing the messages will only
make the messages disappear, not
correct the problem.
The following are the possible
messages that can be displayed
and some information about them.