2017 GENESIS G90 trunk
[x] Cancel search: trunkPage 16 of 524

1. Door locks . . . . . . . . . . . . . . . . . . . . . . . 3-9
2. Fuel filler door . . . . . . . . . . . . . . . . . . . 3-57
3. Rear combination lamp . . . . . . . . . . . . 7-79
4. Trunk . . . . . . . . . . . . . . . . . . . . . . . . . . . 3-48
5. High mounted stop lamp . . . . . . . . . . . 7-796. Defroster
/Glass antenna . . . . . . . . . . . . . . 3-121, 4-2
7. Combination antenna . . . . . . . . . . . . . . . 4-2
8. Rearview camera . . . . . . . . . . . . . . . . 3-115
9. Towing hook . . . . . . . . . . . . . . . . . . . . . 6-25
1-3
01
OHI016002
The actual shape may differ from the illustration.
■ Rear view
Page 17 of 524

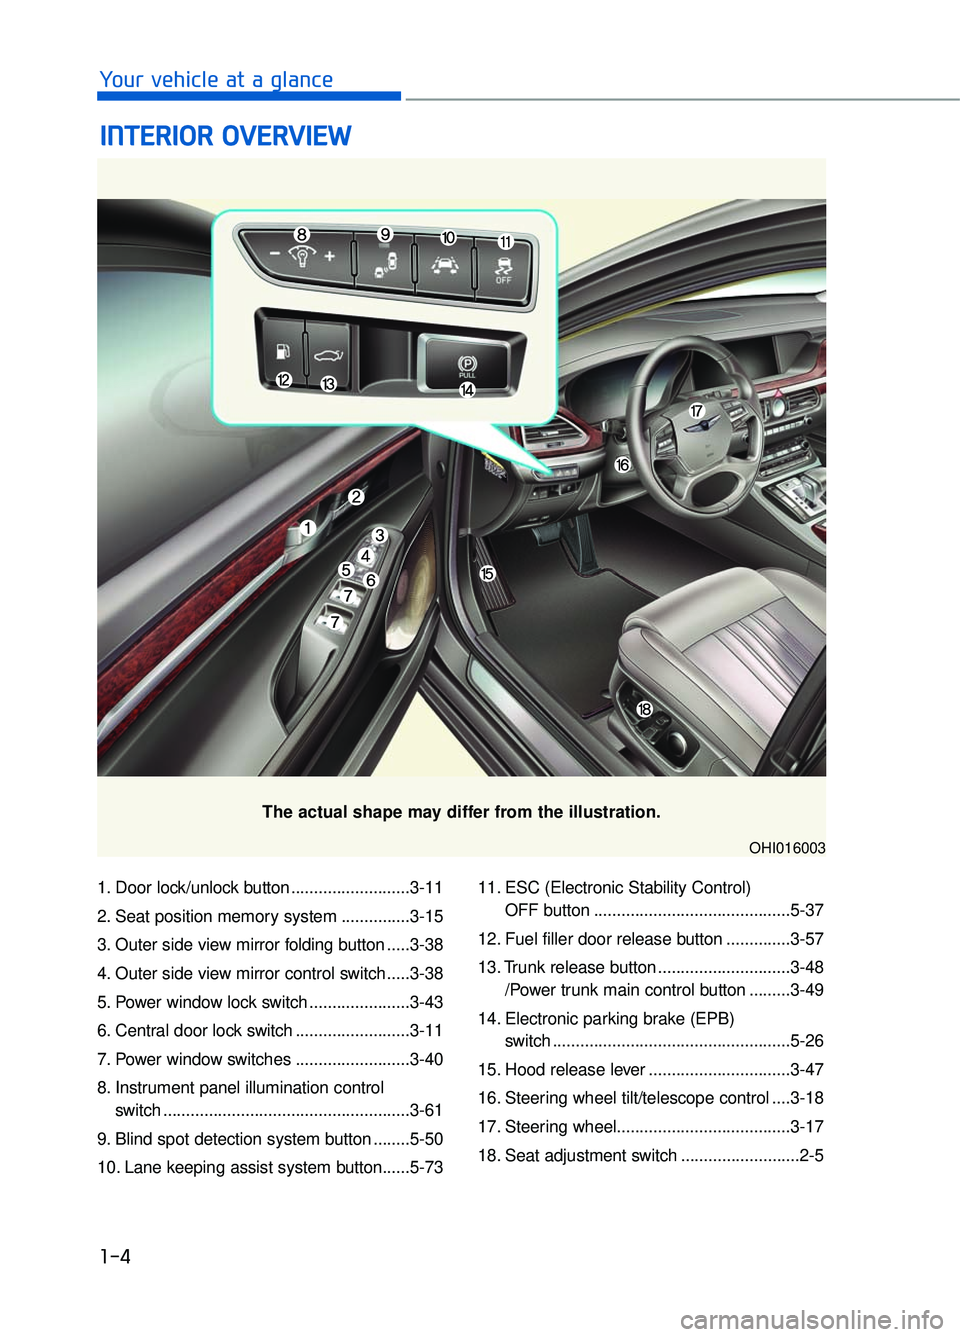
1. Door lock/unlock button ..........................3-11
2. Seat position memory system ...............3-15
3. Outer side view mirror folding button .....3-38
4. Outer side view mirror control switch .....3-38
5. Power window lock switch ......................3-43
6. Central door lock switch .........................3-11
7. Power window switches .........................3-40
8. Instrument panel illumination control switch ......................................................3-61
9. Blind spot detection system button ........5-50
10. Lane keeping assist system button......5-73 11. ESC (Electronic Stability Control)
OFF button ...........................................5-37
12. Fuel filler door release button ..............3-57
13. Trunk release button .............................3-48 /Power trunk main control button .........3-49
14. Electronic parking brake (EPB) switch ....................................................5-26
15. Hood release lever ...............................3-47
16. Steering wheel tilt/telescope control ....3-18
17. Steering wheel......................................3-17
18. Seat adjustment switch ..........................2-5
I I N
N T
TE
ER
R I
IO
O R
R
O
O V
VE
ER
R V
V I
IE
E W
W
1-4
Your vehicle at a glance
The actual shape may differ from the illustration.
OHI016003
Page 42 of 524

2-22
Safety system of your vehicle
Carrying long/narrow cargo
Additional cargo space is provided to
accommodate long/narrow cargo
(skis, poles, etc.) not able to fit prop-
erly in the trunk when closed.
1. Pull the armrest down.
2. Pull the cover down while pushingthe release lever down.
Be careful when loading cargo through the rear passenger
seats to prevent damage to the
vehicle interior.
When both the arm rest and the panel, are folded down, put back
the panel first, before folding
back the arm rest. If not, the
panel knobs and the arm rest
knobs may interfere with each
other and get damaged.
NOTICE
OHI036031
Cargo should always be secured
to prevent it from being thrown
about the vehicle in a collision
and causing injury to the vehicle
occupants. Do not place objects
in the rear seats, since they can-
not be properly secured and
may hit the front seat occupants
in a collision.
WARNING
Make sure the engine is off,the shift lever is in P and the
parking brake is applied
whenever loading or unload-
ing cargo. The vehicle may
move if the shift lever is inad-
vertently moved to another
position.
When cargo is loaded through the rear passenger seats,
ensure the cargo is properly
secured to prevent it from
moving while driving.
Unsecured cargo in the pas- senger compartment can
cause damage to the vehicle
or injury to its occupants.
CAUTION
Page 103 of 524

Accessing Your Vehicle ...............................................................3-4
Smart Key ........................................................................\
..............................3-4
Door Locks ........................................................................\
............3-9
Outside the Vehicle ........................................................................\
.............3-9
Inside the Vehicle........................................................................\
...............3-11
Auto Door Lock/Unlock Features .........................................................3-13
Child-Protector Rear Door locks ...........................................................3-13
Theft-Alarm System ..................................................................3-14
Seat Position Memory System .................................................3-15
Easy Access Function........................................................................\
.......3-16
Steering Wheel ........................................................................\
...3-17
Motor-Driven Power Steering (MDPS) ................................................3-17
Tilt Steering / Telescope Steering ........................................................3-18
Heated Steering Wheel ........................................................................\
....3-18
Horn ........................................................................\
......................................3-19
Mirrors ........................................................................\
.................3-20
Inside Rearview Mirror ........................................................................\
.....3-20
Side View Mirrors ........................................................................\
..............3-37
Reverse Parking Aid Function ................................................................3-39
Windows ........................................................................\
..............3-40
Sunroof ........................................................................\
................3-44
Sunroof opening and closing.................................................\
.................3-44
Tilting the Sunroof ........................................................................\
............3-45
Sunshade........................................................................\
..............................3-46
Resetting the Sunroof ........................................................................\
......3-46
Hood ........................................................................\
.....................3-47
Opening the Hood ........................................................................\
.............3-47
Closing the Hood........................................................................\
................3-47
Trunk ........................................................................\
....................3-48
Non-Powered Trunk ........................................................................\
.........3-48
Power Trunk........................................................................\
........................3-49
Emergency Trunk Safety Release .........................................................3-53
3
C Co
on
nv
ve
e n
n i
ie
e n
n t
t
f
f e
e a
at
tu
u r
re
e s
s
o
o f
f
y
y o
o u
ur
r
v
v e
e h
h i
ic
c l
le
e
Page 104 of 524

Smart Trunk ........................................................................\
........3-54
Fuel Filler Door ........................................................................\
..3-57
Opening the Fuel Filler Door ..................................................................3-57
Closing the Fuel Filler Door ....................................................................3-57\
Emergency Fuel Filler Door Release ....................................................3-59
Instrument Cluster .....................................................................3-6\
0
Instrument Cluster Control ......................................................................3-\
61
Gauges and Meters ........................................................................\
...........3-61
Warning and Indicator Lights .................................................................3-65
LCD Display Messages........................................................................\
......3-75
LCD Display ........................................................................\
.........3-86
LCD Display Control......................................................................\
.............3-86
LCD Modes ........................................................................\
..........................3-87
Trip Computer ........................................................................\
.....3-95
Head-Up Display ........................................................................\
3-98
Light ........................................................................\
...................3-101
Exterior Lights........................................................................\
..................3-101
Interior Lights ........................................................................\
...................3-108
Welcome System........................................................................\
..............3-111
Wipers and Washers ................................................................3-112
Windshield Wipers ........................................................................\
...........3-112
Windshield Washers ........................................................................\
........3-114
Driver Assist System................................................................3-115
Rear View Camera ........................................................................\
...........3-115
Multi-View Camera System ..................................................................3-116
Parking Assist System ........................................................................\
....3-117
Defroster ........................................................................\
...........3-121
Rear Window Defroster ........................................................................\
.3-121
Front Wiper Deicer........................................................................\
..........3-121
3
Page 106 of 524

Smart Key
Your G90 uses a Smart Key, which
you can use to lock or unlock a door
(and trunk) and even start the engine.
1. Door Lock
2. Door Unlock
3. Trunk Unlock
4. Panic
Locking
To lock :
1. Close all doors, engine hood andtrunk.
2. Either press the door handle but- ton or press the Door Lock button
(1) on the smart key. 3. The hazard warning lights will blink
and the chime will sound once.
Also, the outer side view mirror will
fold, if the side view mirror folding
switch is in the AUTO position.
4. Make sure the doors are locked by checking the position of the door
lock button inside the vehicle.
Information
• The door handle button will onlyoperate when the smart key is with-
in 28~40 inches (0.7~1 m) from the
outside door handle.
• Pressing the door handle button does not unlock the doors. To unlock the
doors, refer to the following page.
Even though you press the outside
door handle button, the doors will not
lock and the chime will sound for
three seconds if any of the following
occur:
• The Smart Key is in the vehicle.
The Engine Start/Stop button is in ACC or ON position.
Any door except the trunk is open.
i
A A C
CC
CE
E S
SS
SI
IN
N G
G
Y
Y O
O U
UR
R
V
V E
EH
H I
IC
C L
LE
E
3-4
Convenient features of your vehicle
OHI046058
OHI046003
Do not leave the Smart Key in
your vehicle with unsupervised
children. Unattended children
could press the Engine Start/
Stop button and may operate
power windows or other con-
trols, or even make the vehicle
move, which could result in
serious injury or death.
WARNING
Page 107 of 524

Unlocking
To unlock:
1. Carry the Smart Key.
2. Either put your hand in the outsidedoor handle or press the Door
Unlock button (2) on the smart
key.
3. The doors will unlock. The hazard warning lights will blink two times.
Also, the outer side view mirror will
unfold, if the side view mirror fold-
ing switch is in the AUTO position.
Information
• The door handle unlocking will onlyoperate when the smart key is with-
in 28~40 inches (0.7~1 m) from the
outside door handle and other peo-
ple can also open the doors.
• If you put your hand in the door handle of the outside door, all doors
will unlock.
• If you press the Door Unlock button on the smart key or if you put your
hand in the door handle again with-
in four seconds, then all doors will
unlock.
You can change the system to the
central door unlock mode in the User
Settings menu of the LCD display to
unlock all the doors when you press
the unlock button one time.
• After unlocking the doors, the doors will lock automatically after 30 sec-
onds unless a door is opened.
Trunk opening
To open:
1. Carry the smart key.
2. Either press the trunk handle but- ton or press and hold the Trunk
Unlock button (3) on the smart key
for more than one second.
3. The hazard warning lights will blink two times.
Once the trunk is opened and then
closed, the trunk will lock automati-
cally.
Information
The trunk handle button will only oper-
ate when the smart key is within 28
inches (0.7 m) from the trunk handle.
Information
The power trunk (if equipped) can be
operated when the engine is not run-
ning. However, the power trunk con-
sumes large amounts of vehicle elec-
tric power. To prevent the battery
from being discharged, do not operate
consecutively (more than approxi-
mately 10 times).
Panic button
Press and hold the Panic button (4)
for more than one second. The horn
sounds and hazard warning lights
blink for about 30 seconds. To cancel
the panic mode, press any button on
the Smart Key.
i
ii
03
3-5
Page 110 of 524

Restrictions in handling keys
When leaving keys with parking lot and
valet attendants, the following proce-
dures will ensure your vehicle's trunk
and glove box compartment can only
be opened with the mechanical key.
To lock:
1. Remove the mechanical key fromthe Smart Key.
2. Unlock the glove box by using the mechanical key, then open it.
3. Set the Trunk Lid Control button to the LOCK position (button pressed).
4. Close and lock the glove box using the mechanical key.
5. Leave the Smart Key with the attendant and keep the mechani-
cal key with you.
The Smart Key can only be used to
start the engine and operate door locks.
To unlock:
1. Open the glove box with the mechanical key.
2. Set the Trunk Lid Control button to the UNLOCK position (button not
pressed).
In this position the trunk lid will open
with the Trunk Lid button or the Smart
Key.
Battery replacement
If the Smart Key is not working prop-
erly, try replacing the battery with a
new one.
Battery Type : CR2032
To replace the battery:
1. Using a flat-blade screwdriver, gently pry open the rear cover of
the smart key.
2. Remove the old battery and insert the new battery.
3. Reinstall the rear cover of the smart key.
If you suspect your smart key might
have sustained some damage, or
you feel your smart key is not work-
ing correctly, contact an authorized
Dealer of Genesis Brand Products.
Information
An inappropriately disposed battery can be harmful to the
environment and human
health. Dispose the battery
according to your local
law(s) and regulation(s).
i
3-8
Convenient features of your vehicle
OHI046006
OHI046009