2017 GENESIS G80 manual
[x] Cancel search: manualPage 13 of 23

MULTIMEDIA
20 I Quick Reference Guide Quick Reference Guide I 21GENESIS
BLUETOOTH PHONE PAIRING
Pairing a new device
Standard AVN
DIS navigation system
2. Press
Bluetooth phones.
3. Pair your car after your mobile
phone detects the Bluetooth device.
4. Enter the passkey or accept
the authorization popup.
(The default passkey is 0000.)
5. Connect Bluetooth.
1.
Press the PHONE button in the head unit(or DIS navigation system)
or button in the steering wheel remote control.
NOTE: Vehicle must be in (P) Park to complete pairing process.
GENESIS CONNECTED SERVICES
• SOS
• Navigation
• Connected Services Menu
Press the button for access to the voice-response menu of services.
- Press the button for Destination Search Powered by Google®.
- Press the button for SOS Emergency Assistance.
- Refer to your Genesis Connected Services Menu User’s Manual for detailed
information on system operation.
- For immediate assistance with subscription services, please call
1-844-340-9741.
Google® is a registered trademark of Google Inc.
You can say:
- "Service Link" to schedule a service appointment.
- "Roadside Assistance" for roadside services.
- "Genesis Account Services" for help with your Blue Link subscription.
Page 15 of 23

STEERING WHEEL AUDIO CONTROL
2
3
1
1 VOLUME/MUTE
Scroll up or down to adjust the volume.
Press to mute or unmute the sound.
2 SEEK/PRESET
Change station.
3 MODE
Change the audio source.
To Answer a Call: • Press button on the steering wheel.
To Reject a Call: • Press button on the steering wheel.
To Adjust Ring Volume: • Use the VOLUME buttons on the steering wheel.
To Transfer a Call to the Phone (Private Call): • Press and hold button on the steering wheel until the audio system transfers a call to the phone.
To Finish a Call: • Press button on the steering wheel.
BLUETOOTH OPERATIONAL TIPS
In the following situations you or the other party may have difficulty
hearing each other:
1. When Bluetooth volume is set too high. It may result in distortion and echo.
2. When driving on a rough road, high speeds and/or with the window open.
3. When the air conditioning vents are facing the microphone and/or when
the air conditioning fan is at the max speed.
Steering wheel bluetooth control
1 TALK
Activates voice recognition.
2 CALL
Places and transfers calls.
3 END
Ends calls or cancels functions.
23
1
Making a call using voice recognition:
The menu tree identifies available voice recognition Bluetooth® functions.
Calling by Name:
1. Press button.
2. Say the following command after the Voice Recognition beep:
• “Call
• “ Call
call to John Smith’s Mobile, Home, or Office phone number.
Dialing by Number:
1. Press button.
2. Say “Dial Number” after the Voice Recognition beep.
3. Say desired phone number. For complete list of commands,
refer to your Owner’s Manual.
VOICE RECOGNITION TIPS
Your vehicle is equipped with Voice Recognition technology which allows drivers to
operate their phones without having to take their eyes off the road
to minimize distractions.
Voice recognition performance may be affected if speaking before Voice
Recognition beep is heard, driving with windows and sun roof open; when the
heating-cooling system is on; when passing in a tunnel or when driving \
on rugged
and uneven roads.
Quick reference on using voice commands
To start voice command. Press the key, the following commands are available:
CommandFunction
CallDisplays downloaded Contacts.
Call
Dial NumberDisplays a screen where you can say a phone number to dial.
Dial
RedialDirectly calls at the number that you last dialed.
Call HistoryDisplays your Call History.
MULTIMEDIA
24 I Quick Reference Guide Quick Reference Guide I 25GENESIS
Page 17 of 23

Quick Reference Guide I 29
FEATURES AND CONTROLS
28 I Quick Reference Guide GENESIS
Scrolling through Controller
Move the focus or scroll through the
navigation map.
Turning the controller
Move the focus, or zoom in/out the
navigation map.
Pressing the controller
Start/Select the focused feature.
DRIVER INFORMATION SYSTEM (DIS)CLOCK ADJUSTMENT
The central control panel is located in the vehicle center console.
It comprises the controller and the main function buttons.
Open the HOME
main menuOpen menu screen
Go back
one menu
level
Open the
Navigation main
menu
Open the Genesis
Connected Services
main menu
Open the
PHONE main
menu
MAP/VOICE
button
1.
Press "HOME" button.
1.
Press the "SETUP" button.
2. Press "Settings" icon on the screen, then press "Clock".
3. To set your preferred Time Setting:
• Check "GPS Time" to adjust the time automatically.
• Press “Time Setting” to adjust the clock manually. GPS Time must
not be selected.
• If "Daylight Savings Time" is selected, the clock will be adjusted
forward by one hour.
2. Press "Clock" icon on the screen.
3. To set your preferred Time Setting:
• Check "GPS Time" to adjust the time automatically.
• Press “Date/Time Setting” to adjust the clock manually.
GPS Time must not be selected.
• If "Daylight Savings Time" is selected, the clock will be adjusted
forward by one hour.
With DIS Touch System
With Touch Screen System
NOTE: Once the digital clock is adjusted, the analog
clock will be updated accordingly.
Page 20 of 23

Quick Reference Guide I 35
DRIVING
34 I Quick Reference Guide GENESIS
AUTOMATIC EMERGENCY BRAKING (AEB)
The Automatic Emergency Braking
(AEB) helps avoid accidents by
identifying critical situations early and
warning the driver.
Also, the system helps reduce the
severity of crashes which cannot be
avoided by lowering the speed of
collision and, in some cases, by
preparing the vehicle and restraint
systems for impact.
TIRE PRESSURE MONITORING SYSTEM (TPMS)
LOW TIRE PRESSURE INDICATOR
Illuminates if one or more of your tires is significantly under-inflated.
TPMS MALFUNCTION INDICATOR Blinks for approximately one minute, then remains illuminated when
there is a malfunction with the TPMS. Inspect all tires and adjust tire
pressure to specification. If the lamp remains illuminated, have the
system checked by authorized retailer of Genesis Branded Products
as soon as possible.
Low Tire Pressure Position Telltale and
Tire Pressure Telltale
( Shown on the LCD display )
Low Tire Pressure Indicator /
TPMS Malfunction Indicator
NOTE: Vehicle must
be driven for accurate
tire pressure reading.
ELECTRONIC PARKING BRAKE (EPB)
or
Stop the vehicle then pull
the EPB switch.
Applying
Move shift lever from P to
R, N or D while depressing
the brake pedal.
Releasing
Press the EPB switch while
depressing the brake pedal.
NOTE: If necessary, emergency braking is
possible by pulling and holding the EPB
switch.
NOTE: System can be Enabled/
Disabled in the User Settings page
of the instrument cluster under
Driving Assist.
NOTE: Units can be changed in the User Settings page of the instrument
cluster under Other Features.
AUTO HOLD
To cancel the AUTO HOLD operation,
press the AUTO HOLD switch again.
The Auto Hold feature assists in steep
hill areas. It holds the brake until the
accelerator pedal is pressed.
1.
Press the AUTO HOLD
switch.
WHITE
2. Stop the vehicle by pressing
the brake pedal. The brakes
will remain engaged even if
the brake pedal is released.
GREEN
3. The brakes will release
when the accelerator pedal
is pressed with transmission
in D, R or manual mode.
WHITE
Page 21 of 23
36 I Quick Reference Guide Quick Reference Guide I 37
DRIVING
GENESIS
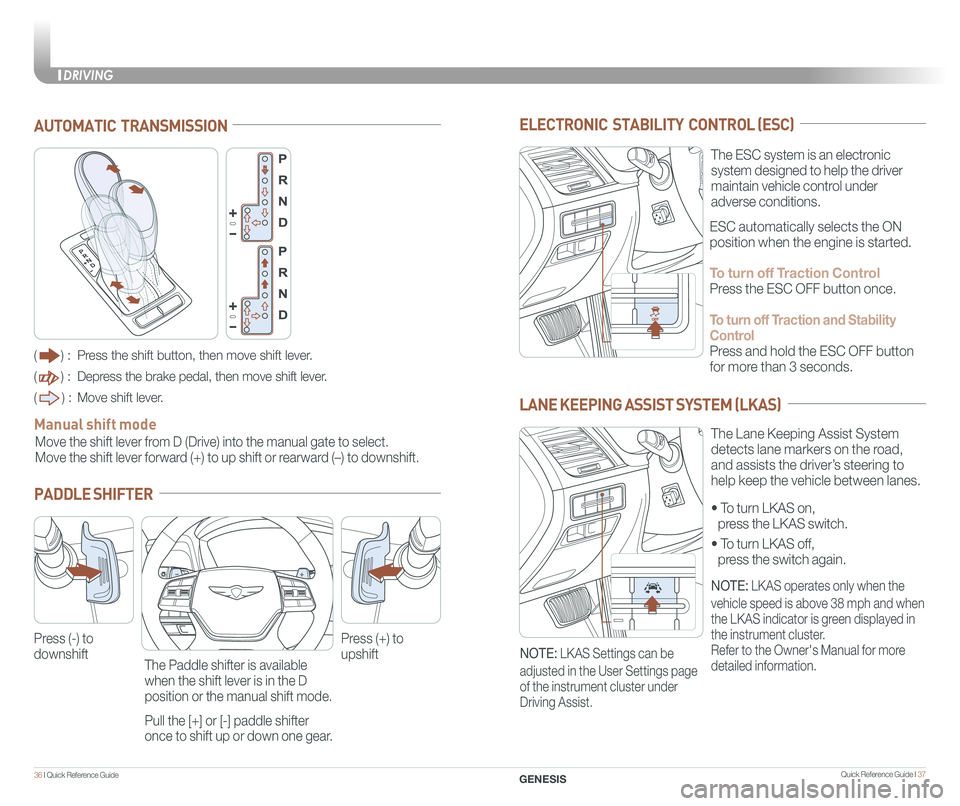
ELECTRONIC STABILITY CONTROL (ESC)
The ESC system is an electronic
system designed to help the driver
maintain vehicle control under
adverse conditions.
• To turn LKAS on,
press the LKAS switch.
• To turn LKAS off,
press the switch again.
The Lane Keeping Assist System
detects lane markers on the road,
and assists the driver’s steering to
help keep the vehicle between lanes.
LANE KEEPING ASSIST SYSTEM (LKAS)
ESC automatically selects the ON
position when the engine is started.
To turn off Traction Control
Press the ESC OFF button once.
To turn off Traction and Stability
Control
Press and hold the ESC OFF button
for more than 3 seconds.
NOTE: LKAS operates only when the
vehicle speed is above 38 mph and when
the LKAS indicator is green displayed in
the instrument cluster.
Refer to the Owner's Manual for more
detailed information.NOTE: LKAS Settings can be
adjusted in the User Settings page
of the instrument cluster under
Driving Assist.
AUTOMATIC TRANSMISSION
() : Press the shift button, then move shift lever.
() : Depress the brake pedal, then move shift lever.
() : Move shift lever.
Move the shift lever from D (Drive) into the manual gate to select.
Move the shift lever forward (+) to up shift or rearward (–) to downshift.
Manual shift mode
PADDLE SHIFTER
Press (-) to
downshift
Press (+) to
upshiftThe Paddle shifter is available
when the shift lever is in the D
position or the manual shift mode.
Pull the [+] or [-] paddle shifter
once to shift up or down one gear.
Page 23 of 23

GENESIS BRAND OWNER RETAILER NAME
SALES CONSULTANT DATE
VIN PREVIOUS VEHICLE
GENESIS CUSTOMER DELIVERY CHECKLIST
BEFORE DELIVERY
☐ SET TIRE PRESURE LF RF RR LR
☐ VERIFY VEHICLE IS CLEAN, IN GOOD CONDITION, FREE OF CHIPS AND SCRATCHES · CLEAN WINDSHIELD AND BACK WINDOW
☐ ENSURE FLOORMATS ARE SNAPPED INTO PLACE
Sales Consultant Date Sales Manager Date
Customer Date
Email
@
40 I Quick Reference Guide
DRIVING
CRUISE CONTROL/ADVANCED
SMART CRUISE CONTROL
Setting vehicle distance
(Advanced smart cruise
control only)
The vehicle to vehicle distance will
automatically activate when you set
the cruise speed.
This system assist you in setting the
distance from the vehicle ahead and
will maintain the selected distance
without you depressing the
accelerator or the brake pedal.
If your vehicle is equipped with Advanced smart cruise control and you
wish to eliminate the vehicle distance function, you can change cruise
control setting to a standard setting.
Press the Cruise Control button on the
steering wheel to turn on Cruise Control.
Then press and hold the vehicle distance
button for more than 2 seconds to toggle
between Smart Cruise Control (SCC) and
Cruise Control (CC) mode.
Please refer to your Owner's Manual for
more information.
Each time the vehicle distance set
button is pressed, the vehicle to
vehicle distance changes as follows:
The cruise control system allows
you to program the vehicle to
maintain a constant speed without
holding the accelerator pedal.
Distance 4
Distance 3
Distance 2
Distance 1
1 To On/Off the cruise control.
2 To Resume or Increase
the cruise control speed.
3 To Set or Decrease
the cruise control speed.
4 To Cancel the cruise control.
2
3
1
4
GENESIS BRANDED VEHICLE OWNER PRIVACY POLICY
Your Genesis Branded vehicle may be equipped with technologies and
services that use information collected, generated, recorded or stored by
the vehicle. We have created a Vehicle Owner Privacy Policy to explain
how these technologies and services collect, use, and share this
information.
You may read our Vehicle Owner Privacy Policy on the GenesisMotorsUSA.com
website at http://www.genesismotorsusa.com/privacy-policy.html
If you would like to receive a hard copy of our Vehicle Owner Privacy
Policy, please contact Customer Care at:
Genesis Customer Care
P.O. Box 20850
Fountain Valley, CA 92728
844-340-9741
[email protected]
Genesis Customer Care representatives are available Monday through
Friday, between the hours of 5:00 AM and 7:00 PM PST and Saturday
and Sunday between 6:30 AM and 3:00 PM PST
(English). For Customer Care assistance in Spanish or Korean,
representatives are available Monday through Friday between
6:30 AM and 3:00 PM PST.