2017 GENESIS G80 window
[x] Cancel search: windowPage 15 of 496

1-2
E
EX
X T
TE
ER
R I
IO
O R
R
O
O V
VE
ER
R V
V I
IE
E W
W
(
( I
I)
)
Your vehicle at a glance
1. Hood ..................................................3-48
2. Headlamp ..........................................7-79
3. Front fog light.....................................7-79
4. Tires and wheels ...............................7-45
5. Side view mirrors ...............................3-36
6. Panorama sunroof .............................3-44
7. Front windshield wiper blades ...........7-39
8. Windows ............................................3-40
ODH014001CN
■ Front view
The actual shape may differ from the illustration.
Page 17 of 496

1-4
Your vehicle at a glance
I
IN
N T
TE
ER
R I
IO
O R
R
O
O V
VE
ER
R V
V I
IE
E W
W
1. Door lock/unlock button ....................3-12
2. Power window switches ....................3-40
3. Power window lock switch ................3-43
4. Central door lock switch ....................3-13
5. Side view mirror control switch ..........3-37
6. Side view mirror folding button ..........3-38
7. Fuel filler lid release button ..............3-59
8. Instrument panel illumination
control switch ....................................3-63
9. Trunk release button ..........................3-49
10. Lane keeping assist system button* ..5-69
11. Blind spot detection system button* ..5-78
12. Rear curtain button* ......................3-160
13. ESC OFF button ..............................5-38
14. Electronic parking brake switch* ....5-26
15. Steering wheel ................................3-19
16. Steering wheel tilt/telescope control ..3-19
17. Seat ..................................................2-4
18. Hood release lever ..........................3-48
19. Brake pedal ....................................5-23
20. Accelerator pedal
* : if equipped
ODH014003NThe actual shape may differ from the illustration.
Page 70 of 496

2-50
Safety system of your vehicle
Curtain air bags
Curtain air bags are located along
both sides of the roof rails above the
front and rear doors.
They are designed to help protect
the heads of the front seat occupants
and the rear outboard seat occu-
pants in certain side impact colli-
sions.
To reduce the risk of serious
injury or death from an inflating
side air bag, take the follo
wing
precautions:
Seat belts must be worn at all
times to help keep occupants
positioned properly.
Do not allow passengers to
lean their heads or bodies onto
doors, put their arms on the
doors, stretch their arms out of
the window, or place objects
between the doors and seats.
Hold the steering wheel at the 9
o'clock and 3 o'clock positions,
to minimize the risk of injuries
to your hands and arms.
Do not use any accessory
seat covers. This could reduce
or prevent the effectiveness
of the system.
Do not hang other objects
except clothes on the clothes
hanger. In an accident it may
cause vehicle damage or per-
sonal injury especially when
airbag is inflated.
(Continued)
WARNING (Continued)
Do not place any objects over
the air bag or between the air
bag and yourself. Also, do not
attach any objects around the
area the air bag inflates such
as the door, side door glass,
front and rear pillar.
Do not place any objects
between the door and the
seat. They may become dan-
gerous projectiles if the side
air bag inflates.
Do not install any accessories
on the side or near the side air
bags.
Do not cause impact to the
doors when the Engine Start/
Stop button is in the ON posi-
tion or this may cause the
side air bags to inflate.
If the seat or seat cover is
damaged, have the vehicle
checked and repaired by an
authorized retailer of Genesis
Branded products.
ODH033087
ODH033089
Page 71 of 496

2-51
Safety system of your vehicle
2
The curtain air bags are designed to
deploy only during certain side
impact collisions, depending on the
crash severity, angle, speed and
impact.
The curtain air bags do not only
deploy on the side of the impact but
also on the opposite side.
For vehicles equipped with a rollover
sensor the side and curtain air bags
on both sides of the vehicle may
deploy if a rollover or possible
rollover is detected.
The curtain air bags are not designed
to deploy in all side impact or rollover
situations.How does the air bags system
operate?
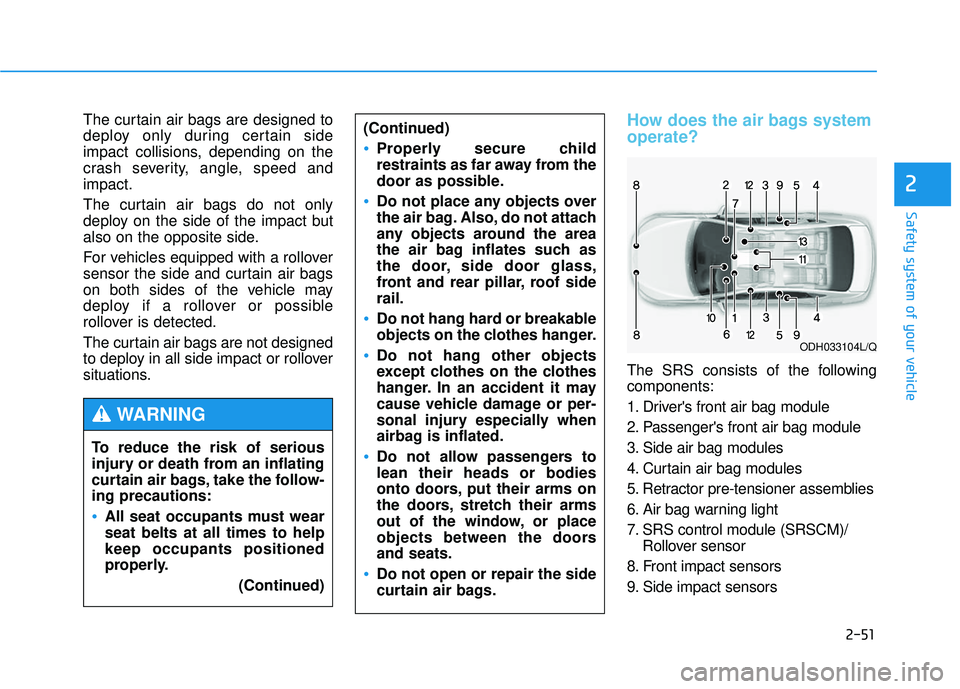
The SRS consists of the following
components:
1. Driver's front air bag module
2. Passenger's front air bag module
3. Side air bag modules
4. Curtain air bag modules
5. Retractor pre-tensioner assemblies
6. Air bag warning light
7. SRS control module (SRSCM)/Rollover sensor
8. Front impact sensors
9. Side impact sensors
To reduce the risk of serious
injury or death from an inflating
curtain air bags, take the follow-
ing precautions:
All seat occupants must wear
seat belts at all times to help
keep occupants positioned
properly.
(Continued)
(Continued)
Properly secure child
restraints as far away from the
door as possible.
Do not place any objects over
the air bag. Also, do not attach
any objects around the area
the air bag inflates such as
the door, side door glass,
front and rear pillar, roof side
rail.
Do not hang hard or breakable
objects on the clothes hanger.
Do not hang other objects
except clothes on the clothes
hanger. In an accident it may
cause vehicle damage or per-
sonal injury especially when
airbag is inflated.
Do not allow passengers to
lean their heads or bodies
onto doors, put their arms on
the doors, stretch their arms
out of the window, or place
objects between the doors
and seats.
Do not open or repair the side
curtain air bags.
WARNING
ODH033104L/Q
Page 76 of 496

2-56
Safety system of your vehicle
What to expect after an air bag
inflates
After a frontal or side air bag inflates,
it will deflate very quickly. Air bag
inflation will not prevent the driver
from seeing out of the windshield or
being able to steer. Curtain air bags
may remain partially inflated for
some time after they deploy.
Noise and smoke from inflatingair bag
When the air bags inflate, they make
a loud noise and they leave smoke
and powder in the air inside of the
vehicle. This is normal and is a result
of the ignition of the air bag inflator.
After the air bag inflates, you may
feel substantial discomfort in breath-
ing because of the contact of your
chest with both the seat belt and the
air bag, as well as from breathing the
smoke and powder. The powder may
aggravate asthma for some people. If
you experience breathing problems
after an air bag deployment, seek
medical attention immediately.
Though the smoke and powder are
nontoxic, they may cause irritation to
the skin, eyes, nose, throat, etc. If
this is the case, wash and rinse with
cold water immediately and seek
medical attention if the symptoms
persist.
After an air bag inflates, take
the following precautions:
Open your windows and
doors as soon as possible
after impact to reduce pro-
longed exposure to the smoke
and powder released by the
inflating air bag.
Do not touch the air bag stor-
age area's internal compo-
nents immediately after an air
bag has inflated. The parts
that come into contact with an
inflating air bag may be very
hot.
(Continued)
WARNING
(Continued)
Always wash exposed skin
areas thoroughly with cold
water and mild soap.
Always have an authorized
retailer of Genesis Branded
products replace the air bag
immediately after deployment.
Air bags are designed to be
used only once.
Page 89 of 496

Convenient features of your vehicle
Accessing your vehicle .........................................3-4
Smart key ........................................................................\
....3-4
Smart key precautions .....................................................3-7
Immobilizer System ...........................................................3-9
Door locks .............................................................3-11
Operating door locks from outside the vehicle ......3-11
Power Door Latch ...........................................................3-12
Operating door locks from inside the vehicle .........3-12
Auto door lock/unlock features..................................3-14
Child-protector rear door locks ..................................3-14
Theft-alarm system.............................................3-15
Driver position memory system .........................3-16
Storing positions into memory ...................................3-16
Resetting the driver's seat memory system ............3-17
Easy access function .....................................................3-18
Steering wheel......................................................3-19
Electric power steering (EPS) ......................................3-19
Tilt steering / Telescope steering...............................3-19
Heated steering wheel ...................................................3-20
Horn ........................................................................\
............3-21
Mirrors ...................................................................3-22
Inside rearview mirror....................................................3-22
Side view mirrors.............................................................3-36
Reverse parking aid function.......................................3-39
Windows ................................................................3-40
Power windows................................................................3-41
Panorama sunroof ...............................................3-44
Sunshade ........................................................................\
...3-44
Sliding the sunroof .........................................................3-45
Tilting the sunroof ..........................................................3-45
Closing the sunroof ........................................................3-46
Resetting the sunroof ....................................................3-47
Exterior features .................................................3-48
Hood ........................................................................\
...........3-48
Trunk ........................................................................\
..........3-49
Smart trunk.......................................................................3\
-55
Fuel filler door .................................................................3-59
Instrument cluster................................................3-62
Instrument Cluster Control............................................3-63
LCD Display Control ........................................................3-63
Gauges ........................................................................\
.......3-64
3
Page 90 of 496

LCD display ...........................................................3-68
LCD Modes ........................................................................\
3-68
Trip Computer Mode.......................................................3-69
Turn By Turn (TBT) Mode ............................................3-70
ASCC/LKAS Mode ...........................................................3-70
A/V Mode........................................................................\
..3-70
Information Mode ...........................................................3-71
User Settings Mode ........................................................3-73
Warning Messages..........................................................3-80
Trip computer .......................................................3-90
Overview........................................................................\
....3-90
Trip A/B ........................................................................\
.....3-91
Fuel Economy...................................................................3-92
Digital Speedometer .......................................................3-94
Warning and indicator lights ..............................3-95
Warning lights ..................................................................3-95
Indicator Lights ..............................................................3-103
Head Up Display (HUD).....................................3-107
Description ......................................................................3-\
107
Head Up Display ON/OFF ...........................................3-108
Head Up Display Information .....................................3-108
Head Up Display Setting .............................................3-109
Light .....................................................................3-1\
10
Exterior lights ................................................................3-110
Smart High Beam ..........................................................3-112
Welcome system ...........................................................3-117
Interior lights..................................................................3-118
Wipers and washers ..........................................3-123
Windshield wipers .........................................................3-123
Windshield washers ......................................................3-125
Driver assist system ..........................................3-126
Rear view camera .........................................................3-126
Parking Guide System ..................................................3-127
Parking Assist System .................................................3-128
Defroster .............................................................3-132
Rear window defroster ...............................................3-132
Automatic climate control system ...................3-134
Automatic heating and air conditioning ..................3-135
Manual heating and air conditioning .......................3-136
System operation ..........................................................3-144
Climate control air filter ..............................................3-146
Air conditioner refrigerant and compressor
lubricant ........................................................................\
..3-147
Air Conditioning refrigerant label .............................3-147
Windshield defrosting and defogging ............3-148
Auto defogging system ON/OFF...............................3-150
3
Page 92 of 496

3-4
Convenient features of your vehicle
Smart key
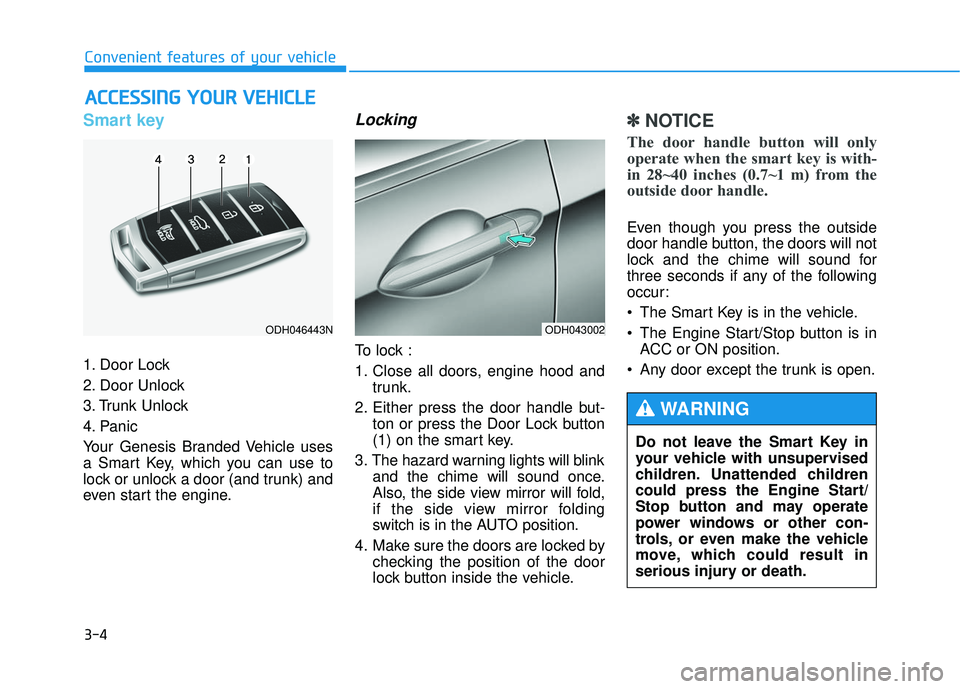
1. Door Lock
2. Door Unlock
3. Trunk Unlock
4. Panic
Your Genesis Branded Vehicle uses
a Smart Key, which you can use to
lock or unlock a door (and trunk) and
even start the engine.
Locking
To lock :
1. Close all doors, engine hood andtrunk.
2. Either press the door handle but- ton or press the Door Lock button
(1) on the smart key.
3. The hazard warning lights will blink and the chime will sound once.
Also, the side view mirror will fold,
if the side view mirror folding
switch is in the AUTO position.
4. Make sure the doors are locked by checking the position of the door
lock button inside the vehicle.
✽ ✽NOTICE
The door handle button will only
operate when the smart key is with-
in 28~40 inches (0.7~1 m) from the
outside door handle.
Even though you press the outside
door handle button, the doors will not
lock and the chime will sound for
three seconds if any of the following
occur:
• The Smart Key is in the vehicle.
The Engine Start/Stop button is in
ACC or ON position.
Any door except the trunk is open.
A A C
CC
CE
E S
SS
SI
IN
N G
G
Y
Y O
O U
UR
R
V
V E
EH
H I
IC
C L
LE
E
ODH043002
Do not leave the Smart Key in
your vehicle with unsupervised
children. Unattended children
could press the Engine Start/
Stop button and may operate
power windows or other con-
trols, or even make the vehicle
move, which could result in
serious injury or death.
WARNING
ODH046443N