2017 FORD TAURUS lock
[x] Cancel search: lockPage 65 of 504
The anti-scan feature turns off after anyof the following occur:
•One minute of keypad inactivity.
•You press the unlock button on theremote control.
•You switch your vehicle on.
•You unlock the vehicle using intelligentaccess.
Locking and Unlocking the Doors
Locking All Doors
Press and hold 7·8 and 9·0 on the keypadsimultaneously with the driver door closed.You do not need to enter a code first.
Unlocking All Doors
Enter the factory-set code or your personalcode, then press 3·4 on the keypad withinfive seconds.
Unlocking Only the Driver Door
Enter the factory-set or your personalfive-digit code. You must press eachnumber within five seconds of each other.The interior lamps illuminate.
Note:All doors unlock if the two-stageunlocking feature is turned off. See Lockingand Unlocking (page 57).
INTERIOR LUGGAGE
COMPARTMENT RELEASE
WARNINGS
Keep vehicle doors and luggagecompartment locked and keep keysand remote transmitters out of achild’s reach. Unsupervised children couldlock themselves in the trunk and risk injury.Children should be taught not to play invehicles.
WARNINGS
Do not leave children or animalsunattended in the vehicle. On hotdays, the temperature in the trunk orvehicle interior can rise very quickly.Exposure of people or animals to thesehigh temperatures for even a short timecan cause death or serious heat-relatedinjuries, including brain damage. Smallchildren are particularly at risk.
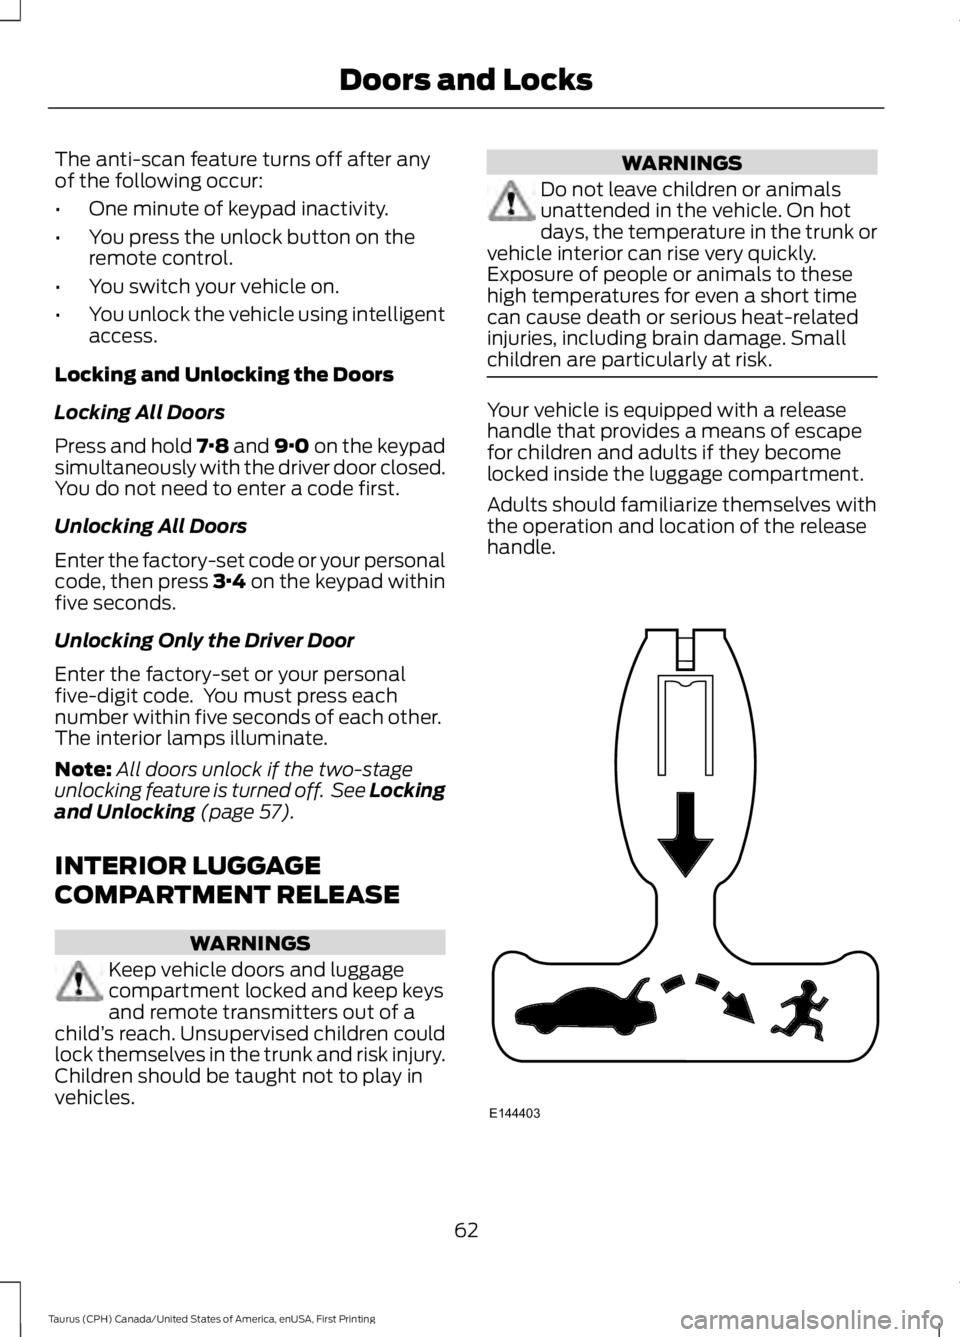
Your vehicle is equipped with a releasehandle that provides a means of escapefor children and adults if they becomelocked inside the luggage compartment.
Adults should familiarize themselves withthe operation and location of the releasehandle.
62
Taurus (CPH) Canada/United States of America, enUSA, First Printing
Doors and LocksE144403
Page 66 of 504
The handle is located inside the luggagecompartment either on the luggagecompartment door (lid) or near the taillamps. It is composed of a material thatwill glow for hours in darkness followingbrief exposure to ambient light.
Pull the handle and push up on the luggagecompartment door (lid) to open fromwithin the luggage compartment.
63
Taurus (CPH) Canada/United States of America, enUSA, First Printing
Doors and Locks
Page 67 of 504
PASSIVE ANTI-THEFT
SYSTEM
Note:The system is not compatible withnon-Ford aftermarket remote start systems.Use of these systems may result in vehiclestarting problems and a loss of securityprotection.
Note:Metallic objects, electronic devicesor a second coded key on the same keychain may cause vehicle starting problemsif they are too close to the key when startingthe engine. Prevent these objects fromtouching the coded key while starting theengine. Switch the ignition off, move allobjects on the key chain away from thecoded key and restart the engine if aproblem occurs.
Note:Do not leave a duplicate coded keyin the vehicle. Always take your keys andlock all doors when leaving the vehicle.
SecuriLock®
The system is an engine immobilizationsystem. It is designed to help prevent theengine from being started unless a codedkey programmed to your vehicle is used.Using the wrong key may prevent theengine from starting. A message mayappear in the information display.
If you are unable to start the engine with acorrectly coded key, a malfunction hashappened and a message may appear inthe information display.
Automatic Arming
The vehicle arms immediately after youswitch the ignition off.
Automatic Disarming
Switching the ignition on with a coded keydisarms the vehicle.
Replacement Keys
Note:Your vehicle comes equipped withtwo integrated keyhead transmitters or twointelligent access keys.
The integrated keyhead transmitterfunctions as a programmed ignition keythat operates all the locks and starts thevehicle, as well as a remote control.
The intelligent access key functions as aprogrammed key that operates the driverdoor lock and activates the intelligentaccess with push button start system, aswell as a remote control.
If your programmed transmitters orstandard SecuriLock coded keys(integrated keyhead transmitters only) arelost or stolen and you do not have an extracoded key, you will need to have yourvehicle towed to an authorized dealer. Youneed to erase the key codes from yourvehicle and program new coded keys.
Store an extra programmed key away fromthe vehicle in a safe place to help preventany inconveniences. See your authorizeddealer to purchase additional spare orreplacement keys.
Programming a Spare IntegratedKeyhead Transmitter
Note:You can program a maximum of eightcoded keys to your vehicle. All eight can beintegrated keyhead transmitters.
You can program your own integratedkeyhead transmitter or standardSecuriLock coded keys to your vehicle. Thisprocedure will program both the engineimmobilizer keycode and the remote entryportion of the remote control to yourvehicle
Only use integrated keyhead transmittersor standard SecuriLock keys.
64
Taurus (CPH) Canada/United States of America, enUSA, First Printing
Security
Page 68 of 504
You must have two previouslyprogrammed coded keys and the newunprogrammed key readily accessible. Seeyour authorized dealer to have the sparekey programmed if two previouslyprogrammed coded keys are not available.
Read and understand the entire procedurebefore you begin.
1.Insert the first previously programmedcoded key into the ignition.
2.Switch the ignition from off to on. Keepthe ignition on for at least threeseconds, but no more than 10 seconds.
3.Switch the ignition off and remove thefirst coded key from the ignition.
4. After three seconds but within 10seconds of switching the ignition off,insert the second previously coded keyinto the ignition.
5.Switch the ignition from off to on. Keepthe ignition on for at least threeseconds, but no more than 10 seconds.
6.Switch the ignition off and remove thesecond previously programmed codedkey from the ignition.
7. After three seconds but within 10seconds of switching the ignition offand removing the previouslyprogrammed coded key, insert the newunprogrammed key into the ignition.
8.Switch the ignition from off to on. Keepthe ignition on for at least six seconds.
9.Remove the newly programmed codedkey from the ignition.
If the key has been successfullyprogrammed it will start the engine andoperate the remote entry system (if thenew key is an integrated keyheadtransmitter).
If programming was not successful, wait10 seconds and repeat Steps 1 through 8.If you are still unsuccessful, take yourvehicle to your authorized dealer.
Programming a Spare IntelligentAccess Key
See your authorized dealer to haveadditional keys programmed to yourvehicle.
ANTI-THEFT ALARM (If Equipped)
The system will warn you of anunauthorized entry to your vehicle. It willbe triggered if any door, the luggagecompartment or the hood is openedwithout using the key, remote control orkeyless entry keypad.
The direction indicators will flash and thehorn will sound if unauthorized entry isattempted while the alarm is armed.
Take all remote controls to an authorizeddealer if there is any potential alarmproblem with your vehicle.
Arming the Alarm
The alarm is ready to arm when there isnot a key in your vehicle. Electronically lockyour vehicle to arm the alarm.
Disarming the Alarm
Disarm the alarm by any of the followingactions:
•Unlock the doors or luggagecompartment with the remote controlor keyless entry keypad.
•Switch your vehicle on or start yourvehicle.
•Use a key in the driver door to unlockyour vehicle, then switch your vehicleon within 12 seconds.
Note:Pressing the panic button on theremote control will stop the horn and signalindicators, but will not disarm the system.
65
Taurus (CPH) Canada/United States of America, enUSA, First Printing
Security
Page 69 of 504
ADJUSTING THE STEERING
WHEEL - VEHICLES WITH:
MANUAL ADJUSTABLE
STEERING COLUMN
WARNING
Do not adjust the steering wheelwhen your vehicle is moving.
Note:Make sure that you are sitting in thecorrect position. See Sitting in the CorrectPosition (page 119).
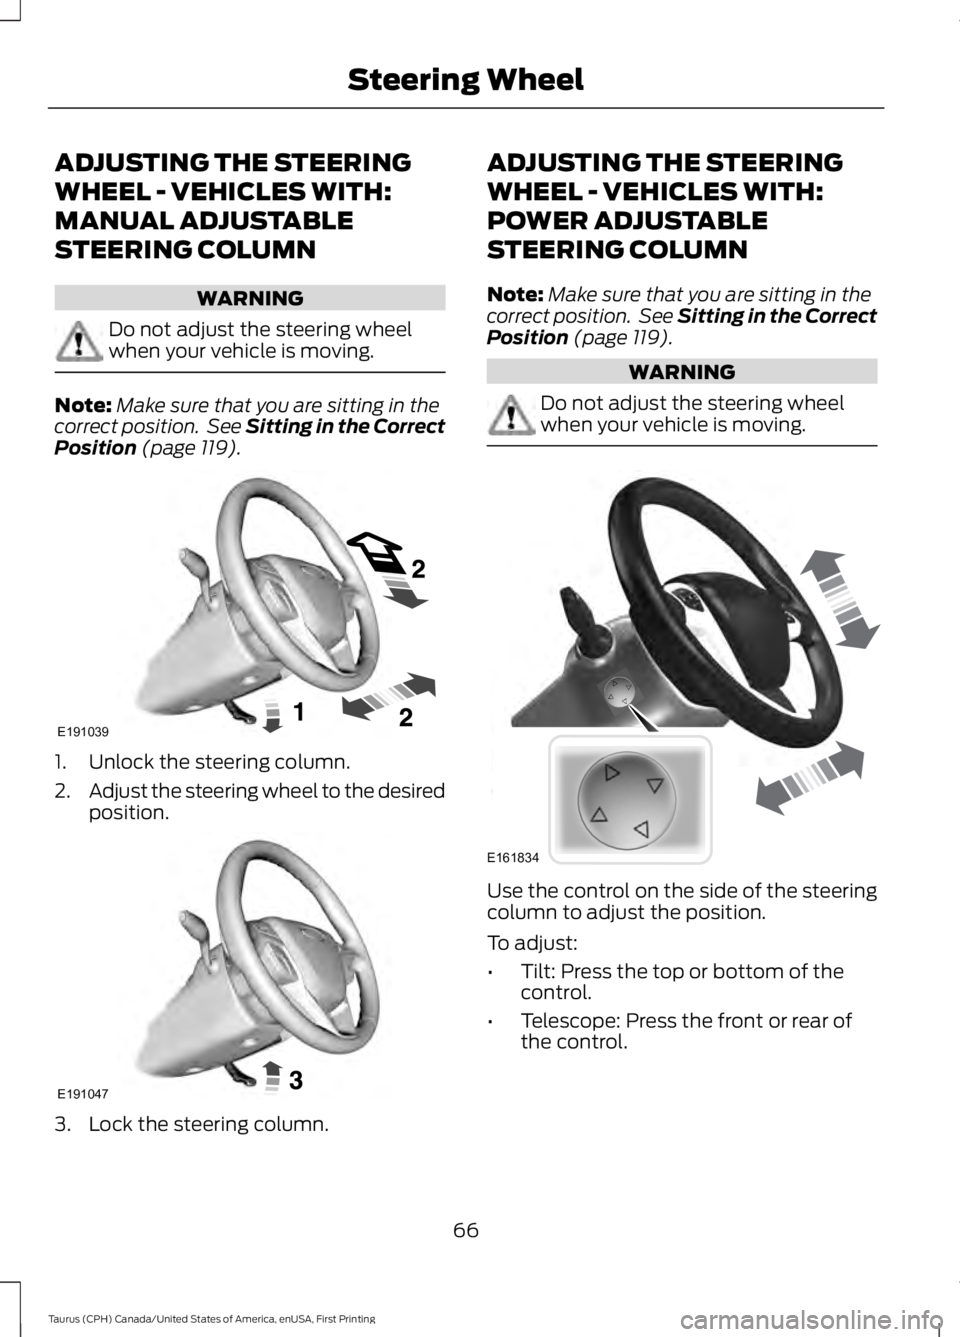
1. Unlock the steering column.
2.Adjust the steering wheel to the desiredposition.
3. Lock the steering column.
ADJUSTING THE STEERING
WHEEL - VEHICLES WITH:
POWER ADJUSTABLE
STEERING COLUMN
Note:Make sure that you are sitting in thecorrect position. See Sitting in the CorrectPosition (page 119).
WARNING
Do not adjust the steering wheelwhen your vehicle is moving.
Use the control on the side of the steeringcolumn to adjust the position.
To adjust:
•Tilt: Press the top or bottom of thecontrol.
•Telescope: Press the front or rear ofthe control.
66
Taurus (CPH) Canada/United States of America, enUSA, First Printing
Steering WheelE191039 E191047 E161834
Page 78 of 504
The daytime running lamps turn on when:
1. The ignition is switched to the onposition.
2. The lighting control is in the offposition, parking lamps position or theautolamps position, and the sensordetects daylight.
3. Your vehicle is in drive (D).
AUTOMATIC HIGH BEAM
CONTROL (If Equipped)
The system will automatically turn on yourhigh beams if it is dark enough and no othertraffic is present. When it detects theheadlights of an approaching vehicle, thetail lamps of the preceding vehicle or streetlighting, the system will turn off the highbeams. The low beams remain on.
Note:If it appears that automatic controlof the high beams is not functioningproperly, check the windshield in front ofthe camera for a blockage. A clear view ofthe road is required for proper systemoperation. Have any windshield damage inthe area of the camera’s field-of-viewrepaired.
Note:If the system detects a blockage suchas bird droppings, bug splatter, snow or ice,and you do not observe changes, the systemwill go into low beam mode until you clearthe blockage. A message may also appearin the instrument cluster display noting thefront camera is blocked.
Note:In cold or inclement weatherconditions, you will notice a decrease in theavailability of the high beam system,especially at start up. If you want to changethe beam state independently of theautomatic control, you may switch the highbeams on or off using the lever. Automaticcontrol will resume when conditions arecorrect.
Note:Modification of the vehicle ride heightsuch as using much larger tires, maydegrade feature performance.
A camera sensor, centrally mountedbehind the windshield of your vehicle,continuously monitors conditions to decidewhen to turn the high beams off and on.
Once the system is active, the high beamswill turn on if:
•The ambient light level is low enough.
•There is no traffic in front of the vehicle.
•The vehicle speed is greater than32 mph (52 km/h).
The high beams will turn off if:
•The system detects the headlamps ofan approaching vehicle or the taillamps of a preceding vehicle.
•Vehicle speed falls below 27 mph(44 km/h).
•The ambient light level is high enoughthat high beams are not required.
•The system detects severe rain, snowor fog.
•The camera is blocked.
Activating the System
Switch on the system using the informationdisplay and autolamps. See InformationDisplays (page 89).
Switch the lighting control to theautolamps position. See Autolamps(page 73).
75
Taurus (CPH) Canada/United States of America, enUSA, First Printing
Lighting
Page 81 of 504
POWER WINDOWS
WARNINGS
Do not leave children unattended inyour vehicle and do not let them playwith the power windows. They mayseriously injure themselves.
When closing the power windows,you should verify they are free ofobstructions and make sure thatchildren and pets are not in the proximityof the window openings.
Note:You may hear a pulsing noise whenjust one of the windows is open. Lower theopposite window slightly to reduce thisnoise.
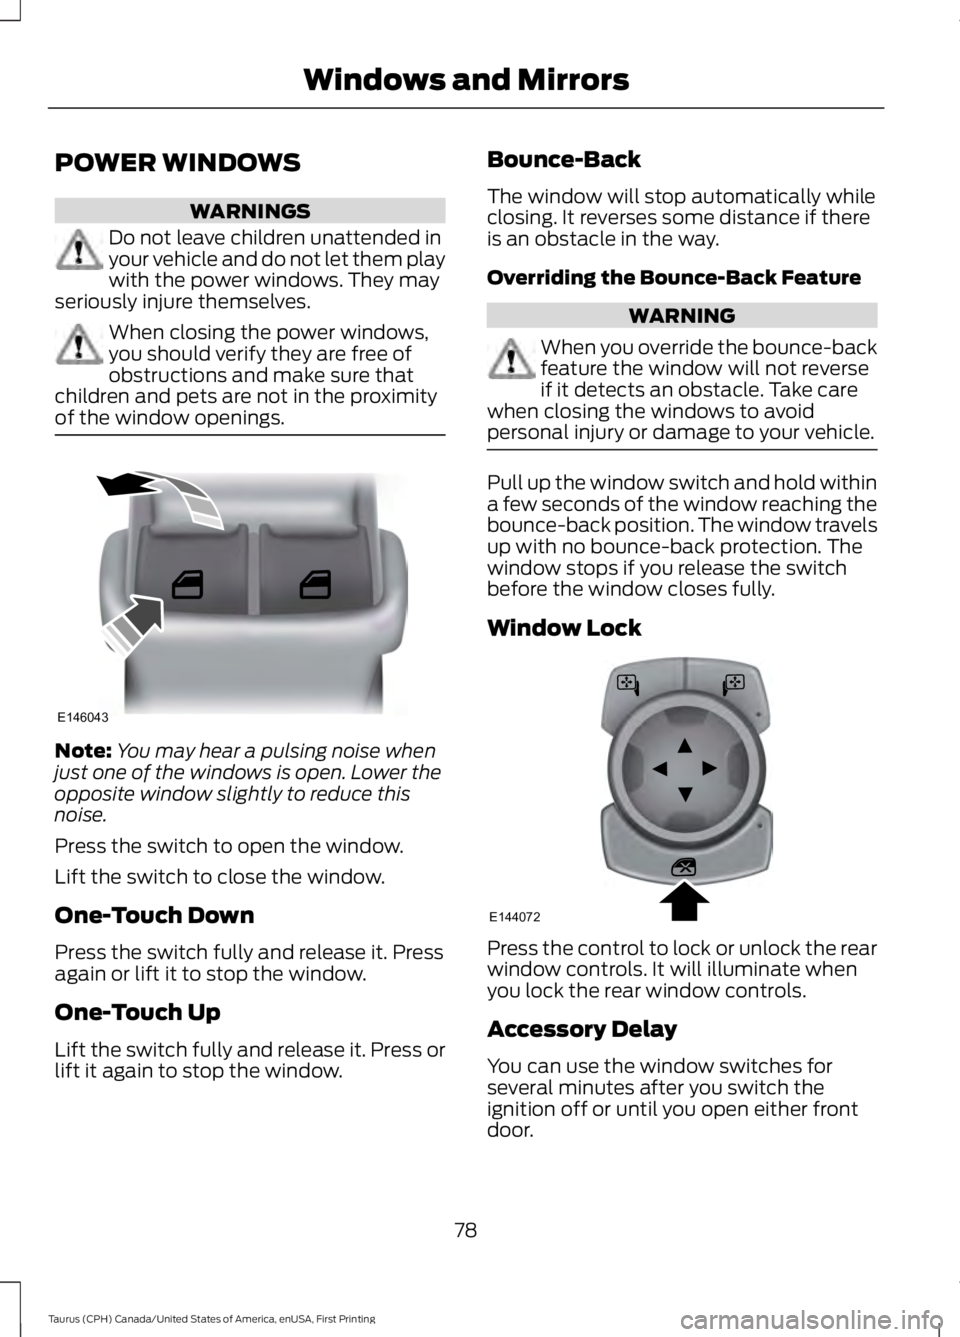
Press the switch to open the window.
Lift the switch to close the window.
One-Touch Down
Press the switch fully and release it. Pressagain or lift it to stop the window.
One-Touch Up
Lift the switch fully and release it. Press orlift it again to stop the window.
Bounce-Back
The window will stop automatically whileclosing. It reverses some distance if thereis an obstacle in the way.
Overriding the Bounce-Back Feature
WARNING
When you override the bounce-backfeature the window will not reverseif it detects an obstacle. Take carewhen closing the windows to avoidpersonal injury or damage to your vehicle.
Pull up the window switch and hold withina few seconds of the window reaching thebounce-back position. The window travelsup with no bounce-back protection. Thewindow stops if you release the switchbefore the window closes fully.
Window Lock
Press the control to lock or unlock the rearwindow controls. It will illuminate whenyou lock the rear window controls.
Accessory Delay
You can use the window switches forseveral minutes after you switch theignition off or until you open either frontdoor.
78
Taurus (CPH) Canada/United States of America, enUSA, First Printing
Windows and MirrorsE146043 E144072
Page 82 of 504
GLOBAL OPENING (If Equipped)
You can use the remote control to operatethe windows with the ignition off.
Note:You can enable or disable this featurein the information display, or see anauthorized dealer. See GeneralInformation (page 89).
Note:To operate this feature, accessorydelay must not be active.
Opening the Windows
You can open the windows for a short timeafter you unlock your vehicle with theremote control. After you unlock yourvehicle, press and hold the remote controlunlock button to open the windows andvent the moonroof. Release the buttononce movement starts. Press the lock orunlock button to stop movement.
Note:Only the front windows are operatedduring global opening.
EXTERIOR MIRRORS
Power Exterior Mirrors
WARNING
Do not adjust the mirrors when yourvehicle is moving.
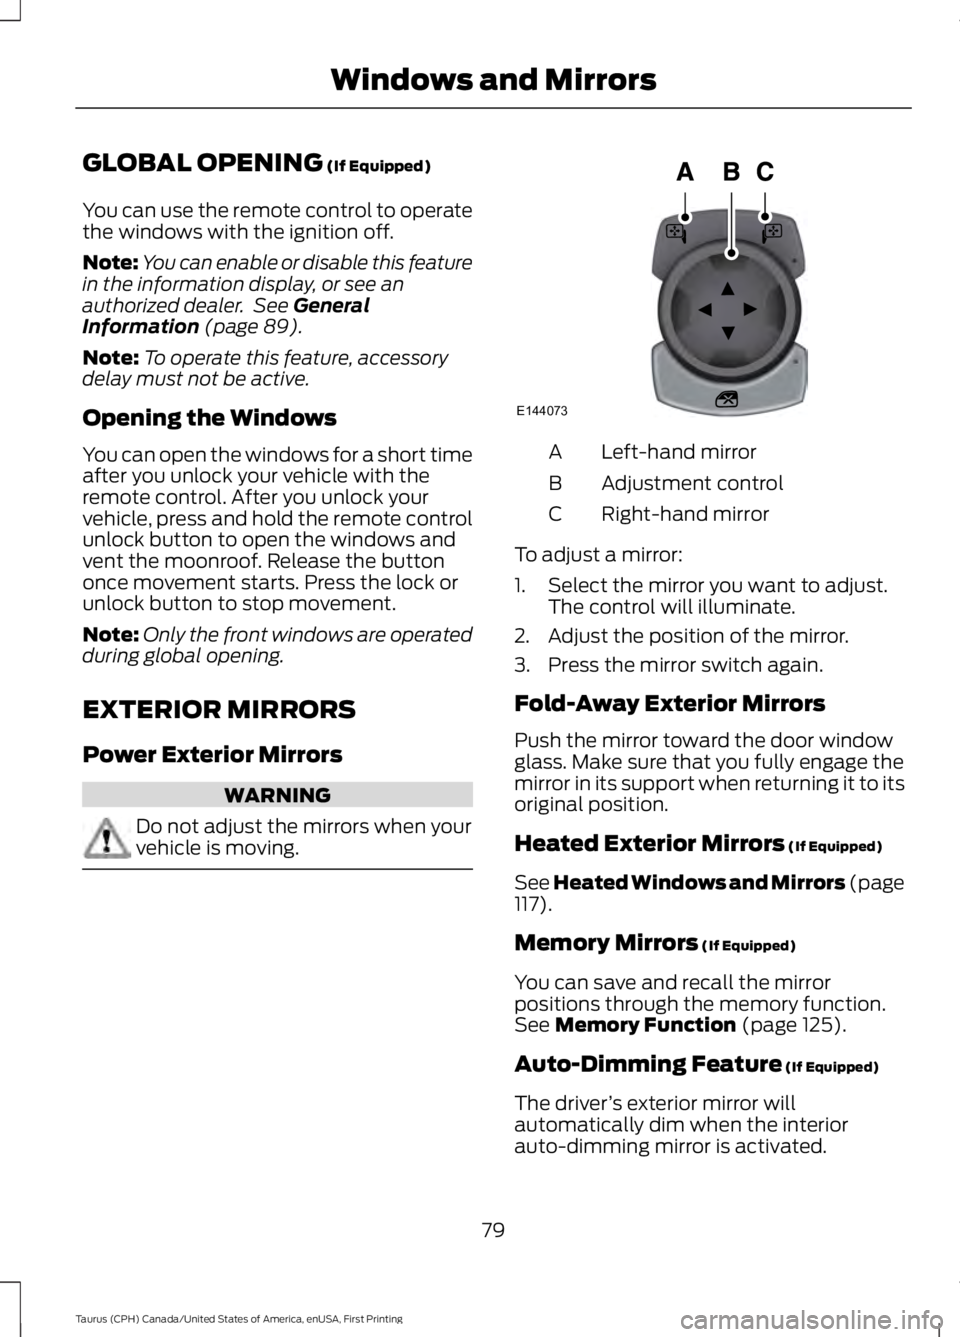
Left-hand mirrorA
Adjustment controlB
Right-hand mirrorC
To adjust a mirror:
1. Select the mirror you want to adjust.The control will illuminate.
2. Adjust the position of the mirror.
3. Press the mirror switch again.
Fold-Away Exterior Mirrors
Push the mirror toward the door windowglass. Make sure that you fully engage themirror in its support when returning it to itsoriginal position.
Heated Exterior Mirrors (If Equipped)
See Heated Windows and Mirrors (page117).
Memory Mirrors (If Equipped)
You can save and recall the mirrorpositions through the memory function.See Memory Function (page 125).
Auto-Dimming Feature (If Equipped)
The driver’s exterior mirror willautomatically dim when the interiorauto-dimming mirror is activated.
79
Taurus (CPH) Canada/United States of America, enUSA, First Printing
Windows and MirrorsE144073