2017 FORD TAURUS air filter
[x] Cancel search: air filterPage 242 of 504
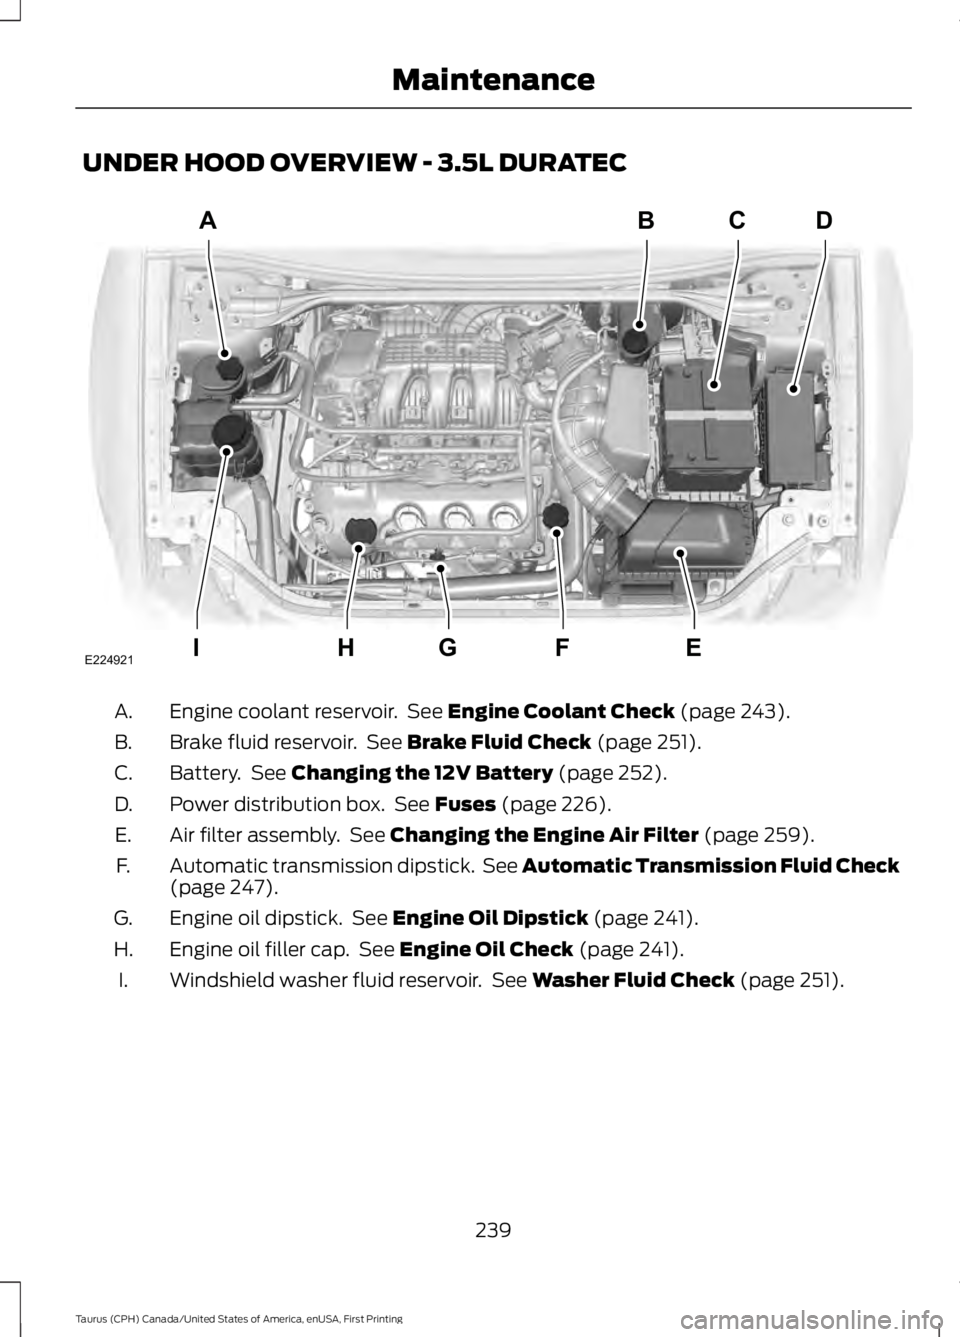
UNDER HOOD OVERVIEW - 3.5L DURATEC
Engine coolant reservoir. See Engine Coolant Check (page 243).A.
Brake fluid reservoir. See Brake Fluid Check (page 251).B.
Battery. See Changing the 12V Battery (page 252).C.
Power distribution box. See Fuses (page 226).D.
Air filter assembly. See Changing the Engine Air Filter (page 259).E.
Automatic transmission dipstick. See Automatic Transmission Fluid Check(page 247).F.
Engine oil dipstick. See Engine Oil Dipstick (page 241).G.
Engine oil filler cap. See Engine Oil Check (page 241).H.
Windshield washer fluid reservoir. See Washer Fluid Check (page 251).I.
239
Taurus (CPH) Canada/United States of America, enUSA, First Printing
MaintenanceA
IEFGH
BCD
E224921
Page 244 of 504
Engine oil dipstick. See Engine Oil Dipstick (page 241).C.
Brake fluid reservoir. See Brake Fluid Check (page 251).D.
Battery. See Changing the 12V Battery (page 252).E.
Engine compartment fuse box. See Fuses (page 226).F.
Air filter assembly. See Changing the Engine Air Filter (page 259).G.
Automatic transmission dipstick. See Automatic Transmission Fluid Check(page 247).H.
Washer fluid reservoir. See Washer Fluid Check (page 251).I.
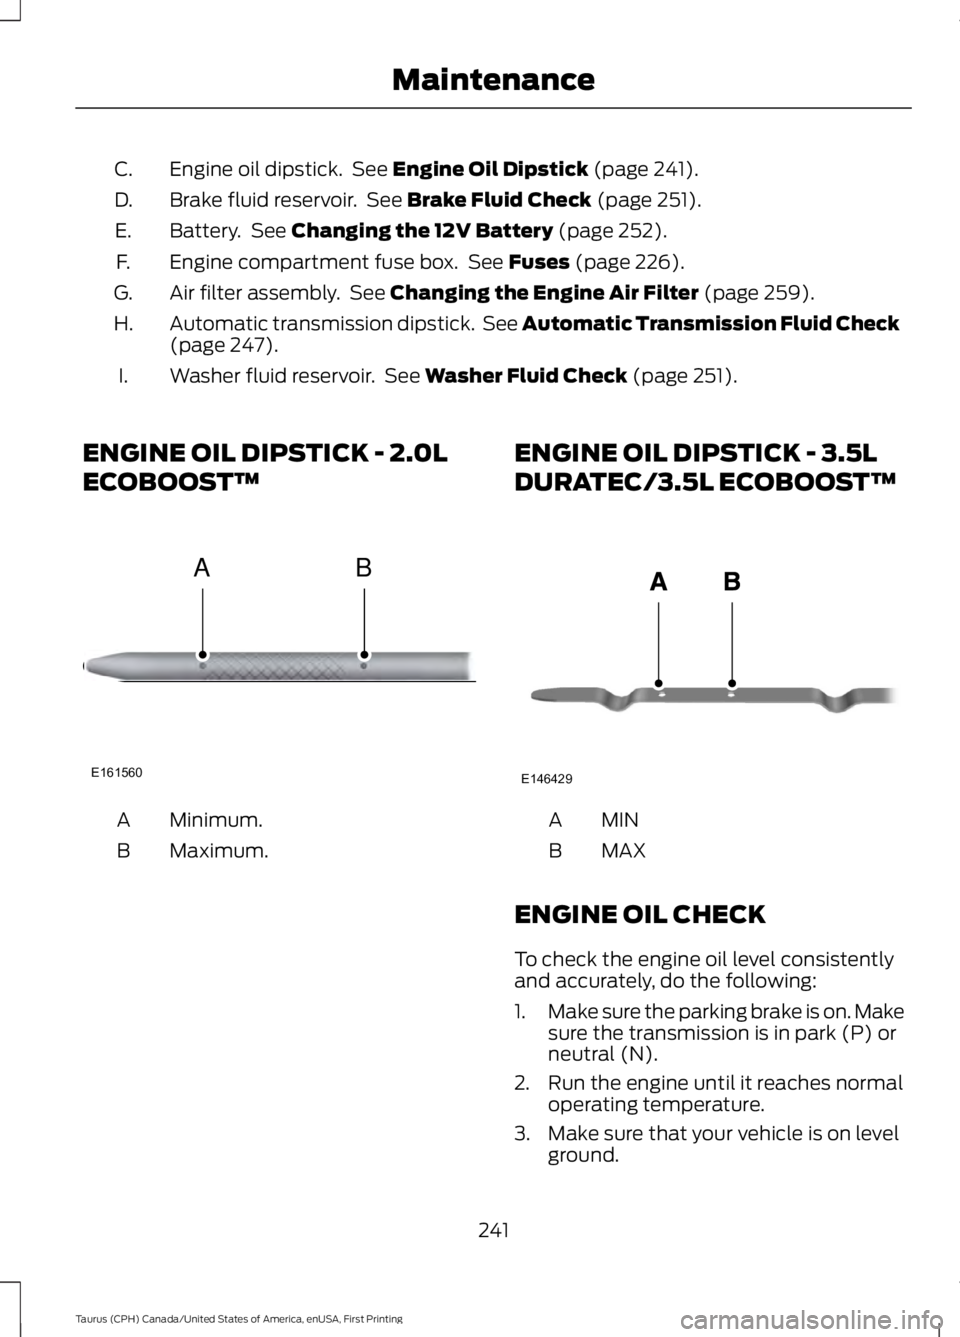
ENGINE OIL DIPSTICK - 2.0L
ECOBOOST™
Minimum.A
Maximum.B
ENGINE OIL DIPSTICK - 3.5L
DURATEC/3.5L ECOBOOST™
MINA
MAXB
ENGINE OIL CHECK
To check the engine oil level consistentlyand accurately, do the following:
1.Make sure the parking brake is on. Makesure the transmission is in park (P) orneutral (N).
2. Run the engine until it reaches normaloperating temperature.
3. Make sure that your vehicle is on levelground.
241
Taurus (CPH) Canada/United States of America, enUSA, First Printing
MaintenanceE161560
AB E146429
Page 250 of 504
If you tow a trailer with your vehicle, theengine may temporarily reach a highertemperature during severe operatingconditions, for example ascending a longor steep grade in high ambienttemperatures.
At this time, you may notice the coolanttemperature gauge moves toward the redzone and a message may appear in theinformation display.
You may notice a reduction in vehiclespeed caused by reduced engine power inorder to manage the engine coolanttemperature. Your vehicle may enter thismode if certain high-temperature andhigh-load conditions take place. Theamount of speed reduction depends onvehicle loading, grade and ambienttemperature. If this occurs, there is no needto pull off the road. You can continue todrive your vehicle.
The air conditioning may automaticallyturn on and off during severe operatingconditions to protect the engine fromoverheating. When the coolanttemperature decreases to the normaloperating temperature, the air conditioningturns on.
If the coolant temperature gauge movesfully into the red zone, or if the coolanttemperature warning or service enginesoon messages appear in your informationdisplay, do the following:
1. Pull off the road as soon as safelypossible and shift the transmission intopark (P).
2. Leave the engine running until thecoolant temperature gauge needlereturns to the normal position. Afterseveral minutes, if the temperaturedoes not drop, follow the remainingsteps.
3.Switch the engine off and wait for it tocool. Check the coolant level.
4. If the coolant level is at or below theminimum mark, add prediluted coolantimmediately.
5. If the coolant level is normal, restartthe engine and continue.
AUTOMATIC TRANSMISSION
FLUID CHECK - 2.0L
ECOBOOST™
6F35 Transmission
The automatic transmission does not havea transmission fluid dipstick.
The automatic transmission does notconsume fluid. If the transmission is notworking correctly, for example, thetransmission slips, shifts slowly or thereare signs of fluid leakage, have the systemchecked by an authorized dealer.
Change the automatic transmission fluidand filter at the correct service interval.
Do not use supplemental automatictransmission fluid additives because theyare unnecessary and could lead totransmission damage that may not becovered by the vehicle Warranty.
AUTOMATIC TRANSMISSION
FLUID CHECK - 3.5L DURATEC/
3.5L ECOBOOST™
6F50/6F55 Transmission (If Equipped)
WARNINGS
The dipstick cap and surroundingcomponents may be hot, use gloves.
Use gloves when moving the air filterassembly. Components will be hot.
247
Taurus (CPH) Canada/United States of America, enUSA, First Printing
Maintenance
Page 251 of 504
Note:Automatic transmission fluidexpands when warmed. To obtain anaccurate fluid check, drive your vehicle untilyou warm it up, approximately 20 mi(30 km). If you operate your vehicle for anextended period at high speeds, in city trafficduring hot weather or pulling a trailer, switchyour vehicle off until it reaches normaloperating temperatures to allow the fluidto cool before checking. Depending onvehicle use, cooling times could take up to30 minutes or longer.
Refer to your scheduled maintenanceinformation for scheduled intervals for fluidchecks and changes. Your transmissiondoes not consume fluid. However, youshould check the fluid level if thetransmission is not working properly. Forexample, if the transmission slips or shiftsslowly or if you notice some sign of a fluidleak.
1. Drive your vehicle 20 mi (30 km) oruntil it reaches normal operatingtemperature.
2.Park your vehicle on a level surface andengage the parking brake.
3. With the parking brake engaged andyour foot on the brake pedal, start theengine and move the gearshift leverthrough all of the gear ranges. Allow aminimum of 10 seconds for each gearto engage.
4. Put the gearshift lever in park (P) andleave the engine running.
Note:For vehicles with the EcoBoostengine, move the air filter assembly asideto access the transmission dipstick. SeeMoving the Air Filter Assembly for moreinformation.
5. Remove the dipstick and wipe it cleanwith a dry, lint free clean rag. Ifnecessary, refer to the Under hoodoverview in this chapter for the locationof the dipstick.
6. Install the dipstick making sure youfully seat it in the filler tube by turningit to the locked position.
7. Remove the dipstick and inspect thefluid level. The fluid should be in thedesignated areas for normal operatingtemperature.
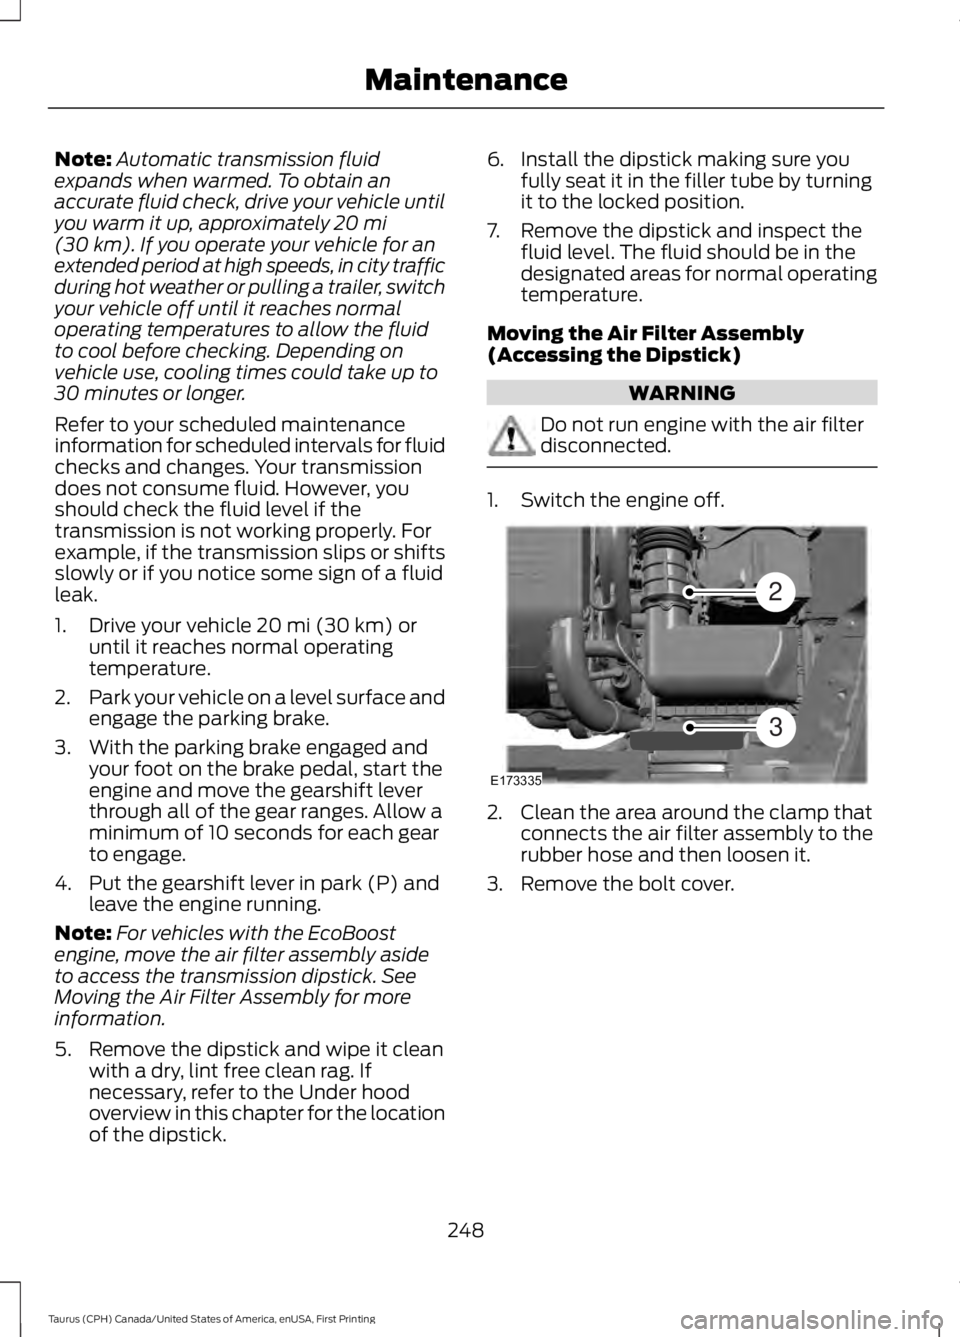
Moving the Air Filter Assembly(Accessing the Dipstick)
WARNING
Do not run engine with the air filterdisconnected.
1. Switch the engine off.
2. Clean the area around the clamp thatconnects the air filter assembly to therubber hose and then loosen it.
3. Remove the bolt cover.
248
Taurus (CPH) Canada/United States of America, enUSA, First Printing
MaintenanceE173335
2
3
Page 252 of 504

4. Remove two bolts that attach the airfilter assembly to the front of thevehicle.
5. Remove the harness retaining clip bypulling up.
6. Do not disconnect the sensor.
7. Pull the air filter assembly up todisconnect it from the seatedgrommets located under the air filterassembly.
8. Rotate the air filter assembly 90degrees counterclockwise. Make surethe rubber hose is still connected to theair filter assembly.
9. Tighten the clamp.
You can now access the transmission fluidlevel indicator.
Checking the fluid level
Low fluid level
If the fluid level is below the MIN range ofthe dipstick, add fluid to reach the hashmark level.
Note:If the fluid level is below the MINlevel, do not drive the vehicle. An underfillcondition may cause shift or engagementconcerns or possible damage.
Correct fluid level
249
Taurus (CPH) Canada/United States of America, enUSA, First Printing
MaintenanceE173334
654 E173400 E158842 E158843
Page 253 of 504

Check the transmission fluid at the normaloperating temperatures between 180°F(82°C) and 200°F (93°C) on a levelsurface. Drive your vehicle until you warmit up to the normal operating temperatureafter approximately 20 mi (30 km).
Target the transmission fluid level withinthe cross-hatch area if at the normaloperating temperature between 180°F(82°C) and 200°F (93°C).
High fluid level
If the fluid level is above the MAX range ofthe dipstick, remove fluid to reach thehashmark level.
Note:Fluid level above the MAX level maycause shift or engagement concerns orpossible damage. An overheating conditioncan cause high fluid levels. If you operateyour vehicle for an extended period at highspeeds, in city traffic during hot weather orpulling a trailer, you should switch yourvehicle off until your vehicle reaches normaloperating temperatures. Depending onvehicle use, cooling times could take up to30 minutes or longer.
Adjusting Automatic Transmission FluidLevels
Before adding any fluid, make sure thecorrect type is used. The type of fluid usedis normally indicated on the dipstick andin the Technical Specifications section inthis chapter.
Note:An overfill condition of transmissionfluid may cause shift or engagementconcerns or possible damage.
Do not use supplemental transmissionfluid additives, treatments or cleaningagents. The use of these materials mayaffect transmission operation and resultin damage to internal transmissioncomponents. Reinstall the air filterassembly. After you check the fluid leveland adjust as necessary, do the following:
1. Switch the engine off.
2. Loosen the clamp holding the air filterassembly to the rubber hose.
3. Seat the air filter assembly back intothe grommets by pushing down on theair filter assembly.
4. Tighten the clamp.
250
Taurus (CPH) Canada/United States of America, enUSA, First Printing
MaintenanceE158844 E158845 E158846
Page 254 of 504
5. Install and tighten the two bolts thatattach the air filter assembly to thefront of the vehicle.
6. Install the bolt cover.
7.Reinstall the harness retaining clip intothe front of the air filter assembly.
BRAKE FLUID CHECK
WARNINGS
Do not use any fluid other than therecommended brake fluid as this willreduce brake efficiency. Use ofincorrect fluid could result in the loss ofvehicle control, serious personal injury ordeath.
Only use brake fluid from a sealedcontainer. Contamination with dirt,water, petroleum products or othermaterials may result in brake systemdamage or failure. Failure to adhere to thiswarning could result in the loss of vehiclecontrol, serious personal injury or death.
Do not allow the fluid to touch yourskin or eyes. If this happens, rinse theaffected areas immediately withplenty of water and contact your physician.
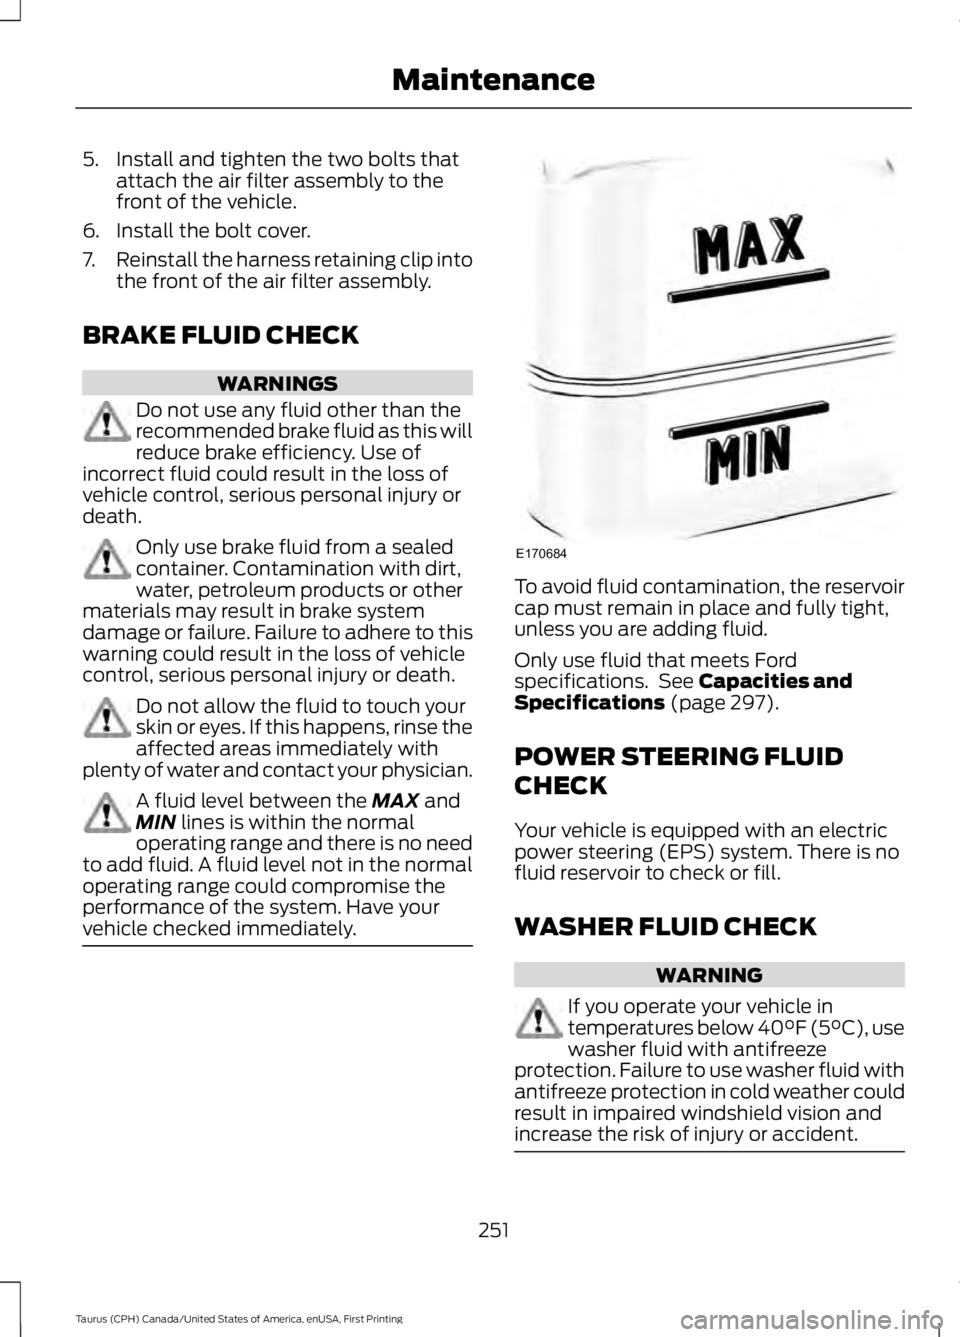
A fluid level between the MAX andMIN lines is within the normaloperating range and there is no needto add fluid. A fluid level not in the normaloperating range could compromise theperformance of the system. Have yourvehicle checked immediately.
To avoid fluid contamination, the reservoircap must remain in place and fully tight,unless you are adding fluid.
Only use fluid that meets Fordspecifications. See Capacities andSpecifications (page 297).
POWER STEERING FLUID
CHECK
Your vehicle is equipped with an electricpower steering (EPS) system. There is nofluid reservoir to check or fill.
WASHER FLUID CHECK
WARNING
If you operate your vehicle intemperatures below 40
Page 262 of 504
CHANGING THE ENGINE AIR
FILTER
WARNING
Do not start the engine with the aircleaner removed. This can causedamage not covered by the vehicleWarranty and can result in serious injury.
When changing the air filter element, useonly the air filter element listed. SeeCapacities and Specifications (page297).
For vehicles with EcoBoost engines, whenservicing the air cleaner, it is important thatno foreign material enters the air inductionsystem. The engine and turbocharger aresusceptible to damage from even smallparticles.
Change the air filter element at the correctinterval. See Scheduled Maintenance(page 447).
Note: Failure to use the correct air filterelement may result in severe enginedamage. Resulting component damagemay not be covered by the vehicle Warranty.
To replace the air filter element do thefollowing:
1. Switch the ignition off.
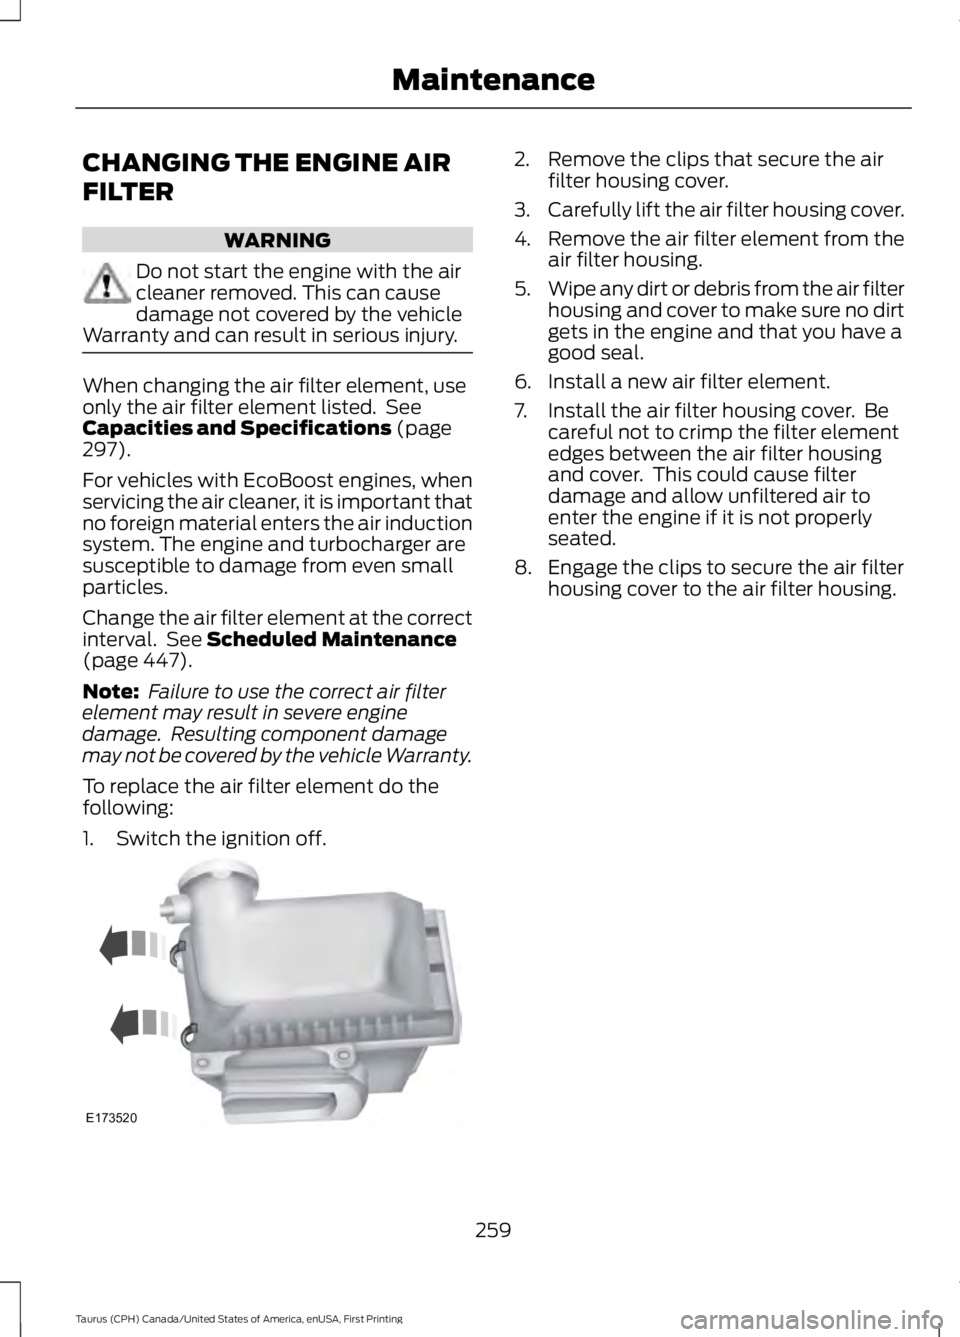
2. Remove the clips that secure the airfilter housing cover.
3.Carefully lift the air filter housing cover.
4.Remove the air filter element from theair filter housing.
5.Wipe any dirt or debris from the air filterhousing and cover to make sure no dirtgets in the engine and that you have agood seal.
6. Install a new air filter element.
7. Install the air filter housing cover. Becareful not to crimp the filter elementedges between the air filter housingand cover. This could cause filterdamage and allow unfiltered air toenter the engine if it is not properlyseated.
8. Engage the clips to secure the air filterhousing cover to the air filter housing.
259
Taurus (CPH) Canada/United States of America, enUSA, First Printing
MaintenanceE173520