2017 FORD SUPER DUTY air condition
[x] Cancel search: air conditionPage 359 of 636
Operating your vehicle in heavy snowfall
or extreme rain conditions may allow
excessive amounts of snow or water into
the air intake system. This could restrict air
flow and cause the engine to lose power
or shut down.
After installing a new air filter element, you
must reset the gauge by pressing the reset
button.
After operating your vehicle during in heavy
snowfall or extreme rain, do the following:
•
Snow: At the earliest opportunity, open
the hood and clear any snow and ice
from the air filter housing inlet and
reset the air filter restriction gauge.
• Extreme rain: The air filter element
dries out after approximately 15– 30
minutes of driving at highway speeds.
At the earliest opportunity, open the
hood and reset the air filter restriction
gauge.
Note: Do not remove the foam filter.
CHANGING THE ENGINE-
MOUNTED AND DIESEL FUEL
CONDITIONER MODULE FUEL
FILTERS - 6.7L DIESEL WARNING
Do not dispose of fuel in the
household refuse or the public
sewage system. Use an authorized
waste disposal facility. Your vehicle has two fuel filters. The first
filter mounts on top of the engine on the
left-hand side. The second filter is inside
the diesel fuel conditioner module. The
module is mounted between the outboard
side of the fuel tank and the frame rail.
Note:
The module is at the front of the fuel
tank or at the front of the aft-axle fuel tank
on some models. Regular fuel filter changes are an
important part of engine maintenance;
failing to keep with the scheduled
maintenance could lead to engine
performance issues and fuel injection
system damage. See Scheduled
Maintenance (page 567).
Use only recommended service parts
conforming to specifications. See
Motorcraft Parts
(page 415).
Note: Using fuel that has high levels of
impurities may require more frequent filter
replacements than the service interval
specifies.
Diesel Fuel Conditioner Module
Filter
Removal
1. Access the underside of your vehicle. 356
Super Duty (TFE) Canada/United States of America, enUSA, First Printing MaintenanceE226475
2
Page 368 of 636
•
Avoid cleaners or polishes that increase
the gloss of the upper portion of the
instrument panel. The dull finish in this
area helps protect you from
undesirable windshield reflection.
• Do not use any household cleaning
products or glass cleaners as these
may damage the finish of the
instrument panel, interior trim and
cluster lens.
• Wash or wipe your hands clean if you
have been in contact with certain
products such as insect repellent and
suntan lotion to avoid possible damage
to the interior painted surfaces.
• Do not allow air fresheners and hand
sanitizers to spill onto interior surfaces.
If a spill occurs, wipe off immediately.
Your warranty may not cover these
damages.
If a staining liquid like coffee or juice has
been spilled on the instrument panel or on
interior trim surfaces:
1. Wipe up spilled liquid using a clean, soft cloth as quickly as possible.
2. Use Motorcraft Premium Leather and Vinyl Cleaner or a commercially
available leather cleaning product for
automotive interiors. Test any cleaner
or stain remover on an inconspicuous
area.
3. Alternatively, wipe the surface with a clean, soft cloth and a mild soap and
water solution. Dry the area with a
clean, soft cloth.
4. If necessary, apply more soap and water solution or cleaning product to
a clean, soft cloth and press it onto the
soiled area. Allow this to set at room
temperature for 30 minutes.
5. Remove the soaked cloth, then with a clean, damp cloth, use a rubbing
motion for 60 seconds on the soiled
area. 6. Dry the area with a clean, soft cloth.
CLEANING LEATHER SEATS (If
Equipped)
Without King Ranch Edition
Note: Follow the same procedure as
cleaning leather seats for cleaning leather
instrument panels and leather interior trim
surfaces.
For routine cleaning, wipe the surface with
a soft, damp cloth and a mild soap and
water solution. Dry the area with a clean,
soft cloth.
For cleaning and removing spots and stains
such as dye transfer, use Motorcraft
Premium Leather and Vinyl Cleaner or a
commercially available leather cleaning
product for automotive interiors.
Note: Test any cleaner or stain remover on
an inconspicuous area.
You should:
• Remove dust and loose dirt with a
vacuum cleaner.
• Clean and treat spills and stains as
soon as possible.
Do not use the following products as these
may damage the leather:
• Oil and petroleum or silicone-based
leather conditioners.
• Household cleaners.
• Alcohol solutions.
• Solvents or cleaners intended
specifically for rubber, vinyl and
plastics.
365
Super Duty (TFE) Canada/United States of America, enUSA, First Printing Vehicle Care
Page 369 of 636
With King Ranch Edition
Your vehicle has seating covered in
premium, top-grain leather that is
extremely durable, but still requires special
care and maintenance in order to preserve
longevity and comfort.
Regular cleaning and conditioning
maintains the appearance of the leather.
Cleaning
For dirt, use a vacuum cleaner then use a
clean, damp cloth or soft brush.
For routine cleaning, wipe the surface with
a soft, damp cloth. For more thorough
cleaning, wipe the surface with a mild soap
and water solution.
•
Clean spills as quickly as possible.
• Test any cleaner or stain remover on
an inconspicuous part of the leather as
cleaners may darken the leather.
• Do not spill coffee, ketchup, mustard,
orange juice or oil-based products on
the leather as they may permanently
stain the leather.
• Do not use household cleaning
products, alcohol solutions, solvents
or cleaners intended for rubber, vinyl
or plastics.
Scratches
Because the leather in the seat comes
from genuine steer hides, there may be
evidence of naturally occurring markings,
such as small scars. These markings give
character to the seating covers and are
considered to be proof of a genuine leather
product.
In order to lessen the appearance of
certain scratches and other wear marks,
apply conditioner on the affected area
following the same instructions as in the
Conditioning section. Conditioning
Bottles of King Ranch Leather Conditioner
are available at the King Ranch Saddle
Shop. Visit the website at
www.krsaddleshop.com, or call
1–800–
282–KING (5464) in the United
States. If you are unable to obtain King
Ranch Leather Conditioner, use another
premium leather conditioner.
• Clean the surfaces using the steps
outlined in the Cleaning section.
• Make sure the leather is dry then apply
a nickel-sized amount of conditioner
to a clean, dry cloth.
• Rub the conditioner into the leather
until it disappears. Allow the
conditioner to dry, then repeat the
process for the entire interior. If a film
appears, wipe it off with a dry, clean
cloth.
REPAIRING MINOR PAINT
DAMAGE
Authorized dealers have touch-up paint to
match your vehicle ’s color. Your vehicle
color code is printed on a sticker on the
front, left-hand side door jamb. Take your
color code to your authorized dealer to
make sure you get the correct color.
Before repairing minor paint damage, use
a cleaner such as Motorcraft Bug and Tar
Remover to remove particles such as bird
droppings, tree sap, insect deposits, tar
spots, road salt and industrial fallout.
Always read the instructions before using
cleaning products.
CLEANING THE WHEELS
(If
Equipped)
Note: Do not apply a cleaning chemical to
warm or hot wheel rims and covers.
366
Super Duty (TFE) Canada/United States of America, enUSA, First Printing Vehicle Care
Page 377 of 636
The traction grades, from highest
to lowest are AA, A, B, and C. The
grades represent the tire
’s ability
to stop on wet pavement as
measured under controlled
conditions on specified
government test surfaces of
asphalt and concrete. A tire
marked C may have poor traction
performance.
Temperature A B C WARNING
The temperature grade for
this tire is established for a
tire that is properly inflated and
not overloaded. Excessive speed,
underinflation, or excessive
loading, either separately or in
combination, can cause heat
buildup and possible tire failure. The temperature grades are A
(the highest), B and C,
representing the tire
’s resistance
to the generation of heat and its
ability to dissipate heat when
tested under controlled conditions
on a specified indoor laboratory
test wheel. Sustained high
temperature can cause the
material of the tire to degenerate
and reduce tire life, and excessive
temperature can lead to sudden
tire failure. The grade C
corresponds to a level of
performance which all passenger
car tires must meet under the Federal Motor Vehicle Safety
Standard No. 139. Grades B and A
represent higher levels of
performance on the laboratory
test wheel than the minimum
required by law.
Glossary of Tire Terminology
*Tire label: A label showing the
original equipment tire sizes,
recommended inflation pressure
and the maximum weight the
vehicle can carry.
*
Tire Identification Number
(TIN): A number on the sidewall
of each tire providing information
about the tire brand and
manufacturing plant, tire size and
date of manufacture. Also referred
to as DOT code.
*
Inflation pressure: A measure
of the amount of air in a tire.
*
Standard load: A class of
P-metric or Metric tires designed
to carry a maximum load at set
pressure. For example: For
P-metric tires
35 psi (2.4 bar) and
for Metric tires 36 psi (2.5 bar).
Increasing the inflation pressure
beyond this pressure will not
increase the tire ’s load carrying
capability.
*
Extra load: A class of P-metric
or Metric tires designed to carry a
heavier maximum load at
42 psi
(2.9 bar). Increasing the inflation
pressure beyond this pressure will
not increase the tire ’s load
carrying capability.
374
Super Duty (TFE) Canada/United States of America, enUSA, First Printing Wheels and Tires
Page 384 of 636
Note:
Do not reduce tire pressure
to change the ride characteristics
of the vehicle. If you do not
maintain the inflation pressure at
the levels specified by Ford, your
vehicle may experience a condition
known as shimmy. Shimmy is a
severe vibration and oscillation in
the steering wheel after the vehicle
travels over a bump or dip in the
road that does not dampen out by
itself. Shimmy may result from
significant under-inflation of the
tires, improper tires (load range,
size, or type), or vehicle
modifications such as lift-kits. In
the event that your vehicle
experiences shimmy, you should
slowly reduce speed by either lifting
off the accelerator pedal or lightly
applying the brakes. The shimmy
will cease as the vehicle speed
decreases.
Maximum Inflation Pressure is
the tire manufacturer's maximum
permissible pressure and the
pressure at which the maximum
load can be carried by the tire. This
pressure is normally higher than
the manufacturer ’s recommended
cold inflation pressure which can
be found on the Safety
Compliance Certification Label
(affixed to either the door hinge
pillar, door-latch post, or the door
edge that meets the door-latch
post, next to the driver's seating
position), or Tire Label located on the B-pillar or the edge of the
driver's door. The cold inflation
pressure should never be set lower
than the recommended pressure
on the Safety Compliance
Certification Label or Tire Label.
When weather temperature
changes occur, tire inflation
pressures also change. A 10°F
(6°C) temperature drop can
cause a corresponding drop of 1
psi (7 kPa) in inflation pressure.
Check your tire pressures
frequently and adjust them to the
proper pressure which can be
found on the Safety Compliance
Certification Label or Tire Label.
To check the pressure in your
tire(s):
1. Make sure the tires are cool,
meaning they are not hot from
driving even a mile.
Note:
If you are checking tire
pressure when the tire is hot, (for
example, driven more than 1 mile
[1.6 kilometers]), never bleed or
reduce air pressure. The tires are
hot from driving and it is normal for
pressures to increase above
recommended cold pressures. A
hot tire at or below recommended
cold inflation pressure could be
significantly under-inflated.
381
Super Duty (TFE) Canada/United States of America, enUSA, First Printing Wheels and Tires
Page 387 of 636
it needs to be repaired or replaced.
For your safety, tires that are
damaged or show signs of
excessive wear should not be used
because they are more likely to
blow out or fail.
Improper or inadequate vehicle
maintenance can cause tires to
wear abnormally. Inspect all your
tires, including the spare,
frequently, and replace them if
one or more of the following
conditions exist:
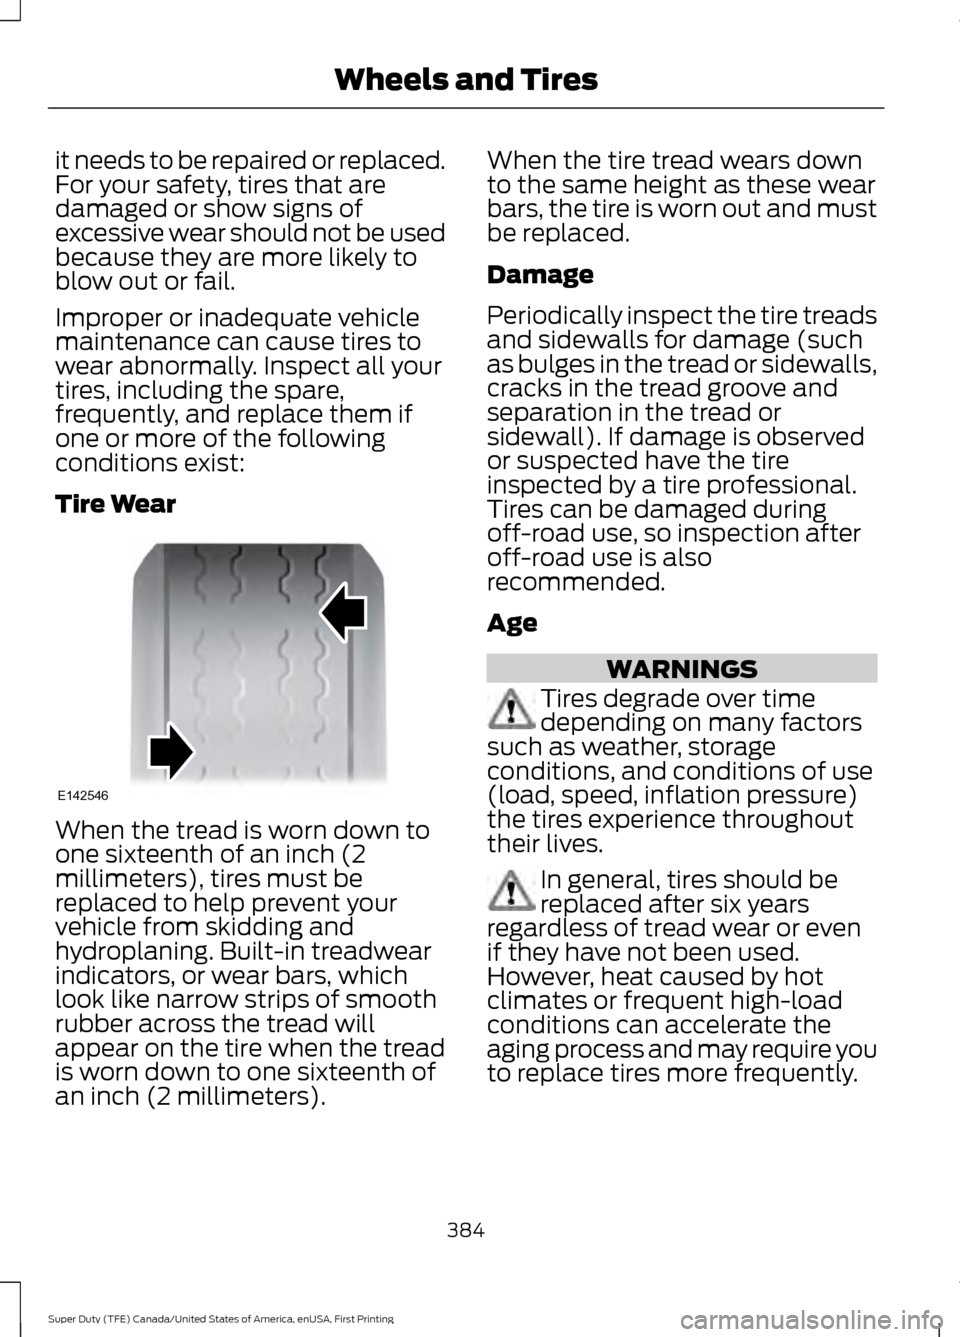
Tire Wear
When the tread is worn down to
one sixteenth of an inch (2
millimeters), tires must be
replaced to help prevent your
vehicle from skidding and
hydroplaning. Built-in treadwear
indicators, or wear bars, which
look like narrow strips of smooth
rubber across the tread will
appear on the tire when the tread
is worn down to one sixteenth of
an inch (2 millimeters). When the tire tread wears down
to the same height as these wear
bars, the tire is worn out and must
be replaced.
Damage
Periodically inspect the tire treads
and sidewalls for damage (such
as bulges in the tread or sidewalls,
cracks in the tread groove and
separation in the tread or
sidewall). If damage is observed
or suspected have the tire
inspected by a tire professional.
Tires can be damaged during
off-road use, so inspection after
off-road use is also
recommended.
Age
WARNINGS
Tires degrade over time
depending on many factors
such as weather, storage
conditions, and conditions of use
(load, speed, inflation pressure)
the tires experience throughout
their lives. In general, tires should be
replaced after six years
regardless of tread wear or even
if they have not been used.
However, heat caused by hot
climates or frequent high-load
conditions can accelerate the
aging process and may require you
to replace tires more frequently.
384
Super Duty (TFE) Canada/United States of America, enUSA, First Printing Wheels and TiresE142546
Page 421 of 636
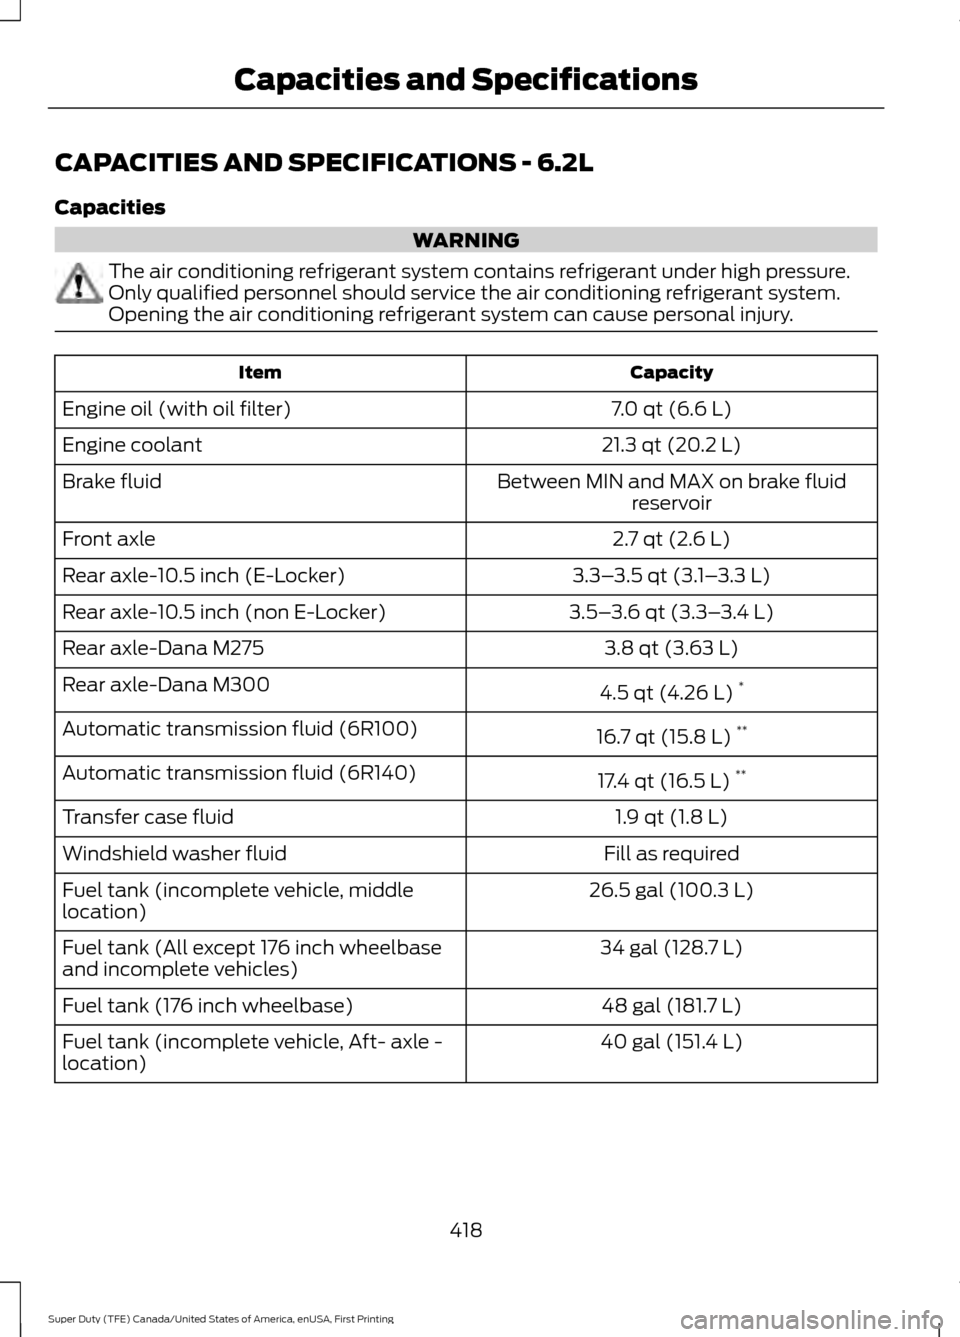
CAPACITIES AND SPECIFICATIONS - 6.2L
Capacities
WARNING
The air conditioning refrigerant system contains refrigerant under high pressure.
Only qualified personnel should service the air conditioning refrigerant system.
Opening the air conditioning refrigerant system can cause personal injury.
Capacity
Item
7.0 qt (6.6 L)
Engine oil (with oil filter)
21.3 qt (20.2 L)
Engine coolant
Between MIN and MAX on brake fluidreservoir
Brake fluid
2.7 qt (2.6 L)
Front axle
3.3–3.5 qt (3.1– 3.3 L)
Rear axle-10.5 inch (E-Locker)
3.5–3.6 qt (3.3– 3.4 L)
Rear axle-10.5 inch (non E-Locker)
3.8 qt (3.63 L)
Rear axle-Dana M275
4.5 qt (4.26 L)*
Rear axle-Dana M300
16.7 qt (15.8 L)**
Automatic transmission fluid (6R100)
17.4 qt (16.5 L)**
Automatic transmission fluid (6R140)
1.9 qt (1.8 L)
Transfer case fluid
Fill as required
Windshield washer fluid
26.5 gal (100.3 L)
Fuel tank (incomplete vehicle, middle
location)
34 gal (128.7 L)
Fuel tank (All except 176 inch wheelbase
and incomplete vehicles)
48 gal (181.7 L)
Fuel tank (176 inch wheelbase)
40 gal (151.4 L)
Fuel tank (incomplete vehicle, Aft- axle -
location)
418
Super Duty (TFE) Canada/United States of America, enUSA, First Printing Capacities and Specifications
Page 425 of 636
If you use oil and fluids that do not meet
the defined specification and viscosity
grade, this may lead to:
•
Component damage which is not
covered by the vehicle warranty.
• Longer engine cranking periods.
• Increased emission levels.
• Reduced engine performance.
• Reduced fuel economy.
• Degraded brake performance.
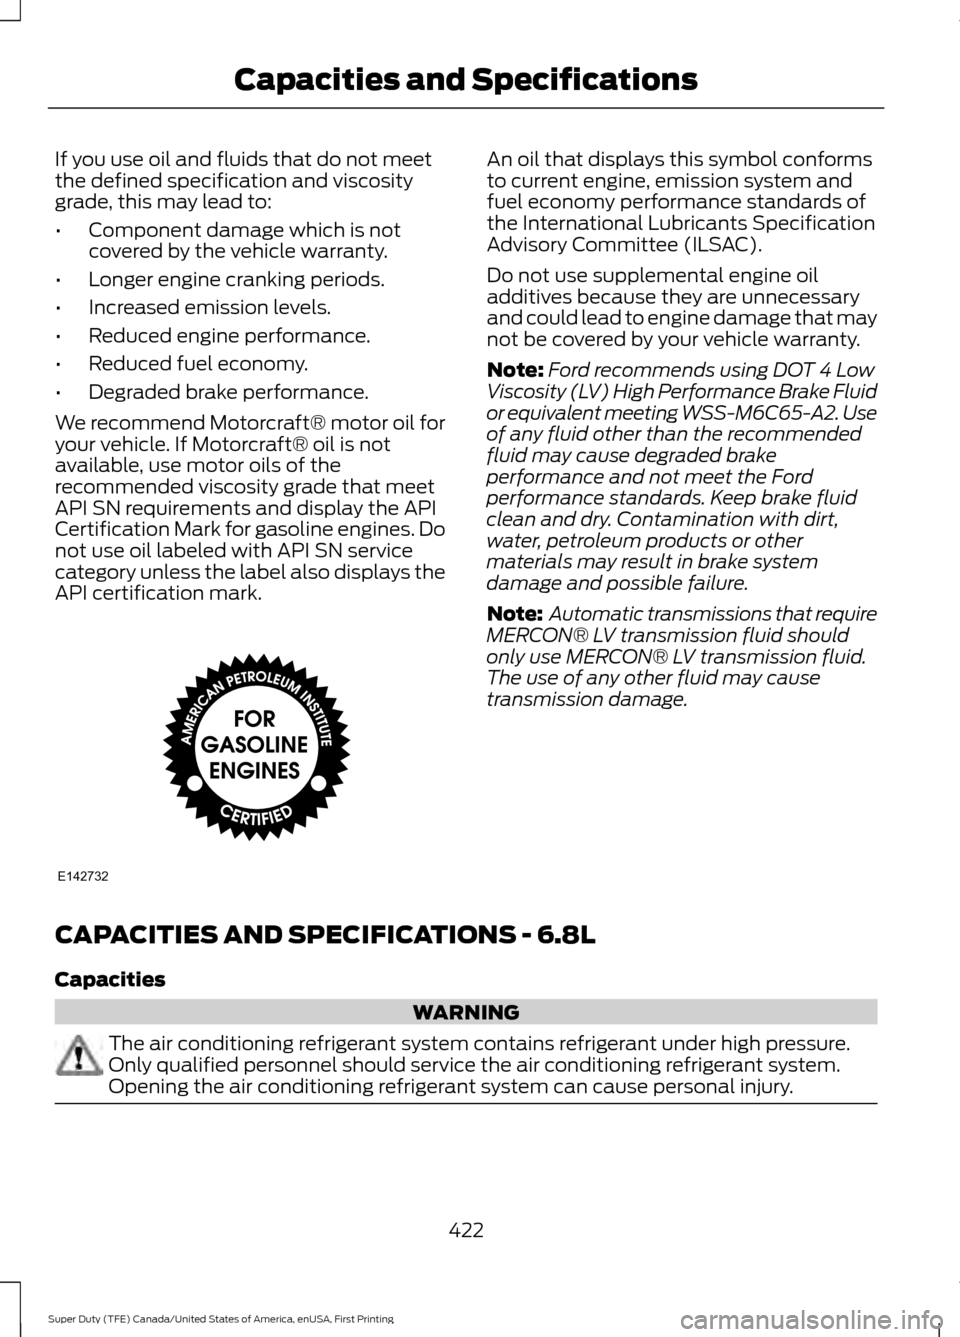
We recommend Motorcraft® motor oil for
your vehicle. If Motorcraft® oil is not
available, use motor oils of the
recommended viscosity grade that meet
API SN requirements and display the API
Certification Mark for gasoline engines. Do
not use oil labeled with API SN service
category unless the label also displays the
API certification mark. An oil that displays this symbol conforms
to current engine, emission system and
fuel economy performance standards of
the International Lubricants Specification
Advisory Committee (ILSAC).
Do not use supplemental engine oil
additives because they are unnecessary
and could lead to engine damage that may
not be covered by your vehicle warranty.
Note:
Ford recommends using DOT 4 Low
Viscosity (LV) High Performance Brake Fluid
or equivalent meeting WSS-M6C65-A2. Use
of any fluid other than the recommended
fluid may cause degraded brake
performance and not meet the Ford
performance standards. Keep brake fluid
clean and dry. Contamination with dirt,
water, petroleum products or other
materials may result in brake system
damage and possible failure.
Note: Automatic transmissions that require
MERCON® LV transmission fluid should
only use MERCON® LV transmission fluid.
The use of any other fluid may cause
transmission damage.
CAPACITIES AND SPECIFICATIONS - 6.8L
Capacities WARNING
The air conditioning refrigerant system contains refrigerant under high pressure.
Only qualified personnel should service the air conditioning refrigerant system.
Opening the air conditioning refrigerant system can cause personal injury.
422
Super Duty (TFE) Canada/United States of America, enUSA, First Printing Capacities and SpecificationsE142732