2017 FORD SUPER DUTY transmission
[x] Cancel search: transmissionPage 132 of 636
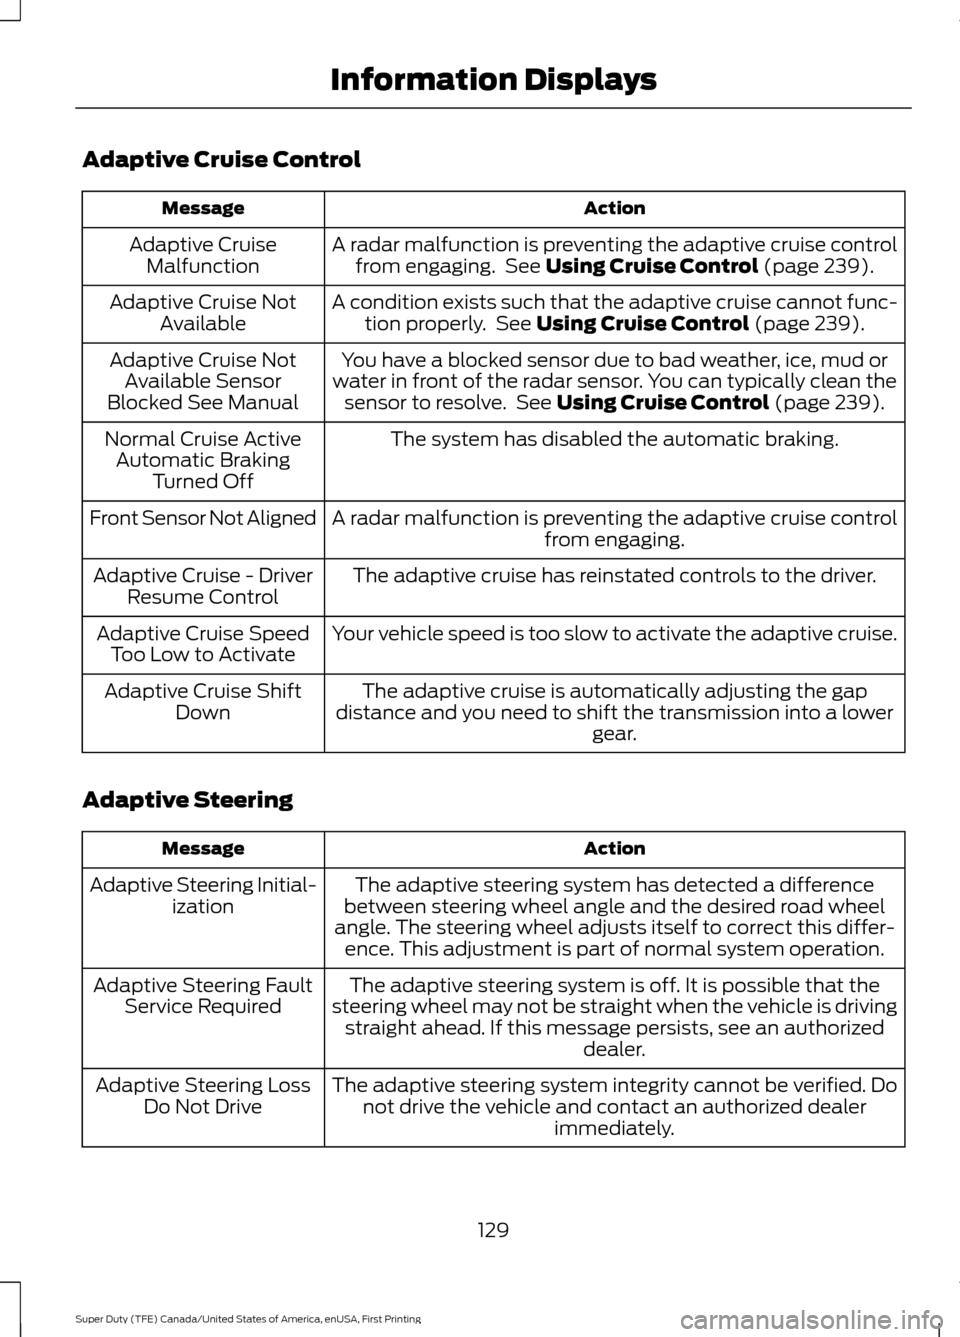
Adaptive Cruise Control
Action
Message
A radar malfunction is preventing the adaptive cruise controlfrom engaging. See Using Cruise Control (page 239).
Adaptive Cruise
Malfunction
A condition exists such that the adaptive cruise cannot func-tion properly. See
Using Cruise Control (page 239).
Adaptive Cruise Not
Available
You have a blocked sensor due to bad weather, ice, mud or
water in front of the radar sensor. You can typically clean the sensor to resolve. See
Using Cruise Control (page 239).
Adaptive Cruise Not
Available Sensor
Blocked See Manual
The system has disabled the automatic braking.
Normal Cruise Active
Automatic Braking Turned Off
A radar malfunction is preventing the adaptive cruise control from engaging.
Front Sensor Not Aligned
The adaptive cruise has reinstated controls to the driver.
Adaptive Cruise - Driver
Resume Control
Your vehicle speed is too slow to activate the adaptive cruise.
Adaptive Cruise Speed
Too Low to Activate
The adaptive cruise is automatically adjusting the gap
distance and you need to shift the transmission into a lower gear.
Adaptive Cruise Shift
Down
Adaptive Steering Action
Message
The adaptive steering system has detected a difference
between steering wheel angle and the desired road wheel
angle. The steering wheel adjusts itself to correct this differ- ence. This adjustment is part of normal system operation.
Adaptive Steering Initial-
ization
The adaptive steering system is off. It is possible that the
steering wheel may not be straight when the vehicle is driving straight ahead. If this message persists, see an authorized dealer.
Adaptive Steering Fault
Service Required
The adaptive steering system integrity cannot be verified. Donot drive the vehicle and contact an authorized dealer immediately.
Adaptive Steering Loss
Do Not Drive
129
Super Duty (TFE) Canada/United States of America, enUSA, First Printing Information Displays
Page 139 of 636
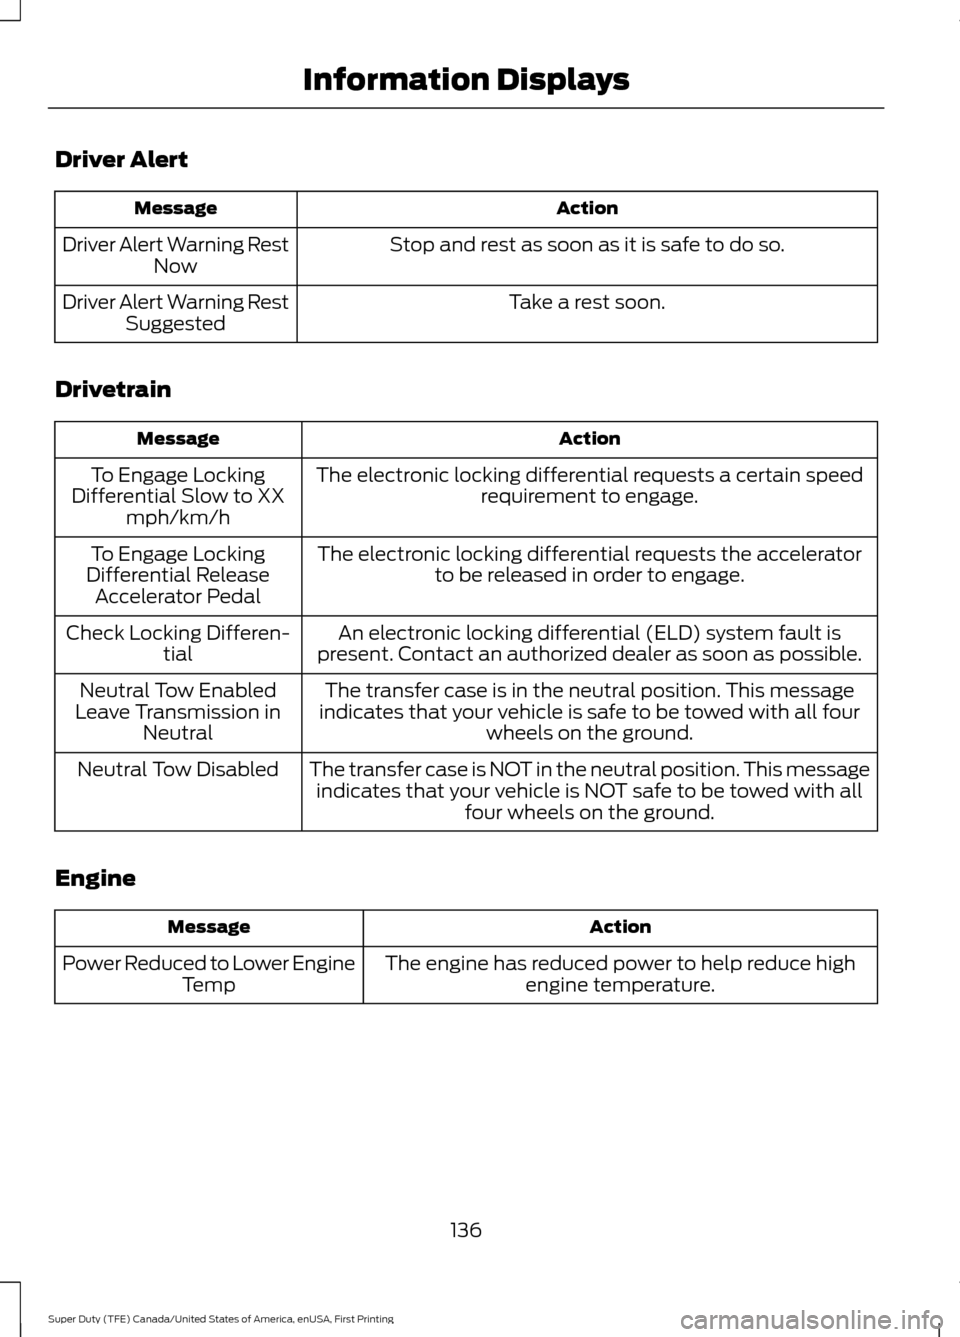
Driver Alert
Action
Message
Stop and rest as soon as it is safe to do so.
Driver Alert Warning Rest
Now
Take a rest soon.
Driver Alert Warning Rest
Suggested
Drivetrain Action
Message
The electronic locking differential requests a certain speedrequirement to engage.
To Engage Locking
Differential Slow to XX mph/km/h
The electronic locking differential requests the acceleratorto be released in order to engage.
To Engage Locking
Differential Release Accelerator Pedal
An electronic locking differential (ELD) system fault is
present. Contact an authorized dealer as soon as possible.
Check Locking Differen-
tial
The transfer case is in the neutral position. This message
indicates that your vehicle is safe to be towed with all four wheels on the ground.
Neutral Tow Enabled
Leave Transmission in Neutral
The transfer case is NOT in the neutral position. This messageindicates that your vehicle is NOT safe to be towed with all four wheels on the ground.
Neutral Tow Disabled
Engine Action
Message
The engine has reduced power to help reduce highengine temperature.
Power Reduced to Lower Engine
Temp
136
Super Duty (TFE) Canada/United States of America, enUSA, First Printing Information Displays
Page 142 of 636
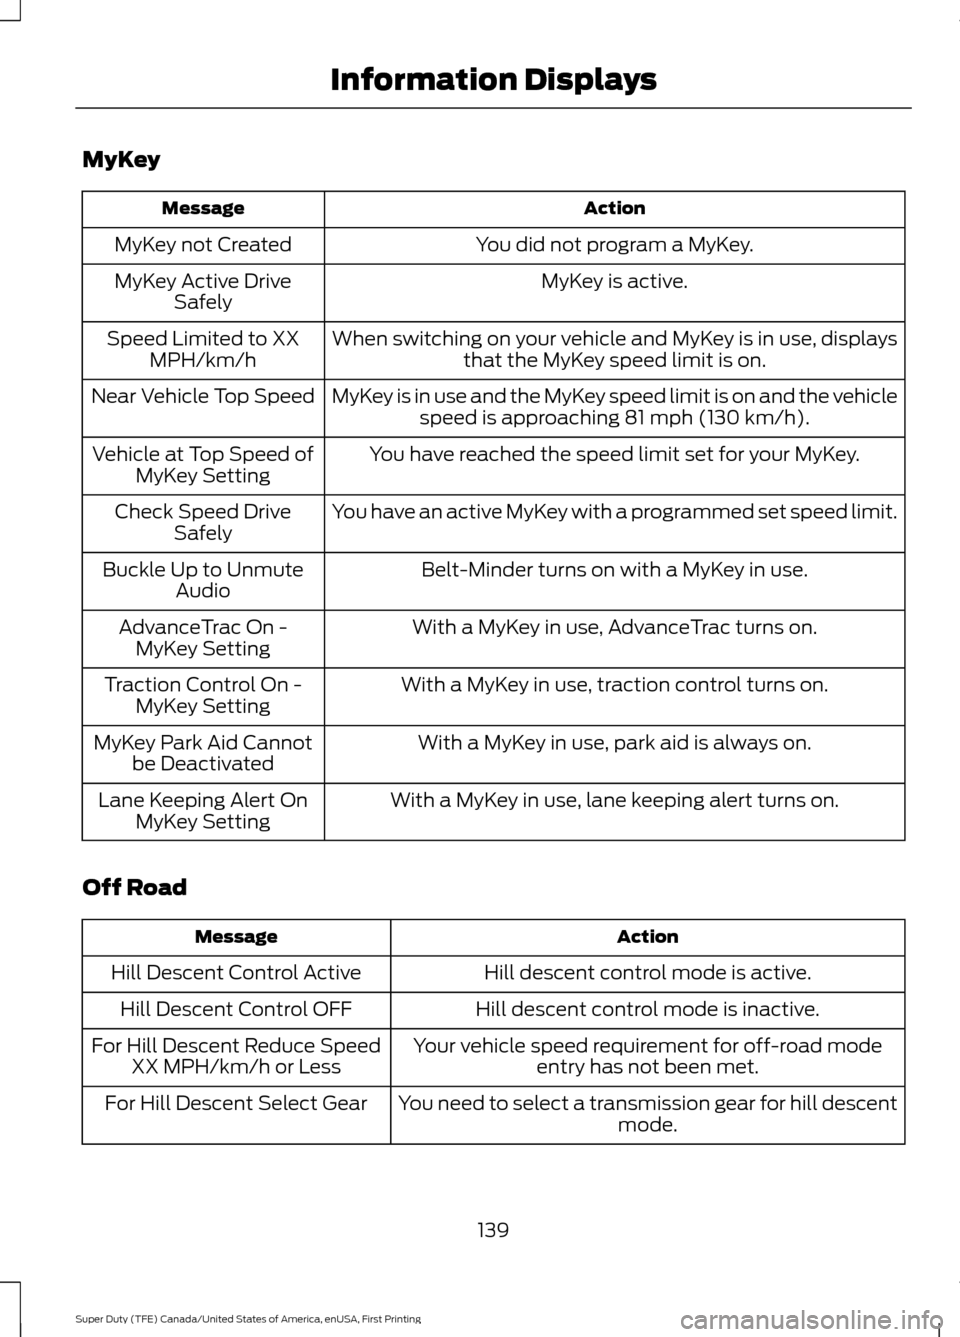
MyKey
Action
Message
You did not program a MyKey.
MyKey not Created
MyKey is active.
MyKey Active Drive
Safely
When switching on your vehicle and MyKey is in use, displaysthat the MyKey speed limit is on.
Speed Limited to XX
MPH/km/h
MyKey is in use and the MyKey speed limit is on and the vehiclespeed is approaching 81 mph (130 km/h).
Near Vehicle Top Speed
You have reached the speed limit set for your MyKey.
Vehicle at Top Speed of
MyKey Setting
You have an active MyKey with a programmed set speed limit.
Check Speed Drive
Safely
Belt-Minder turns on with a MyKey in use.
Buckle Up to Unmute
Audio
With a MyKey in use, AdvanceTrac turns on.
AdvanceTrac On -
MyKey Setting
With a MyKey in use, traction control turns on.
Traction Control On -
MyKey Setting
With a MyKey in use, park aid is always on.
MyKey Park Aid Cannot
be Deactivated
With a MyKey in use, lane keeping alert turns on.
Lane Keeping Alert On
MyKey Setting
Off Road Action
Message
Hill descent control mode is active.
Hill Descent Control Active
Hill descent control mode is inactive.
Hill Descent Control OFF
Your vehicle speed requirement for off-road modeentry has not been met.
For Hill Descent Reduce Speed
XX MPH/km/h or Less
You need to select a transmission gear for hill descentmode.
For Hill Descent Select Gear
139
Super Duty (TFE) Canada/United States of America, enUSA, First Printing Information Displays
Page 161 of 636
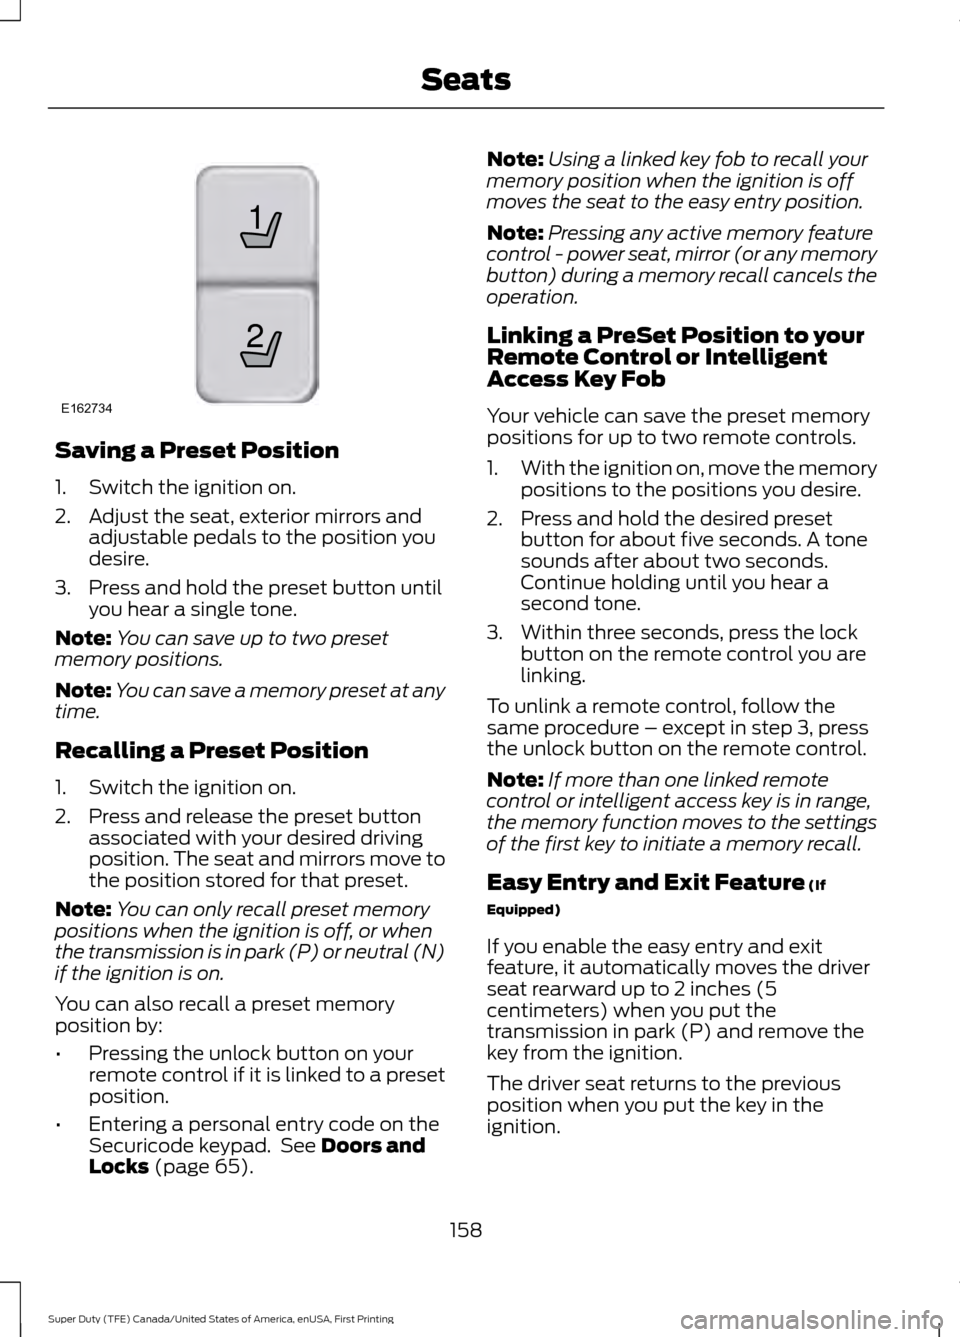
Saving a Preset Position
1. Switch the ignition on.
2. Adjust the seat, exterior mirrors and
adjustable pedals to the position you
desire.
3. Press and hold the preset button until you hear a single tone.
Note: You can save up to two preset
memory positions.
Note: You can save a memory preset at any
time.
Recalling a Preset Position
1. Switch the ignition on.
2. Press and release the preset button associated with your desired driving
position. The seat and mirrors move to
the position stored for that preset.
Note: You can only recall preset memory
positions when the ignition is off, or when
the transmission is in park (P) or neutral (N)
if the ignition is on.
You can also recall a preset memory
position by:
• Pressing the unlock button on your
remote control if it is linked to a preset
position.
• Entering a personal entry code on the
Securicode keypad. See Doors and
Locks (page 65). Note:
Using a linked key fob to recall your
memory position when the ignition is off
moves the seat to the easy entry position.
Note: Pressing any active memory feature
control - power seat, mirror (or any memory
button) during a memory recall cancels the
operation.
Linking a PreSet Position to your
Remote Control or Intelligent
Access Key Fob
Your vehicle can save the preset memory
positions for up to two remote controls.
1. With the ignition on, move the memory
positions to the positions you desire.
2. Press and hold the desired preset button for about five seconds. A tone
sounds after about two seconds.
Continue holding until you hear a
second tone.
3. Within three seconds, press the lock button on the remote control you are
linking.
To unlink a remote control, follow the
same procedure – except in step 3, press
the unlock button on the remote control.
Note: If more than one linked remote
control or intelligent access key is in range,
the memory function moves to the settings
of the first key to initiate a memory recall.
Easy Entry and Exit Feature
(If
Equipped)
If you enable the easy entry and exit
feature, it automatically moves the driver
seat rearward up to 2 inches (5
centimeters) when you put the
transmission in park (P) and remove the
key from the ignition.
The driver seat returns to the previous
position when you put the key in the
ignition.
158
Super Duty (TFE) Canada/United States of America, enUSA, First Printing Seats21
E162734
Page 167 of 636
HomeLink Wireless Control
System
WARNINGS
Make sure that the garage door and
security device are free from
obstruction when you are
programming. Do not program the system
with the vehicle in the garage. Do not use the system with any
garage door opener that does not
have the safety stop and reverse
feature as required by U.S. Federal Safety
Standards (this includes any garage door
opener manufactured before April 1, 1982).
A garage door opener which cannot detect
an object, signaling the door to stop and
reverse, does not meet current federal
safety standards. Using a garage door
opener without these features increases
the risk of serious injury or death. Note:
Make sure you keep the original
remote control transmitter for use in other
vehicles as well as for future system
programming.
Note: We recommend that upon the sale
or lease termination of your vehicle, you
erase the programmed function buttons for
security reasons. See Erasing the Function
Button Codes later in this section.
Note: You can program a maximum of
three devices. To change or replace any of
the three devices after it has been initially
programmed, you must first erase the
current settings. See Erasing the Function
Button Codes
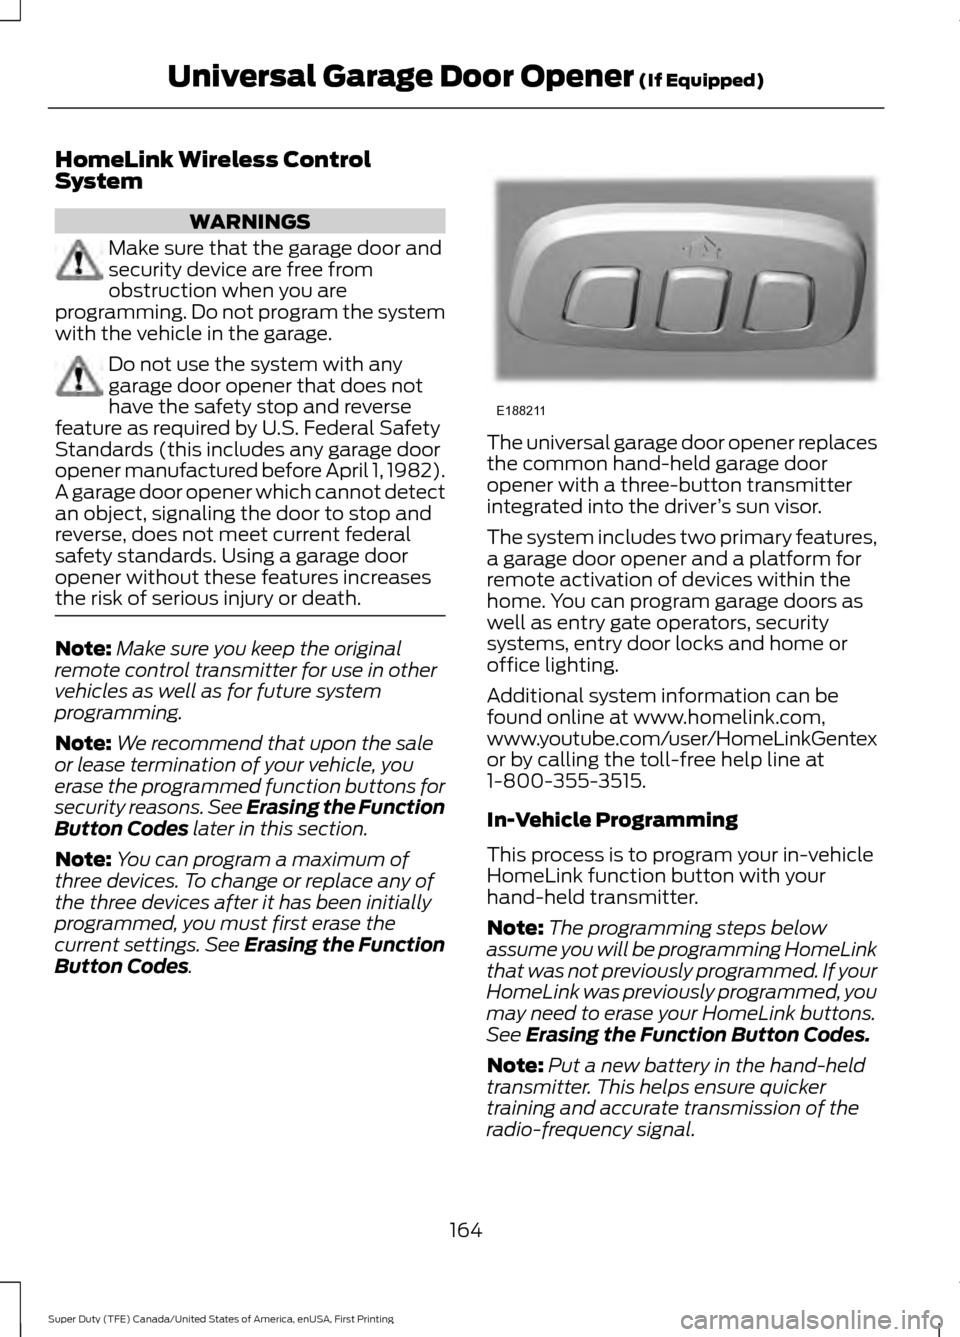
. The universal garage door opener replaces
the common hand-held garage door
opener with a three-button transmitter
integrated into the driver
’s sun visor.
The system includes two primary features,
a garage door opener and a platform for
remote activation of devices within the
home. You can program garage doors as
well as entry gate operators, security
systems, entry door locks and home or
office lighting.
Additional system information can be
found online at www.homelink.com,
www.youtube.com/user/HomeLinkGentex
or by calling the toll-free help line at
1-800-355-3515.
In-Vehicle Programming
This process is to program your in-vehicle
HomeLink function button with your
hand-held transmitter.
Note: The programming steps below
assume you will be programming HomeLink
that was not previously programmed. If your
HomeLink was previously programmed, you
may need to erase your HomeLink buttons.
See
Erasing the Function Button Codes.
Note: Put a new battery in the hand-held
transmitter. This helps ensure quicker
training and accurate transmission of the
radio-frequency signal.
164
Super Duty (TFE) Canada/United States of America, enUSA, First Printing Universal Garage Door Opener
(If Equipped)E188211
Page 169 of 636
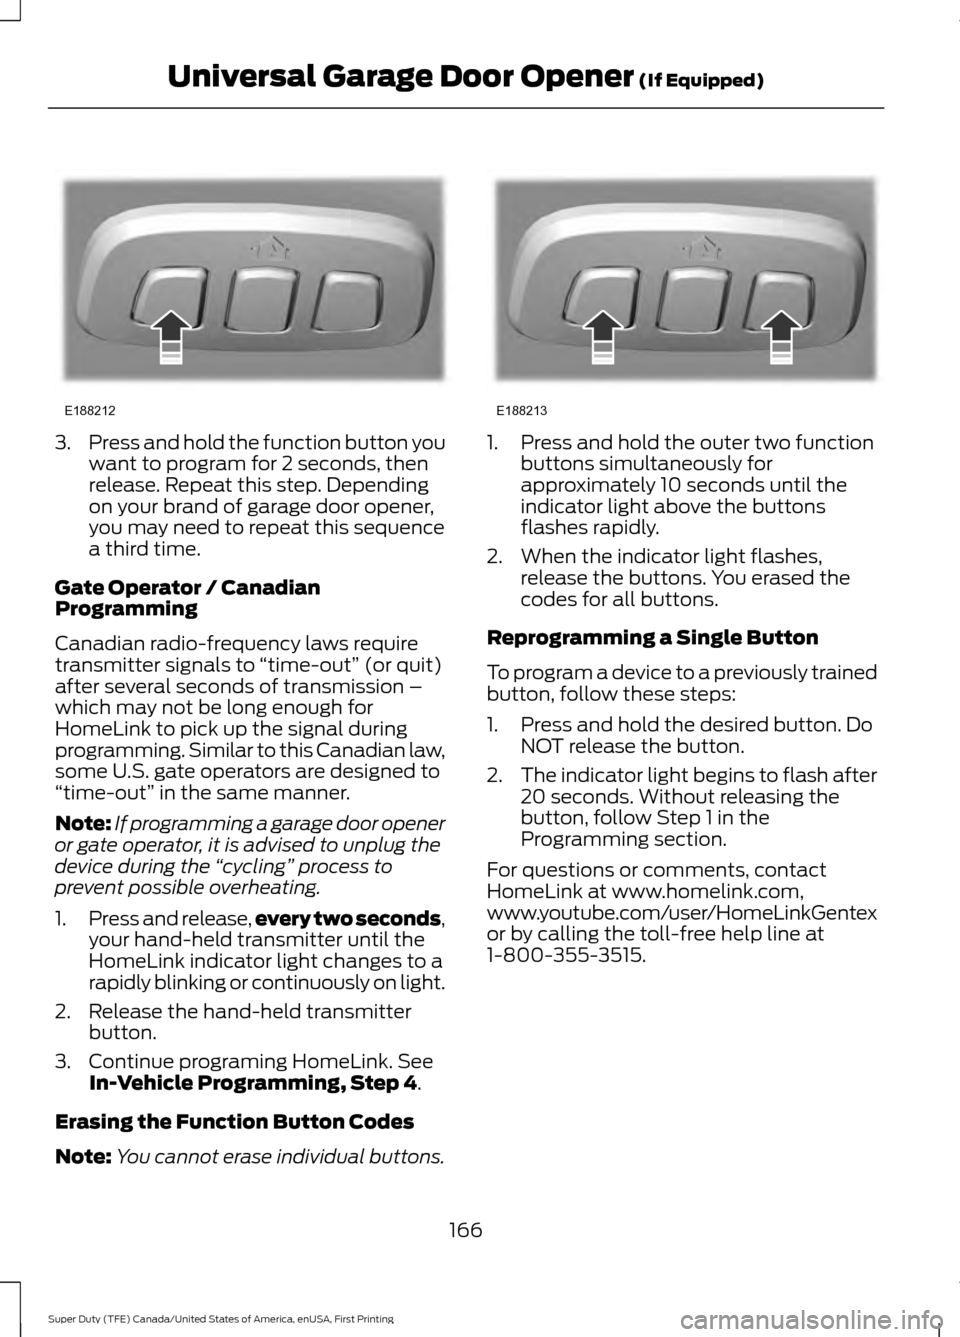
3.
Press and hold the function button you
want to program for 2 seconds, then
release. Repeat this step. Depending
on your brand of garage door opener,
you may need to repeat this sequence
a third time.
Gate Operator / Canadian
Programming
Canadian radio-frequency laws require
transmitter signals to “time-out” (or quit)
after several seconds of transmission –
which may not be long enough for
HomeLink to pick up the signal during
programming. Similar to this Canadian law,
some U.S. gate operators are designed to
“time-out” in the same manner.
Note: If programming a garage door opener
or gate operator, it is advised to unplug the
device during the “cycling” process to
prevent possible overheating.
1. Press and release, every two seconds,
your hand-held transmitter until the
HomeLink indicator light changes to a
rapidly blinking or continuously on light.
2. Release the hand-held transmitter button.
3. Continue programing HomeLink. See In-Vehicle Programming, Step 4.
Erasing the Function Button Codes
Note: You cannot erase individual buttons. 1. Press and hold the outer two function
buttons simultaneously for
approximately 10 seconds until the
indicator light above the buttons
flashes rapidly.
2. When the indicator light flashes, release the buttons. You erased the
codes for all buttons.
Reprogramming a Single Button
To program a device to a previously trained
button, follow these steps:
1. Press and hold the desired button. Do NOT release the button.
2. The indicator light begins to flash after
20 seconds. Without releasing the
button, follow Step 1 in the
Programming section.
For questions or comments, contact
HomeLink at www.homelink.com,
www.youtube.com/user/HomeLinkGentex
or by calling the toll-free help line at
1-800-355-3515.
166
Super Duty (TFE) Canada/United States of America, enUSA, First Printing Universal Garage Door Opener
(If Equipped)E188212 E188213
Page 178 of 636
Before starting the engine check the
following:
•
Make sure all occupants have fastened
their safety belts.
• Make sure the headlamps and
electrical accessories are off.
• Make sure the parking brake is on.
• Move the transmission selector lever
to position P.
• Turn the ignition key to the on position.
Note: Do not touch the accelerator pedal.
1. Fully depress the brake pedal.
2. Turn the key to the start position to start your vehicle.
3. When the engine starts, release the key, then gradually release the
accelerator pedal as the engine speed
increases.
Note: The engine may continue cranking
for up to 15 seconds or until it starts.
Note: If you cannot start the engine on the
first try, wait for a short period and try again.
Failure to Start
If you cannot start the engine after three
attempts, wait 10 seconds and follow this
procedure:
1. Fully depress the brake pedal.
2. Fully press the accelerator pedal and hold it there.
3. Start the engine.
Stopping the Engine When Your
Vehicle is Stationary
1. When your vehicle has stopped, shift into park (P) and switch the ignition
off.
2. Apply the parking brake. Stopping the Engine When Your
Vehicle is Moving WARNING
Switching off the engine when the
vehicle is still moving will result in a
loss of brake and steering assistance.
The steering will not lock, but higher effort
will be required. When the ignition is
switched off, some electrical circuits,
including air bags, warning lamps and
indicators may also be off. If the ignition
was turned off accidentally, you can shift
into neutral (N) and re-start the engine. 1. Put the transmission into neutral (N)
and use the brakes to bring your vehicle
to a safe stop.
2. When your vehicle has stopped, shift into park (P) and switch the ignition
off.
3. Apply the parking brake.
Cold Weather Starting (Flexible
Fuel Vehicles Only)
The starting characteristics of all grades
of E85 ethanol make it unsuitable for use
when ambient temperatures fall below
-0°F (-18°C). Consult your fuel distributor
for the availability of winter grade ethanol.
As the outside temperature approaches
freezing, ethanol fuel distributors should
supply winter grade ethanol, the same as
with unleaded gasoline.
If summer grade ethanol is used in cold
weather conditions, -0°F (-18°C), you may
experience increased cranking times, rough
idle or hesitation until the engine has
warmed up.
You may experience a decrease in
performance when the engine is cold when
operating on E85 ethanol.
175
Super Duty (TFE) Canada/United States of America, enUSA, First Printing Starting and Stopping the Engine
Page 179 of 636
Do not use starting fluid such as ether in
the air intake system. Such fluid could
cause immediate explosive damage to the
engine and possible personal injury.
If you should experience cold weather
starting problems on E85 ethanol, and
neither an alternative brand of E85 ethanol
nor an engine block heater is available, the
addition of unleaded gasoline to your tank
improves cold starting performance. Your
vehicle is designed to operate on E85
ethanol alone, unleaded gasoline alone, or
any mixture of the two.
If the Engine Fails to Start Using the
Preceding Instructions (Flexible Fuel
Vehicles Only)
1. Press the accelerator pedal down
one-third to one-half of its travel, and
then crank the engine.
2. When the engine starts, release the key, then gradually release the
accelerator pedal as the engine speed
increases. If the engine still does not
start, repeat Step 1.
Guarding Against Exhaust Fumes WARNING
Exhaust leaks may result in entry of
harmful and potentially lethal fumes
into the passenger compartment. If
you smell exhaust fumes inside your
vehicle, have your vehicle inspected
immediately. Do not drive if you smell
exhaust fumes. Important Ventilating Information
If you stop your vehicle and then leave the
engine idling for long periods of time, we
recommend that you do one of the
following:
•
Open the windows at least 1 inch (2.5
centimeters).
• Set your climate control to outside air. STARTING A DIESEL ENGINE -
6.7L DIESEL
Read all starting instructions carefully
before you start your vehicle.
For temperatures below 32°F (0°C), the
use of the correct grade engine oil is
essential for proper operation. Refer to
engine oil specifications for more
information. See
Capacities and
Specifications (page 428).
Your vehicle may have a cold weather
starting strategy that prevents severe
engine damage by assisting in engine
lubrication warm-up. In extremely cold
ambient temperatures, this strategy
activates and prevents the accelerator
pedal from being used for 30 seconds after
you start your vehicle. A message appears
in the information display as your vehicle
warms up. By not allowing the accelerator
pedal to be used, the engine oil is allowed
to properly lubricate the bearings
preventing engine damage due to lack of
proper lubrication. After the 30 second
warm-up period, the accelerator pedal will
be operational again and a message
appears informing you the vehicle is ok to
drive.
When you start the engine in extremely
cold temperatures
-15°F (-26°C), we
recommend that you allow the engine to
idle for several minutes before you drive
the vehicle.
Before starting the engine check the
following:
• Make sure all occupants have fastened
their seatbelts.
• Make sure the headlamps and
electrical accessories are off.
• Make sure the parking brake is on.
• Make sure the transmission is in park
(P).
176
Super Duty (TFE) Canada/United States of America, enUSA, First Printing Starting and Stopping the Engine