2017 FORD POLICE INTERCEPTOR SEDAN warning
[x] Cancel search: warningPage 192 of 358
CHANGING A BULB
WARNINGS
Bulbs can become hot. Let the bulb
cool down before removing it. Failure
to do so could result in personal
injury. Switch the lamps and the ignition off.
Failure to follow this warning could
result in serious personal injury.
Use the correct specification bulb. See
Bulb Specification Chart (page 190).
Install in the reverse order unless otherwise
stated.
High-Intensity Discharge
Headlamps
These lamps operate at a high voltage. See
an authorized dealer if they fail.
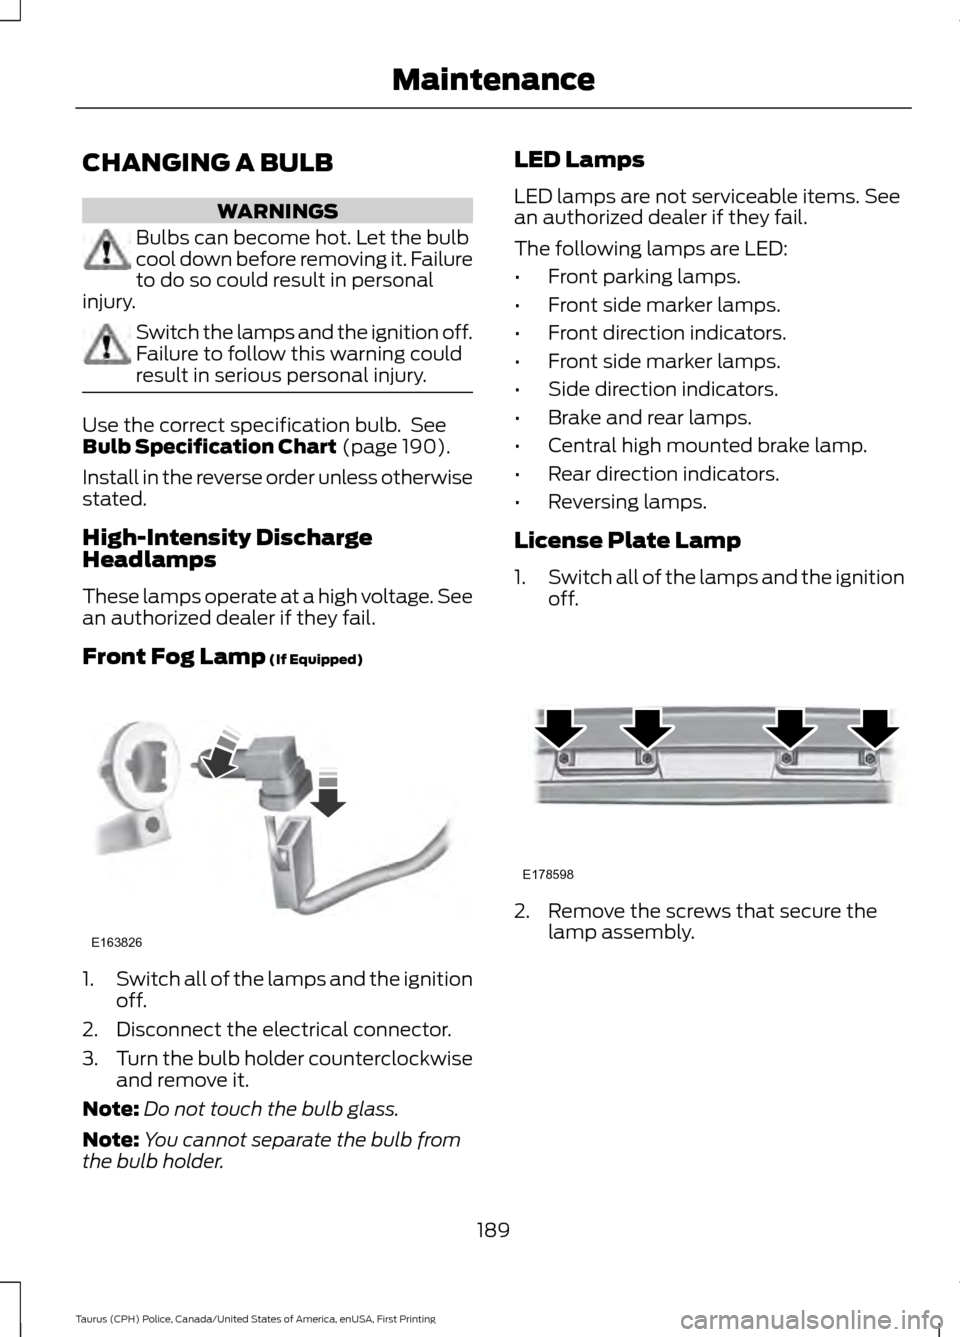
Front Fog Lamp
(If Equipped) 1.
Switch all of the lamps and the ignition
off.
2. Disconnect the electrical connector.
3. Turn the bulb holder counterclockwise
and remove it.
Note: Do not touch the bulb glass.
Note: You cannot separate the bulb from
the bulb holder. LED Lamps
LED lamps are not serviceable items. See
an authorized dealer if they fail.
The following lamps are LED:
•
Front parking lamps.
• Front side marker lamps.
• Front direction indicators.
• Front side marker lamps.
• Side direction indicators.
• Brake and rear lamps.
• Central high mounted brake lamp.
• Rear direction indicators.
• Reversing lamps.
License Plate Lamp
1. Switch all of the lamps and the ignition
off. 2. Remove the screws that secure the
lamp assembly.
189
Taurus (CPH) Police, Canada/United States of America, enUSA, First Printing MaintenanceE163826 E178598
Page 193 of 358

3. Remove the bulb.
BULB SPECIFICATION CHART
Headlamp bulbs must be marked with an
authorized D.O.T. marking for North
America to make sure they have the proper
lamp performance, light brightness, light
pattern and safe visibility.
Replacement bulbs are specified in the
chart below. The correct bulbs will not
damage the lamp assembly or void the
lamp assembly warranty and will provide
quality bulb illumination time.
Exterior Lamps Power (Watt)
Specification
Lamp
LED
LED
Front side marker lamps.
LED
LED
Front parking lamps.
LED
LED
Front warning lamp.
LED
LED
Daytime running lamps. If equipped.
LED
LED
Front auxiliary warning lamp.
LED
LED
Exterior mirror warning lamp.
LED
LED
Front direction indicator.
55
D3S
High-intensity discharge headlamps.
55
H11
Front fog lamps.
LED
LED
Side direction indicator.
LED
LED
Rear quarter window warning lamp.
LED
LED
Rear side marker lamp.
LED
LED
Front auxiliary warning lamp.
LED
LED
Brake and rear lamp.
LED
LED
Central high mounted brake lamp.
LED
LED
Rear direction indicator.
190
Taurus (CPH) Police, Canada/United States of America, enUSA, First Printing MaintenanceE178599
Page 195 of 358
CHANGING THE ENGINE AIR
FILTER
WARNING
Do not start the engine with the air
cleaner removed. This can cause
damage not covered by the vehicle
Warranty and can result in serious injury. When changing the air filter element, use
only the air filter element listed. See
Capacities and Specifications (page
224).
For vehicles with EcoBoost engines, when
servicing the air cleaner, it is important that
no foreign material enters the air induction
system. The engine and turbocharger are
susceptible to damage from even small
particles.
Change the air filter element at the correct
interval. See
Scheduled Maintenance
(page 301).
Note: Failure to use the correct air filter
element may result in severe engine
damage. Resulting component damage
may not be covered by the vehicle Warranty.
To replace the air filter element do the
following:
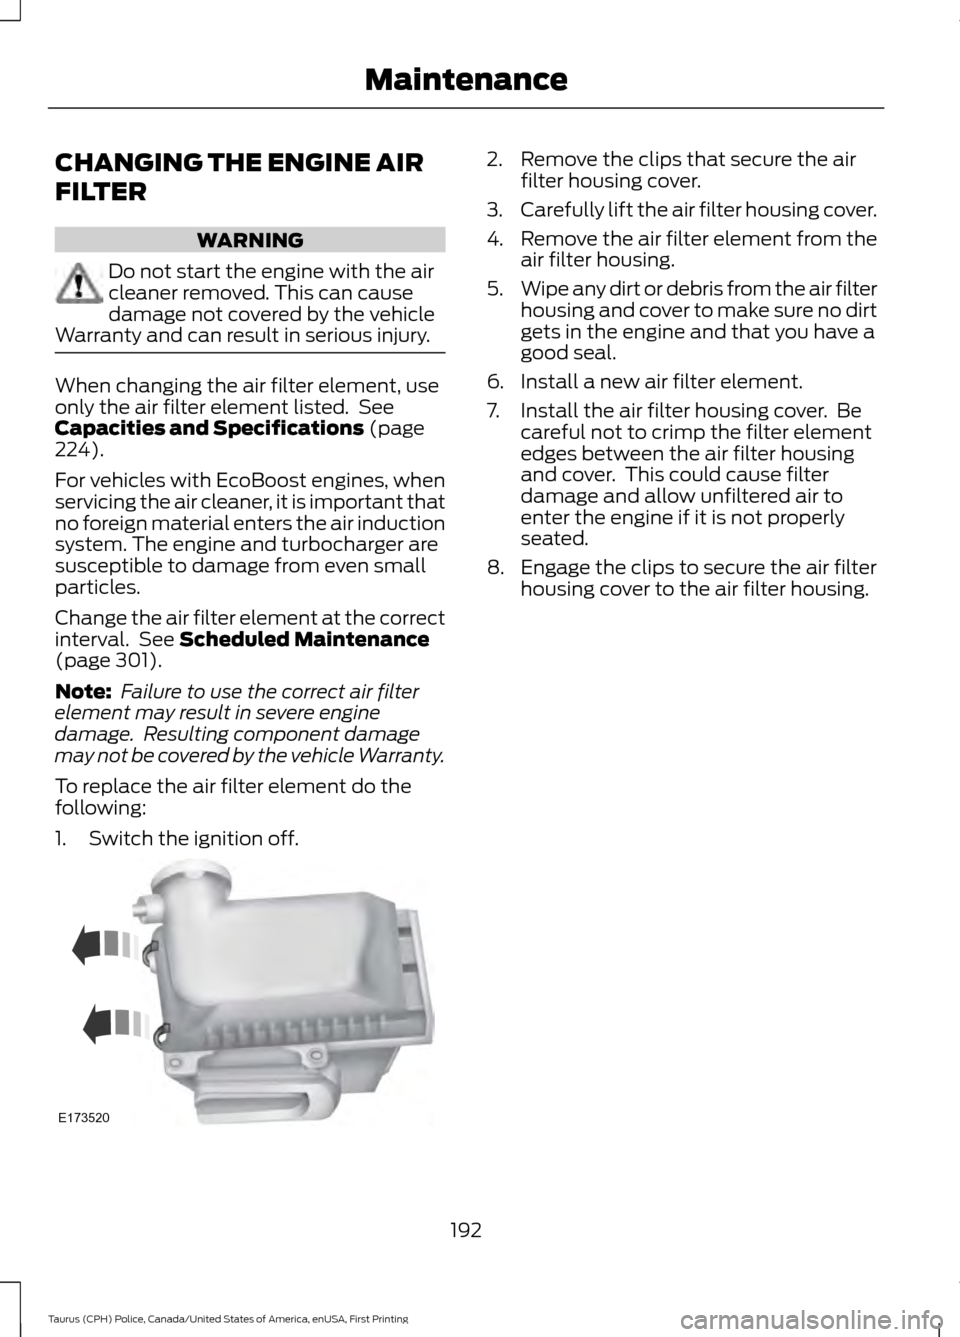
1. Switch the ignition off. 2. Remove the clips that secure the air
filter housing cover.
3. Carefully lift the air filter housing cover.
4. Remove the air filter element from the
air filter housing.
5. Wipe any dirt or debris from the air filter
housing and cover to make sure no dirt
gets in the engine and that you have a
good seal.
6. Install a new air filter element.
7. Install the air filter housing cover. Be careful not to crimp the filter element
edges between the air filter housing
and cover. This could cause filter
damage and allow unfiltered air to
enter the engine if it is not properly
seated.
8. Engage the clips to secure the air filter housing cover to the air filter housing.
192
Taurus (CPH) Police, Canada/United States of America, enUSA, First Printing MaintenanceE173520
Page 199 of 358
CLEANING THE INTERIOR
WARNINGS
Do not use cleaning solvents, bleach
or dye on the vehicle
’s safety belts,
as these actions may weaken the
belt webbing. On vehicles equipped with
seat-mounted airbags, do not use
chemical solvents or strong
detergents. Such products could
contaminate the side airbag system and
affect performance of the side airbag in a
collision. For fabric, carpets, cloth seats, safety belts
and seats equipped with side airbags:
•
Remove dust and loose dirt with a
vacuum cleaner.
• Remove light stains and soil with
Motorcraft Professional Strength
Carpet & Upholstery Cleaner.
• If grease or tar is present on the
material, spot-clean the area first with
Motorcraft Spot and Stain Remover. In
Canada, use Motorcraft Multi-Purpose
Cleaner.
• If a ring forms on the fabric after spot
cleaning, clean the entire area
immediately (but do not oversaturate)
or the ring will set.
• Do not use household cleaning
products or glass cleaners, which can
stain and discolor the fabric and affect
the flame retardant abilities of the seat
materials. CLEANING THE INSTRUMENT
PANEL AND INSTRUMENT
CLUSTER LENS WARNING
Do not use chemical solvents or
strong detergents when cleaning the
steering wheel or instrument panel
to avoid contamination of the airbag
system. Note:
Follow the same procedure as
cleaning leather seats for cleaning leather
instrument panels and leather interior trim
surfaces. See Cleaning Leather Seats
(page 197).
Clean the instrument panel and cluster
lens with a clean, damp and soft cloth,
then use a clean, dry and soft cloth to dry
these areas.
• Avoid cleaners or polishes that increase
the gloss of the upper portion of the
instrument panel. The dull finish in this
area helps protect you from
undesirable windshield reflection.
• Do not use any household cleaning
products or glass cleaners as these
may damage the finish of the
instrument panel, interior trim and
cluster lens.
• Wash or wipe your hands clean if you
have been in contact with certain
products such as insect repellent and
suntan lotion to avoid possible damage
to the interior painted surfaces.
• Do not allow air fresheners and hand
sanitizers to spill onto interior surfaces.
If a spill occurs, wipe off immediately.
Your warranty may not cover these
damages.
If a staining liquid like coffee or juice has
been spilled on the instrument panel or on
interior trim surfaces:
196
Taurus (CPH) Police, Canada/United States of America, enUSA, First Printing Vehicle Care
Page 204 of 358
the government course as a tire
graded 100. The relative
performance of tires depends
upon the actual conditions of their
use, however, and may depart
significantly from the norm due to
variations in driving habits, service
practices, and differences in road
characteristics and climate.
Traction AA A B C
WARNING
The traction grade assigned
to this tire is based on
straight-ahead braking traction
tests, and does not include
acceleration, cornering,
hydroplaning or peak traction
characteristics. The traction grades, from highest
to lowest are AA, A, B, and C. The
grades represent the tire
’s ability
to stop on wet pavement as
measured under controlled
conditions on specified
government test surfaces of
asphalt and concrete. A tire
marked C may have poor traction
performance. Temperature A B C WARNING
The temperature grade for
this tire is established for a
tire that is properly inflated and
not overloaded. Excessive speed,
underinflation, or excessive
loading, either separately or in
combination, can cause heat
buildup and possible tire failure. The temperature grades are A
(the highest), B and C,
representing the tire
’s resistance
to the generation of heat and its
ability to dissipate heat when
tested under controlled conditions
on a specified indoor laboratory
test wheel. Sustained high
temperature can cause the
material of the tire to degenerate
and reduce tire life, and excessive
temperature can lead to sudden
tire failure. The grade C
corresponds to a level of
performance which all passenger
car tires must meet under the
Federal Motor Vehicle Safety
Standard No. 139. Grades B and A
represent higher levels of
performance on the laboratory
test wheel than the minimum
required by law.
Glossary of Tire Terminology
*Tire label: A label showing the
original equipment tire sizes,
recommended inflation pressure
and the maximum weight the
vehicle can carry.
201
Taurus (CPH) Police, Canada/United States of America, enUSA, First Printing Wheels and Tires
Page 209 of 358
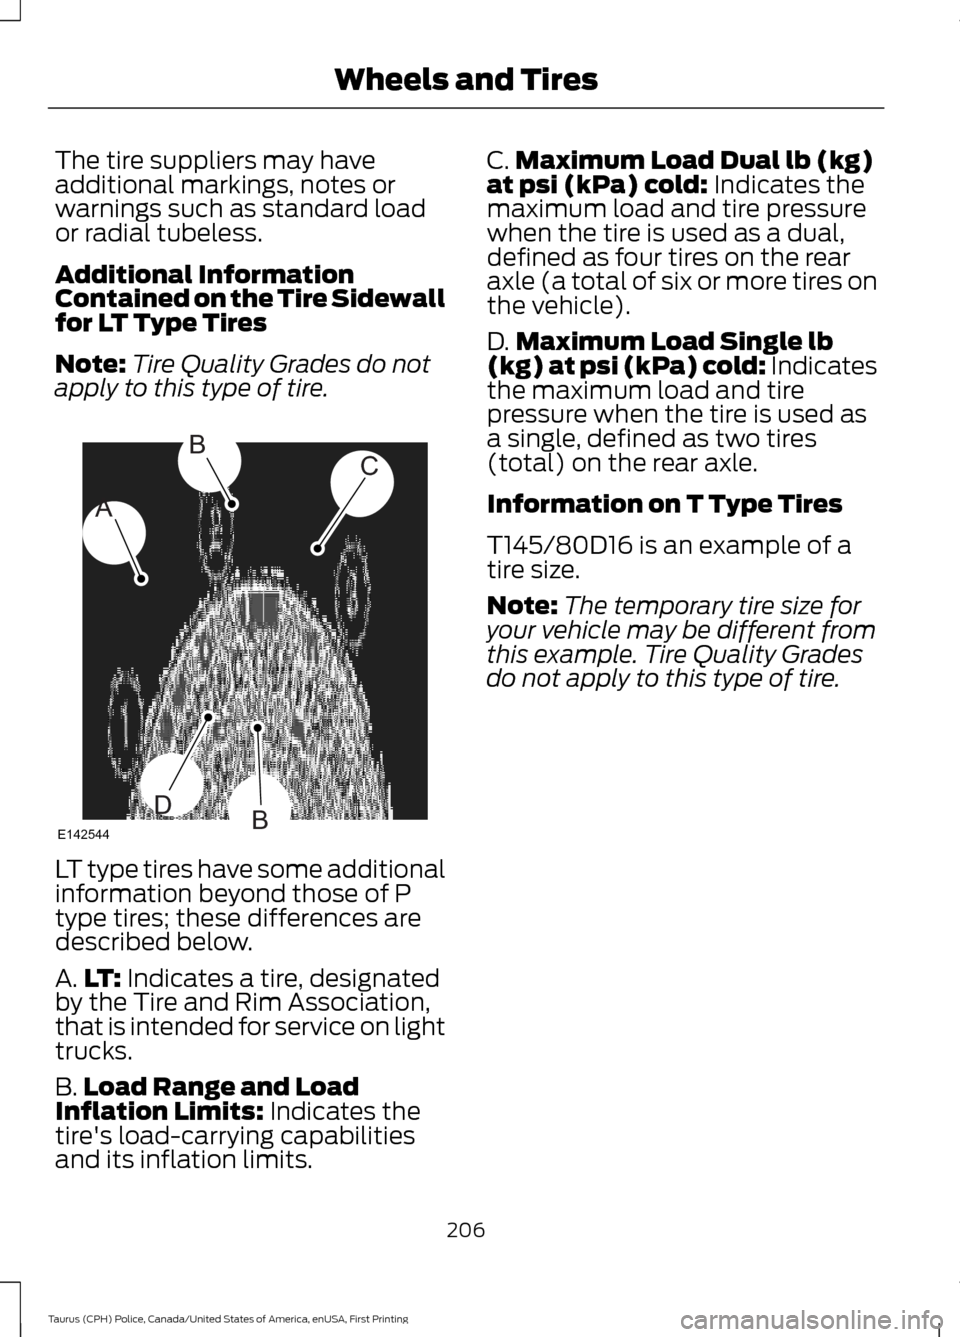
The tire suppliers may have
additional markings, notes or
warnings such as standard load
or radial tubeless.
Additional Information
Contained on the Tire Sidewall
for LT Type Tires
Note:
Tire Quality Grades do not
apply to this type of tire. LT type tires have some additional
information beyond those of P
type tires; these differences are
described below.
A.
LT: Indicates a tire, designated
by the Tire and Rim Association,
that is intended for service on light
trucks.
B. Load Range and Load
Inflation Limits:
Indicates the
tire's load-carrying capabilities
and its inflation limits. C.
Maximum Load Dual lb (kg)
at psi (kPa) cold:
Indicates the
maximum load and tire pressure
when the tire is used as a dual,
defined as four tires on the rear
axle (a total of six or more tires on
the vehicle).
D. Maximum Load Single lb
(kg) at psi (kPa) cold:
Indicates
the maximum load and tire
pressure when the tire is used as
a single, defined as two tires
(total) on the rear axle.
Information on T Type Tires
T145/80D16 is an example of a
tire size.
Note: The temporary tire size for
your vehicle may be different from
this example. Tire Quality Grades
do not apply to this type of tire.
206
Taurus (CPH) Police, Canada/United States of America, enUSA, First Printing Wheels and TiresA
BC
BDE142544
Page 211 of 358
WARNING
Under-inflation is the most
common cause of tire failures
and may result in severe tire
cracking, tread separation or
blowout, with unexpected loss of
vehicle control and increased risk
of injury. Under-inflation increases
sidewall flexing and rolling
resistance, resulting in heat
buildup and internal damage to
the tire. It also may result in
unnecessary tire stress, irregular
wear, loss of vehicle control and
accidents. A tire can lose up to
half of its air pressure and not
appear to be flat! You are strongly urged to buy a
reliable tire pressure gauge, as
automatic service station gauges
may be inaccurate. Ford
recommends the use of a digital
or dial-type tire pressure gauge
rather than a stick-type tire
pressure gauge. Use the
recommended cold inflation
pressure for optimum tire
performance and wear.
Under-inflation or over-inflation
may cause uneven treadwear
patterns. Always inflate your tires to the
Ford recommended inflation
pressure even if it is less than the
maximum inflation pressure
information found on the tire. You
will find a Tire Label containing
the Ford recommended tire
inflation pressure by the tire size
and other important information
located on the B-Pillar or the edge
of the driver
’s door.
The Ford recommended tire
inflation pressure is also found on
the Safety Compliance
Certification Label (affixed to
either the door hinge pillar,
door-latch post, or the door edge
that meets the door-latch on the
B-pillar, or on the edge of the
driver ’s door.
Failure to follow the tire pressure
recommendations can cause
uneven treadwear patterns and
adversely affect the way your
vehicle handles.
Inspecting Your Tires and
Wheel Valve Stems
Periodically inspect the tire treads
for uneven or excessive wear and
remove objects such as stones,
nails or glass that may be wedged
in the tread grooves. Check the tire
and valve stems for holes, cracks,
or cuts that may permit air
leakage and repair or replace the
tire and replace the valve stem.
Inspect the tire sidewalls for
cracking, cuts, bruises and other
signs of damage or excessive
wear. If internal damage to the tire
208
Taurus (CPH) Police, Canada/United States of America, enUSA, First Printing Wheels and Tires
Page 213 of 358
Age
WARNING
Tires degrade over time
depending on many factors
such as weather, storage
conditions, and conditions of use
(load, speed, inflation pressure)
the tires experience throughout
their lives.
In general, tires should be
replaced after six years regardless
of tread wear. However, heat
caused by hot climates or
frequent high loading conditions
can accelerate the aging process
and may require tires to be
replaced more frequently.
You should replace your spare tire
when you replace the road tires or
after six years due to aging even if
it has not been used. U.S. DOT Tire Identification
Number
Both United States and Canada
Federal regulations require tire
manufacturers to place
standardized information on the
sidewall of all tires. This
information identifies and
describes the fundamental
characteristics of the tire and also
provides a U.S. DOT Tire
Identification Number for safety
standard certification and in case
of a recall. This begins with the letters DOT
and indicates that the tire meets
all federal standards. The next
two numbers or letters are the
plant code designating where it
was manufactured, the next two
are the tire size code and the last
four numbers represent the week
and year the tire was built. For
example, the numbers 317 mean
the 31st week of 1997. After 2000,
the numbers go to four digits. For
example, 2501 means the 25th
week of 2001. The numbers in
between are identification codes
used for traceability. This
information is used to contact
customers if a tire defect requires
a recall.
Tire Replacement
Requirements
Your vehicle is equipped with tires
designed to provide a safe ride
and handling capability.
WARNINGS
Only use replacement tires
and wheels that are the same
size, load index, speed rating and
type (such as P-metric versus
LT-metric or all-season versus
all-terrain) as those originally
provided by Ford. The
recommended tire and wheel size
may be found on either the Safety
Compliance Certification Label
(affixed to either the door hinge
pillar, door-latch post, or the door
edge that meets the door-latch
post, next to the driver's seating
position), or the Tire Label which
210
Taurus (CPH) Police, Canada/United States of America, enUSA, First Printing Wheels and Tires