2017 FORD FUSION ENERGI clock
[x] Cancel search: clockPage 172 of 526

You can modify the lighting ring, refer tothe Charge Port Light Ring Settings. SeeSYNC™ 3 (page 365).
Disconnecting the Charging Coupler
Note:Do not pull the wall plug from thewall while your vehicle is charging. Doing somay damage the outlet and the cord.
1. Remove the lock from the chargingcoupler button.
2. Press the button on the chargingcoupler.
3. While holding the button, remove thecharging coupler from the charge portreceptacle on your vehicle.
4.Close the charge port door by pressingthe indentation on the charge portdoor. Continue pressing the indentationwhile the door rotatescounterclockwise and closes.
HIGH VOLTAGE BATTERY CUT-
OFF SWITCH
The high-voltage shut off operation shutsoff power from the high-voltage batteryafter a collision, or if your vehicle receivesa substantial physical jolt.
To reactivate your vehicle after eitherevent, perform the following steps:
1. Turn the ignition off.
2. Turn the ignition on.
3.If your vehicle is not powered after thissequence, repeat steps 1 and 2 up totwo more times.
For vehicles equipped with a push buttonstart system:
1. Press the START/STOP button toturn ignition off.
2. Press the brake pedal and press theSTART/STOP button.
3.If your vehicle is not powered after thissequence, repeat steps 1 and 2 up totwo more times.
Note:During this process, your vehicle willdetect if the electrical system is safe andreactivate. Once your vehicle determinesthe electrical system safe, you can start yourvehicle as you would normally by eitherturning the ignition key or by pressing thebrake in combination with theSTART/STOP button.
Note:In the event your vehicle does notreactivate after the third key cycle, contactan authorized dealer.
169
Fusion Energi / Fusion Hybrid (CC7) Hybrid Electric Vehicle (HEV)/Plug-In Hybrid Electric Vehicle (PHEV), Canada/United States of America, enUSA, Edition date: 201602, Second Printing
High Voltage BatteryE144781
Page 236 of 526

It is acceptable to have your front-wheeldrive vehicle towed from the front if usingproper wheel lift equipment to raise thefront wheels off the ground. When towingin this manner, the rear wheels can remainon the ground.
Front-wheel drive vehicles must have thefront wheels placed on a tow dolly whentowing your vehicle from the rear usingwheel lift equipment. This preventsdamage to the transmission.
Towing an all-wheel or four-wheel drivevehicle requires that all wheels be off theground, such as using a wheel lift anddollies or flatbed equipment. This preventsdamage to the transmission, all-wheel orfour-wheel drive system and vehicle.
TOWING POINTS
Due to local market requirements in somecountries, some vehicles may be equippedwith a recovery hook.
Recovery Hook Location
If your vehicle is equipped with a screw-inrecovery hook, it is located with the sparetire kit.
Installing the Recovery Hook
There is an installation point for therecovery hook located behind the fascia.
Note:The screw-in recovery hook has aleft-hand thread. Turn it counterclockwiseto install it. Make sure that the recovery hookis fully tightened.
Remove the recovery hook cover by pryingit off at the notch with a screwdriver orsimilar object.
Note:Use a soft cloth to cover the pryingtool. This helps prevent scratch marks tothe vehicle's paint.
233
Fusion Energi / Fusion Hybrid (CC7) Hybrid Electric Vehicle (HEV)/Plug-In Hybrid Electric Vehicle (PHEV), Canada/United States of America, enUSA, Edition date: 201602, Second Printing
Roadside EmergenciesE146284 E188420
Page 260 of 526

Note:Coolants marketed for all makes andmodels may not be approved to Fordspecifications and may cause damage tothe cooling system. Resulting componentdamage may not be covered by the vehicleWarranty.
If the coolant level is at or below theminimum mark, add prediluted coolantimmediately.
To top up the coolant level do thefollowing:
1. Unscrew the cap slowly. Any pressureescapes as you unscrew the cap.
2. Add prediluted coolant approved tothe correct specification. SeeCapacities and Specifications (page305).
3. Add enough prediluted coolant toreach the correct level.
4.Replace the coolant reservoir cap, turnit clockwise until you feel a strongresistance.
5. Check the coolant level in the coolantreservoir the next few times you driveyour vehicle. If necessary, add enoughprediluted engine coolant to bring thecoolant level to the correct level.
If you have to add more than 1.1 qt (1 L) ofengine coolant per month, have yourvehicle checked as soon as possible.Operating an engine with a low level ofcoolant can result in engine overheatingand possible engine damage.
Note:During normal vehicle operation, thecoolant may change color from orange topink or light red. As long as the coolant isclear and uncontaminated, this color changedoes not indicate the coolant has degradednor does it require the coolant to be drained,the system to be flushed, or the coolant tobe replaced.
Note:In case of emergency, you can add alarge amount of water without coolant inorder to reach a vehicle service location.Water alone, without coolant, can causeengine damage from corrosion, overheatingor freezing. When you reach a servicelocation, you must have the cooling systemdrained and refilled with prediluted coolantapproved to the correct specification. SeeCapacities and Specifications (page 305).
Do not use the following as a coolantsubstitute:
•Alcohol.
•Methanol.
•Brine.
•Any coolant mixed with alcohol ormethanol antifreeze.
Alcohol and other liquids can cause enginedamage from overheating or freezing.
Do not add extra inhibitors or additives tothe coolant. These can be harmful andcompromise the corrosion protection ofthe coolant.
Recycled Coolant
We do not recommend the use of recycledcoolant as an approved recycling processis not yet available.
Dispose of used engine coolant in anappropriate manner. Follow yourcommunity’s regulations and standardsfor recycling and disposing of automotivefluids.
257
Fusion Energi / Fusion Hybrid (CC7) Hybrid Electric Vehicle (HEV)/Plug-In Hybrid Electric Vehicle (PHEV), Canada/United States of America, enUSA, Edition date: 201602, Second Printing
Maintenance
Page 264 of 526

WARNINGS
Battery posts, terminals and relatedaccessories contain lead and leadcompounds. Wash hands afterhandling.
The 12V battery is located in the left-handside of the luggage compartment. Removethe door to gain access to the battery.
Your vehicle is fitted with a Motorcraftmaintenance-free battery which normallydoes not require additional water.
Note:After cleaning or replacing thebattery, make sure you reinstall the batterycover or shield.
When a battery replacement is required,you must use a recommendedreplacement battery that matches theelectrical requirements of the vehicle.
Note:Contact an authorized dealer for lowvoltage battery access, testing orreplacement.
To make sure the battery managementsystem works correctly, do not connect anelectrical device ground connectiondirectly to the low voltage battery negativepost. This can cause inaccuratemeasurements of the battery conditionand potential incorrect system operation.
Note:If you add electrical accessories orcomponents to the vehicle, it may adverselyaffect the low voltage battery performanceand durability. This may also affect theperformance of other electrical systems inthe vehicle.
For longer, trouble-free operation, keep thetop of the battery clean and dry.
If you see any corrosion on the battery orterminals, remove the cables from theterminals and clean with a wire brush. Youcan neutralize the acid with a solution ofbaking soda and water.
Because your vehicle’s engine iselectronically-controlled by a computer,some engine control settings aremaintained by power from the low-voltagebattery. Some engine computer settings,like the idle trim and fuel trim strategy,optimize the driveability and performanceof the engine. The clock and radio stationpresets are also maintained in memory bypower from the low-voltage battery. Thesesettings are erased when a techniciandisconnects and connects the low-voltagebattery.
To restore the settings, do the following:
1. Apply the parking brake.
2. Shift into park (P) or neutral (N).
3. Switch off all accessories.
4. Press the brake pedal and start yourvehicle.
5. Run the engine until it reaches normaloperating temperature. While theengine is warming up, complete thefollowing: Reset the clock. See AudioSystem (page 313). Reset the powerwindows bounce-back feature. SeeWindows and Mirrors (page 81).Reset the radio station presets. SeeAudio System (page 313).
6.Allow the engine to idle for at least oneminute.
261
Fusion Energi / Fusion Hybrid (CC7) Hybrid Electric Vehicle (HEV)/Plug-In Hybrid Electric Vehicle (PHEV), Canada/United States of America, enUSA, Edition date: 201602, Second Printing
MaintenanceE168357
Page 266 of 526

ADJUSTING THE HEADLAMPS
Vertical Aim Adjustment
The headlamps on your vehicle areproperly aimed at the assembly plant. Ifyour vehicle has been in an accident, thealignment of your headlamps should bechecked by your authorized dealer.
Headlamp Aiming Target
8 feet (2.4 meters)A
Center height of lamp to groundB
25 feet (7.6 meters)C
Horizontal reference lineD
Vertical Aim Adjustment Procedure
1. Park the vehicle directly in front of awall or screen on a level surface,approximately 25 feet (7.6 meters)away.
2. Measure the height of the headlampbulb center from the ground and markan 8 foot (2.4 meter) horizontalreference line on the vertical wall orscreen at this height.
Note:To see a clearer light pattern foradjusting, you may want to block the lightfrom one headlamp while adjusting theother.
3. Turn on the low beam headlamps toilluminate the wall or screen and openthe hood.
4. On the wall or screen you will observea flat zone of high intensity lightlocated at the top of the right handportion of the beam pattern. If the topedge of the high intensity light zone isnot at the horizontal reference line, theheadlamp will need to be adjusted.
5. Locate the vertical adjuster on eachheadlamp. Using a Phillips #2screwdriver, turn the adjuster eitherclockwise or counterclockwise in orderto adjust the vertical aim of theheadlamp. The horizontal edge of thebrighter light should touch thehorizontal reference line.
6.Close the hood and turn off the lamps.
263
Fusion Energi / Fusion Hybrid (CC7) Hybrid Electric Vehicle (HEV)/Plug-In Hybrid Electric Vehicle (PHEV), Canada/United States of America, enUSA, Edition date: 201602, Second Printing
MaintenanceE142592 E142465 E145594
Page 268 of 526

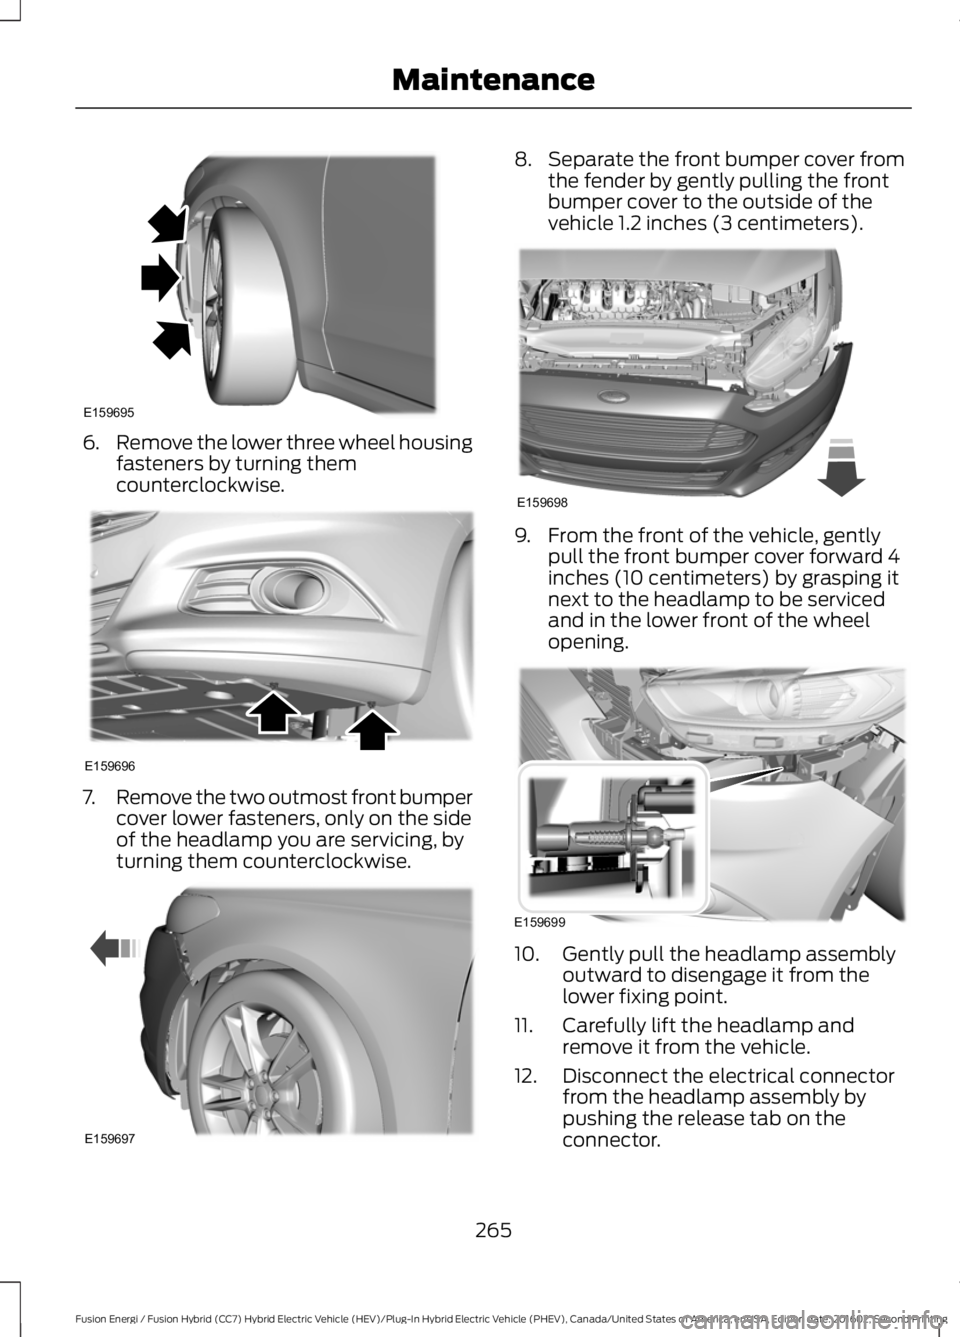
6.Remove the lower three wheel housingfasteners by turning themcounterclockwise.
7.Remove the two outmost front bumpercover lower fasteners, only on the sideof the headlamp you are servicing, byturning them counterclockwise.
8.Separate the front bumper cover fromthe fender by gently pulling the frontbumper cover to the outside of thevehicle 1.2 inches (3 centimeters).
9. From the front of the vehicle, gentlypull the front bumper cover forward 4inches (10 centimeters) by grasping itnext to the headlamp to be servicedand in the lower front of the wheelopening.
10. Gently pull the headlamp assemblyoutward to disengage it from thelower fixing point.
11. Carefully lift the headlamp andremove it from the vehicle.
12. Disconnect the electrical connectorfrom the headlamp assembly bypushing the release tab on theconnector.
265
Fusion Energi / Fusion Hybrid (CC7) Hybrid Electric Vehicle (HEV)/Plug-In Hybrid Electric Vehicle (PHEV), Canada/United States of America, enUSA, Edition date: 201602, Second Printing
MaintenanceE159695 E159696 E159697 E159698 E159699
Page 269 of 526

CHANGING A BULB
WARNINGS
Switch the lamps and the ignition off.Failure to follow this warning couldresult in serious personal injury.
Bulbs become hot when in use. Letthem cool down before you removethem.
Use the correct specification bulb. SeeBulb Specification Chart (page 267).
Install in the reverse order unless otherwisestated.
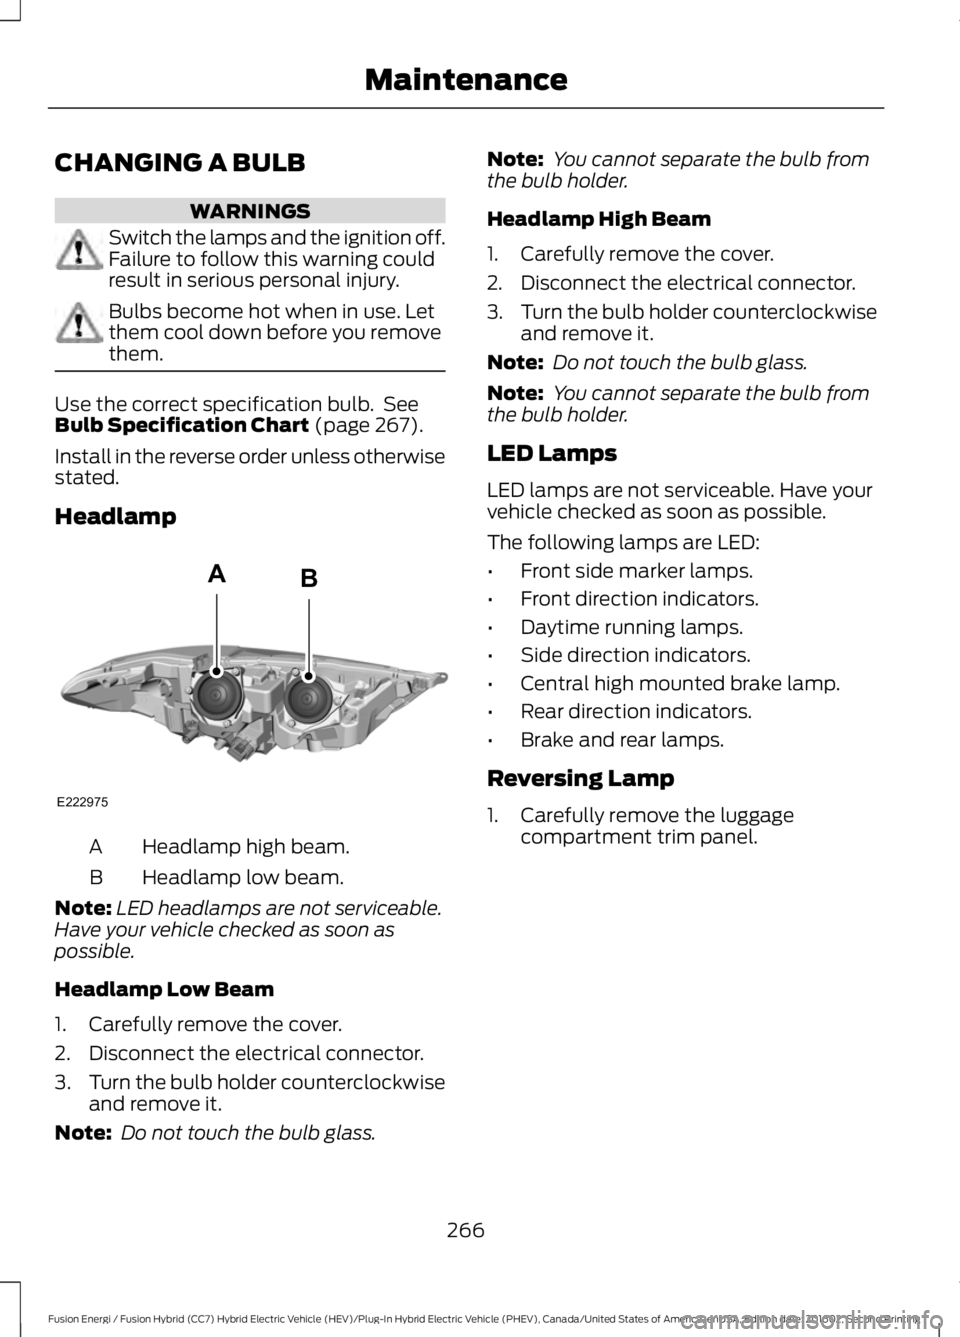
Headlamp
Headlamp high beam.A
Headlamp low beam.B
Note:LED headlamps are not serviceable.Have your vehicle checked as soon aspossible.
Headlamp Low Beam
1. Carefully remove the cover.
2. Disconnect the electrical connector.
3.Turn the bulb holder counterclockwiseand remove it.
Note: Do not touch the bulb glass.
Note: You cannot separate the bulb fromthe bulb holder.
Headlamp High Beam
1. Carefully remove the cover.
2. Disconnect the electrical connector.
3.Turn the bulb holder counterclockwiseand remove it.
Note: Do not touch the bulb glass.
Note: You cannot separate the bulb fromthe bulb holder.
LED Lamps
LED lamps are not serviceable. Have yourvehicle checked as soon as possible.
The following lamps are LED:
•Front side marker lamps.
•Front direction indicators.
•Daytime running lamps.
•Side direction indicators.
•Central high mounted brake lamp.
•Rear direction indicators.
•Brake and rear lamps.
Reversing Lamp
1. Carefully remove the luggagecompartment trim panel.
266
Fusion Energi / Fusion Hybrid (CC7) Hybrid Electric Vehicle (HEV)/Plug-In Hybrid Electric Vehicle (PHEV), Canada/United States of America, enUSA, Edition date: 201602, Second Printing
MaintenanceE222975
AB
Page 270 of 526

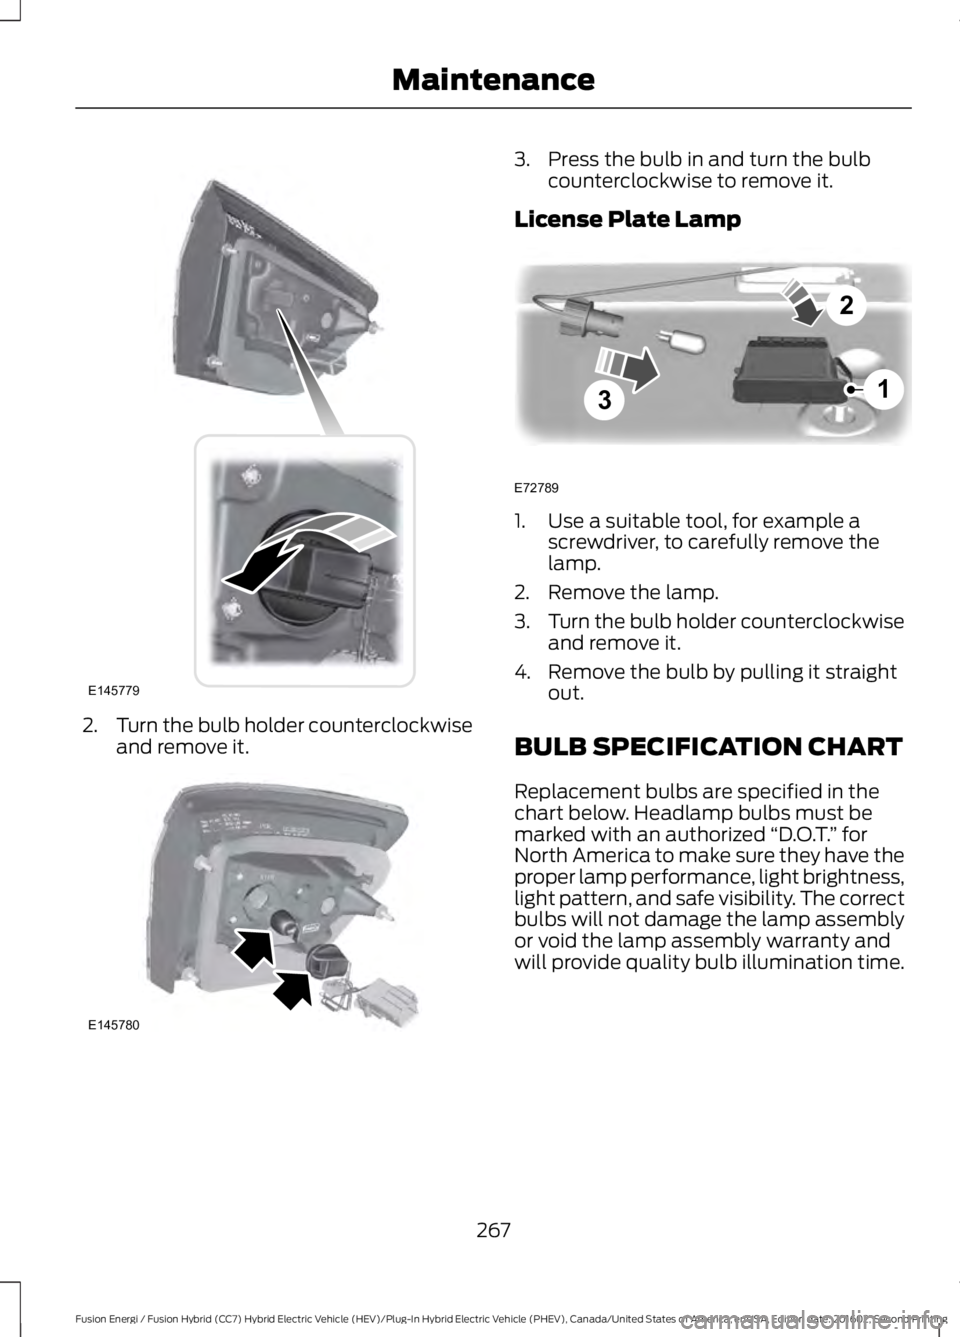
2.Turn the bulb holder counterclockwiseand remove it.
3. Press the bulb in and turn the bulbcounterclockwise to remove it.
License Plate Lamp
1. Use a suitable tool, for example ascrewdriver, to carefully remove thelamp.
2. Remove the lamp.
3.Turn the bulb holder counterclockwiseand remove it.
4. Remove the bulb by pulling it straightout.
BULB SPECIFICATION CHART
Replacement bulbs are specified in thechart below. Headlamp bulbs must bemarked with an authorized “D.O.T.” forNorth America to make sure they have theproper lamp performance, light brightness,light pattern, and safe visibility. The correctbulbs will not damage the lamp assemblyor void the lamp assembly warranty andwill provide quality bulb illumination time.
267
Fusion Energi / Fusion Hybrid (CC7) Hybrid Electric Vehicle (HEV)/Plug-In Hybrid Electric Vehicle (PHEV), Canada/United States of America, enUSA, Edition date: 201602, Second Printing
MaintenanceE145779 E145780 3
2
1
E72789