2017 FORD FUSION (AMERICAS) transmission
[x] Cancel search: transmissionPage 239 of 528

TRANSPORTING THE VEHICLE
If you need to have your vehicle towed,
contact a professional towing service or,
if you are a member of a roadside
assistance program, your roadside
assistance service provider.
We recommend the use of a wheel lift and
dollies or flatbed equipment to tow your
vehicle. Do not tow with a slingbelt. Ford
Motor Company has not approved a
slingbelt towing procedure. Vehicle
damage may occur if towed incorrectly, or
by any other means.
Ford Motor Company produces a towing
manual for all authorized tow truck
operators. Have your tow truck operator
refer to this manual for proper hook-up
and towing procedures for your vehicle. It is acceptable to have your front-wheel
drive vehicle towed from the front if using
proper wheel lift equipment to raise the
front wheels off the ground. When towing
in this manner, the rear wheels can remain
on the ground.
Front-wheel drive vehicles must have the
front wheels placed on a tow dolly when
towing your vehicle from the rear using
wheel lift equipment. This prevents
damage to the transmission.
Towing an all-wheel or four-wheel drive
vehicle requires that all wheels be off the
ground, such as using a wheel lift and
dollies or flatbed equipment. This prevents
damage to the transmission, all-wheel or
four-wheel drive system and vehicle.
TOWING POINTS
Due to local market requirements in some
countries, some vehicles may be equipped
with a recovery hook.
Recovery Hook Location
If your vehicle is equipped with a screw-in
recovery hook, it is located with the spare
tire kit.
Installing the Recovery Hook
There is an installation point for the
recovery hook located behind the fascia.
Note:
The screw-in recovery hook has a
left-hand thread. Turn it counterclockwise
to install it. Make sure that the recovery hook
is fully tightened.
236
Fusion (CC7) Canada/United States of America, enUSA, First Printing Roadside EmergenciesE143886
Page 250 of 528

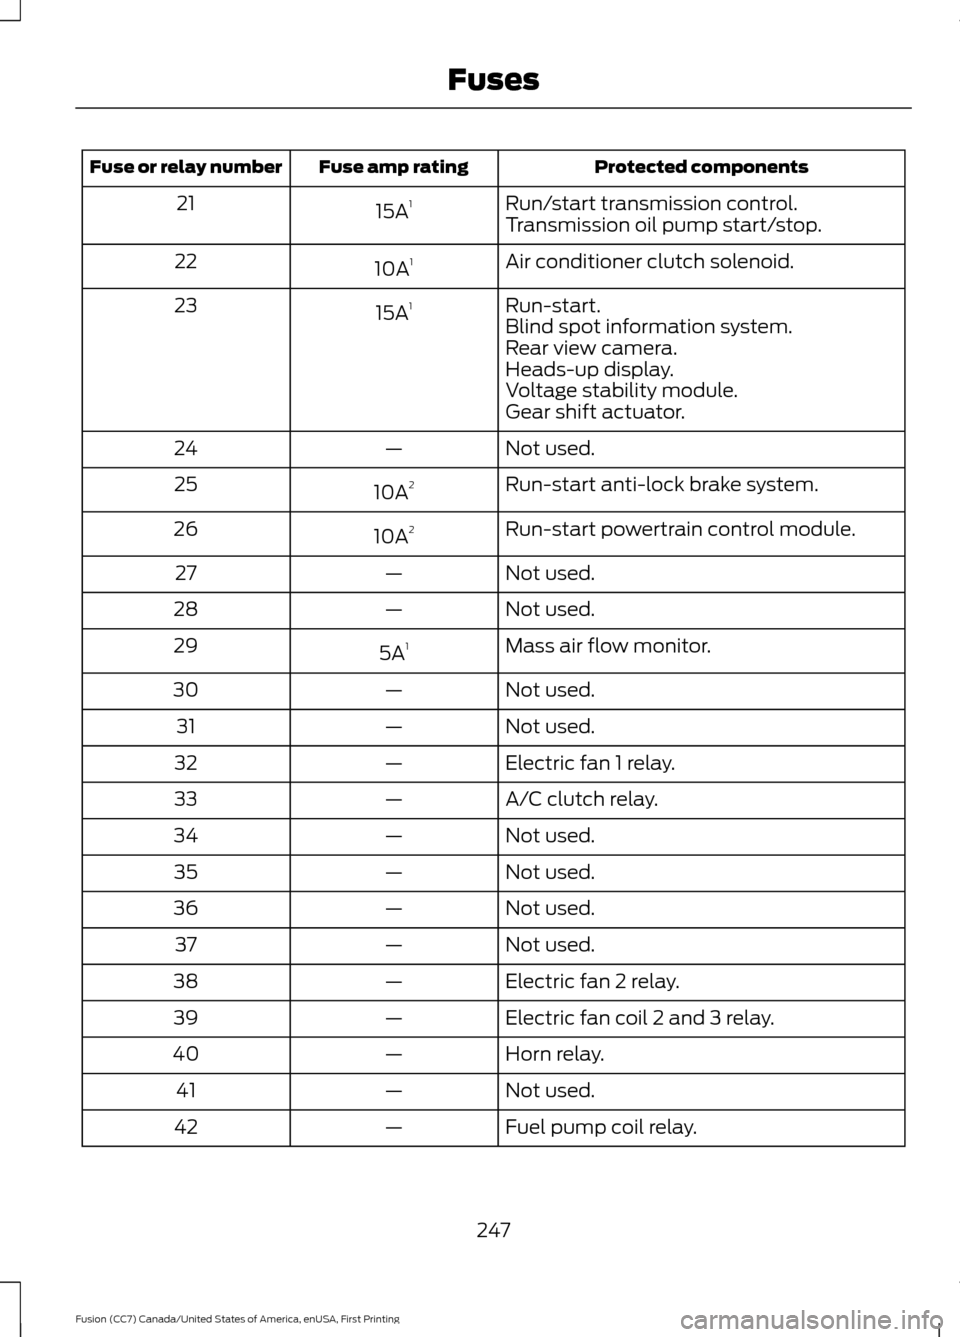
Protected components
Fuse amp rating
Fuse or relay number
Run/start transmission control.
15A 1
21
Transmission oil pump start/stop.
Air conditioner clutch solenoid.
10A 1
22
Run-start.
15A 1
23
Blind spot information system.
Rear view camera.
Heads-up display.
Voltage stability module.
Gear shift actuator.
Not used.
—
24
Run-start anti-lock brake system.
10A 2
25
Run-start powertrain control module.
10A 2
26
Not used.
—
27
Not used.
—
28
Mass air flow monitor.
5A 1
29
Not used.
—
30
Not used.
—
31
Electric fan 1 relay.
—
32
A/C clutch relay.
—
33
Not used.
—
34
Not used.
—
35
Not used.
—
36
Not used.
—
37
Electric fan 2 relay.
—
38
Electric fan coil 2 and 3 relay.
—
39
Horn relay.
—
40
Not used.
—
41
Fuel pump coil relay.
—
42
247
Fusion (CC7) Canada/United States of America, enUSA, First Printing Fuses
Page 263 of 528

Air filter. See Changing the Engine Air Filter (page 278).
G
Washer system fluid reservoir. See
Washer Fluid Check (page 269).
H
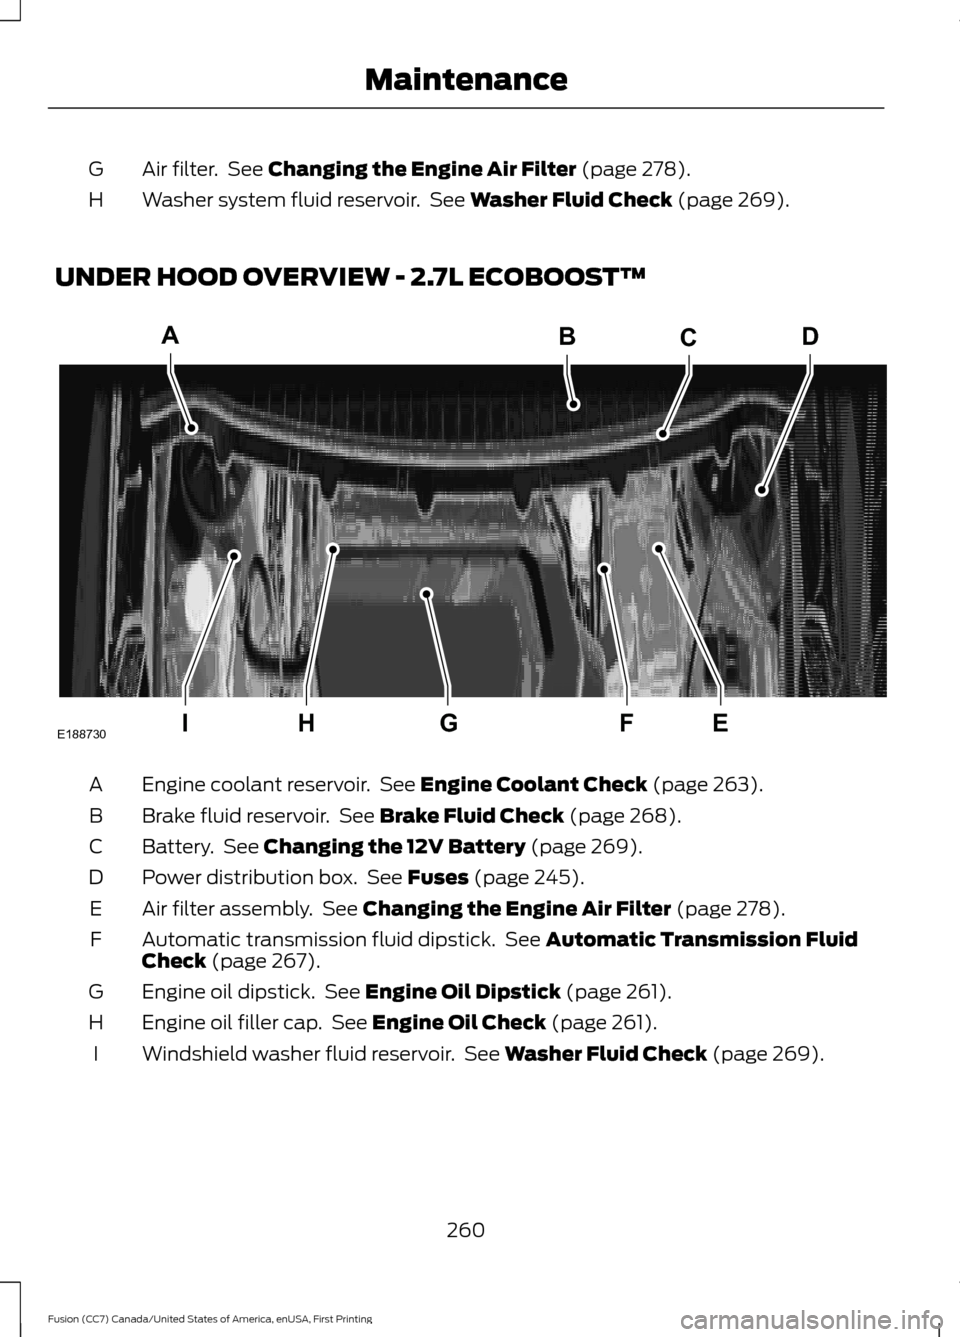
UNDER HOOD OVERVIEW - 2.7L ECOBOOST™ Engine coolant reservoir. See
Engine Coolant Check (page 263).
A
Brake fluid reservoir. See
Brake Fluid Check (page 268).
B
Battery. See
Changing the 12V Battery (page 269).
C
Power distribution box. See
Fuses (page 245).
D
Air filter assembly. See
Changing the Engine Air Filter (page 278).
E
Automatic transmission fluid dipstick. See
Automatic Transmission Fluid
Check (page 267).
F
Engine oil dipstick. See
Engine Oil Dipstick (page 261).
G
Engine oil filler cap. See
Engine Oil Check (page 261).
H
Windshield washer fluid reservoir. See
Washer Fluid Check (page 269).
I
260
Fusion (CC7) Canada/United States of America, enUSA, First Printing MaintenanceA
IEFGH
BCD
E188730
Page 264 of 528

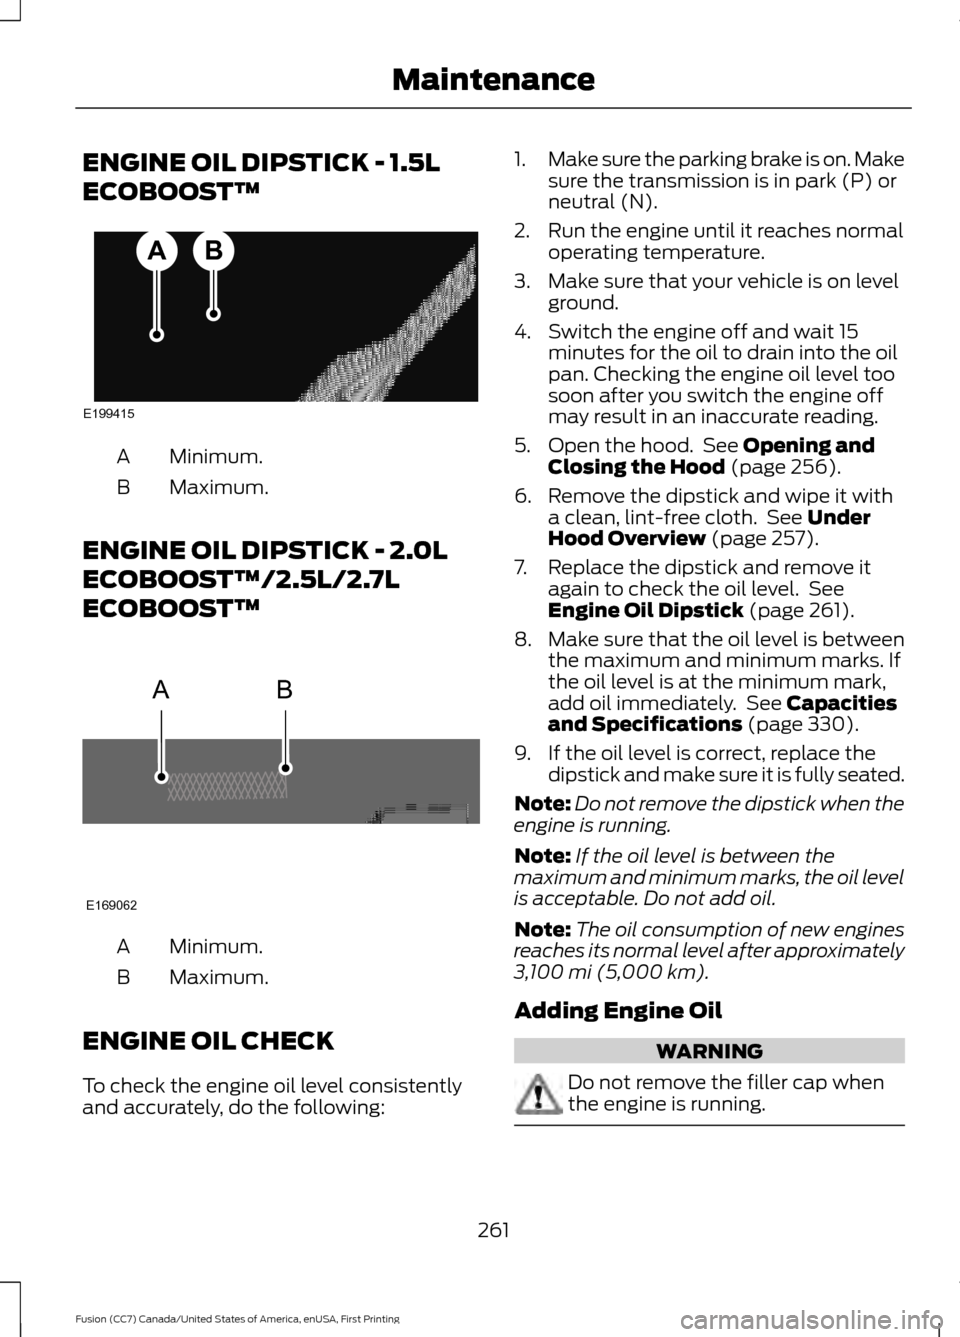
ENGINE OIL DIPSTICK - 1.5L
ECOBOOST™
Minimum.
A
Maximum.
B
ENGINE OIL DIPSTICK - 2.0L
ECOBOOST™/2.5L/2.7L
ECOBOOST™ Minimum.
A
Maximum.
B
ENGINE OIL CHECK
To check the engine oil level consistently
and accurately, do the following: 1.
Make sure the parking brake is on. Make
sure the transmission is in park (P) or
neutral (N).
2. Run the engine until it reaches normal operating temperature.
3. Make sure that your vehicle is on level ground.
4. Switch the engine off and wait 15 minutes for the oil to drain into the oil
pan. Checking the engine oil level too
soon after you switch the engine off
may result in an inaccurate reading.
5. Open the hood. See Opening and
Closing the Hood (page 256).
6. Remove the dipstick and wipe it with a clean, lint-free cloth. See
Under
Hood Overview (page 257).
7. Replace the dipstick and remove it again to check the oil level. See
Engine Oil Dipstick
(page 261).
8. Make sure that the oil level is between
the maximum and minimum marks. If
the oil level is at the minimum mark,
add oil immediately. See
Capacities
and Specifications (page 330).
9. If the oil level is correct, replace the dipstick and make sure it is fully seated.
Note: Do not remove the dipstick when the
engine is running.
Note: If the oil level is between the
maximum and minimum marks, the oil level
is acceptable. Do not add oil.
Note: The oil consumption of new engines
reaches its normal level after approximately
3,100 mi (5,000 km)
.
Adding Engine Oil WARNING
Do not remove the filler cap when
the engine is running.
261
Fusion (CC7) Canada/United States of America, enUSA, First Printing MaintenanceE199415
AB AB
E169062
Page 269 of 528

Engine Coolant Temperature
Management (If Equipped)
WARNING
To reduce the risk of crash and injury,
be prepared that the vehicle speed
may reduce and the vehicle may not
be able to accelerate with full power until
the coolant temperature reduces. If you tow a trailer with your vehicle, the
engine may temporarily reach higher a
temperature during severe operating
conditions, for example ascending a long
or steep grade in high ambient
temperatures.
At this time, you may notice the coolant
temperature gauge moves toward the red
zone and a message may appear in the
information display.
You may notice a reduction in vehicle
speed caused by reduced engine power.
In order to manage the engine coolant
temperature. Your vehicle may enter this
mode if certain high-temperature and
high-load conditions take place. The
amount of speed reduction depends on
vehicle loading, grade and ambient
temperature. If this occurs, there is no need
to pull off the road. You can continue to
drive your vehicle.
The air conditioning may automatically
turn on and off during severe operating
conditions to protect the engine from
overheating. When the coolant
temperature decreases to the normal
operating temperature, the air conditioning
turns on.
If the coolant temperature gauge moves
fully into the red zone, or if the coolant
temperature warning or service engine
soon messages appear in your information
display, do the following: 1. Pull off the road as soon as safely
possible and shift the transmission into
park (P).
2. Leave the engine running until the coolant temperature gauge needle
returns to the normal position. After
several minutes, if the temperature
does not drop, follow the remaining
steps.
3. Switch the engine off and wait for it to
cool. Check the coolant level.
4. If the coolant level is at or below the minimum mark, add prediluted coolant
immediately.
5. If the coolant level is normal, restart the engine and continue.
AUTOMATIC TRANSMISSION
FLUID CHECK - 1.5L
ECOBOOST™/2.0L
ECOBOOST™/2.5L
The automatic transmission does not have
a transmission fluid dipstick.
Have an authorized dealer check and
change the transmission fluid at the
correct service interval. See
Scheduled
Maintenance (page 477). Your
transmission does not consume fluid.
However, if the transmission slips, shifts
slowly or if you notice a sign of leaking
fluid, contact an authorized dealer.
Do not use supplemental transmission
fluid additives, treatments or cleaning
agents. The use of these materials may
affect transmission operation and result
in damage to internal transmission
components.
266
Fusion (CC7) Canada/United States of America, enUSA, First Printing Maintenance
Page 270 of 528

AUTOMATIC TRANSMISSION
FLUID CHECK - 2.7L
ECOBOOST™
WARNING
Do not use supplemental
transmission fluid additives,
treatments or cleaning agents. The
use of these materials may affect
transmission operation and result in
damage to internal transmission
components. The transmission does not consume fluid.
However, if the transmission slips or shifts
slowly you should check the fluid level. If
you notice a sign of leaking fluid, contact
an authorized dealer.
Checking the Transmission Fluid
Level
*
Only check the transmission fluid level
when the engine is at normal operating
temprature 179°F (82°C)-199°F (93°C).
Normal operating temprature is reached
after driving approximately 20 mi (30 km). Minimum
A
Maximum
B
Note: Check the fluid level with the engine
running and the transmission in park (P).
1. Make sure that your vehicle is on level ground. 2. Rotate the automatic transmission
fluid cap in a counterclockwise
direction. See
Under Hood Overview
(page 260).
3. Remove the cap and dipstick and wipe
it with a clean, lint-free cloth. Replace
the cap and dipstick and remove it
again to check the fluid level.
4. Make sure that the fluid level is between the MIN and the MAX marks.
If the fluid level is at the MIN mark, add
fluid immediately. See
Adding
Transmission Fluid.
5. Replace the automatic transmission fluid cap and dipstick. Turn it clockwise
until you feel a strong resistance.
Low Fluid Level
If the fluid level is within the minimum
range (below point A) add the correct
specification fluid to be within the hash
mark area. See
Capacities and
Specifications (page 321).
Note: If the fluid level is below the
minimum range do not drive your vehicle.
An underfill conition can damage the
transmission.
Correct Fluid Level
If the fluid level is within the hash mark
area (between points A and B) do not add
any fluid.
High Fluid Level
If the fluid level is above the maximum
range (above point B) fluid may need to
be removed. High fluid levels may be
caused by a overheating condition. If you
have operated your vehicle at high speeds,
towing a trailer or in city traffic during hot
weather, allow your vehicle to cool for a
minimum of 30 minutes before rechecking
the level.
Note: An overfill conition can damage the
transmission.
267
Fusion (CC7) Canada/United States of America, enUSA, First Printing MaintenanceE190273
AB
Page 271 of 528

Adding Transmission Fluid
*
1. Rotate the automatic transmission fluid cap in a counterclockwise
direction. *
2. Remove the cap and dipstick and wipe
it with a clean, lint-free cloth.
3. Add fluid that meets the Ford specifications. See Capacities and
Specifications (page 340). Pour the
fluid directly into the automatic
transmission fluid cap and dipstick
hole.
4. Replace the cap and dipstick and remove it again to check the fluid level.
5. Make sure that the fluid level is between the MIN and the MAX marks.
6. Replace the automatic transmission fluid cap and dipstick. Turn it clockwise
until you feel a strong resistance.
* Vehicles With 2.7L EcoBoost WARNING
Do not run the engine with the air
filter disconnected. 1. Remove the two air filter assembly
securing bolts.
2. Lift the air filter assembly to disengage
the locating pins.
3. Rotate the air filter assembly slightly in a counterclockwise direction.
4. Check the fluid level. See
Checking
the Transmission Fluid Level.
5. Install in reverse order. Tighten the two
air filter assembly securing bolts until
you feel a strong resistance.
BRAKE FLUID CHECK
Fluid levels between the MIN and MAX
lines are within the normal operating range;
there is no need to add fluid. If the fluid
levels are outside of the normal operating
range, the performance of the system
could be compromised; seek service from
your authorized dealer immediately.
268
Fusion (CC7) Canada/United States of America, enUSA, First Printing MaintenanceE190367
x2
Page 317 of 528

Changing a Road Wheel Procedure
(If Equipped)
WARNINGS
When one of the front wheels is off
the ground, the transmission alone
will not prevent the vehicle from
moving or slipping off the jack, even if the
transmission is in park (P). To help prevent your vehicle from
moving when you change a tire, be
sure to place the transmission in park
(P), set the parking brake and block (in
both directions) the wheel that is
diagonally opposite (other side and end of
the vehicle) to the tire being changed. Never get underneath a vehicle that
is supported only by a jack. If your
vehicle slips off the jack, you or
someone else could be seriously injured. Do not attempt to change a tire on
the side of the vehicle close to
moving traffic. Pull far enough off the
road to avoid the danger of being hit when
operating the jack or changing the wheel. Always use the jack provided as
original equipment with your vehicle.
If using a jack other than the one
provided as original equipment with your
vehicle, make sure the jack capacity is
adequate for the vehicle weight, including
any vehicle cargo or modifications. Note:
Passengers should not remain in your
vehicle when the vehicle is being jacked.
1. Park on a level surface, set the parking
brake and activate the hazard flashers.
2. Place the transmission in park (P) and
turn the engine off. For vehicles with a
manual transmission, place the
transmission in reverse ®) after the
engine is turned off. 3. Block both the front and rear of the
wheel diagonally opposite the flat tire.
For example, if the left front tire is flat,
block the right rear wheel.
4. Remove the carpeted wheel cover.
5. Remove the spare tire bolt securing the
spare tire by turning it
counterclockwise.
6. Remove the spare tire from the spare tire compartment. 7. Remove the lug wrench and jack from
the spare tire compartment.
314
Fusion (CC7) Canada/United States of America, enUSA, First Printing Wheels and TiresE175447 E178186