2017 FORD FUSION (AMERICAS) check engine
[x] Cancel search: check enginePage 176 of 528

GENERAL INFORMATION
Note:
Occasional brake noise is normal. If
a metal-to-metal, continuous grinding or
continuous squeal sound is present, the
brake linings may be worn-out. Have the
system checked by an authorized dealer. If
your vehicle has continuous vibration or
shudder in the steering wheel while braking,
have it checked by an authorized dealer.
Note: Brake dust may accumulate on the
wheels, even under normal driving
conditions. Some dust is inevitable as the
brakes wear and does not contribute to
brake noise. See Cleaning the Alloy
Wheels (page 283).
Note: Depending on applicable laws and
regulations in the country for which your
vehicle was originally built, your brake lamps
may flash during heavy braking. Following
this, your hazard lights may also flash when
your vehicle comes to a stop. See
Warning Lamps and
Indicators (page 89).
Wet brakes result in reduced braking
efficiency. Gently press the brake pedal a
few times when driving from a car wash or
standing water to dry the brakes.
Brake Over Accelerator
In the event the accelerator pedal
becomes stuck or entrapped, apply steady
and firm pressure to the brake pedal to
slow the vehicle and reduce engine power.
If you experience this condition, apply the
brakes and bring your vehicle to a safe
stop. Move the transmission to park (P),
switch the engine off and apply the parking
brake. Inspect the accelerator pedal for
any interference. If none are found and the
condition persists, have your vehicle towed
to the nearest authorized dealer. Brake Assist
Brake assist detects when you brake
rapidly by measuring the rate at which you
press the brake pedal. It provides
maximum braking efficiency as long as you
press the pedal, and can reduce stopping
distances in critical situations.
Anti-lock Brake System
This system helps you maintain steering
control during emergency stops by keeping
the brakes from locking.
This lamp momentarily
illuminates when you turn the
ignition on. If the light does not
illuminate during start up, remains on or
flashes, the system may be disabled. Have
the system checked by an authorized
dealer. If the anti-lock brake system is
disabled, normal braking is still effective. If the brake warning lamp
illuminates when you release the
parking brake, have the system
checked by an authorized dealer.
HINTS ON DRIVING WITH
ANTI-LOCK BRAKES
Note: When the system is operating, the
brake pedal may pulse and may travel
further. Maintain pressure on the brake
pedal. You may also hear a noise from the
system. This is normal.
The anti-lock braking system will not
eliminate the risks when:
• You drive too closely to the vehicle in
front of you.
• Your vehicle is hydroplaning.
• You take corners too fast.
• The road surface is poor.
173
Fusion (CC7) Canada/United States of America, enUSA, First Printing BrakesE144522 E144522
Page 228 of 528
Before Towing a Trailer
Practice turning, stopping and backing up
to get the feel of your vehicle-trailer
combination before starting on a trip.
When turning, make wider turns so the
trailer wheels clear curbs and other
obstacles.
When Towing a Trailer
•
Do not drive faster than 70 mph (113
km/h) during the first 500 miles (800
kilometers).
• Do not make full-throttle starts.
• Check your hitch, electrical connections
and trailer wheel lug nuts thoroughly
after you have traveled 50 miles (80
kilometers).
• When stopped in congested or heavy
traffic during hot weather, place the
gearshift in position P to aid engine and
transmission cooling and to help A/C
performance.
• Turn off the speed control with heavy
loads or in hilly terrain. The speed
control may turn off automatically
when you are towing on long, steep
grades.
• Shift to a lower gear when driving down
a long or steep hill. Do not apply the
brakes continuously, as they may
overheat and become less effective.
• If your transmission is equipped with a
Grade Assist or Tow/Haul feature, use
this feature when towing. This provides
engine braking and helps eliminate
excessive transmission shifting for
optimum fuel economy and
transmission cooling.
• Allow more distance for stopping with
a trailer attached. Anticipate stops and
brake gradually.
• Avoid parking on a grade. However, if
you must park on a grade: 1. Turn the steering wheel to point your
vehicle tires away from traffic flow.
2. Set your vehicle parking brake.
3. Place the automatic transmission in position P.
4. Place wheel chocks in front and back of the trailer wheels. (Chocks not
included with vehicle.)
Launching or Retrieving a Boat or
Personal Watercraft (PWC)
Note: Disconnect the wiring to the trailer
before
backing the trailer into the water.
Note: Reconnect the wiring to the trailer
after
removing the trailer from the water.
When backing down a ramp during boat
launching or retrieval:
• Do not allow the static water level to
rise above the bottom edge of the rear
bumper.
• Do not allow waves to break higher
than 6 inches (15 centimeters) above
the bottom edge of the rear bumper.
Exceeding these limits may allow water to
enter vehicle components:
• Causing internal damage to the
components.
• Affecting driveability, emissions, and
reliability.
Replace the rear axle lubricant anytime
you submerge the rear axle in water. Water
may contaminate the rear axle lubricant,
which is not a normal maintenance
inspection item unless there is a possibility
of a leak or other axle repair is required.
225
Fusion (CC7) Canada/United States of America, enUSA, First Printing Towing
Page 231 of 528

BREAKING-IN
You need to break in new tires for
approximately 300 miles (480
kilometers). During this time, your vehicle
may exhibit some unusual driving
characteristics.
Avoid driving too fast during the first 1000
miles (1600 kilometers). Vary your speed
frequently and change up through the
gears early. Do not labor the engine.
Do not tow during the first 1000 miles
(1600 kilometers).
ECONOMICAL DRIVING
Fuel economy is affected by several things
such as how you drive, the conditions you
drive under and how you maintain your
vehicle.
There are some things to keep in mind that
may improve your fuel economy:
•
Accelerate and slow down in a smooth,
moderate fashion.
• Drive at steady speeds.
• Anticipate stops; slowing down may
eliminate the need to stop.
• Combine errands and minimize
stop-and-go driving (When running
errands, go to the furthest destination
first and then work your way back
home).
• Close the windows for high-speed
driving.
• Drive at reasonable speeds.
• Keep the tires properly inflated and use
only the recommended size.
• Use the recommended engine oil.
• Perform all regularly scheduled
maintenance. There are also some things you may want
to avoid doing because they reduce your
fuel economy:
•
Avoid sudden or hard accelerations.
• Avoid revving the engine before turning
off the car.
• Avoid long idle periods.
• Do not warm up your vehicle on cold
mornings.
• Reduce the use of air conditioning and
heat.
• Avoid using speed control in hilly
terrain.
• Do not rest your foot on the brake
pedal while driving.
• Avoid carrying unnecessary weight.
• Avoid adding particular accessories to
your vehicle (e.g. bug deflectors,
rollbars/light bars, running boards, ski
racks).
• Avoid driving with the wheels out of
alignment.
DRIVING THROUGH WATER WARNING
Do not drive through flowing or deep
water as you may lose control of your
vehicle.
Note:
Driving through standing water can
cause vehicle damage.
Note: Engine damage can occur if water
enters the air filter.
Before driving through standing water,
check the depth. Never drive through water
that is higher than the bottom of the front
rocker area of your vehicle.
228
Fusion (CC7) Canada/United States of America, enUSA, First Printing Driving Hints
Page 259 of 528
GENERAL INFORMATION
Have your vehicle serviced regularly to help
maintain its roadworthiness and resale
value. There is a large network of
authorized dealers that are there to help
you with their professional servicing
expertise. We believe that their specially
trained technicians are best qualified to
service your vehicle properly and expertly.
They are supported by a wide range of
highly specialized tools developed
specifically for servicing your vehicle.
If your vehicle requires professional service,
an authorized dealer can provide the
necessary parts and service. Check your
warranty information to find out which
parts and services are covered.
Use only recommended fuels, lubricants,
fluids and service parts conforming to
specifications. Motorcraft® parts are
designed and built to provide the best
performance in your vehicle.
Precautions
•
Do not work on a hot engine.
• Make sure that nothing gets caught in
moving parts.
• Do not work on a vehicle with the
engine running in an enclosed space,
unless you are sure you have enough
ventilation.
• Keep all open flames and other burning
material (such as cigarettes) away
from the battery and all fuel related
parts.
Working with the Engine Off
1. Set the parking brake and shift to park
(P).
2. Switch off the engine.
3. Block the wheels. Working with the Engine On WARNING
To reduce the risk of vehicle damage
and/or personal burn injuries, do not
start your engine with the air cleaner
removed and do not remove it while the
engine is running. 1.
Set the parking brake and shift to park
(P).
2. Block the wheels.
OPENING AND CLOSING THE
HOOD
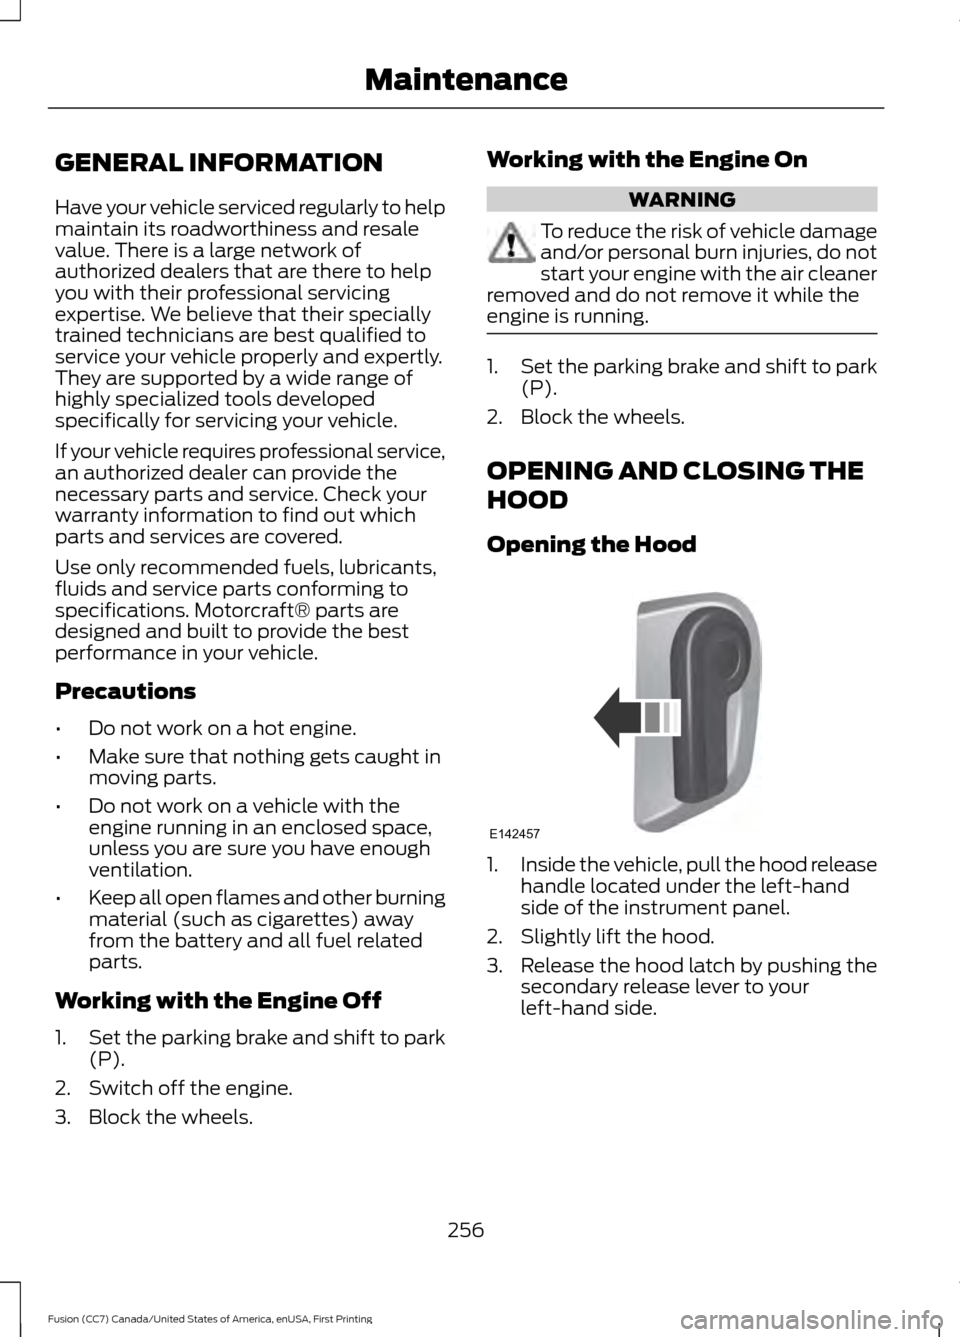
Opening the Hood 1.
Inside the vehicle, pull the hood release
handle located under the left-hand
side of the instrument panel.
2. Slightly lift the hood.
3. Release the hood latch by pushing the secondary release lever to your
left-hand side.
256
Fusion (CC7) Canada/United States of America, enUSA, First Printing MaintenanceE142457
Page 261 of 528
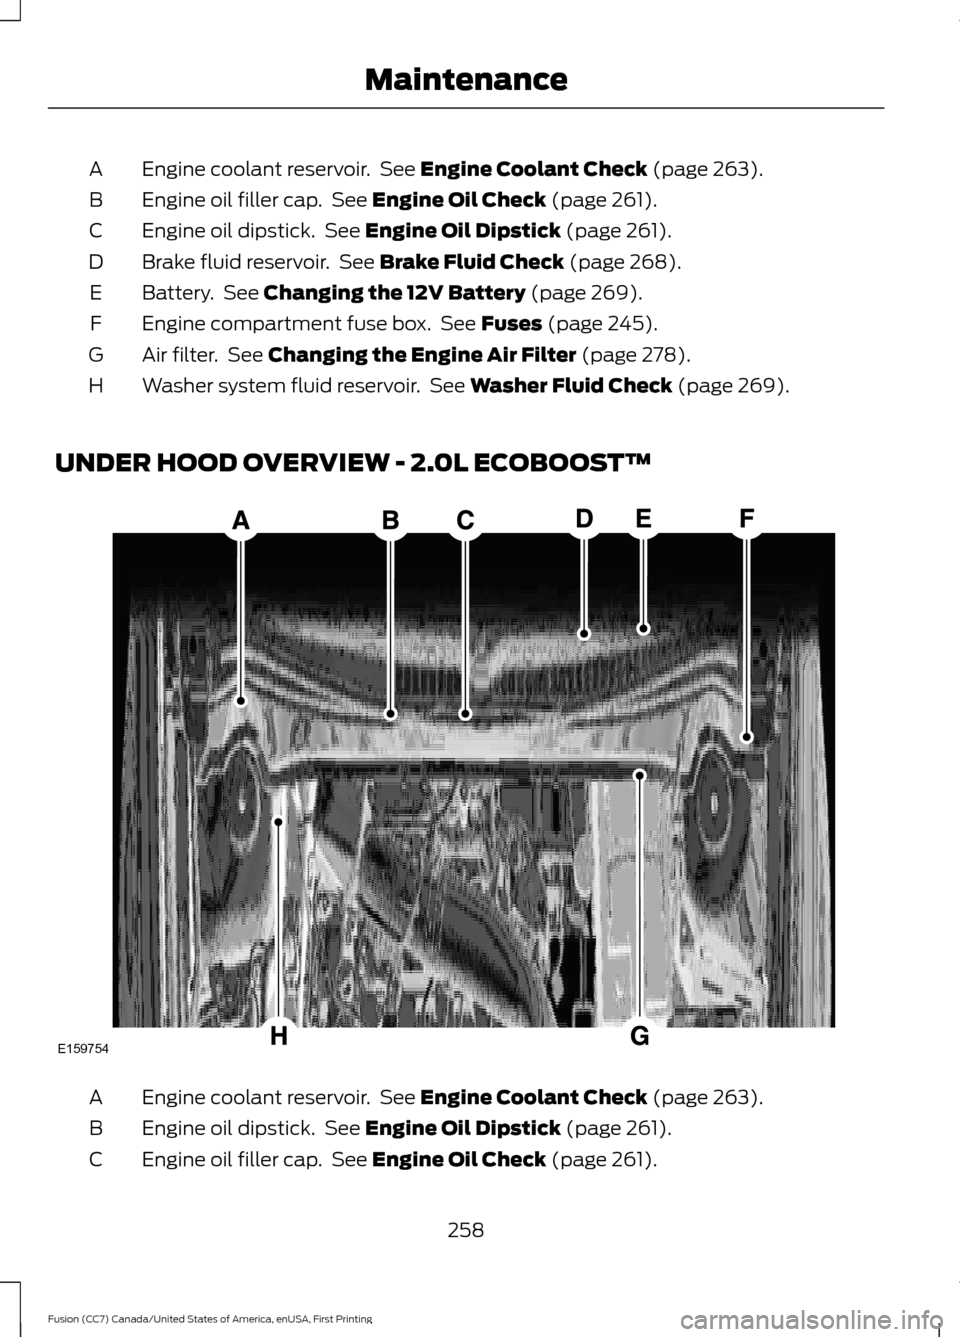
Engine coolant reservoir. See Engine Coolant Check (page 263).
A
Engine oil filler cap. See
Engine Oil Check (page 261).
B
Engine oil dipstick. See
Engine Oil Dipstick (page 261).
C
Brake fluid reservoir. See
Brake Fluid Check (page 268).
D
Battery. See
Changing the 12V Battery (page 269).
E
Engine compartment fuse box. See
Fuses (page 245).
F
Air filter. See
Changing the Engine Air Filter (page 278).
G
Washer system fluid reservoir. See
Washer Fluid Check (page 269).
H
UNDER HOOD OVERVIEW - 2.0L ECOBOOST™ Engine coolant reservoir. See
Engine Coolant Check (page 263).
A
Engine oil dipstick. See
Engine Oil Dipstick (page 261).
B
Engine oil filler cap. See
Engine Oil Check (page 261).
C
258
Fusion (CC7) Canada/United States of America, enUSA, First Printing MaintenanceE159754
Page 262 of 528
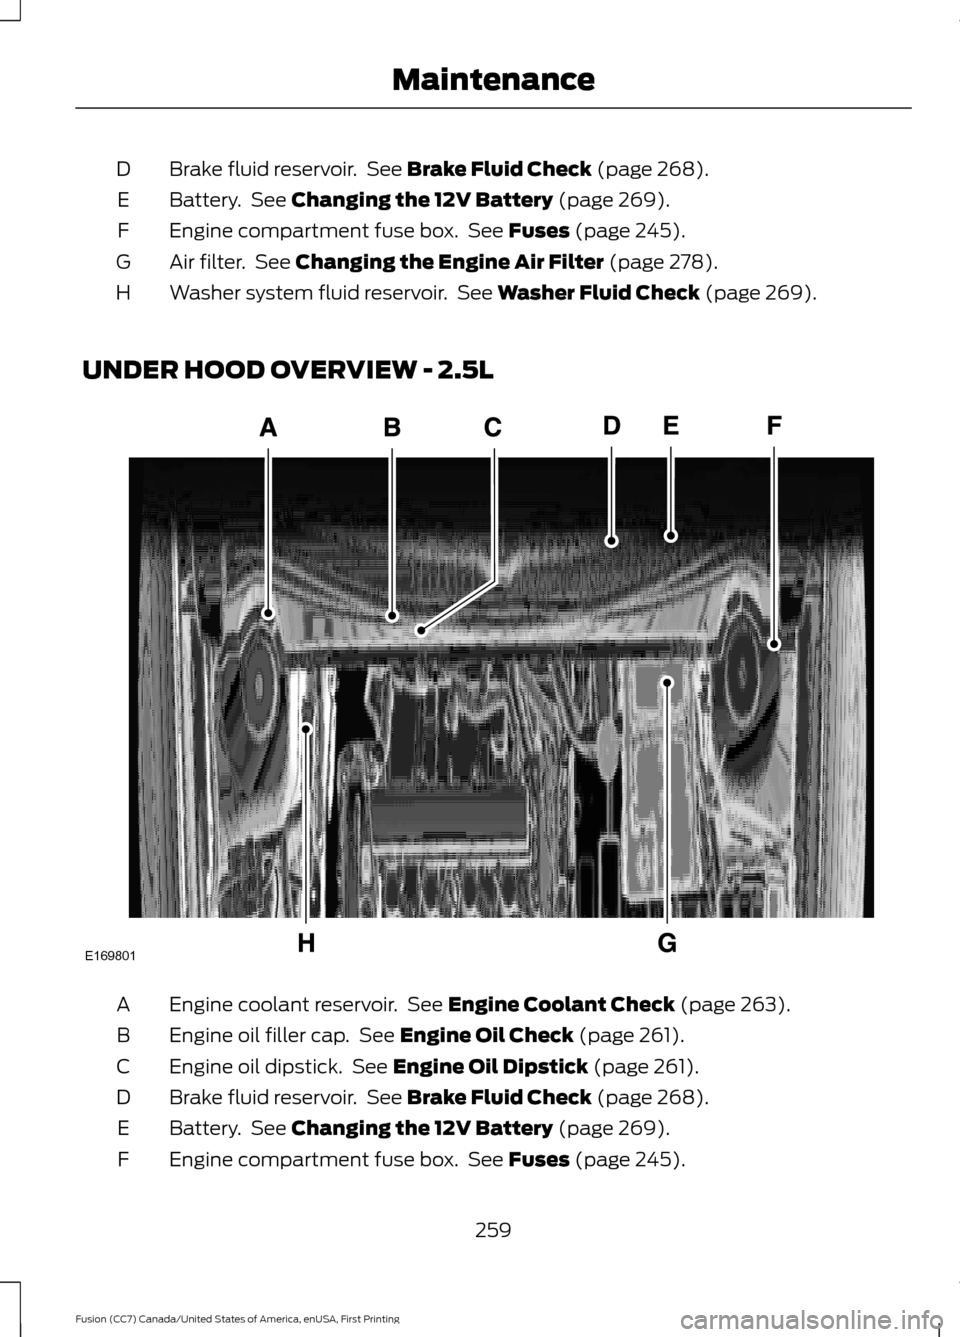
Brake fluid reservoir. See Brake Fluid Check (page 268).
D
Battery. See
Changing the 12V Battery (page 269).
E
Engine compartment fuse box. See
Fuses (page 245).
F
Air filter. See
Changing the Engine Air Filter (page 278).
G
Washer system fluid reservoir. See
Washer Fluid Check (page 269).
H
UNDER HOOD OVERVIEW - 2.5L Engine coolant reservoir. See
Engine Coolant Check (page 263).
A
Engine oil filler cap. See
Engine Oil Check (page 261).
B
Engine oil dipstick. See
Engine Oil Dipstick (page 261).
C
Brake fluid reservoir. See
Brake Fluid Check (page 268).
D
Battery. See
Changing the 12V Battery (page 269).
E
Engine compartment fuse box. See
Fuses (page 245).
F
259
Fusion (CC7) Canada/United States of America, enUSA, First Printing MaintenanceE169801
Page 263 of 528
Air filter. See Changing the Engine Air Filter (page 278).
G
Washer system fluid reservoir. See
Washer Fluid Check (page 269).
H
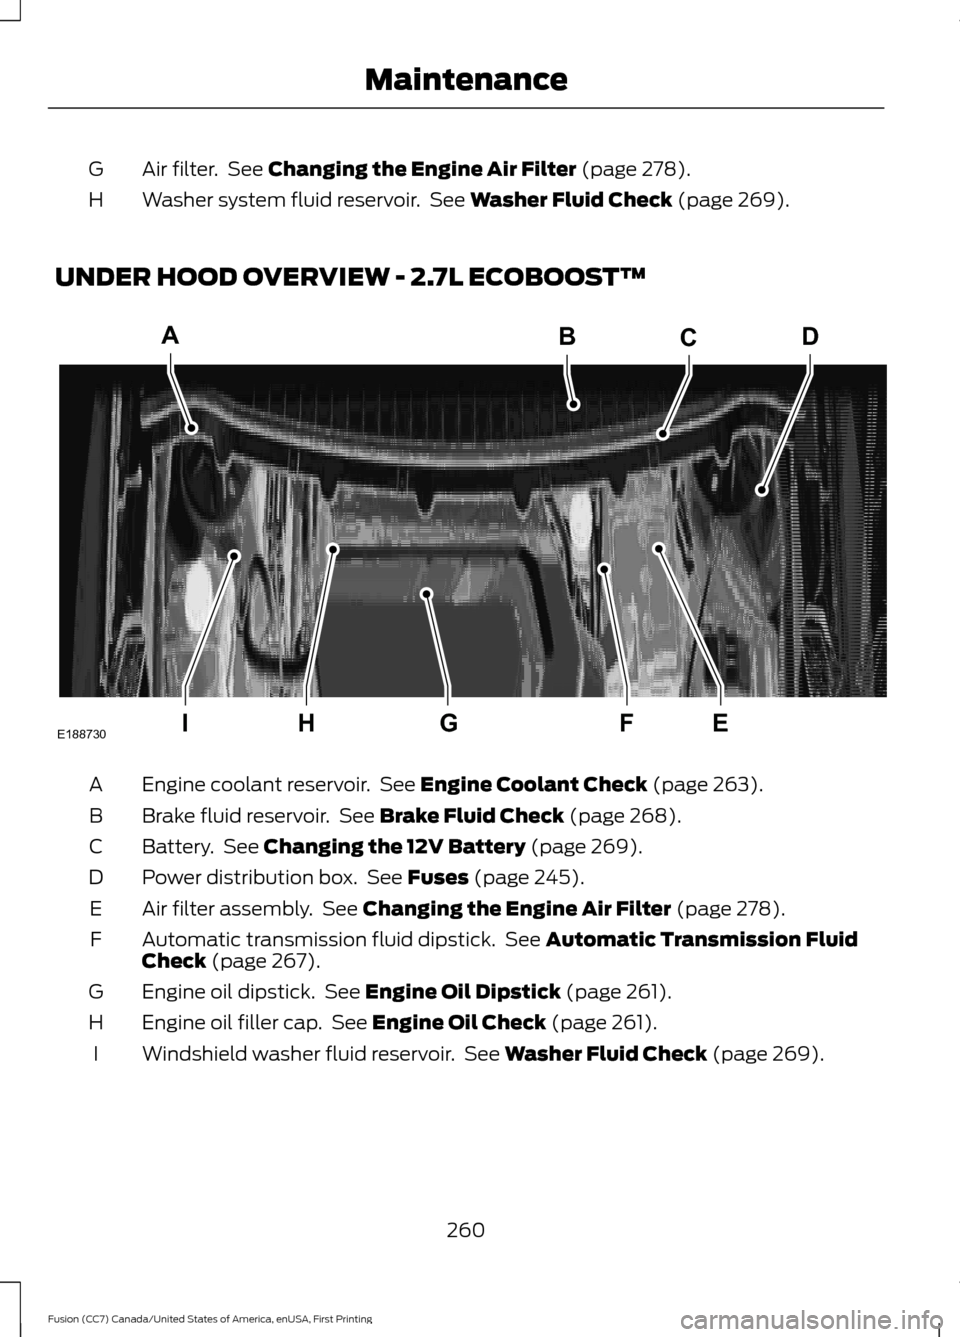
UNDER HOOD OVERVIEW - 2.7L ECOBOOST™ Engine coolant reservoir. See
Engine Coolant Check (page 263).
A
Brake fluid reservoir. See
Brake Fluid Check (page 268).
B
Battery. See
Changing the 12V Battery (page 269).
C
Power distribution box. See
Fuses (page 245).
D
Air filter assembly. See
Changing the Engine Air Filter (page 278).
E
Automatic transmission fluid dipstick. See
Automatic Transmission Fluid
Check (page 267).
F
Engine oil dipstick. See
Engine Oil Dipstick (page 261).
G
Engine oil filler cap. See
Engine Oil Check (page 261).
H
Windshield washer fluid reservoir. See
Washer Fluid Check (page 269).
I
260
Fusion (CC7) Canada/United States of America, enUSA, First Printing MaintenanceA
IEFGH
BCD
E188730
Page 264 of 528
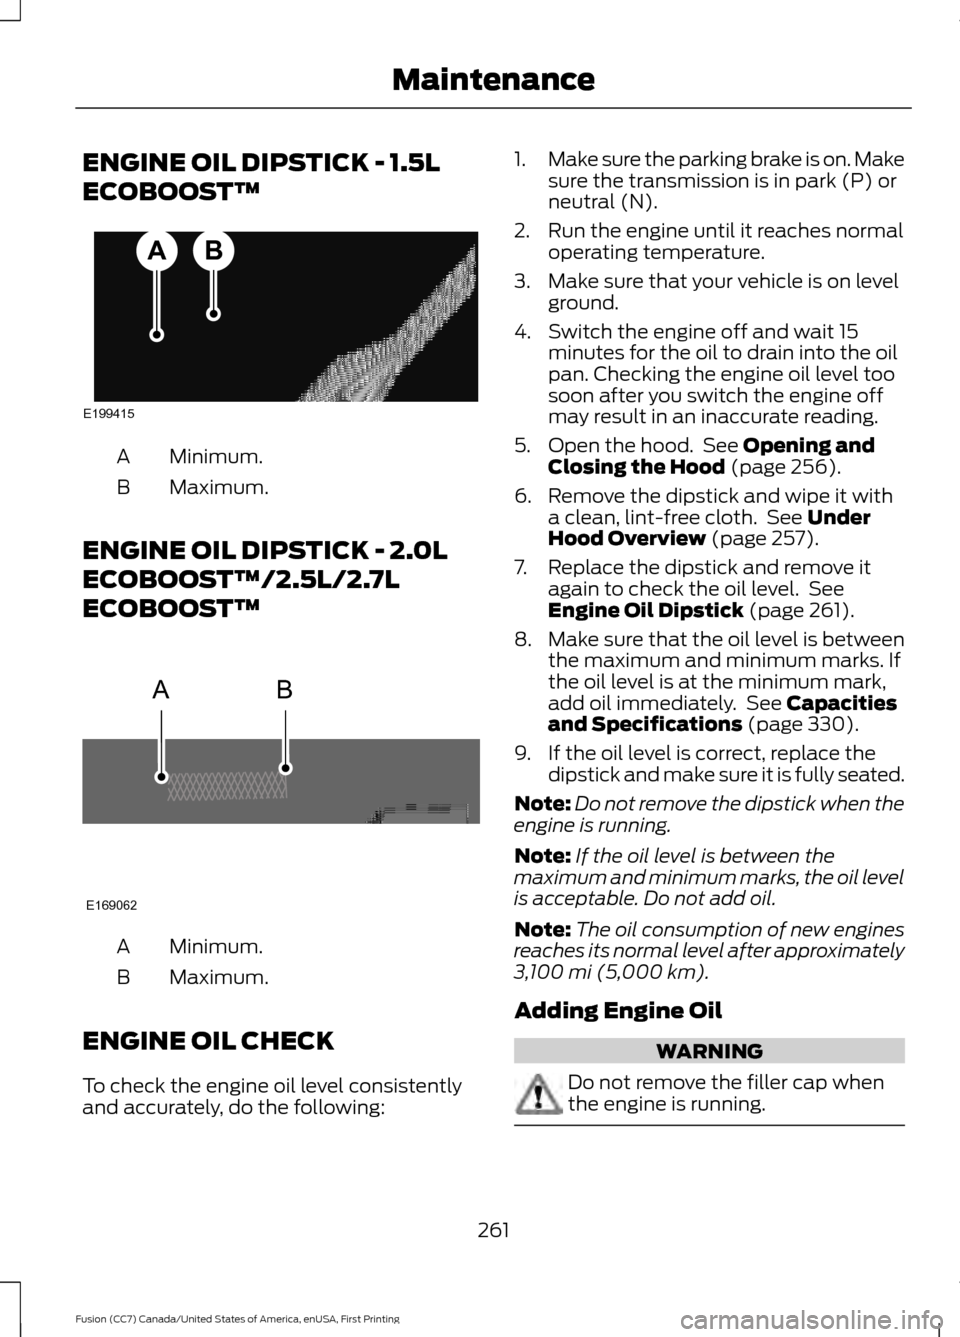
ENGINE OIL DIPSTICK - 1.5L
ECOBOOST™
Minimum.
A
Maximum.
B
ENGINE OIL DIPSTICK - 2.0L
ECOBOOST™/2.5L/2.7L
ECOBOOST™ Minimum.
A
Maximum.
B
ENGINE OIL CHECK
To check the engine oil level consistently
and accurately, do the following: 1.
Make sure the parking brake is on. Make
sure the transmission is in park (P) or
neutral (N).
2. Run the engine until it reaches normal operating temperature.
3. Make sure that your vehicle is on level ground.
4. Switch the engine off and wait 15 minutes for the oil to drain into the oil
pan. Checking the engine oil level too
soon after you switch the engine off
may result in an inaccurate reading.
5. Open the hood. See Opening and
Closing the Hood (page 256).
6. Remove the dipstick and wipe it with a clean, lint-free cloth. See
Under
Hood Overview (page 257).
7. Replace the dipstick and remove it again to check the oil level. See
Engine Oil Dipstick
(page 261).
8. Make sure that the oil level is between
the maximum and minimum marks. If
the oil level is at the minimum mark,
add oil immediately. See
Capacities
and Specifications (page 330).
9. If the oil level is correct, replace the dipstick and make sure it is fully seated.
Note: Do not remove the dipstick when the
engine is running.
Note: If the oil level is between the
maximum and minimum marks, the oil level
is acceptable. Do not add oil.
Note: The oil consumption of new engines
reaches its normal level after approximately
3,100 mi (5,000 km)
.
Adding Engine Oil WARNING
Do not remove the filler cap when
the engine is running.
261
Fusion (CC7) Canada/United States of America, enUSA, First Printing MaintenanceE199415
AB AB
E169062