2017 FORD FUSION (AMERICAS) change wheel
[x] Cancel search: change wheelPage 196 of 528

The fixed and active guidelines fade in and
out depending on the steering wheel
position. The active guidelines do not
display when the steering wheel position
is straight.
Always use caution while reversing.
Objects in the red zone are closest to your
vehicle and objects in the green zone are
farther away. Objects are getting closer to
your vehicle as they move from the green
zone to the yellow or red zones. Use the
side view mirrors and rear view mirror to
get better coverage on both sides and rear
of the vehicle.
Obstacle Distance Indicator (If
Equipped) The system will provide an image of your
vehicle and the sensor zones. The zones
will highlight green, yellow and red when
the parking aid sensors detect an object in
the coverage area. Manual Zoom WARNING
When manual zoom is on, the full
area behind your vehicle may not
show. Be aware of your surroundings
when using the manual zoom feature. Note:
Manual zoom is only available when
the transmission is in reverse (R).
Note: When you enable manual zoom, only
the centerline is shown.
Selectable settings for this feature are
Zoom in (+) and Zoom out (-). Press the
symbol in the camera screen to change the
view. The default setting is Zoom OFF.
This allows you to get a closer view of an
object behind your vehicle. The zoomed
image keeps the bumper in the image to
provide a reference. The zoom is only
active while the transmission is in reverse
(R).
Rear Camera Delay
Selectable settings for this feature are ON
and OFF. The default setting for the rear
camera delay is OFF.
When shifting the transmission out of
reverse (R) and into any gear other than
park (P), the camera image remains in the
display until:
• Your vehicle speed sufficiently
increases.
• You shift your vehicle into park (P)
(automatic transmission).
• You apply the parking brake (manual
transmission).
193
Fusion (CC7) Canada/United States of America, enUSA, First Printing Parking AidsE190459
Page 197 of 528

PRINCIPLE OF OPERATION
Cruise control lets you maintain a set
speed without keeping your foot on the
accelerator pedal. You can use cruise
control when your vehicle speed is greater
than 20 mph (30 km/h).
USING CRUISE CONTROL WARNINGS
Do not use cruise control on winding
roads, in heavy traffic or when the
road surface is slippery. This could
result in loss of vehicle control, serious
injury or death. When you are going downhill, your
vehicle speed may increase above
the set speed. The system will not
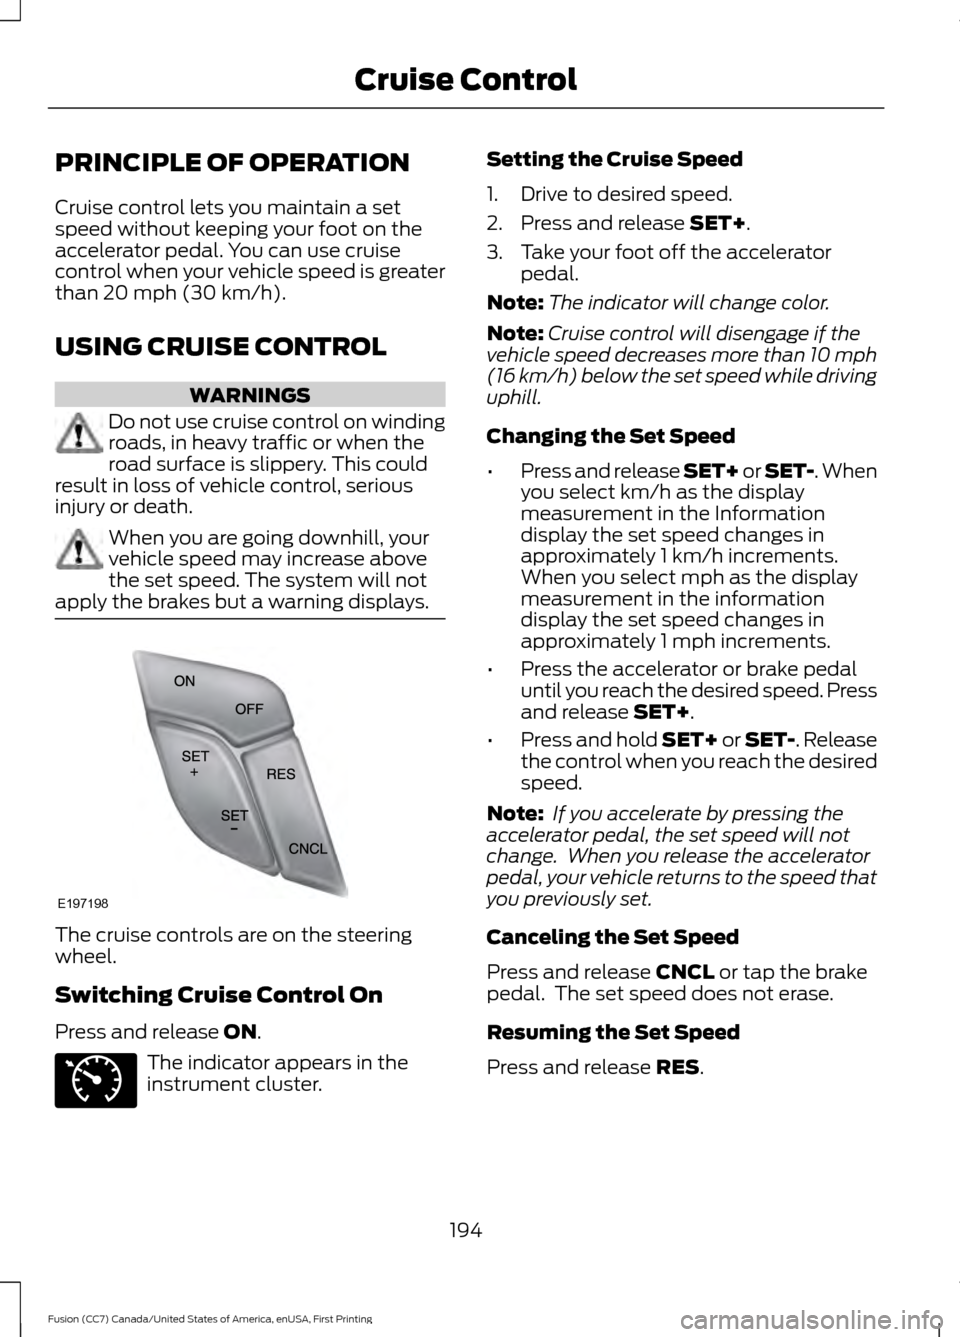
apply the brakes but a warning displays. The cruise controls are on the steering
wheel.
Switching Cruise Control On
Press and release
ON.
The indicator appears in the
instrument cluster. Setting the Cruise Speed
1. Drive to desired speed.
2. Press and release
SET+.
3. Take your foot off the accelerator pedal.
Note: The indicator will change color.
Note: Cruise control will disengage if the
vehicle speed decreases more than 10 mph
(16 km/h) below the set speed while driving
uphill.
Changing the Set Speed
• Press and release SET+ or SET-. When
you select km/h as the display
measurement in the Information
display the set speed changes in
approximately 1 km/h increments.
When you select mph as the display
measurement in the information
display the set speed changes in
approximately 1 mph increments.
• Press the accelerator or brake pedal
until you reach the desired speed. Press
and release
SET+.
• Press and hold SET+ or SET-. Release
the control when you reach the desired
speed.
Note: If you accelerate by pressing the
accelerator pedal, the set speed will not
change. When you release the accelerator
pedal, your vehicle returns to the speed that
you previously set.
Canceling the Set Speed
Press and release
CNCL or tap the brake
pedal. The set speed does not erase.
Resuming the Set Speed
Press and release
RES.
194
Fusion (CC7) Canada/United States of America, enUSA, First Printing Cruise ControlE197198 E71340
Page 206 of 528

The current assessment of your alertness
indicates that you should rest as soon as
safely possible.
The status bar will travel from left to right
as the calculated alertness level
decreases. As the rest icon is approached
the color turns from green to yellow to red.
The yellow position indicates the first
warning is active and the red position
indicates the second warning is active.
Note:
If you have recently received a
warning; you should consider resting, even
if the current assessment is within the
typical range.
Note: If the camera sensor cannot track the
road lane markings or if your vehicle speed
drops below approximately 40 mph
(64 km/h), the alertness level will change
to grey for a short time and the information
display will inform you that the system is
unavailable.
Resetting the System
You can reset the system by either:
• Switching the ignition off and on.
• Stopping the vehicle and then opening
and closing the driver ’s door. LANE KEEPING SYSTEM
(If
Equipped) WARNINGS
Always drive with due care and
attention when using and operating
the controls and features on your
vehicle. At all times, you are responsible for
controlling your vehicle, supervising
the system and intervening, if
required. Failure to take care may result in
the loss of control of your vehicle, serious
personal injury or death. In cold and severe weather
conditions the system may not
function. Rain, snow and spray can
all limit sensor performance. Large contrasts in outside lighting
can limit sensor performance.
The system will not operate if the
sensor cannot track the road lane
markings.
If damage occurs in the immediate
area surrounding the sensor, have
your vehicle checked as soon as
possible. Note:
The system works above
40 mph
(64 km/h).
Note: The system works as long as the
camera can detect one lane marking.
Note: The system may not function if the
camera is blocked or there is damage to the
windshield.
Note: When Aid mode is on and the system
detects no steering activity for a short
period, the system will alert you to put your
hands on the steering wheel. The system
may detect a light grip or touch on the
steering wheel as hands off driving.
203
Fusion (CC7) Canada/United States of America, enUSA, First Printing Driving AidsE131359
Page 207 of 528

The system notifies you to stay in your lane
through the steering system and the
instrument cluster display when the front
camera detects an unintentional drift out
of your lane is likely to occur. The system
automatically detects and tracks the road
lane markings using a camera mounted
behind the interior rear view mirror.
Switching the System On and Off
Note:
The system on or off setting is stored
until it is manually changed, unless a MyKey
is detected. If the system detects a MyKey
it defaults to on and the mode is set to Alert.
Note: If a MyKey is detected, pressing the
button will not affect the on or off status of
the system. Press the button on the steering
wheel stalk to switch the system
on or off.
System Settings
The system has optional setting menus
available. The system stores the
last-known selection for each of these
settings. You do not need to readjust your
settings each time you turn on the system.
Mode: This setting allows you to select
which of the system features you can
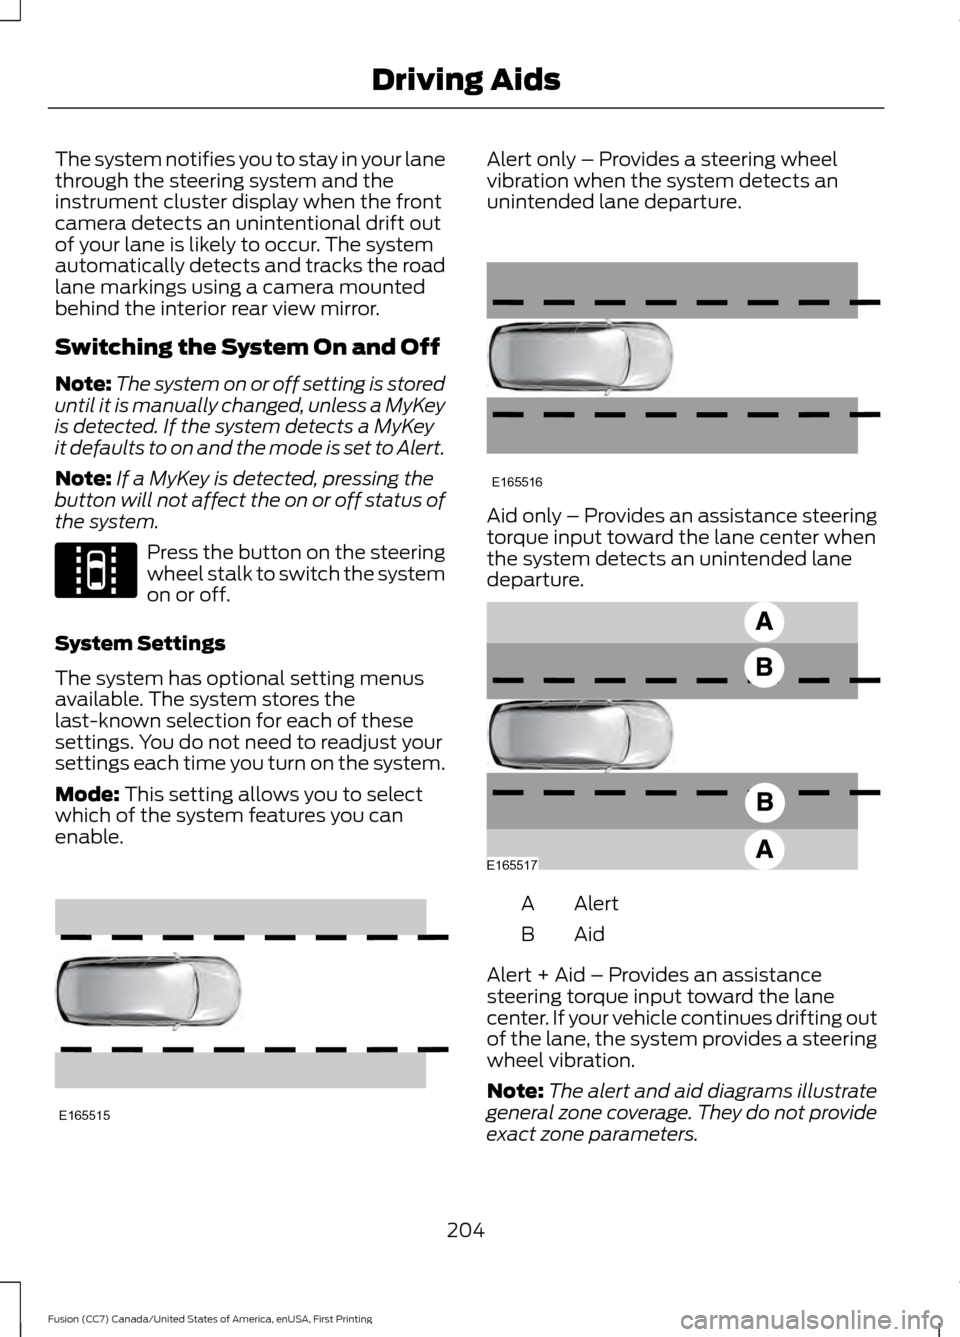
enable. Alert only – Provides a steering wheel
vibration when the system detects an
unintended lane departure.
Aid only – Provides an assistance steering
torque input toward the lane center when
the system detects an unintended lane
departure.
Alert
A
AidB
Alert + Aid – Provides an assistance
steering torque input toward the lane
center. If your vehicle continues drifting out
of the lane, the system provides a steering
wheel vibration.
Note: The alert and aid diagrams illustrate
general zone coverage. They do not provide
exact zone parameters.
204
Fusion (CC7) Canada/United States of America, enUSA, First Printing Driving AidsE144813 E165515 E165516 E165517
Page 208 of 528

Intensity: This setting affects the intensity
of the steering wheel vibration used for the
alert and alert + aid modes. This setting
does not affect the aid mode.
•
Low
• Normal
• High
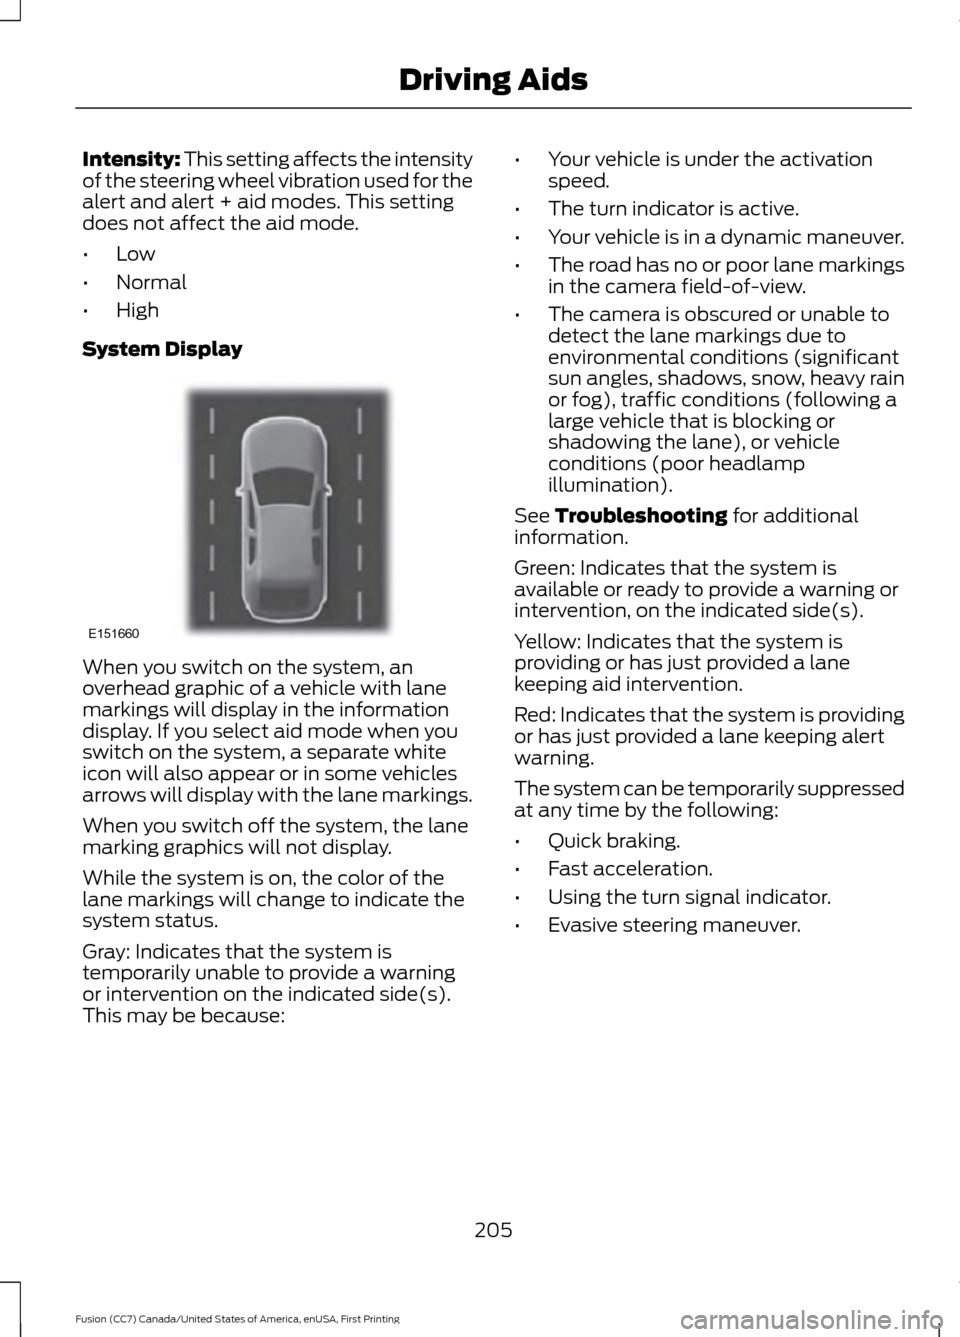
System Display When you switch on the system, an
overhead graphic of a vehicle with lane
markings will display in the information
display. If you select aid mode when you
switch on the system, a separate white
icon will also appear or in some vehicles
arrows will display with the lane markings.
When you switch off the system, the lane
marking graphics will not display.
While the system is on, the color of the
lane markings will change to indicate the
system status.
Gray: Indicates that the system is
temporarily unable to provide a warning
or intervention on the indicated side(s).
This may be because: •
Your vehicle is under the activation
speed.
• The turn indicator is active.
• Your vehicle is in a dynamic maneuver.
• The road has no or poor lane markings
in the camera field-of-view.
• The camera is obscured or unable to
detect the lane markings due to
environmental conditions (significant
sun angles, shadows, snow, heavy rain
or fog), traffic conditions (following a
large vehicle that is blocking or
shadowing the lane), or vehicle
conditions (poor headlamp
illumination).
See Troubleshooting for additional
information.
Green: Indicates that the system is
available or ready to provide a warning or
intervention, on the indicated side(s).
Yellow: Indicates that the system is
providing or has just provided a lane
keeping aid intervention.
Red: Indicates that the system is providing
or has just provided a lane keeping alert
warning.
The system can be temporarily suppressed
at any time by the following:
• Quick braking.
• Fast acceleration.
• Using the turn signal indicator.
• Evasive steering maneuver.
205
Fusion (CC7) Canada/United States of America, enUSA, First Printing Driving AidsE151660
Page 231 of 528

BREAKING-IN
You need to break in new tires for
approximately 300 miles (480
kilometers). During this time, your vehicle
may exhibit some unusual driving
characteristics.
Avoid driving too fast during the first 1000
miles (1600 kilometers). Vary your speed
frequently and change up through the
gears early. Do not labor the engine.
Do not tow during the first 1000 miles
(1600 kilometers).
ECONOMICAL DRIVING
Fuel economy is affected by several things
such as how you drive, the conditions you
drive under and how you maintain your
vehicle.
There are some things to keep in mind that
may improve your fuel economy:
•
Accelerate and slow down in a smooth,
moderate fashion.
• Drive at steady speeds.
• Anticipate stops; slowing down may
eliminate the need to stop.
• Combine errands and minimize
stop-and-go driving (When running
errands, go to the furthest destination
first and then work your way back
home).
• Close the windows for high-speed
driving.
• Drive at reasonable speeds.
• Keep the tires properly inflated and use
only the recommended size.
• Use the recommended engine oil.
• Perform all regularly scheduled
maintenance. There are also some things you may want
to avoid doing because they reduce your
fuel economy:
•
Avoid sudden or hard accelerations.
• Avoid revving the engine before turning
off the car.
• Avoid long idle periods.
• Do not warm up your vehicle on cold
mornings.
• Reduce the use of air conditioning and
heat.
• Avoid using speed control in hilly
terrain.
• Do not rest your foot on the brake
pedal while driving.
• Avoid carrying unnecessary weight.
• Avoid adding particular accessories to
your vehicle (e.g. bug deflectors,
rollbars/light bars, running boards, ski
racks).
• Avoid driving with the wheels out of
alignment.
DRIVING THROUGH WATER WARNING
Do not drive through flowing or deep
water as you may lose control of your
vehicle.
Note:
Driving through standing water can
cause vehicle damage.
Note: Engine damage can occur if water
enters the air filter.
Before driving through standing water,
check the depth. Never drive through water
that is higher than the bottom of the front
rocker area of your vehicle.
228
Fusion (CC7) Canada/United States of America, enUSA, First Printing Driving Hints
Page 265 of 528

Do not use supplemental engine oil
additives because they are unnecessary
and could lead to engine damage that may
not be covered by the vehicle Warranty.
Only use oils certified for gasoline engines
by the American Petroleum Institute (API).
An oil with this trademark symbol
conforms to the current engine and
emission system protection standards and
fuel economy requirements of the
International Lubricants Specification
Advisory Committee (ILSAC), comprised
of U.S. and Japanese automobile
manufacturers.
To top up the engine oil level do the
following:
Clean the area surrounding the engine oil
filler cap before you remove it.
1. Remove the engine oil filler cap. See
Under Hood Overview (page 257).
Turn it counterclockwise and remove
it.
2. Add engine oil that meets the correct specification. See
Capacities and
Specifications (page 330). You may
have to use a funnel to pour the engine
oil into the opening.
3. Recheck the oil level.
4. If the oil level is correct, replace the dipstick and make sure it is fully seated. 5. Replace the engine oil filler cap. Turn
it clockwise until you feel a strong
resistance.
Note: Do not add oil further than the
maximum mark. Oil levels above the
maximum mark may cause engine damage.
Note: Make sure you install the oil filler cap
correctly.
Note: Soak up any spillage with an
absorbent cloth immediately.
OIL CHANGE INDICATOR
RESET
Use the information display controls on
the steering wheel to reset the oil change
indicator.
From the main menu scroll to: Action and description
Message
Press the right arrow button,
then from this menu scroll
to the following message.
Settings
Press the right arrow button,
then from this menu scroll
to the following message.
Vehicle
Press the right arrow button,
then from this menu scroll
to the following message.
Oil Life
Press and hold the
OK
button until the instrument
cluster displays the
following message.
Hold OK to
Reset
Reset Successful
When the oil change indic-
ator resets the instrument
cluster displays 100%.
Remaining Life
{00}%
262
Fusion (CC7) Canada/United States of America, enUSA, First Printing MaintenanceE142732
Page 287 of 528

Note:
Industrial-strength or heavy-duty
cleaners in combination with brush agitation
to remove brake dust and dirt, could wear
away the clear coat finish over a period time.
Note: Do not use hydrofluoric acid-based
or high caustic-based wheel cleaners, steel
wool, fuels or strong household detergents.
Note: If you intend parking your vehicle for
an extended period after cleaning the
wheels with a wheel cleaner, drive your
vehicle for a few minutes before doing so.
This will reduce the risk of increased
corrosion of the brake discs.
Alloy wheels and wheel covers are coated
with a clear coat paint finish. To maintain
their condition we recommend that you:
• Clean the wheels weekly using
Motorcraft Wheel and Tire Cleaner.
Apply using manufacturer's
instructions.
• Use a sponge to remove heavy
deposits of dirt and brake dust
accumulation.
• Rinse thoroughly with a strong stream
of water when you have completed the
cleaning process.
• To remove tar and grease, use
Motorcraft Bug and Tar Remover.
VEHICLE STORAGE
If you plan on storing your vehicle for 30
days or more, read the following
maintenance recommendations to make
sure your vehicle stays in good operating
condition.
We engineer and test all motor vehicles
and their components for reliable, regular
driving. Under various conditions,
long-term storage may lead to degraded
engine performance or failure unless you
use specific precautions to preserve engine
components. General
•
Store all vehicles in a dry, ventilated
place.
• Protect from sunlight, if possible.
• If vehicles are stored outside, they
require regular maintenance to protect
against rust and damage.
Body
• Wash your vehicle thoroughly to
remove dirt, grease, oil, tar or mud from
exterior surfaces, rear-wheel housing
and the underside of front fenders.
• Periodically wash your vehicle if it is
stored in exposed locations.
• Touch-up exposed or primed metal to
prevent rust.
• Cover chrome and stainless steel parts
with a thick coat of auto wax to prevent
discoloration. Re-wax as necessary
when you wash your vehicle.
• Lubricate all hood, door and luggage
compartment hinges and latches with
a light grade oil.
• Cover interior trim to prevent fading.
• Keep all rubber parts free from oil and
solvents.
Engine
• Change the engine oil and filter prior to
storage because used engine oil
contains contaminates which may
cause engine damage.
• Start the engine every 15 days for a
minimum of 15 minutes. Run at fast idle
with the climate controls set to defrost
until the engine reaches normal
operating temperature.
284
Fusion (CC7) Canada/United States of America, enUSA, First Printing Vehicle Care