2017 FORD FOCUS engine
[x] Cancel search: enginePage 174 of 467

Note:
Do not apply bumper stickers and/or
repair compound to these areas, this can
cause degraded system performance.
If the system detects a degraded
performance condition, a message warning
of a blocked sensor will appear in the
information display. Also the BLIS alert
indicators will remain ON and BLIS will no
longer provide any vehicle warnings. You
can clear the information display warning
but the alert indicators will remain
illuminated.
A "blocked" condition can be cleared in
two ways:
• After the blockage in front of the
sensors is removed or the
rainfall/snowfall rate decreases or
stops, drive for a few minutes in traffic
to allow the sensors to detect passing
vehicles.
• By cycling the ignition from ON to OFF
and then back ON.
Note: If your vehicle has a tow bar with a
factory equipped trailer tow module and it
is towing a trailer, the sensors will
automatically turn the Blind Spot
Information System off. If your vehicle has
a tow bar but no factory equipped trailer
tow module, it is recommended to turn the
Blind Spot Information System off
manually. Operating the Blind Spot
Information System with a trailer attached
will cause poor system performance.
System Errors
If the system senses a problem with the
left or right sensor, the telltale will
illuminate and a message will appear in
the information display. See Information
Messages (page 95). Switching the System Off and On
You can temporarily switch the Blind Spot
Information System off in the information
display. See
General Information (page
91). When the Blind Spot Information
System switches off, you will not receive
alerts and the information display shows
a system off message. The telltale in the
cluster also illuminates. When you switch
the Blind Spot Information System on or
off, the alert indicators flash twice.
Note: The Blind Spot Information System
remembers the last selected on or off
setting.
You can also have the Blind Spot
Information System switched off
permanently at an authorized dealer. Once
switched off permanently, the system can
only be switched back on at an authorized
dealer.
CROSS TRAFFIC ALERT WARNING
To help avoid personal injury, NEVER
use the Cross Traffic Alert system as
a replacement for using the interior
and exterior mirrors and looking over your
shoulder before backing out of a parking
space. Cross Traffic Alert is not a
replacement for careful driving. Cross Traffic Alert is designed to warn you
of vehicles approaching from the sides
when the transmission is in reverse (R).
Using the System
Cross Traffic Alert turns on when you start
the engine and you shift into reverse (R).
Once shifted out of reverse (R), Cross
Traffic Alert turns off.
Note:
Cross Traffic Alert only functions
while your transmission is in reverse (R).
171
Focus (CDH) Canada/United States of America, HM5J 19A321 AA enUSA, Edition date: 201608, First Printing Driving Aids
Page 177 of 467
System Errors
If Cross Traffic Alert senses a problem with
the left or right sensor a message will
appear in the information display. See
Information Messages (page 95).
Switching the System Off and On
You can temporarily switch Cross Traffic
Alert off in the information display. See
Information Messages (page 95). When
you switch Cross Traffic Alert off, you will
not receive alerts and the information
display will display a system off message.
Note: The Cross Traffic Alert switches on
whenever the ignition is switched on and
ready to provide appropriate alerts when
the transmission is in reverse (R). Cross
Traffic Alert will not remember the last
selected on or off setting.
You can also have Cross Traffic Alert
switched off permanently at an authorized
dealer. Once switched off permanently,
the system can only be switched back on
at an authorized dealer.
ECO MODE
This system assists you in driving more
efficiently by constantly monitoring
characteristics of gear changing,
anticipation of traffic conditions and
speeds while driving.
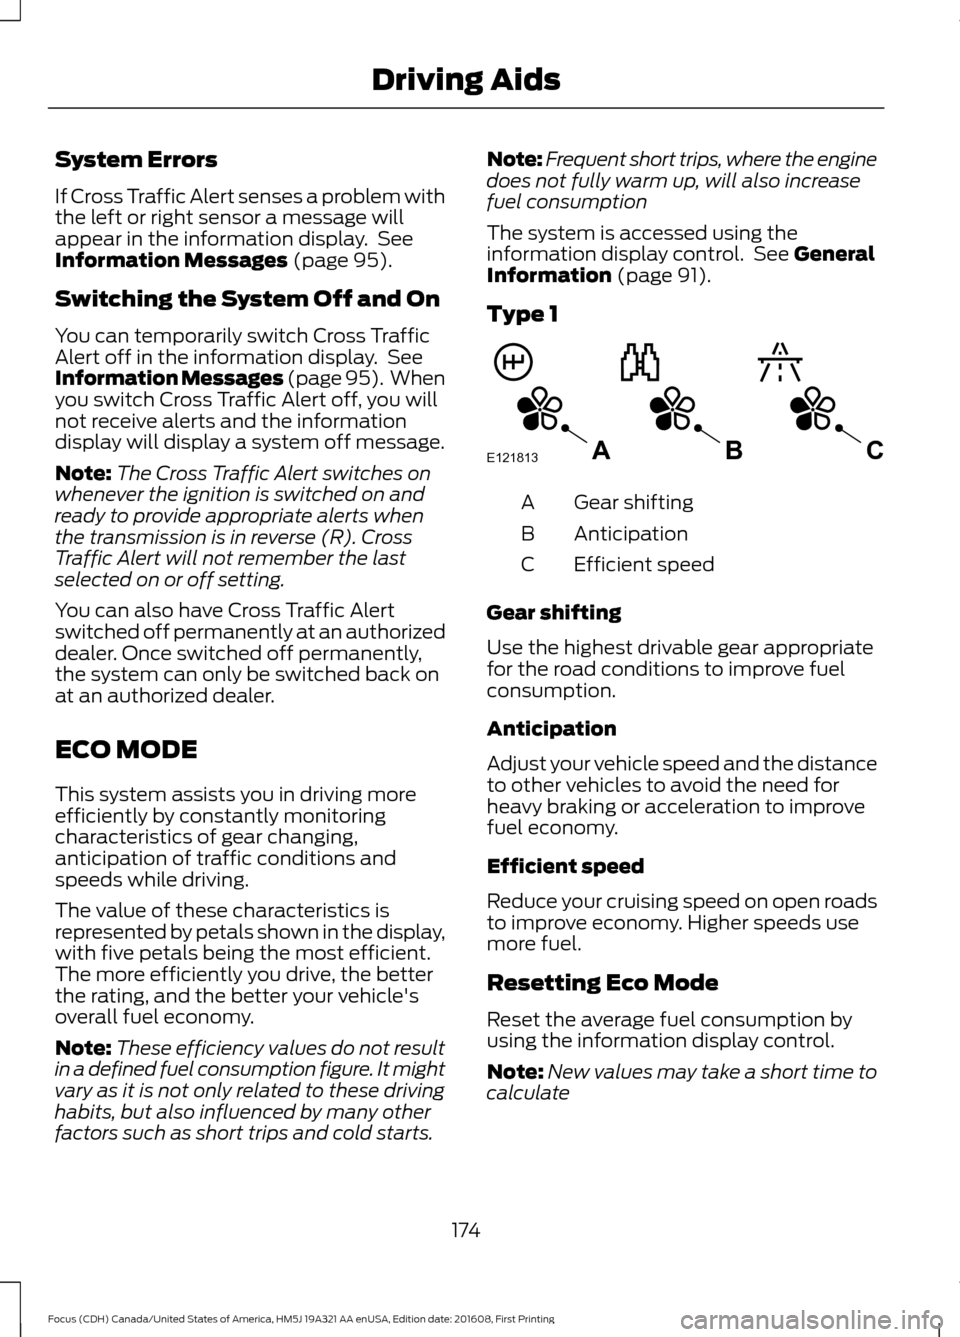
The value of these characteristics is
represented by petals shown in the display,
with five petals being the most efficient.
The more efficiently you drive, the better
the rating, and the better your vehicle's
overall fuel economy.
Note: These efficiency values do not result
in a defined fuel consumption figure. It might
vary as it is not only related to these driving
habits, but also influenced by many other
factors such as short trips and cold starts. Note:
Frequent short trips, where the engine
does not fully warm up, will also increase
fuel consumption
The system is accessed using the
information display control. See General
Information (page 91).
Type 1 Gear shifting
A
Anticipation
B
Efficient speed
C
Gear shifting
Use the highest drivable gear appropriate
for the road conditions to improve fuel
consumption.
Anticipation
Adjust your vehicle speed and the distance
to other vehicles to avoid the need for
heavy braking or acceleration to improve
fuel economy.
Efficient speed
Reduce your cruising speed on open roads
to improve economy. Higher speeds use
more fuel.
Resetting Eco Mode
Reset the average fuel consumption by
using the information display control.
Note: New values may take a short time to
calculate
174
Focus (CDH) Canada/United States of America, HM5J 19A321 AA enUSA, Edition date: 201608, First Printing Driving AidsE121813CBA
Page 187 of 467
You can flat-tow (all wheels on the
ground, regardless of the powertrain and
transmission configuration) your disabled
vehicle (without access to wheel dollies,
car-hauling trailer, or flatbed transport
vehicle) under the following conditions:
•
Your vehicle is facing forward so you
tow it in a forward direction.
• You place the transmission in neutral
(N). If you cannot place the
transmission in neutral (N), you may
need to override it. See Transmission
(page 138).
• Maximum speed is 35 mph (56 km/h).
• Maximum distance is
50 mi (80 km).
Recreational Towing
Vehicles with an Ignition Key
Note: Put your climate control system in
recirculated air mode to prevent exhaust
fumes from entering the vehicle. See
Climate Control
(page 103).
Note: There must be battery power to move
the transmission's internal components to
neutral (N) properly in Step 3. In addition,
moving the gearshift to the neutral (N)
position without first switching the ignition
to the on position limits the towing
capability to
35 mph (56 km/h) and 50 mi
(80 km).
1. Release the parking brake.
2. Switch the ignition to the on position.
3. Press the brake pedal, and then move the gearshift to the neutral (N)
position.
4. Wait for a message in the information and entertainment display indicating
that the transmission is ready, and then
switch off the ignition and release the
brake pedal.
5. Disconnect the negative (black) cable from the battery. See
Changing the
12V Battery (page 223). Note:
The anti-theft system does not work
until you reconnect the battery cable.
Note: The maximum towing speed is
70 mph (112 km/h)
.
Note: There is no limit on towing distance.
After towing, start the engine within 15
minutes of reconnecting the battery cable.
See Changing the 12V Battery (page 223).
Vehicles with Keyless Start
Note: Put your climate control system in
recirculated air mode to prevent exhaust
fumes from entering the vehicle. See
Climate Control
(page 103).
Note: There must be battery power to move
the transmission's internal components to
neutral (N) properly in Step 3. In addition,
moving the gearshift to the neutral (N)
position without first switching the ignition
to the on position limits the towing
capability to
35 mph (56 km/h) and 50 mi
(80 km).
1. Release the parking brake.
2. Switch on the ignition by pressing the keyless start button, but do not apply
the brake pedal.
3. Press the brake pedal, and then move the gearshift to the neutral (N)
position. Release the brake pedal.
4. Wait for a message indicating that the transmission is ready in the information
and entertainment display, and then
switch off the ignition by pressing the
keyless start button.
5. Disconnect the negative (black) cable from the battery. You need the door
key to lock and unlock doors when the
battery cable is disconnected. See
Changing the 12V Battery (page 223).
Note: The anti-theft system does not work
until you reconnect the battery cable.
Note: The maximum towing speed is
70 mph (112 km/h)
.
184
Focus (CDH) Canada/United States of America, HM5J 19A321 AA enUSA, Edition date: 201608, First Printing Towing
Page 188 of 467
Note:
There is no limit on towing distance.
After towing, start the engine within 15
minutes of reconnecting the battery cable.
See Changing the 12V Battery (page 223).
185
Focus (CDH) Canada/United States of America, HM5J 19A321 AA enUSA, Edition date: 201608, First Printing Towing
Page 189 of 467
BREAKING-IN
You need to break in new tires for
approximately 300 mi (480 km). During
this time, your vehicle may exhibit some
unusual driving characteristics.
Avoid driving too fast during the first
1,000 mi (1,600 km)
. Vary your speed
frequently and change up through the
gears early. Do not labor the engine.
Do not tow during the first
1,000 mi
(1,600 km).
ECONOMICAL DRIVING
Fuel economy is affected by several things
such as how you drive, the conditions you
drive under and how you maintain your
vehicle.
There are some things to keep in mind that
may improve your fuel economy:
• Accelerate and slow down in a smooth,
moderate fashion.
• Drive at steady speeds.
• Anticipate stops; slowing down may
eliminate the need to stop.
• Combine errands and minimize
stop-and-go driving (When running
errands, go to the furthest destination
first and then work your way back
home).
• Close the windows for high-speed
driving.
• Drive at reasonable speeds.
• Keep the tires properly inflated and use
only the recommended size.
• Use the recommended engine oil.
• Perform all regularly scheduled
maintenance. There are also some things you may want
to avoid doing because they reduce your
fuel economy:
•
Avoid sudden or hard accelerations.
• Avoid revving the engine before turning
off the car.
• Avoid long idle periods.
• Do not warm up your vehicle on cold
mornings.
• Reduce the use of air conditioning and
heat.
• Avoid using speed control in hilly
terrain.
• Do not rest your foot on the brake
pedal while driving.
• Avoid carrying unnecessary weight.
• Avoid adding particular accessories to
your vehicle (e.g. bug deflectors,
rollbars/light bars, running boards, ski
racks).
• Avoid driving with the wheels out of
alignment.
COLD WEATHER
PRECAUTIONS
The functional operation of some
components and systems can be affected
at temperatures below
-13°F (-25°C).
DRIVING THROUGH WATER WARNING
Do not drive through flowing or deep
water as you may lose control of your
vehicle.
Note:
Driving through standing water can
cause vehicle damage.
Note: Engine damage can occur if water
enters the air filter.
186
Focus (CDH) Canada/United States of America, HM5J 19A321 AA enUSA, Edition date: 201608, First Printing Driving Hints
Page 193 of 467

This program is separate from the New
Vehicle Limited Warranty, but the coverage
is concurrent with the powertrain coverage
period of your vehicle.
Canadian customers who require roadside
assistance, call 1-800-665-2006.
Vehicles Sold in Canada: Using
Roadside Assistance
Complete the roadside assistance
identification card and place it in your
wallet for quick reference.
In Canada, this card is found in the
Warranty Guide in the glove compartment
of your vehicle.
Vehicles Sold in Canada: Roadside
Assistance Program Coverage
The service is available 24 hours a day,
seven days a week.
Canadian roadside coverage and benefits
may differ from the U.S. coverage.
For complete program coverage details
you may contact your dealer, you can call
us in Canada at 1-800-665-2006, or visit
our website at www.ford.ca.
HAZARD WARNING FLASHERS
Note:
If used when the vehicle is not
running, the battery will lose charge. There
may be insufficient power to restart your
vehicle. The hazard warning button is
located on the instrument panel.
Use it when your vehicle is
creating a safety hazard for other
motorists.
• Press the button to turn on the hazard
warning function, and the front and
rear direction indicators will flash.
• Press the button again to turn them
off. FUEL SHUTOFF WARNING
Failure to inspect and, if necessary,
repair fuel leaks after a collision may
increase the risk of fire and serious
injury. Ford Motor Company recommends
that the fuel system be inspected by an
authorized dealer after any collision. In the event of a moderate to severe
collision, this vehicle includes a fuel pump
shutoff feature that stops the flow of fuel
to the engine. Not every impact will cause
a shutoff.
Should your vehicle shut off after a
collision, you may restart your vehicle. For
vehicles equipped with a key system:
1. Switch off the ignition.
2. Switch on the ignition.
3. Repeat Steps 1 and 2 to re-enable the
fuel pump.
For vehicles equipped with a push button
start system:
1. Press the START/STOP button to
switch off the ignition.
2. Press the brake pedal and press the START/STOP
button to switch on the
ignition.
3. Remove your foot from the brake pedal
and press the
START/STOP button
to switch off the ignition.
4. You can either attempt to start the engine by pressing the brake pedal and
the
START/STOP button, or switch
on the ignition only by pressing the
START/STOP
button without
pressing the brake pedal. Both ways
re-enable the fuel system.
190
Focus (CDH) Canada/United States of America, HM5J 19A321 AA enUSA, Edition date: 201608, First Printing Roadside Emergencies
Page 194 of 467
Note:
When you try to restart your vehicle
after a fuel shutoff, the vehicle makes sure
that various systems are safe to restart.
Once your vehicle determines that the
systems are safe, then the vehicle will allow
you to restart.
Note: In the event that your vehicle does
not restart after your third attempt, contact
an authorized dealer.
JUMP STARTING THE VEHICLE WARNINGS
The gases around the battery can
explode if exposed to flames, sparks,
or lit cigarettes. An explosion could
result in personal injury or vehicle damage. Batteries contain sulfuric acid which
can burn skin, eyes and clothing, if
contacted.
Use only an adequate-sized cable
with insulated clamps.
Preparing Your Vehicle
Note:
Do not attempt to push-start your
automatic transmission vehicle. Automatic
transmissions do not have push-start
capability. Attempting to push-start a
vehicle with an automatic transmission may
cause transmission damage.
Note: Use only a 12-volt supply to start your
vehicle.
Note: Do not disconnect the battery of the
disabled vehicle as this could damage the
vehicle's electrical system.
Park the booster vehicle close to the hood
of the disabled vehicle, making sure the
two vehicles do not touch. Turn all
accessories off. Connecting the Jumper Cables WARNING
Do not attach the cables to fuel lines,
engine rocker covers, the intake
manifold or electrical components
as grounding points. Stay clear of moving
parts. To avoid reverse polarity
connections, make sure that you correctly
identify the positive (+) and negative (-)
terminals on both the disabled and booster
vehicles before connecting the cables.
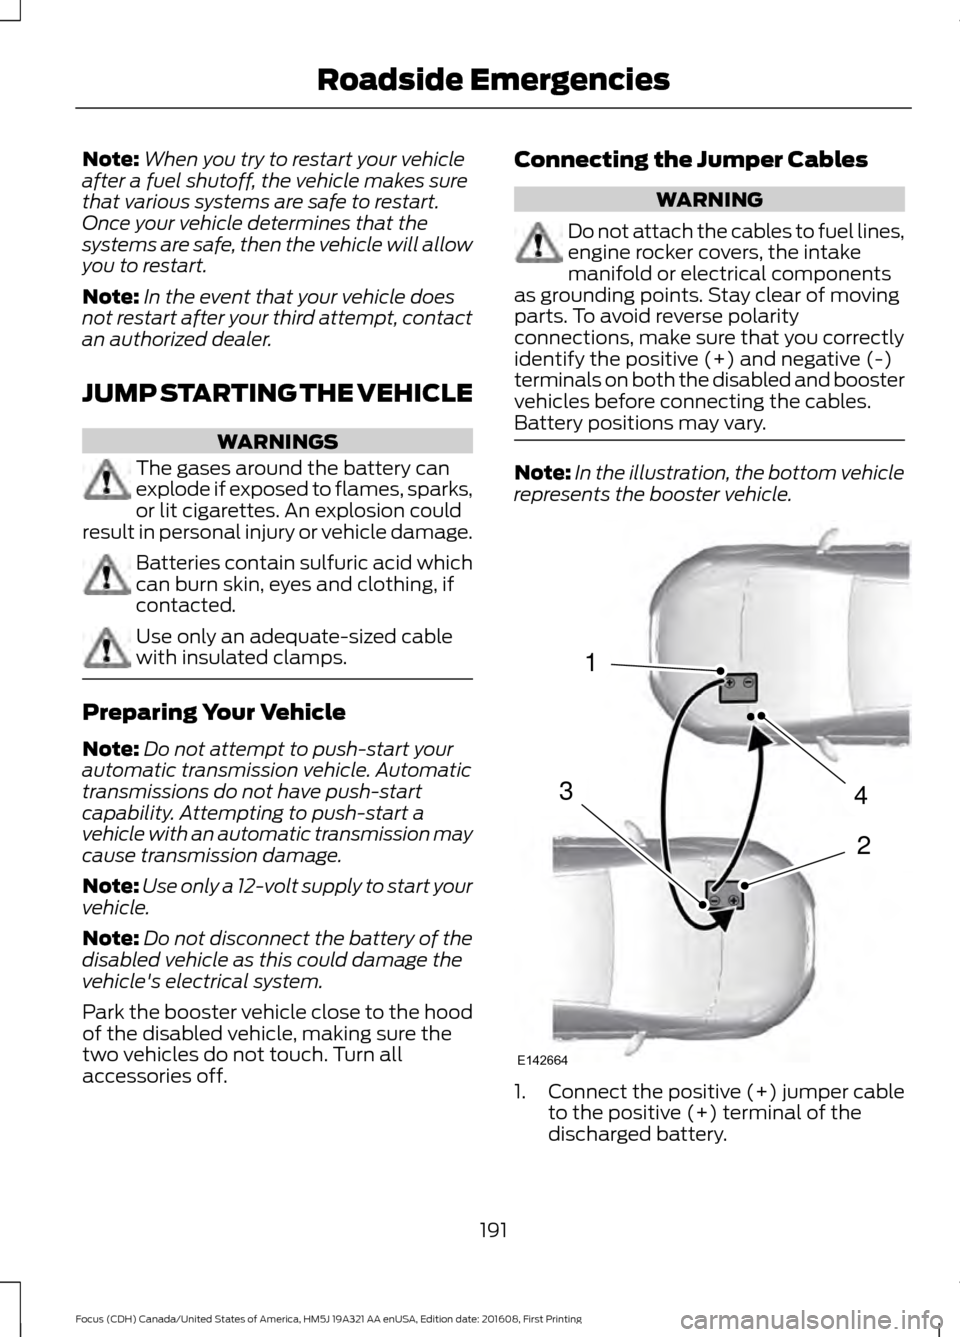
Battery positions may vary. Note:
In the illustration, the bottom vehicle
represents the booster vehicle. 1.
Connect the positive (+) jumper cable
to the positive (+) terminal of the
discharged battery.
191
Focus (CDH) Canada/United States of America, HM5J 19A321 AA enUSA, Edition date: 201608, First Printing Roadside Emergencies4
2
1
3
E142664
Page 195 of 467
2. Connect the other end of the positive
(+) cable to the positive (+) terminal
of the assisting battery.
3. Connect the negative (-) cable to the negative (-) terminal of the assisting
battery. 4. Make the final connection of the
negative (-) cable to an exposed metal
part of the stalled vehicle's engine, or
connect the negative (-) cable to the
ground connection point, if available. WARNING
Do not connect the end of the
second cable to the negative (-)
terminal of the battery to be jumped.
A spark may cause an explosion of the
gases that surround the battery. Jump Starting
1.
Start the engine of the booster vehicle
and rev the engine moderately, or press
the accelerator gently to keep your
engine speed between 2000 and 3000
rpms, as shown in your tachometer.
2. Start the engine of the disabled vehicle.
3. After starting the disabled vehicle, run both vehicle engines for an additional
three minutes before disconnecting the
jumper cables. Removing the Jumper Cables
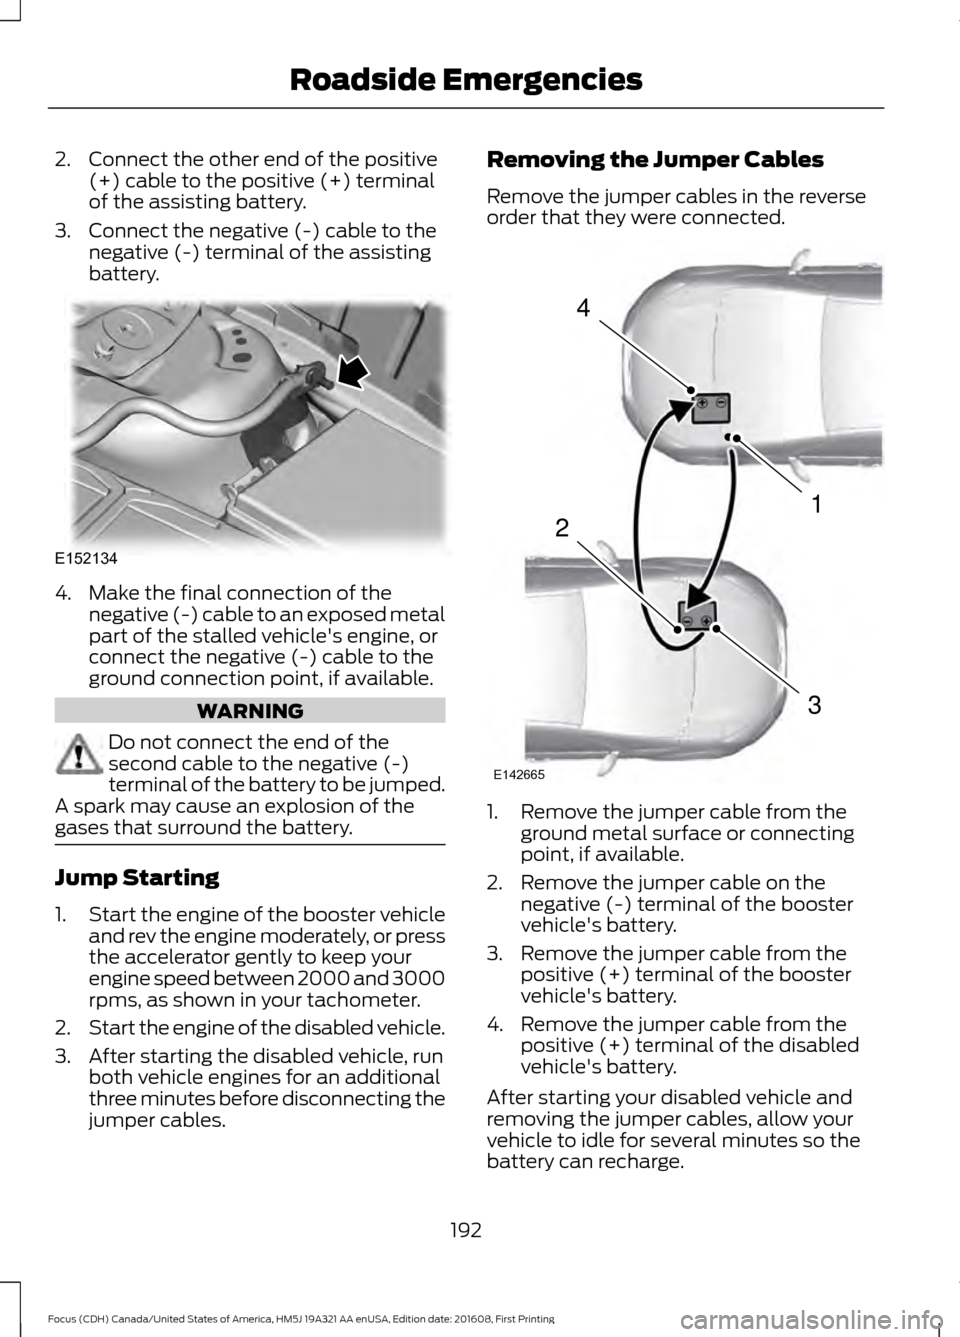
Remove the jumper cables in the reverse
order that they were connected.
1. Remove the jumper cable from the
ground metal surface or connecting
point, if available.
2. Remove the jumper cable on the negative (-) terminal of the booster
vehicle's battery.
3. Remove the jumper cable from the positive (+) terminal of the booster
vehicle's battery.
4. Remove the jumper cable from the positive (+) terminal of the disabled
vehicle's battery.
After starting your disabled vehicle and
removing the jumper cables, allow your
vehicle to idle for several minutes so the
battery can recharge.
192
Focus (CDH) Canada/United States of America, HM5J 19A321 AA enUSA, Edition date: 201608, First Printing Roadside EmergenciesE152134 4
1
3
2
E142665