2017 FORD FOCUS warning
[x] Cancel search: warningPage 66 of 467
Opening the Liftgate or Luggage
Compartment
With the Remote Control
Press twice within three seconds
to unlatch the liftgate or luggage
compartment.
From Inside Your Vehicle Press the button on the lighting
control panel.
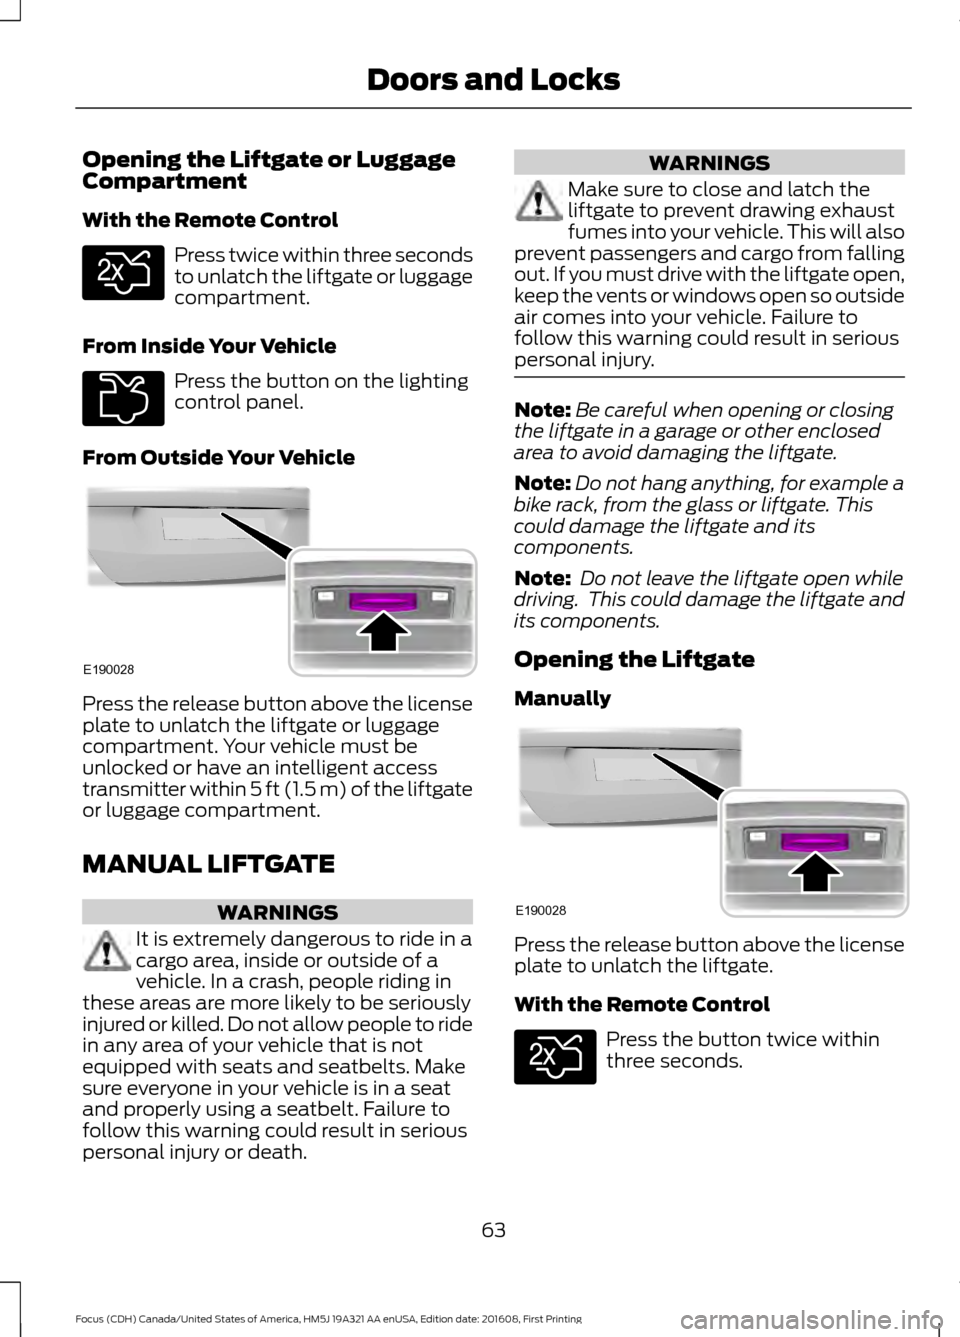
From Outside Your Vehicle Press the release button above the license
plate to unlatch the liftgate or luggage
compartment. Your vehicle must be
unlocked or have an intelligent access
transmitter within 5 ft (1.5 m) of the liftgate
or luggage compartment.
MANUAL LIFTGATE
WARNINGS
It is extremely dangerous to ride in a
cargo area, inside or outside of a
vehicle. In a crash, people riding in
these areas are more likely to be seriously
injured or killed. Do not allow people to ride
in any area of your vehicle that is not
equipped with seats and seatbelts. Make
sure everyone in your vehicle is in a seat
and properly using a seatbelt. Failure to
follow this warning could result in serious
personal injury or death. WARNINGS
Make sure to close and latch the
liftgate to prevent drawing exhaust
fumes into your vehicle. This will also
prevent passengers and cargo from falling
out. If you must drive with the liftgate open,
keep the vents or windows open so outside
air comes into your vehicle. Failure to
follow this warning could result in serious
personal injury. Note:
Be careful when opening or closing
the liftgate in a garage or other enclosed
area to avoid damaging the liftgate.
Note: Do not hang anything, for example a
bike rack, from the glass or liftgate. This
could damage the liftgate and its
components.
Note: Do not leave the liftgate open while
driving. This could damage the liftgate and
its components.
Opening the Liftgate
Manually Press the release button above the license
plate to unlatch the liftgate.
With the Remote Control
Press the button twice within
three seconds.
63
Focus (CDH) Canada/United States of America, HM5J 19A321 AA enUSA, Edition date: 201608, First Printing Doors and LocksE138630 E211694 E190028 E190028 E138630
Page 68 of 467
To program additional personal entry
codes, repeat Steps 1-3, then for Step 4:
•
Press 3·4 to save personal code 2.
• Press
5·6 to save personal code 3.
• Press
7·8 to save personal code 4.
• Press
9·0 to save personal code 5.
Hints:
• Do not set a code that uses five of the
same number.
• Do not use five numbers in sequential
order.
• The factory-set code works even if you
have set your own personal code.
Erasing a Personal Code
1. Enter the factory-set five-digit code.
2. Press and release
1·2 on the keypad
within five seconds.
3. Press and hold
1·2 for two seconds.
You must do this within five seconds
of completing step 2.
All personal codes erase and only the
factory-set five-digit code works.
Anti-Scan Feature
The keypad goes into an anti-scan mode
if you enter the wrong code seven times.
This mode turns off the keypad for one
minute and the keypad lamp flashes.
The anti-scan feature turns off after any
of the following occur:
• One minute of keypad inactivity.
• You press the unlock button on the
remote control.
• You switch your vehicle on.
• You unlock the vehicle using intelligent
access. Locking and Unlocking the Doors
Locking All Doors
Press and hold 7·8 and 9·0 on the keypad
simultaneously with the driver door closed.
You do not need to enter a code first.
Unlocking All Doors
Enter the factory-set code or your personal
code, then press 3·4 on the keypad within
five seconds.
Unlocking Only the Driver Door
Enter the factory-set or your personal
five-digit code. You must press each
number within five seconds of each other.
The interior lamps illuminate.
Note:
All doors unlock if the two-stage
unlocking feature is turned off. See Locking
and Unlocking
(page 59).
INTERIOR LUGGAGE
COMPARTMENT RELEASE - 4-
DOOR WARNINGS
Keep vehicle doors and luggage
compartment locked and keep keys
and remote transmitters out of a
child ’s reach. Unsupervised children could
lock themselves in the trunk and risk injury.
Children should be taught not to play in
vehicles. Do not leave children or animals
unattended in the vehicle. On hot
days, the temperature in the trunk or
vehicle interior can rise very quickly.
Exposure of people or animals to these
high temperatures for even a short time
can cause death or serious heat-related
injuries, including brain damage. Small
children are particularly at risk. 65
Focus (CDH) Canada/United States of America, HM5J 19A321 AA enUSA, Edition date: 201608, First Printing Doors and Locks
Page 73 of 467
ADJUSTING THE STEERING
WHEEL
WARNING
Do not adjust the steering wheel
when your vehicle is moving.
Note:
Make sure that you are sitting in the
correct position. See Sitting in the Correct
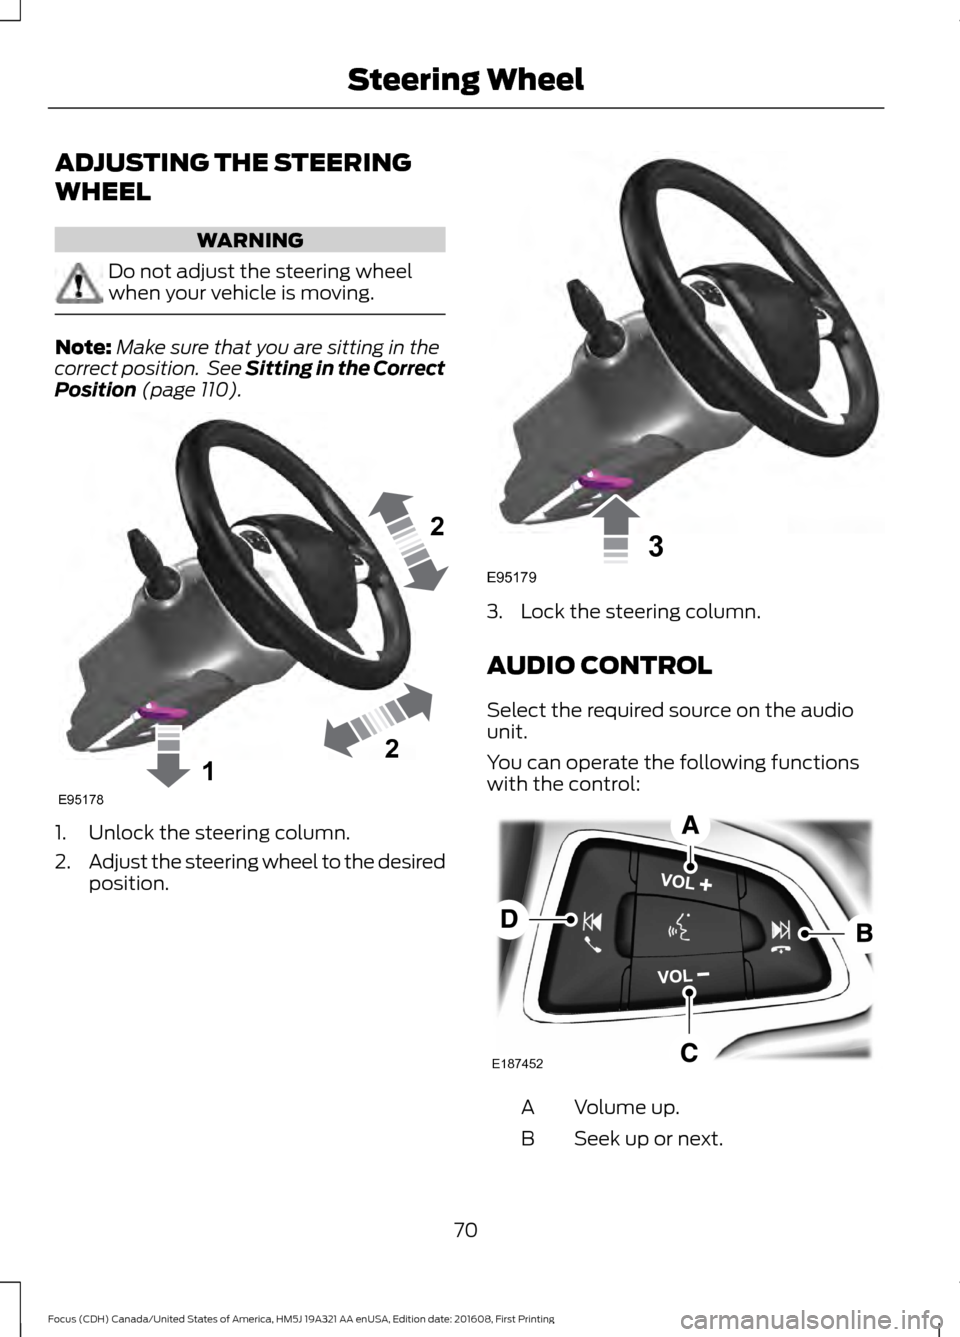
Position (page 110). 1. Unlock the steering column.
2.
Adjust the steering wheel to the desired
position. 3. Lock the steering column.
AUDIO CONTROL
Select the required source on the audio
unit.
You can operate the following functions
with the control:
Volume up.
A
Seek up or next.
B
70
Focus (CDH) Canada/United States of America, HM5J 19A321 AA enUSA, Edition date: 201608, First Printing Steering Wheel122E95178 3E95179 E187452
Page 79 of 467

Push the lever away from you to switch
the high beam on.
Push the lever forward again or pull the
lever toward you to switch the high beams
off.
Headlamp Flasher
Slightly pull the lever toward you and
release it to flash the headlamps.
AUTOLAMPS (If Equipped)
WARNING
The autolamps switch position may
not activate the headlamps in all low
visibility conditions, such as daytime
fog. Always ensure that your headlamps
are switched to auto or on, as appropriate,
during all low visibility conditions. Failure
to do so may result in a collision. When the lighting control is in the
autolamps position, the headlamps
automatically turn on in low light situations
or when the wipers activate.
If equipped, the following also activate
when the lighting control is in the
autolamps position and you switch them
on in the information display:
•
Configurable daytime running lamps.
• Automatic high beam control.
• Adaptive headlamp control.
The headlamps remain on for a period of
time after you switch the ignition off. Use
the information display controls to adjust
the period of time that the headlamps
remain on. See
Information Displays
(page 91).
Note: With the headlamps in the
autolamps position, you cannot switch the
high beam headlamps on until the
autolamps system turns the low beam
headlamps on.
Windshield Wiper Activated
Headlamps
The windshield wiper activated headlamps
turn on within 10 seconds when you switch
the windshield wipers on and the lighting
control is in the autolamps position. They
turn off approximately 60 seconds after
you switch the windshield wipers off.
The headlamps will not turn on by wiper
activation:
• During a mist wipe.
• When the wipers are on to clear washer
fluid during a wash condition.
• If the wipers are in intermittent mode.
Note: If you switch autolamps and
autowipers on, the headlamps will
automatically turn on when the windshield
wipers continuously operate.
76
Focus (CDH) Canada/United States of America, HM5J 19A321 AA enUSA, Edition date: 201608, First Printing LightingE163719 E142451
Page 80 of 467

INSTRUMENT LIGHTING
DIMMER
Note:
You disable the manual dimmer
when you adjust the setting to Auto
Dimming in the information display. See
Information Displays (page 91).
Note: If you disconnect the battery or it
becomes discharged, the illuminated
components will switch to the maximum
setting. Press repeatedly or press and hold until
you reach the desired level.
HEADLAMP EXIT DELAY
After you switch the ignition off, you can
switch the headlamps on by pulling the
direction indicator lever toward you. You
will hear a short tone. The headlamps will
switch off automatically after three
minutes with any door open or 30 seconds
after the last door has been closed. You
can cancel this feature by pulling the
direction indicator toward you again or
switching the ignition on. DAYTIME RUNNING LAMPS WARNING
The daytime running lamps system
does not activate the rear lamps and
may not provide adequate lighting
during low visibility driving conditions. Also,
the autolamps switch position may not
activate the headlamps in all low visibility
conditions, such as daytime fog. Make sure
the headlamps are switched to auto or on,
as appropriate, during all low visibility
conditions. Failure to do so may result in a
crash. Type 1 - Conventional (Non-
Configurable)
The daytime running lamps turn on when:
1. The ignition is switched to the on
position.
2. The transmission is not in park (P) for vehicles with automatic transmissions
or the parking brake is released for
vehicles with manual transmissions.
3. The lighting control is in the off, parking
lamp or autolamps positions.
4. The headlamps are off.
Type 2 - Configurable
Switch the daytime running lamps on or
off using the information display controls.
See
Information Displays (page 91).
The daytime running lamps turn on when:
1. They are switched on in the information
display. See
Information Displays
(page 91).
2. The ignition is switched to the on position.
3. The transmission is not in park (P) for vehicles with automatic transmissions
or the parking brake is released for
vehicles with manual transmissions.
77
Focus (CDH) Canada/United States of America, HM5J 19A321 AA enUSA, Edition date: 201608, First Printing LightingE161902
Page 84 of 467
POWER WINDOWS
WARNINGS
Do not leave children unattended in
your vehicle and do not let them play
with the power windows. They may
seriously injure themselves. When closing the power windows,
you should verify they are free of
obstructions and make sure that
children and pets are not in the proximity
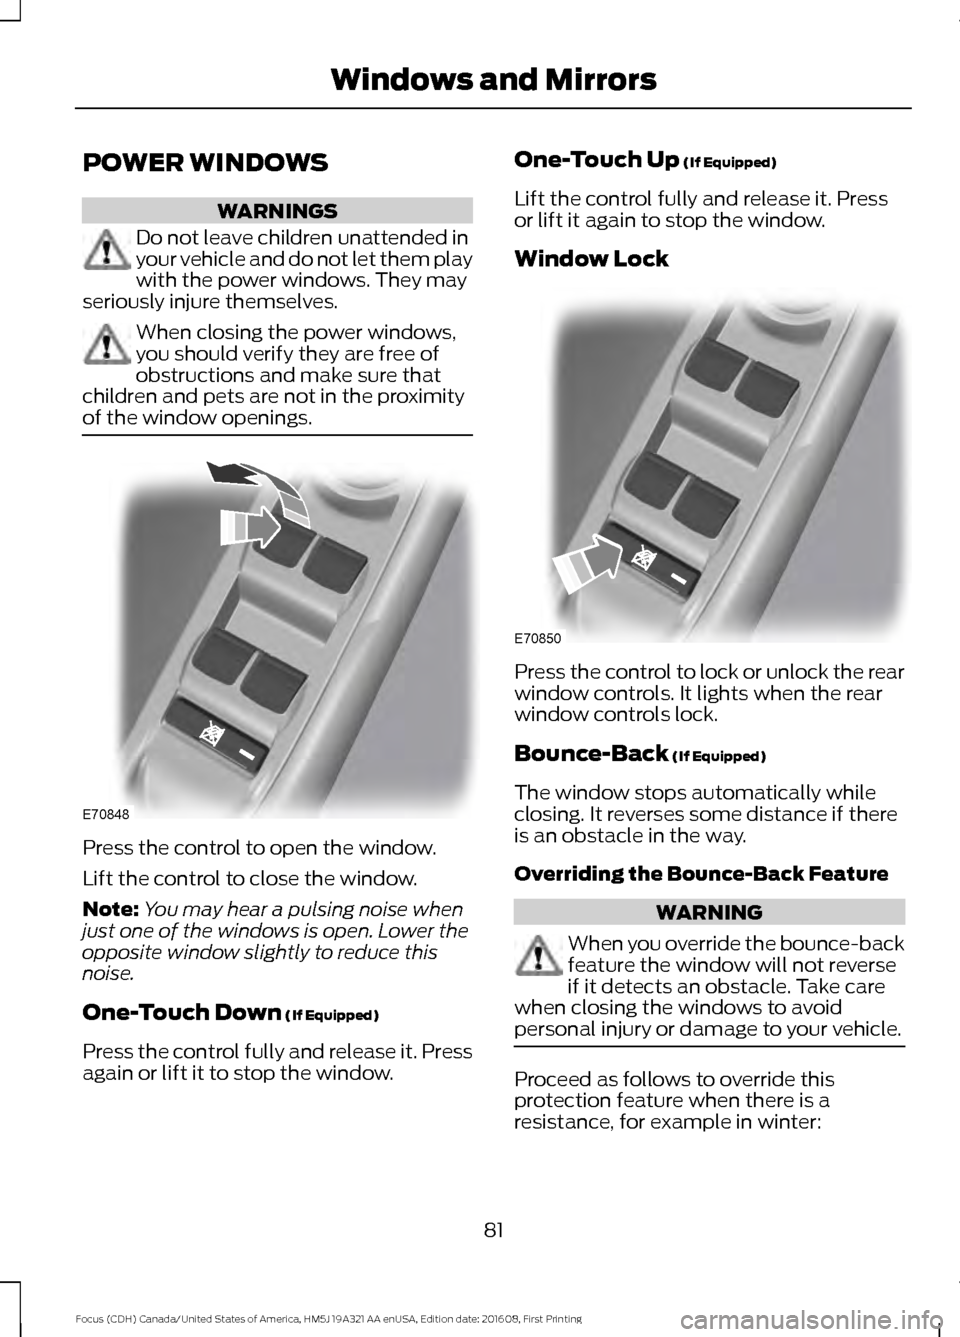
of the window openings. Press the control to open the window.
Lift the control to close the window.
Note:
You may hear a pulsing noise when
just one of the windows is open. Lower the
opposite window slightly to reduce this
noise.
One-Touch Down (If Equipped)
Press the control fully and release it. Press
again or lift it to stop the window. One-Touch Up
(If Equipped)
Lift the control fully and release it. Press
or lift it again to stop the window.
Window Lock Press the control to lock or unlock the rear
window controls. It lights when the rear
window controls lock.
Bounce-Back
(If Equipped)
The window stops automatically while
closing. It reverses some distance if there
is an obstacle in the way.
Overriding the Bounce-Back Feature WARNING
When you override the bounce-back
feature the window will not reverse
if it detects an obstacle. Take care
when closing the windows to avoid
personal injury or damage to your vehicle. Proceed as follows to override this
protection feature when there is a
resistance, for example in winter:
81
Focus (CDH) Canada/United States of America, HM5J 19A321 AA enUSA, Edition date: 201608, First Printing Windows and MirrorsE70848 E70850
Page 85 of 467
1.
Close the window twice until it reaches
the point of resistance and let it
reverse.
2. Close the window a third time to the point of resistance. You disabled the
bounce-back feature and you can now
close the window manually. The
window travels past the point of
resistance and you can close it fully.
Contact an authorized dealer as soon as
possible if the window does not close after
the third attempt.
Resetting the Bounce-Back Feature WARNING
The bounce-back feature remains
turned off until you reset the
memory.
If you have disconnected the battery, you
must reset the bounce-back memory
separately for each window.
1. Lift and hold the control until the
window is fully closed.
2. Release the control.
3. Lift and hold the control again for a few
seconds.
4. Release the control.
5. Lift and hold the control again for a few
seconds.
6. Release the control.
7. Press and hold the control until the window is fully open.
8. Lift and hold the control until the window is fully closed.
9. Release the control.
10. Open the window and then try to close it automatically.
11. Repeat the procedure if the window does not close automatically. Accessory Delay (If Equipped)
You can use the window controls for
several minutes after switching off the
ignition or until opening either front door.
EXTERIOR MIRRORS
Power Exterior Mirrors WARNING
Do not adjust the mirrors when your
vehicle is moving.
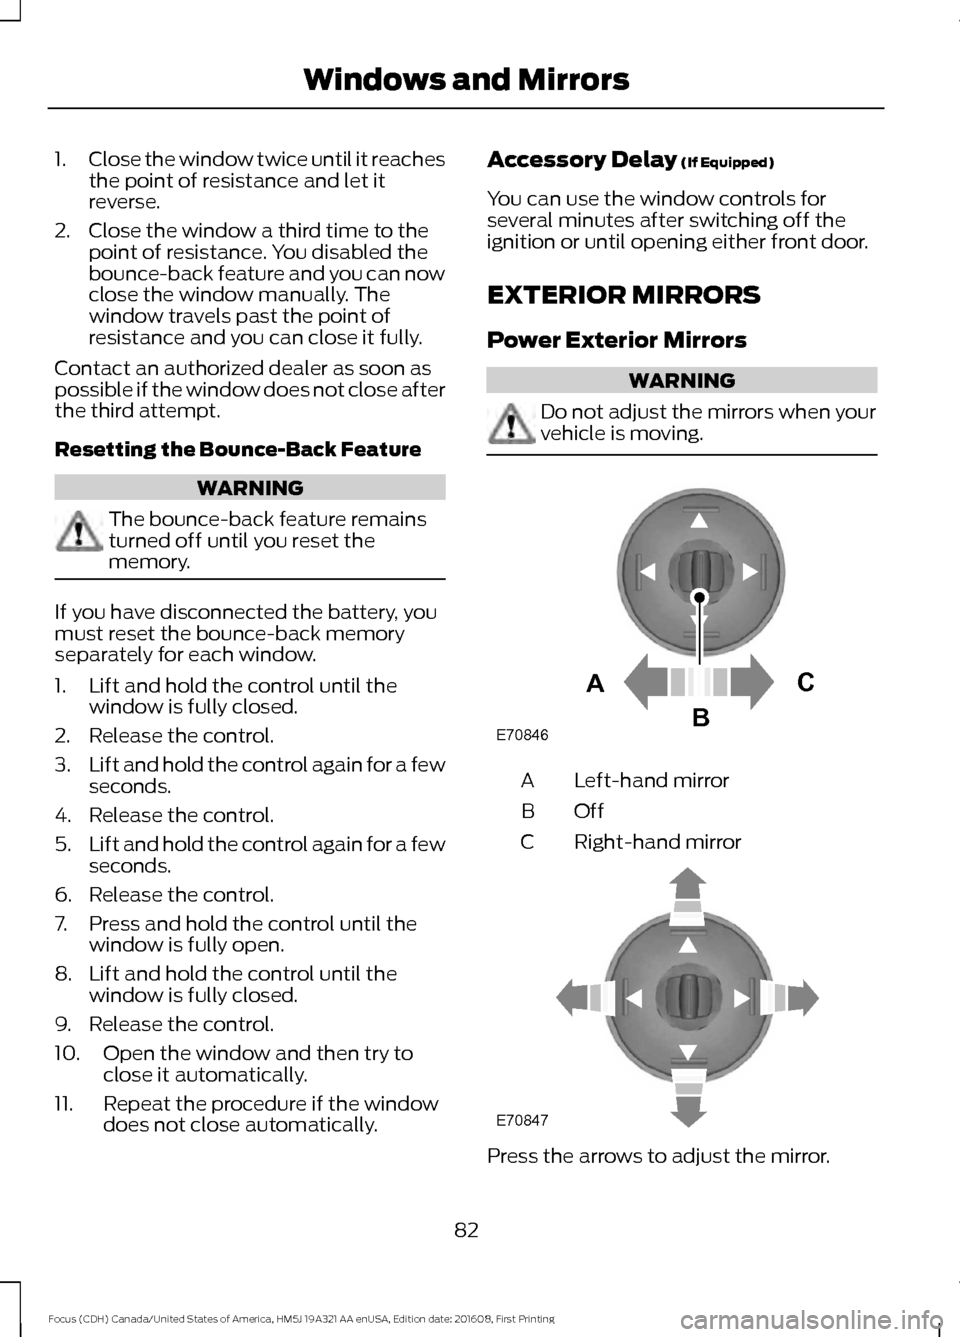
Left-hand mirror
A
OffB
Right-hand mirror
C Press the arrows to adjust the mirror.
82
Focus (CDH) Canada/United States of America, HM5J 19A321 AA enUSA, Edition date: 201608, First Printing Windows and MirrorsE70846A
C
B E70847
Page 86 of 467
Fold-Away Exterior Mirrors
Push the mirror toward the door window
glass. Make sure that you fully engage the
mirror in its support when returning it to its
original position.
Heated Exterior Mirrors (If Equipped)
See Heated Windows and Mirrors (page
108
).
Integrated Blind Spot Mirrors
(If
Equipped) WARNING
Objects in the blind spot mirror are
closer than they appear.
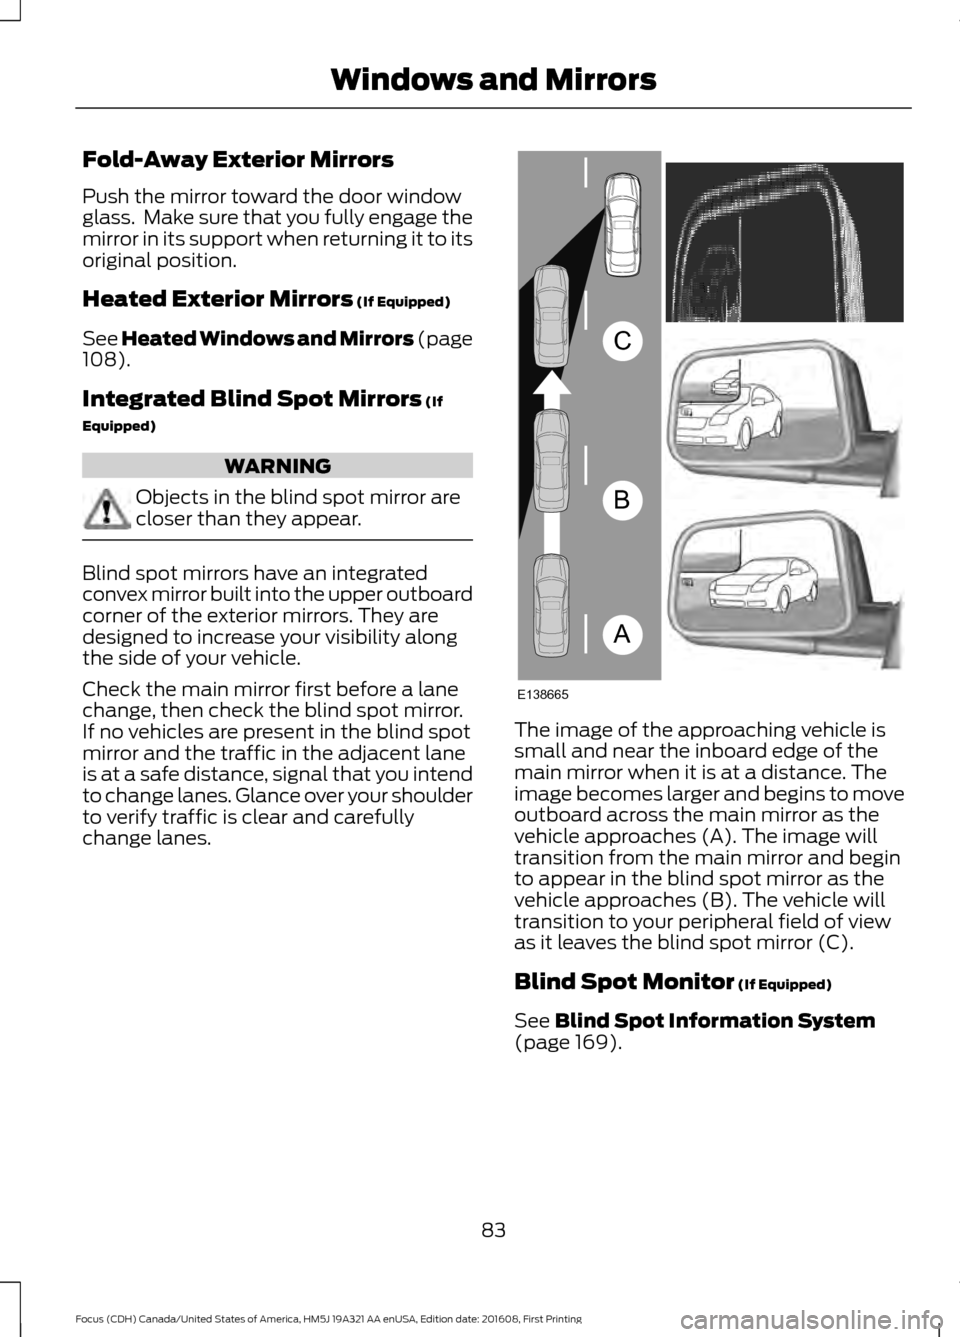
Blind spot mirrors have an integrated
convex mirror built into the upper outboard
corner of the exterior mirrors. They are
designed to increase your visibility along
the side of your vehicle.
Check the main mirror first before a lane
change, then check the blind spot mirror.
If no vehicles are present in the blind spot
mirror and the traffic in the adjacent lane
is at a safe distance, signal that you intend
to change lanes. Glance over your shoulder
to verify traffic is clear and carefully
change lanes.
The image of the approaching vehicle is
small and near the inboard edge of the
main mirror when it is at a distance. The
image becomes larger and begins to move
outboard across the main mirror as the
vehicle approaches (A). The image will
transition from the main mirror and begin
to appear in the blind spot mirror as the
vehicle approaches (B). The vehicle will
transition to your peripheral field of view
as it leaves the blind spot mirror (C).
Blind Spot Monitor
(If Equipped)
See
Blind Spot Information System
(page 169).
83
Focus (CDH) Canada/United States of America, HM5J 19A321 AA enUSA, Edition date: 201608, First Printing Windows and MirrorsA
B
C
E138665