2017 FORD FOCUS lock
[x] Cancel search: lockPage 84 of 467
POWER WINDOWS
WARNINGS
Do not leave children unattended in
your vehicle and do not let them play
with the power windows. They may
seriously injure themselves. When closing the power windows,
you should verify they are free of
obstructions and make sure that
children and pets are not in the proximity
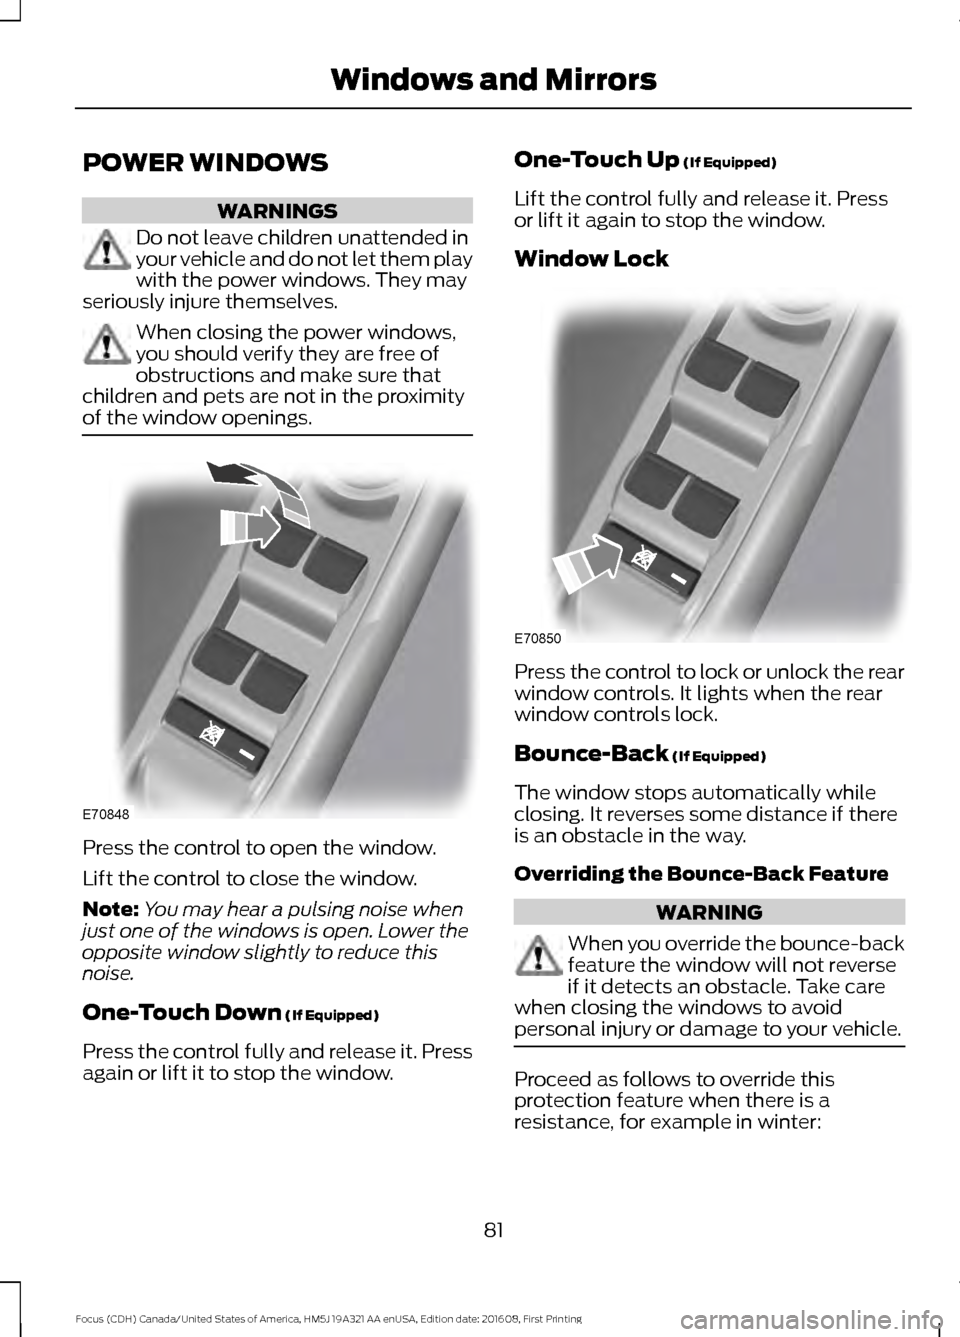
of the window openings. Press the control to open the window.
Lift the control to close the window.
Note:
You may hear a pulsing noise when
just one of the windows is open. Lower the
opposite window slightly to reduce this
noise.
One-Touch Down (If Equipped)
Press the control fully and release it. Press
again or lift it to stop the window. One-Touch Up
(If Equipped)
Lift the control fully and release it. Press
or lift it again to stop the window.
Window Lock Press the control to lock or unlock the rear
window controls. It lights when the rear
window controls lock.
Bounce-Back
(If Equipped)
The window stops automatically while
closing. It reverses some distance if there
is an obstacle in the way.
Overriding the Bounce-Back Feature WARNING
When you override the bounce-back
feature the window will not reverse
if it detects an obstacle. Take care
when closing the windows to avoid
personal injury or damage to your vehicle. Proceed as follows to override this
protection feature when there is a
resistance, for example in winter:
81
Focus (CDH) Canada/United States of America, HM5J 19A321 AA enUSA, Edition date: 201608, First Printing Windows and MirrorsE70848 E70850
Page 90 of 467
If the needle enters the red section, the
engine is overheating. Stop the engine,
switch the ignition off and determine the
cause once the engine has cooled down.
See Engine Coolant Check (page 218).
Fuel Gauge
Note: : The fuel gauge may vary slightly
when your vehicle is moving or on a gradient.
Switch the ignition on. The fuel gauge will
indicate approximately how much fuel is
left in the fuel tank. The arrow adjacent to
the fuel pump symbol indicates on which
side of your vehicle the fuel filler door is
located.
The needle should move toward F when
you refuel your vehicle. If the needle points
to E after adding fuel, this indicates your
vehicle needs service soon.
After refueling some variability in needle
position is normal.
Note: It may take a short time for the
needle to reach F after leaving the gas
station. This is normal and depends upon
the slope of pavement at the gas station.
Note: The fuel amount dispensed into the
tank is a little less or more than the gauge
indicated. This is normal and depends upon
the slope of pavement at the gas station.
Note: If the gas station nozzle shuts off
before the tank is full, try a different gas
pump nozzle.
Low Fuel Reminder
A low fuel reminder triggers at about 50
miles (80 km). The low fuel warning light
will light, a warning chime will sound and
a pop up will be shown in the display
indicating the remaining distance to empty.
You will also get a subsequent reminder
at 20, 10 and 0 miles. WARNING LAMPS AND
INDICATORS
The following warning lamps and
indicators alert you to a vehicle condition
that may become serious. Some lamps
illuminate when you start your vehicle to
make sure they work. If any lamps remain
on after starting your vehicle, refer to the
respective system warning lamp for further
information.
Note:
Some warning indicators appear in
the information display and operate the
same as a warning lamp but do not
illuminate when you start your vehicle.
Adaptive Cruise Control Indicator
(If Equipped) It illuminates when you switch
the system on.
It illuminates white when the system is in
standby mode. It illuminates green when
you set the adaptive cruise speed.
Airbag Warning Lamp If it does not illuminate when you
switch the ignition on, continues
to flash or remains on when the
engine is running, this indicates a
malfunction. Have your vehicle checked
as soon as possible.
Anti-Lock Brake System Warning
Lamp If it illuminates when you are
driving, this indicates a
malfunction. Your vehicle
continues to have normal braking without
the anti-lock brake system function. Have
your vehicle checked as soon as possible.
87
Focus (CDH) Canada/United States of America, HM5J 19A321 AA enUSA, Edition date: 201608, First Printing Instrument ClusterE144524 E67017
Page 100 of 467

Blind Spot Information and Cross Traffic Alert System
Action
Message
Displays when the blind spot information system and cross
traffic alert system sensors are blocked.
Blindspot Low visibility
See manual
See Blind Spot Information System (page 169).
The system has detected a fault that requires service. Have
your vehicle checked as soon as possible.
Blindspot right sensor
fault Service required
Blindspot left sensor
fault Service required
Displays when you attach a trailer to your vehicle.
Blindspot not available
Trailer attached See
Blind Spot Information System (page 169).
Displays when the system detects a vehicle.
Cross Traffic Vehicle
coming from right See
Blind Spot Information System (page 169).
Cross Traffic Vehicle
coming from left Displays when the blind spot information system and cross
traffic alert system sensors are blocked.
Cross Traffic Sensor
blocked See manual
See
Blind Spot Information System (page 169).
The system has detected a fault that requires service. Have
your vehicle checked as soon as possible.
Cross Traffic fault
Service required
Displays when you attach a trailer to your vehicle.
Cross Traffic not avail-
able Trailer attached See
Blind Spot Information System (page 169).
Engine Action
Message
Have your vehicle checked as soon as possible.
Engine fault Service now
Displays when the engine temperature is too high.
High engine temperature
Stop safely Stop your vehicle as soon as it is safe to do so, switch the
engine off and allow it to cool.
If the problem persists, have your vehicle checked as soon
as possible.
See
Engine Coolant Check (page 218).
Displays when the engine has limited power to help reduce
coolant temperature.
Power reduced to lower
engine temperature
97
Focus (CDH) Canada/United States of America, HM5J 19A321 AA enUSA, Edition date: 201608, First Printing Information Displays
Page 101 of 467

Fuel System
Action
Message
Refuel as soon as possible.
Fuel Level Low
Hill Start Assist Action
Message
Displays when hill start assist is not available. Have your
vehicle checked as soon as possible.
Hill start assist not avail-
able
See Hill Start Assist (page 146).
Keyless Entry Action
Message
Displays if you leave a vehicle key in the luggage compartment
and switch the ignition on or try to lock your vehicle.
Ford KeyFree Key inside
vehicle
See
Keyless Starting (page 118).
Displays when the system cannot detect a valid key.
Ford KeyFree No key
detected See
Keyless Starting (page 118).
Displays if you switch the ignition on without starting the
engine.
Switch ign. off Press
ENGINE Start/Stop
button
See
Keyless Starting (page 118).
Displays when the system cannot detect a valid key.
Ford KeyFree Key not
inside car See
Keyless Starting (page 118).
Displays when the remote key battery requires replacing.
Key Battery low Replace
soon See
Remote Control (page 49).
Lane Keeping System Action
Message
The system has detected a fault that requires service. Have
your vehicle checked as soon as possible.
Lane Keeping Sys Fault
Service required
98
Focus (CDH) Canada/United States of America, HM5J 19A321 AA enUSA, Edition date: 201608, First Printing Information Displays
Page 105 of 467
Action
Message
See Using Traction Control (page 148).
Transmission Action
Message
Have your vehicle checked as soon as possible.
Transmission malfunc-
tion Service now
The transmission is overheating and needs to cool. Stop your
vehicle as soon as it is safe to do so, switch the engine off
and allow the transmission to cool.
Transmission over-
heating Stop safely
Displays as a reminder to shift into park (P).
Transmission not in Park
Select P
Press the brake pedal to unlock the transmission.
Press brake to unlock
gearshift lever
Displays when the transmission selector lever unlocks.
Gearshift lever unlocked
102
Focus (CDH) Canada/United States of America, HM5J 19A321 AA enUSA, Edition date: 201608, First Printing Information Displays
Page 114 of 467
WARNINGS
The adjustable head restraint is a
safety device. Whenever possible, it
should be installed and properly
adjusted when the seat is occupied. Failure
to adjust the head restraint properly could
reduce its effectiveness during certain
impacts. Install the head restraint properly to
help minimize the risk of neck injury
in the event of a crash.
Note:
Adjust the seatback to an upright
driving position before adjusting the head
restraint. Adjust the head restraint so that
the top of it is level with the top of your head
and as far forward as possible. Make sure
that you remain comfortable. If you are
extremely tall, adjust the head restraint to
its highest position.
Front seat and rear seat outboard head
restraints Rear center head restraint
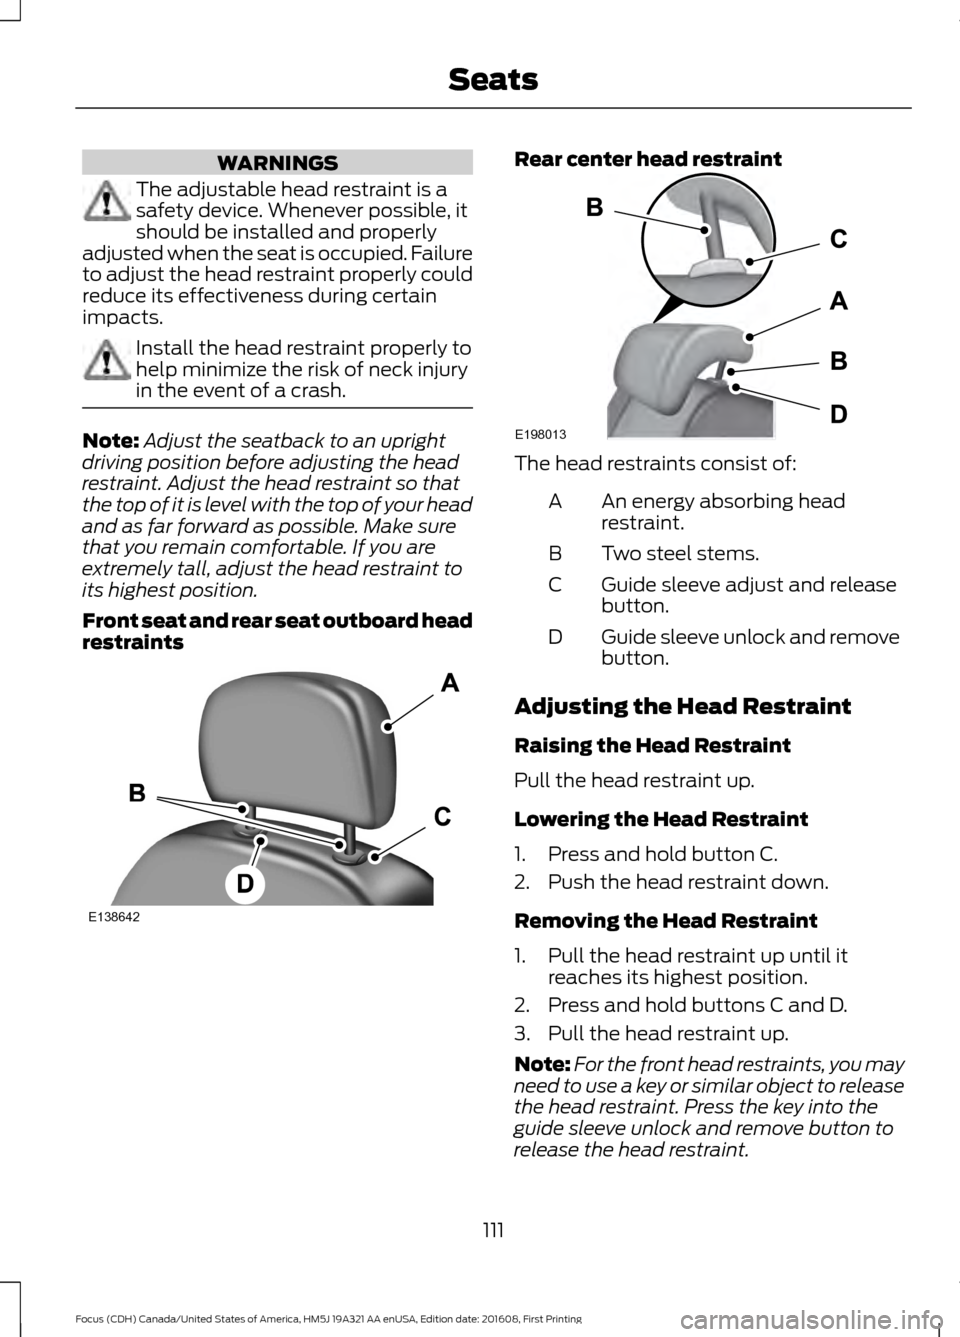
The head restraints consist of:
An energy absorbing head
restraint.
A
Two steel stems.
B
Guide sleeve adjust and release
button.
C
Guide sleeve unlock and remove
button.
D
Adjusting the Head Restraint
Raising the Head Restraint
Pull the head restraint up.
Lowering the Head Restraint
1. Press and hold button C.
2. Push the head restraint down.
Removing the Head Restraint
1. Pull the head restraint up until it reaches its highest position.
2. Press and hold buttons C and D.
3. Pull the head restraint up.
Note: For the front head restraints, you may
need to use a key or similar object to release
the head restraint. Press the key into the
guide sleeve unlock and remove button to
release the head restraint.
111
Focus (CDH) Canada/United States of America, HM5J 19A321 AA enUSA, Edition date: 201608, First Printing SeatsE138642 E198013
Page 115 of 467
Installing the Head Restraint
Align the steel stems into the guide sleeves
and push the head restraint down until it
locks.
Tilting Head Restraints (If Equipped)
The front head restraints tilt for extra
comfort. To tilt the head restraint, do the
following: 1. Adjust the seatback to an upright
driving or riding position.
2. Pivot the head restraint forward toward
your head to the desired position.
After the head restraint reaches the
forward-most tilt position, pivoting it
forward again will then release it to the
rearward, un-tilted position.
MANUAL SEATS WARNINGS
Do not adjust the driver seat or
seatback when your vehicle is
moving. Adjusting your seatback
while your vehicle is in motion may cause
loss of control of your vehicle. WARNINGS
Rock the seat backward and forward
after releasing the lever to make sure
that it is fully engaged.
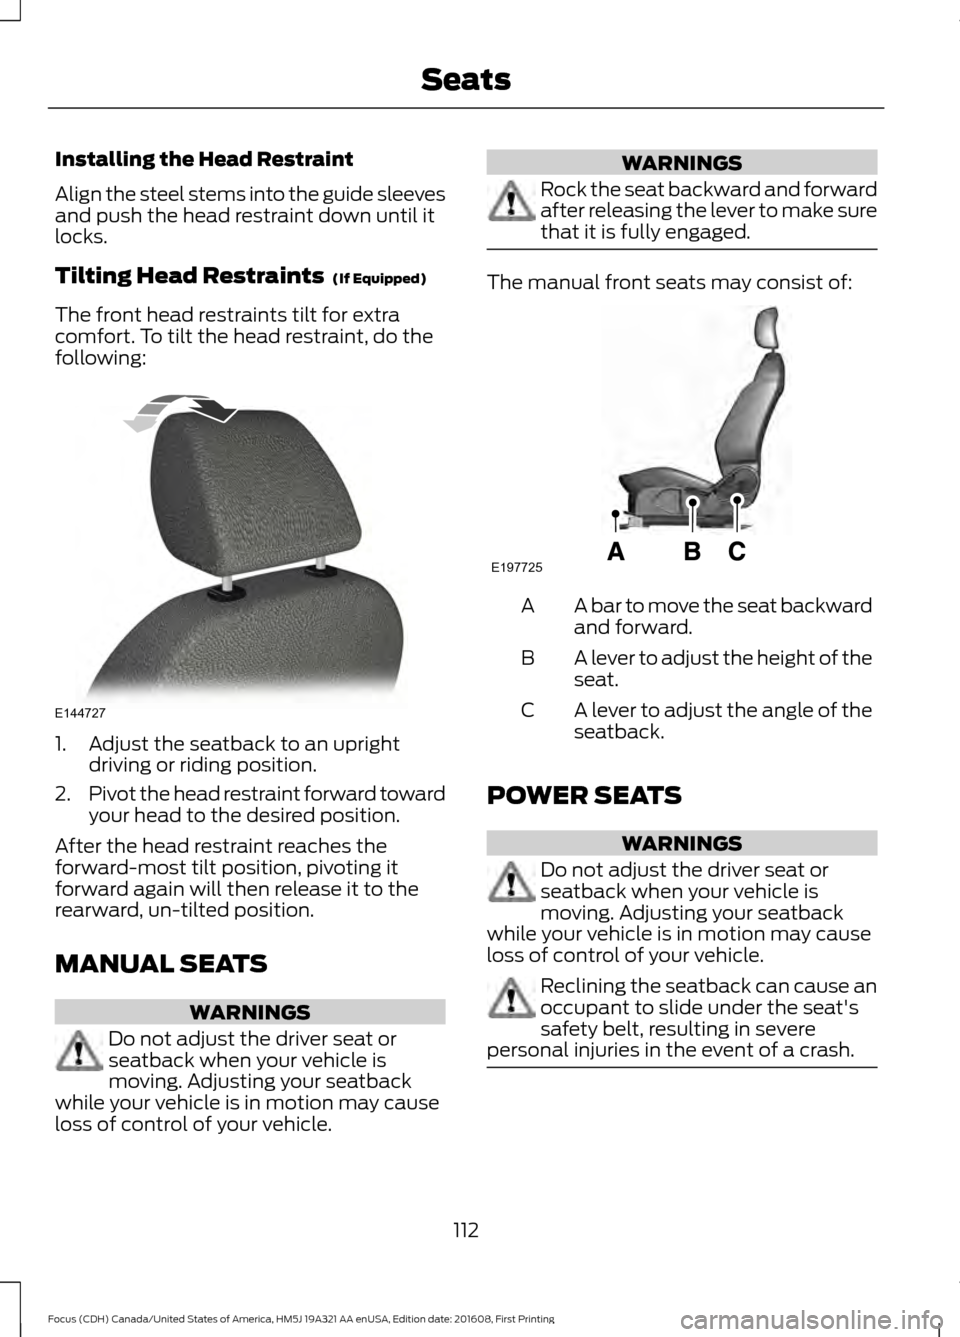
The manual front seats may consist of:
A bar to move the seat backward
and forward.
A
A lever to adjust the height of the
seat.
B
A lever to adjust the angle of the
seatback.
C
POWER SEATS WARNINGS
Do not adjust the driver seat or
seatback when your vehicle is
moving. Adjusting your seatback
while your vehicle is in motion may cause
loss of control of your vehicle. Reclining the seatback can cause an
occupant to slide under the seat's
safety belt, resulting in severe
personal injuries in the event of a crash. 112
Focus (CDH) Canada/United States of America, HM5J 19A321 AA enUSA, Edition date: 201608, First Printing SeatsE144727 E197725
Page 116 of 467
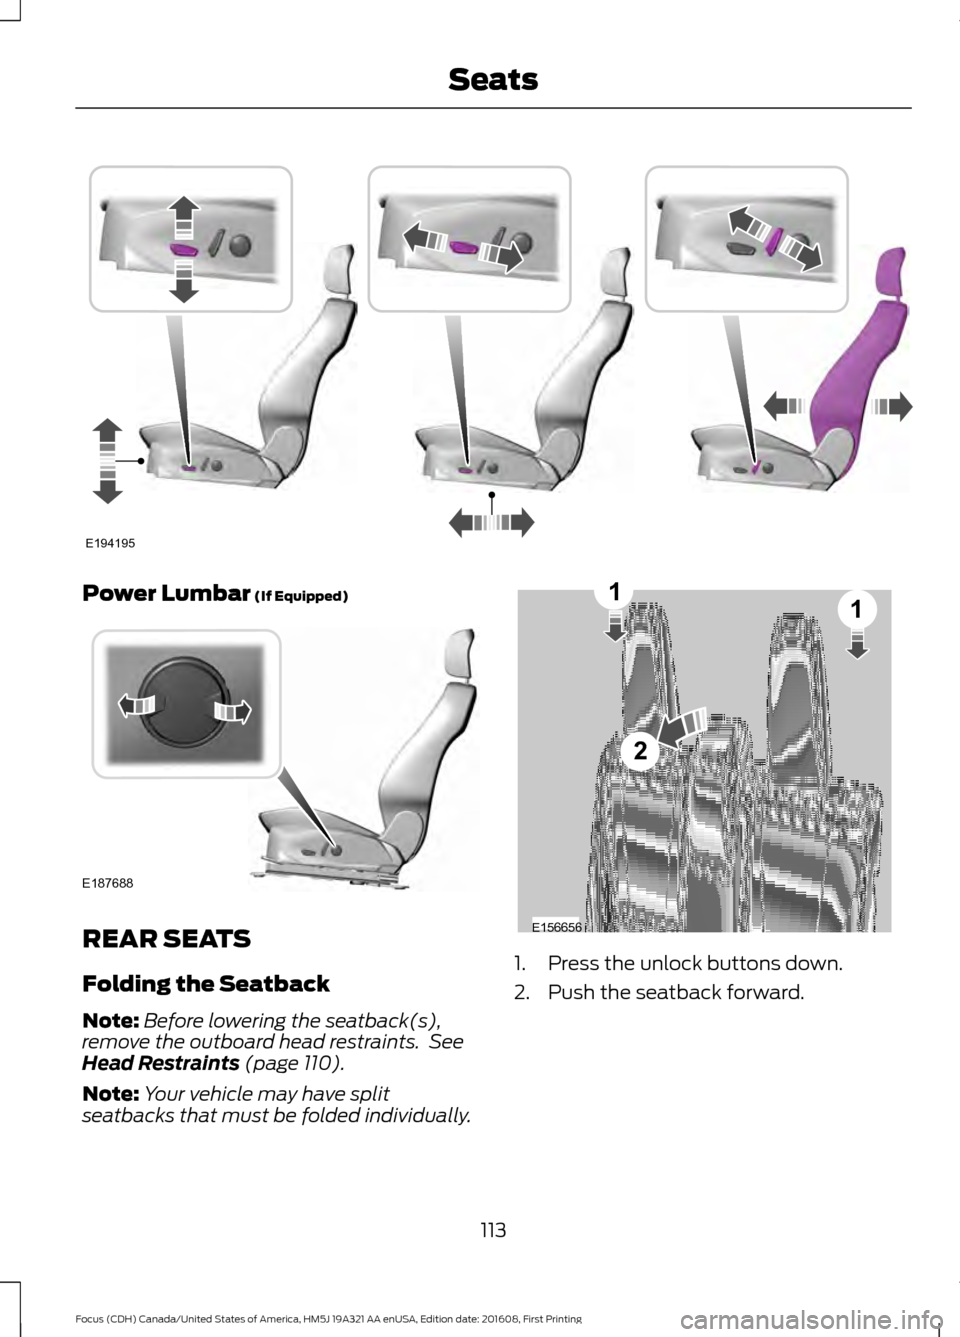
Power Lumbar (If Equipped)
REAR SEATS
Folding the Seatback
Note:
Before lowering the seatback(s),
remove the outboard head restraints. See
Head Restraints
(page 110).
Note: Your vehicle may have split
seatbacks that must be folded individually. 1. Press the unlock buttons down.
2. Push the seatback forward.
113
Focus (CDH) Canada/United States of America, HM5J 19A321 AA enUSA, Edition date: 201608, First Printing SeatsE194195 E187688 E156656
2
11