2017 FORD FOCUS height
[x] Cancel search: heightPage 81 of 467

4.
The lighting control is in the autolamps
position.
5. The headlamps are off.
The other lighting control switch positions
do not activate the daytime running lamps,
and you can use them to temporarily
override autolamp control.
When switched off in the information
display, the daytime running lamps are off
in all lighting control switch positions.
AUTOMATIC HIGH BEAM
CONTROL
The system automatically turns on the high
beams if it is dark enough and no other
traffic is present. When it detects the
headlights of an approaching vehicle, the
rear lamps of the preceding vehicle or
street lighting, the system turns off the high
beams before they distract other drivers.
The low beams remain on.
Note: If it appears that automatic high
beam is not functioning properly, check the
windshield in front of the camera for a
blockage. A clear view of the road is required
for proper system operation. Make sure that
authorized personnel repair any windshield
damage in the area of the camera's field of
view.
Note: If the system detects a blockage such
as bird droppings, bug splatter, snow or ice,
and you do not observe changes, the system
may go into low beam mode until you clear
the blockage. A message may also appear
in the information display noting the front
camera is blocked. Note:
Typical road dust, dirt and water
spots do not affect the performance of the
automatic high beam control. However, in
cold or inclement weather conditions, you
may notice a decrease in the availability of
the automatic high beam control, especially
at start up. If you want to change the beam
state independently of the system, you may
switch the high beams on or off using the
lighting control switch. Automatic high
beam control resumes when conditions are
correct.
Note: Modification of your vehicle ride
height such as using much larger tires, may
degrade feature performance.
A camera sensor, centrally mounted
behind the windshield of your vehicle,
continuously monitors conditions to decide
when to switch the high beams off and on.
Once the system is active, the high beams
switch on if:
• The ambient light level is low enough.
• There is no traffic in front of the vehicle.
• The vehicle speed is greater than
approximately 32 mph (52 km/h).
The high beams turn off if:
• The system detects the headlamps of
an approaching vehicle or the rear
lamps of a preceding vehicle.
• Vehicle speed falls below
approximately
27 mph (44 km/h).
• The ambient light level is high enough
that high beams are not required.
• The system detects severe rain, snow
or fog.
• The camera is blocked.
Activating the System
Switch the system on using the information
display. See Information Displays (page
91
). Turn the switch to the autolamps
position. See Autolamps (page 76).
78
Focus (CDH) Canada/United States of America, HM5J 19A321 AA enUSA, Edition date: 201608, First Printing Lighting
Page 115 of 467

Installing the Head Restraint
Align the steel stems into the guide sleeves
and push the head restraint down until it
locks.
Tilting Head Restraints (If Equipped)
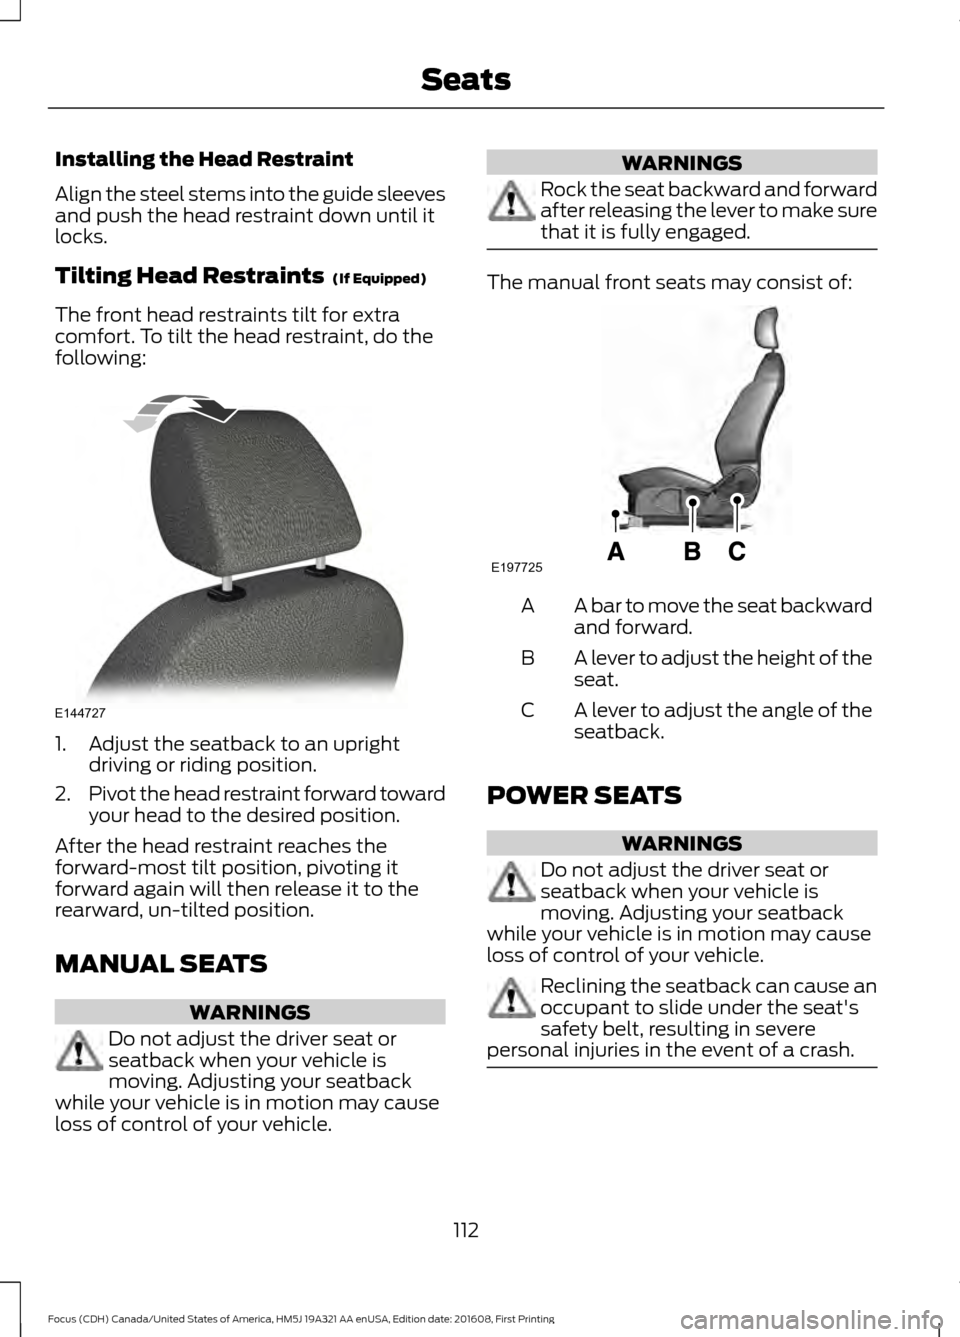
The front head restraints tilt for extra
comfort. To tilt the head restraint, do the
following: 1. Adjust the seatback to an upright
driving or riding position.
2. Pivot the head restraint forward toward
your head to the desired position.
After the head restraint reaches the
forward-most tilt position, pivoting it
forward again will then release it to the
rearward, un-tilted position.
MANUAL SEATS WARNINGS
Do not adjust the driver seat or
seatback when your vehicle is
moving. Adjusting your seatback
while your vehicle is in motion may cause
loss of control of your vehicle. WARNINGS
Rock the seat backward and forward
after releasing the lever to make sure
that it is fully engaged.
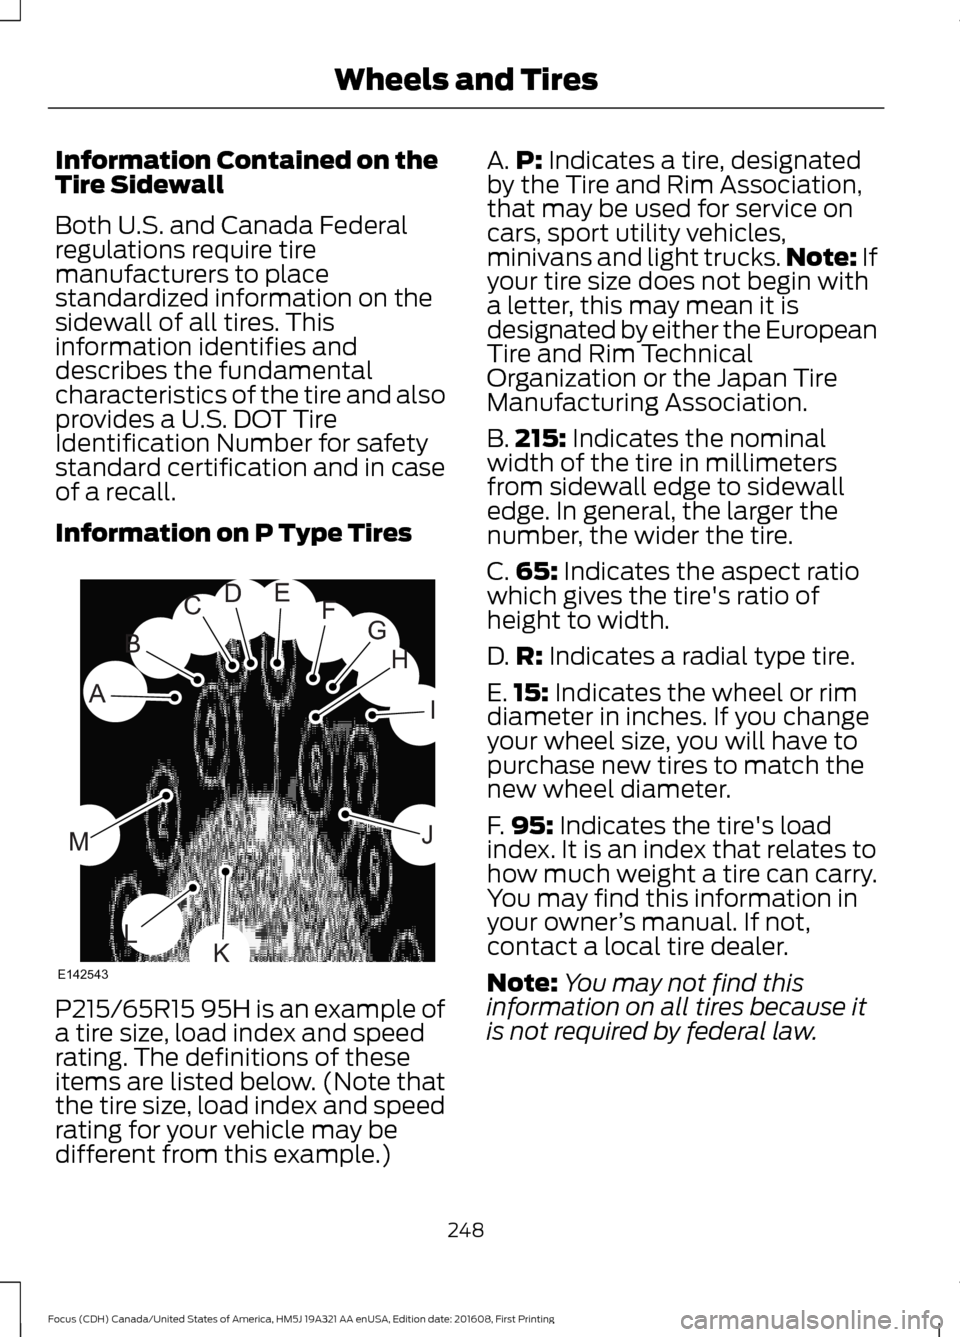
The manual front seats may consist of:
A bar to move the seat backward
and forward.
A
A lever to adjust the height of the
seat.
B
A lever to adjust the angle of the
seatback.
C
POWER SEATS WARNINGS
Do not adjust the driver seat or
seatback when your vehicle is
moving. Adjusting your seatback
while your vehicle is in motion may cause
loss of control of your vehicle. Reclining the seatback can cause an
occupant to slide under the seat's
safety belt, resulting in severe
personal injuries in the event of a crash. 112
Focus (CDH) Canada/United States of America, HM5J 19A321 AA enUSA, Edition date: 201608, First Printing SeatsE144727 E197725
Page 120 of 467

CENTER CONSOLE
Stow items in the cupholder carefully as
items may become loose during hard
braking, acceleration or crashes, including
hot drinks which may spill.
Available console features include:
Cupholder with grips and height
adjuster. To use, flip the
removable inset piece.
A
Storage compartment with
auxiliary power point and media
hub.
B
Parking aid, auto-start-stop and
heated steering wheel controls.
C
Auxiliary power point.
D
USB port.
E OVERHEAD CONSOLE
Press near the rear edge of the door to
open it.
117
Focus (CDH) Canada/United States of America, HM5J 19A321 AA enUSA, Edition date: 201608, First Printing Storage CompartmentsE188648 E131605
Page 229 of 467

Note:
Make sure that the wiper arm does
not spring back against the glass when the
wiper blade is not attached.
1. Lift the wiper arm. 2. Slightly rotate the wiper blade.
3. Disengage the wiper blade from the
wiper arm.
4. Remove the wiper blade.
5. Install in the reverse order.
Note: Make sure that the wiper blade locks
into place.
ADJUSTING THE HEADLAMPS
Vertical Aim Adjustment
If your vehicle has been involved in a crash,
have the aim of the headlamp beam
checked by an authorized dealer. Headlamp Aiming Target
8 ft (2.4 m)
A
Ground to the center of the
headlamp low beam bulb
B
25 ft (7.6 m)
C
Horizontal reference line
D
Vertical Aim Adjustment Procedure
1. Park your vehicle on level ground approximately 25 ft (7.6 m) from a wall
or screen.
2. Measure the distance from the ground
to the center of the headlamp low
beam bulb and mark an
8 ft (2.4 m)
long horizontal reference line on the
wall or screen at this height.
226
Focus (CDH) Canada/United States of America, HM5J 19A321 AA enUSA, Edition date: 201608, First Printing MaintenanceE130060
3
2 E142592
Page 251 of 467

Information Contained on the
Tire Sidewall
Both U.S. and Canada Federal
regulations require tire
manufacturers to place
standardized information on the
sidewall of all tires. This
information identifies and
describes the fundamental
characteristics of the tire and also
provides a U.S. DOT Tire
Identification Number for safety
standard certification and in case
of a recall.
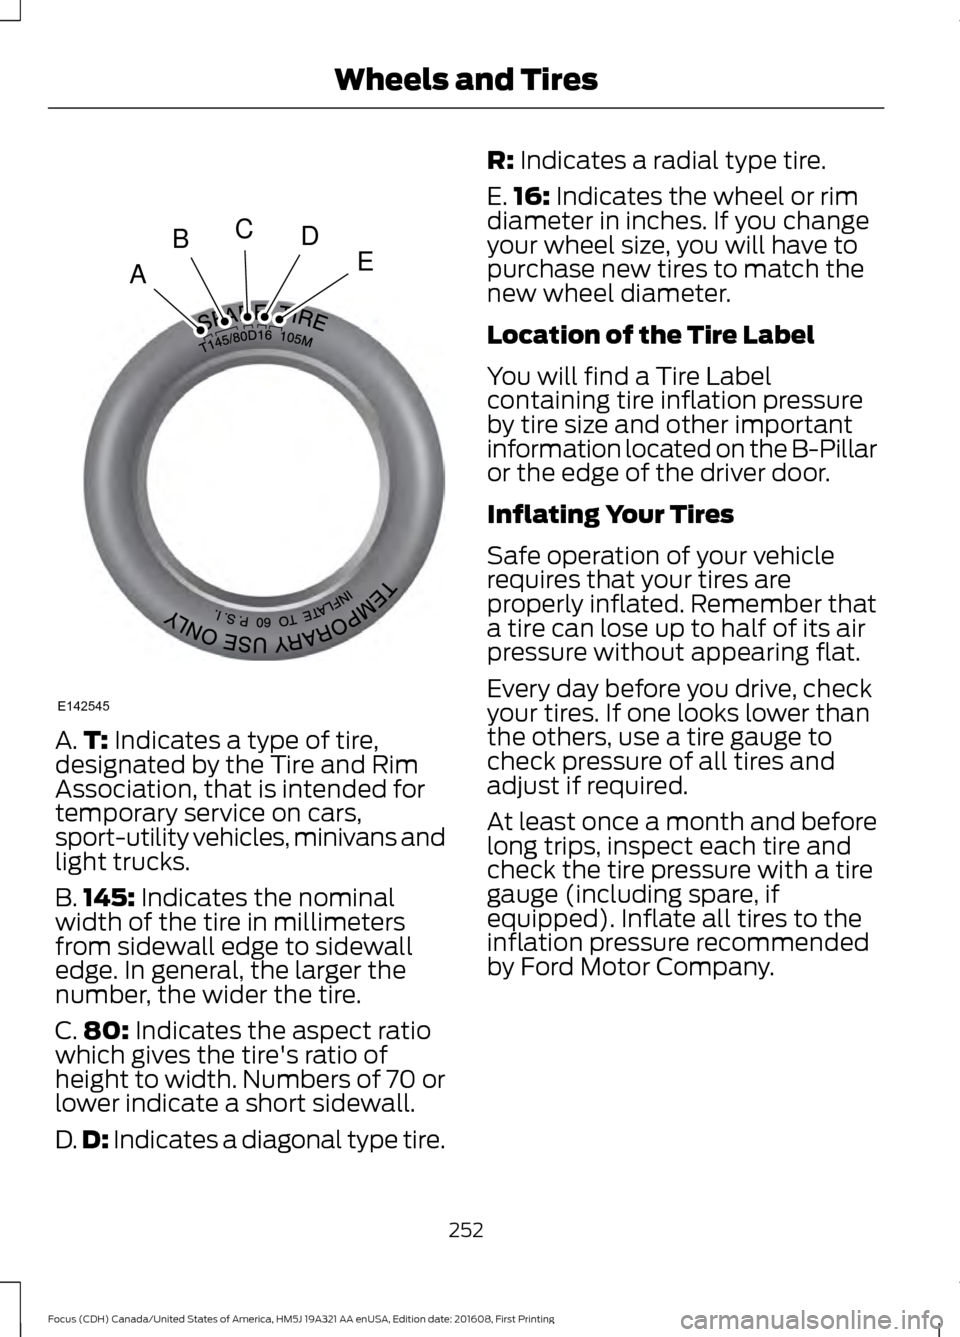
Information on P Type Tires
P215/65R15 95H is an example of
a tire size, load index and speed
rating. The definitions of these
items are listed below. (Note that
the tire size, load index and speed
rating for your vehicle may be
different from this example.) A.
P: Indicates a tire, designated
by the Tire and Rim Association,
that may be used for service on
cars, sport utility vehicles,
minivans and light trucks. Note:
If
your tire size does not begin with
a letter, this may mean it is
designated by either the European
Tire and Rim Technical
Organization or the Japan Tire
Manufacturing Association.
B. 215:
Indicates the nominal
width of the tire in millimeters
from sidewall edge to sidewall
edge. In general, the larger the
number, the wider the tire.
C. 65:
Indicates the aspect ratio
which gives the tire's ratio of
height to width.
D. R:
Indicates a radial type tire.
E. 15:
Indicates the wheel or rim
diameter in inches. If you change
your wheel size, you will have to
purchase new tires to match the
new wheel diameter.
F. 95:
Indicates the tire's load
index. It is an index that relates to
how much weight a tire can carry.
You may find this information in
your owner ’s manual. If not,
contact a local tire dealer.
Note: You may not find this
information on all tires because it
is not required by federal law.
248
Focus (CDH) Canada/United States of America, HM5J 19A321 AA enUSA, Edition date: 201608, First Printing Wheels and TiresH
I
J
KL
M
A
B
CDEFG
E142543
Page 255 of 467

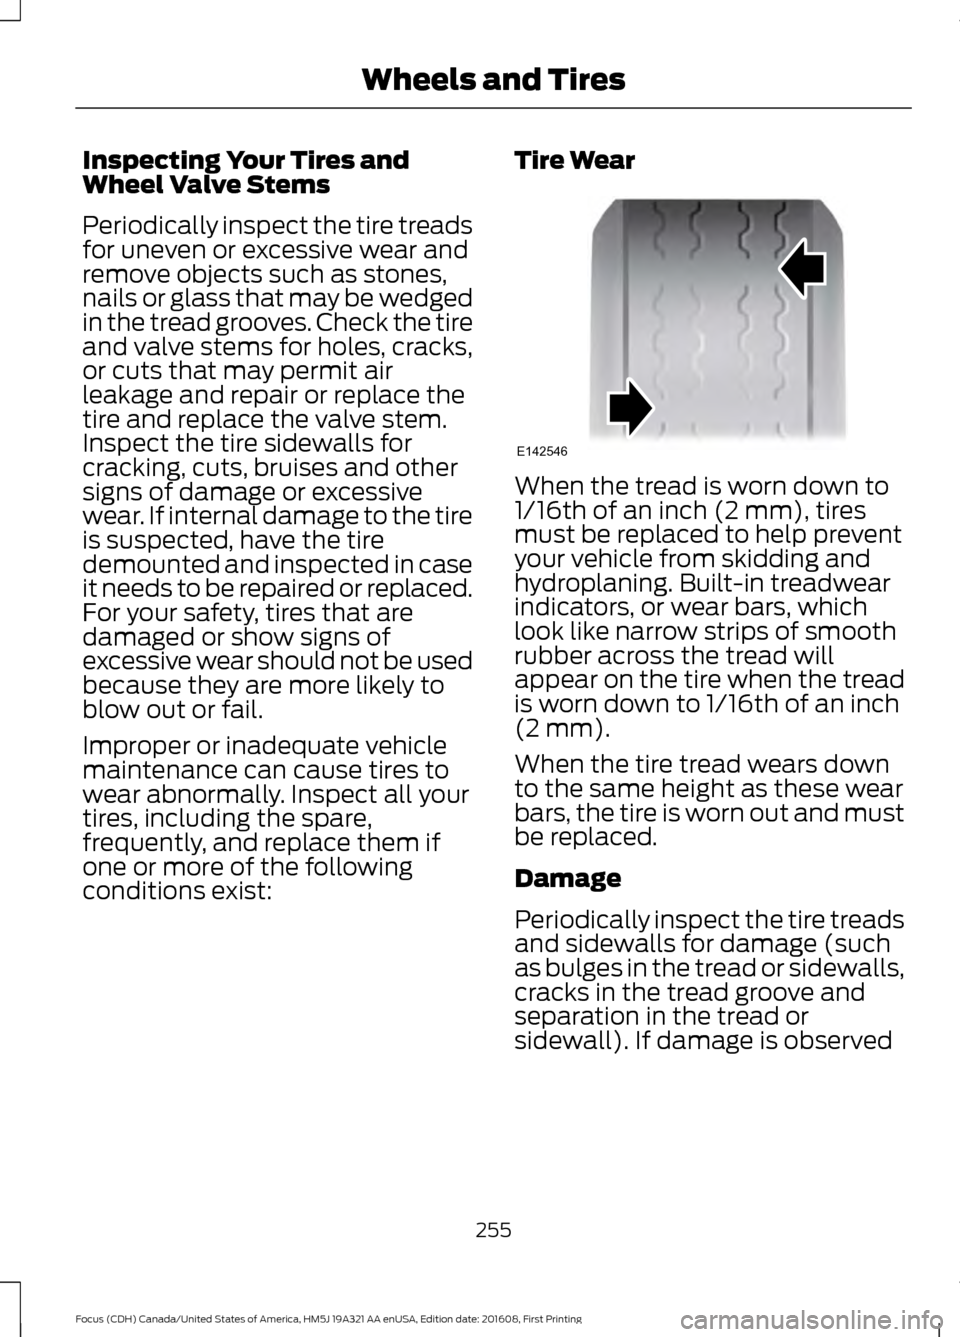
A.
T: Indicates a type of tire,
designated by the Tire and Rim
Association, that is intended for
temporary service on cars,
sport-utility vehicles, minivans and
light trucks.
B. 145:
Indicates the nominal
width of the tire in millimeters
from sidewall edge to sidewall
edge. In general, the larger the
number, the wider the tire.
C. 80:
Indicates the aspect ratio
which gives the tire's ratio of
height to width. Numbers of 70 or
lower indicate a short sidewall.
D. D:
Indicates a diagonal type tire. R:
Indicates a radial type tire.
E. 16:
Indicates the wheel or rim
diameter in inches. If you change
your wheel size, you will have to
purchase new tires to match the
new wheel diameter.
Location of the Tire Label
You will find a Tire Label
containing tire inflation pressure
by tire size and other important
information located on the B-Pillar
or the edge of the driver door.
Inflating Your Tires
Safe operation of your vehicle
requires that your tires are
properly inflated. Remember that
a tire can lose up to half of its air
pressure without appearing flat.
Every day before you drive, check
your tires. If one looks lower than
the others, use a tire gauge to
check pressure of all tires and
adjust if required.
At least once a month and before
long trips, inspect each tire and
check the tire pressure with a tire
gauge (including spare, if
equipped). Inflate all tires to the
inflation pressure recommended
by Ford Motor Company.
252
Focus (CDH) Canada/United States of America, HM5J 19A321 AA enUSA, Edition date: 201608, First Printing Wheels and TiresA
BCDE
E142545
Page 258 of 467

Inspecting Your Tires and
Wheel Valve Stems
Periodically inspect the tire treads
for uneven or excessive wear and
remove objects such as stones,
nails or glass that may be wedged
in the tread grooves. Check the tire
and valve stems for holes, cracks,
or cuts that may permit air
leakage and repair or replace the
tire and replace the valve stem.
Inspect the tire sidewalls for
cracking, cuts, bruises and other
signs of damage or excessive
wear. If internal damage to the tire
is suspected, have the tire
demounted and inspected in case
it needs to be repaired or replaced.
For your safety, tires that are
damaged or show signs of
excessive wear should not be used
because they are more likely to
blow out or fail.
Improper or inadequate vehicle
maintenance can cause tires to
wear abnormally. Inspect all your
tires, including the spare,
frequently, and replace them if
one or more of the following
conditions exist:
Tire Wear When the tread is worn down to
1/16th of an inch (2 mm), tires
must be replaced to help prevent
your vehicle from skidding and
hydroplaning. Built-in treadwear
indicators, or wear bars, which
look like narrow strips of smooth
rubber across the tread will
appear on the tire when the tread
is worn down to 1/16th of an inch
(2 mm).
When the tire tread wears down
to the same height as these wear
bars, the tire is worn out and must
be replaced.
Damage
Periodically inspect the tire treads
and sidewalls for damage (such
as bulges in the tread or sidewalls,
cracks in the tread groove and
separation in the tread or
sidewall). If damage is observed
255
Focus (CDH) Canada/United States of America, HM5J 19A321 AA enUSA, Edition date: 201608, First Printing Wheels and TiresE142546
Page 465 of 467

Running Out of Fuel......................................131
Adding Fuel From a Portable Fuel
Container........................................................... 131
Filling a Portable Fuel Container.................... 131
S
Safety Canopy ™............................................44
Safety Precautions.......................................128
Satellite Radio..............................................295
Satellite Radio Electronic Serial Number
(ESN)................................................................ 296
Satellite Radio Reception Factors..............295
SIRIUS® Satellite Radio Service.................. 295
Troubleshooting................................................. 296
Scheduled Maintenance Record
.............417
Scheduled Maintenance..........................409
Seatbelt Extension........................................35
Seatbelt Height Adjustment......................32
Seatbelt Reminder
.........................................33
Belt-Minder™........................................................ 33
Seatbelts...........................................................29 Principle of Operation........................................ 29
Seatbelt Warning Lamp and Indicator Chime...............................................................32
Conditions of operation..................................... 33
Seats..................................................................110
Security..............................................................67
Settings...........................................................380 911 Assist............................................................... 385
Ambient Lighting............................................... 390
Bluetooth.............................................................. 382
Clock........................................................................\
381
Display
.................................................................... 391
General.................................................................. 389
Media Player......................................................... 381
Mobile Apps........................................................ 388
Navigation............................................................ 386
Phone..................................................................... 382
Radio...................................................................... 385
Sound.................................................................... 380
Valet Mode........................................................... 392
Vehicle................................................................... 390
Voice Control....................................................... 392
Wi-Fi....................................................................... 390
Side Airbags.....................................................42
Sitting in the Correct Position...................110 Snow Chains
See: Using Snow Chains................................. 260
Special Notices................................................12 New Vehicle Limited Warranty......................... 12
On Board Diagnostics Data Link Connector............................................................ 13
Special Instructions.............................................. 12
Special Operating Conditions Scheduled Maintenance...............................................415
Exceptions.............................................................416
Speed Control See: Cruise Control............................................ 162
Stability Control............................................149 Principle of Operation....................................... 149
Starter Switch See: Ignition Switch............................................ 118
Starting a Gasoline Engine.........................121 Automatic Engine Shutdown......................... 122
Failure to Start..................................................... 122
Guarding Against Exhaust Fumes................124
Important Ventilating Information...............124
Stopping the Engine When Your Vehicle is Moving................................................................ 123
Stopping the Engine When Your Vehicle is Stationary......................................................... 123
Vehicles with an Ignition Key........................... 121
Vehicles with Keyless Start.............................. 121
Starting and Stopping the Engine...........118 General Information........................................... 118
Steering.............................................................175 Electric Power Steering..................................... 175
Steering Wheel................................................70
Storage Compartments..............................117
Sunroof See: Moonroof....................................................... 84
Sun Visors
.........................................................84
Illuminated Vanity Mirror................................... 84
Supplementary Restraints System.........38 Principle of Operation........................................ 38
Symbols Glossary
.............................................7
SYNC™ 3........................................................336
General Information......................................... 336
SYNC™ 3 Troubleshooting......................392
SYNC™ Applications and Services
.......314
911 Assist................................................................ 314
SYNC Mobile Apps............................................. 316
SYNC™...........................................................298 General Information......................................... 298
462
Focus (CDH) Canada/United States of America, HM5J 19A321 AA enUSA, Edition date: 201608, First Printing Index