2017 FORD FOCUS clock
[x] Cancel search: clockPage 269 of 467

WARNINGS
Never get underneath a vehicle that
is supported only by a jack. If the
vehicle slips off the jack, you or
someone else could be seriously injured. Do not attempt to change a tire on
the side of the vehicle close to
moving traffic. Pull far enough off the
road to avoid the danger of being hit when
operating the jack or changing the wheel. Always use the jack provided as
original equipment with your vehicle.
If using a jack other than the one
provided as original equipment with your
vehicle, make sure the jack capacity is
adequate for the vehicle weight, including
any vehicle cargo or modifications. Note:
Passengers should not remain in the
vehicle when the vehicle is being jacked.
1. Park on a level surface, set the parking
brake and activate the hazard flashers.
2. Place the transmission in park (P) (automatic transmission) or neutral
(N) (manual transmission) and turn
the engine off.
3. Remove the carpeted wheel cover.
4. Remove the spare tire bolt securing the
spare tire by turning it
counterclockwise.
5. Remove the spare tire from the spare tire compartment
6. Remove the retaining bolt securing the
jack by turning it counterclockwise.
7. Remove the jack. 8. Block the diagonally opposite wheel.
9. Loosen each wheel lug nut one-half
turn counterclockwise, but do not
remove them until the wheel is raised
off the ground.
10. The vehicle jacking points are shown
here, and are depicted on the warning
label on the jack. Note: Jack at the
specified locations to avoid damage
to the vehicle. 11. Indentations in the sills show the
location of the jacking points.
266
Focus (CDH) Canada/United States of America, HM5J 19A321 AA enUSA, Edition date: 201608, First Printing Wheels and TiresE142551 E145908
Page 270 of 467

12. Remove the lug nuts with the lug
wrench.
13. Replace the flat tire with the spare tire, making sure the valve stem is
facing outward. Reinstall the lug nuts
until the wheel is snug against the
hub. Do not fully tighten the lug nuts
until the wheel has been lowered.
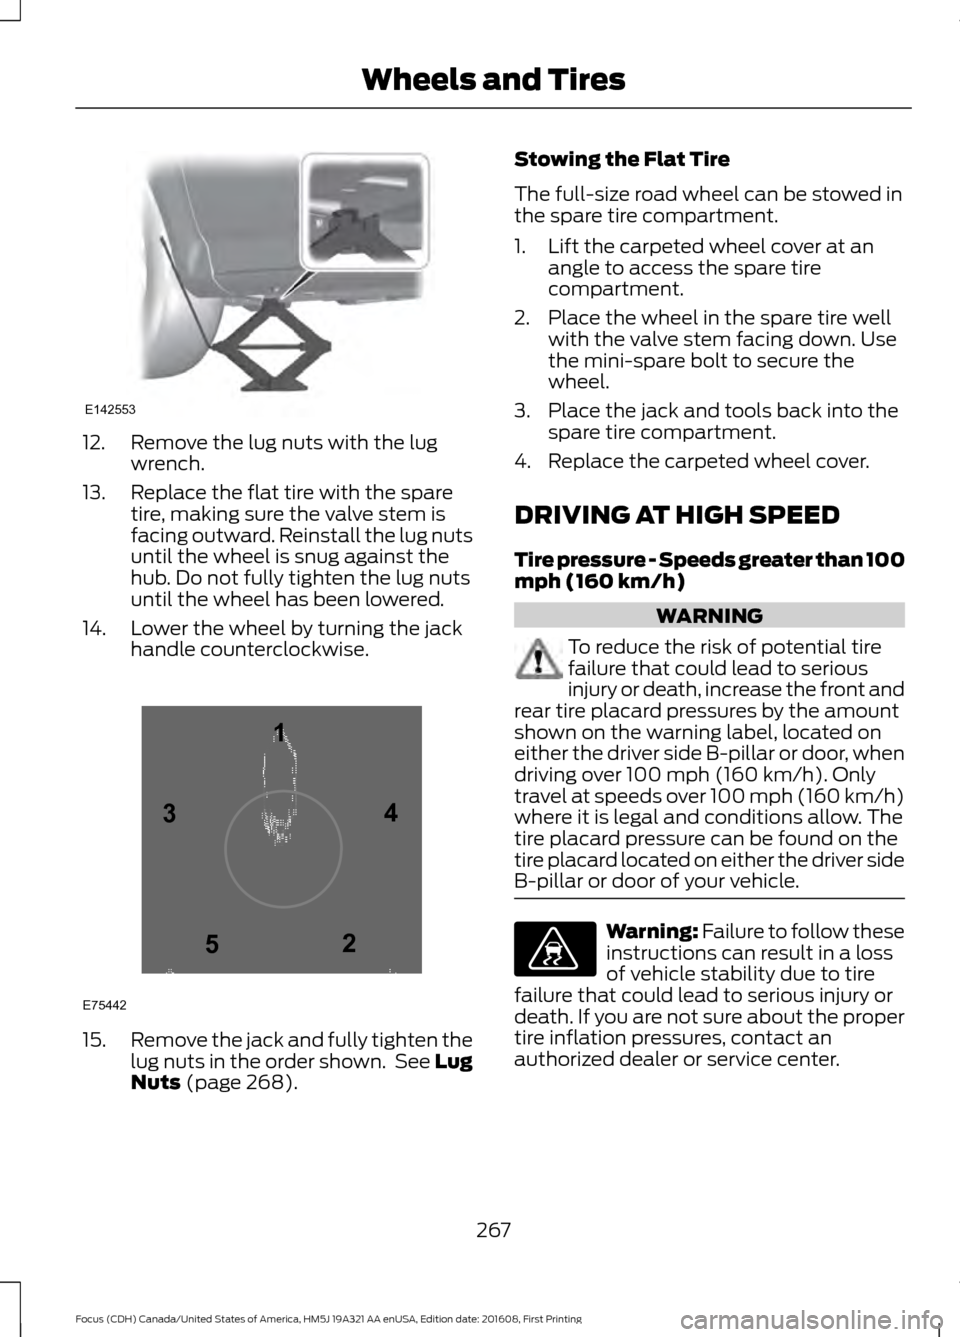
14. Lower the wheel by turning the jack handle counterclockwise. 15.
Remove the jack and fully tighten the
lug nuts in the order shown. See Lug
Nuts (page 268). Stowing the Flat Tire
The full-size road wheel can be stowed in
the spare tire compartment.
1. Lift the carpeted wheel cover at an
angle to access the spare tire
compartment.
2. Place the wheel in the spare tire well with the valve stem facing down. Use
the mini-spare bolt to secure the
wheel.
3. Place the jack and tools back into the spare tire compartment.
4. Replace the carpeted wheel cover.
DRIVING AT HIGH SPEED
Tire pressure - Speeds greater than 100
mph (160 km/h) WARNING
To reduce the risk of potential tire
failure that could lead to serious
injury or death, increase the front and
rear tire placard pressures by the amount
shown on the warning label, located on
either the driver side B-pillar or door, when
driving over
100 mph (160 km/h). Only
travel at speeds over 100 mph (160 km/h)
where it is legal and conditions allow. The
tire placard pressure can be found on the
tire placard located on either the driver side
B-pillar or door of your vehicle. Warning: Failure to follow these
instructions can result in a loss
of vehicle stability due to tire
failure that could lead to serious injury or
death. If you are not sure about the proper
tire inflation pressures, contact an
authorized dealer or service center.
267
Focus (CDH) Canada/United States of America, HM5J 19A321 AA enUSA, Edition date: 201608, First Printing Wheels and TiresE142553 12
3
4
5
E75442 E176077
Page 288 of 467

TUNE and Play or Pause: In radio mode, turn to search the frequency band
in individual increments. Press to mute the station. In media mode, turn to select
a new track. Press to either play or pause a track. This button also mutes the
radio sources.
F
PHONE:
Press to access the phone features of the SYNC system. See your
SYNC information.
G
MENU:
Press to access different audio system features. See Menu Structure
later in this chapter.
H
CLOCK:
If not in phone mode, press to display the clock.
I
Seek and Fast Forward:
In radio mode, select a frequency band and press
this button. The system stops at the first station up the band. Press and hold
the button to move quickly, then release to stop at the next available station.
In CD mode, press to select the next track. Press and hold the button to move
quickly forward through the current track.
J
OK and Arrow buttons:
Press OK to confirm menu selections. Press to scroll
through the menu choices.
K
Seek and Reverse:
In radio mode, select a frequency band and press this
button. The system stops at the first station down the band. Press and hold
the button to move quickly, then release to stop at the previous available station.
In CD mode, press to select the previous track. Press and hold the button to
move quickly backward through the current track.
L
SOUND:
Press to access settings for Treble, Midrange, Bass, Fade or Balance.
Use the up and down arrow buttons to select the various settings. When you
make your selection, press the left and right arrow buttons to change the
settings. Press
OK to set or press MENU to exit. Sound settings can be set for
each audio source independently.
M
RADIO:
Press this multiple times to select a radio band. Press and hold to
select the autostore function. Press to return to the main screen of the active
radio band.
N
MEDIA:
Press to open the media source menu. You can press this multiple
times to change to CD or to a SYNC-Media device or scroll through the media
sources using the arrow buttons. Press
OK to select a source.
O
285
Focus (CDH) Canada/United States of America, HM5J 19A321 AA enUSA, Edition date: 201608, First Printing Audio System
Page 292 of 467

CD Settings
Select to scan all disc selections.
Scan All
Select to scan all music in the current MP3 folder.
Scan Folder
Select to bring soft and loud passages together for a more
consistent listening level.
CD Compression Clock Settings
Select to set the time.
Set Time
Select to set the calendar date.
Set Date
Select to view clock time in a 12-hour mode or 24-hour
mode.
24h Mode Display Settings
Select to change display brightness.
Dimming
Select to display the language in English, French or
Spanish.
Language
Select to display the outside temperature in Fahrenheit
or Celsius.
Temp. Setting
289
Focus (CDH) Canada/United States of America, HM5J 19A321 AA enUSA, Edition date: 201608, First Printing Audio System
Page 295 of 467

TUNE and Play or Pause: In radio mode, turn to search the frequency band
in individual increments or jump to the next station of the station list. Press to
mute the station. In media mode, turn to select a new track. Press to either play
or pause a track. This button also mutes the radio sources.
F
CLOCK:
If not in phone mode, press to display the clock.
G
PHONE:
Press to access the phone features of the SYNC system. See your
SYNC information.
H
MENU:
Press to access different audio system features. See Menu Structure
later in this section.
I
SOUND:
Press to access settings for Treble, Midrange, Bass, Fade or Balance.
Use the up and down arrow buttons to select the various settings. When you
make your selection, press the left and right arrow buttons to change the
settings. Press
OK to set or press MENU to exit. Sound settings can be set for
each audio source independently.
J
Seek and Fast Forward:
In radio mode, select a frequency band and press
this button. The system stops at the first station up the band. Press and hold
the button to move quickly, then release to stop at the next available station.
In CD mode, press to select the next track. Press and hold the button to move
quickly forward through the current track.
K
OK and Arrow buttons:
Press OK to confirm menu selections. Press to scroll
through the menu choices.
L
Seek and Reverse:
In radio mode, select a frequency band and press this
button. The system stops at the first station down the band. Press and hold
the button to move quickly, then release to stop at the previous available station.
In CD mode, press to select the previous track. Press and hold the button to
move quickly backward through the current track.
M
SIRIUS:
Press to listen to Sirius satellite radio.
N
RADIO:
Press this multiple times to select a radio band. Press and hold to
select the autostore function. Press to return to the main screen of the active
radio band.
O
MEDIA:
Press to open the media source menu. You can press this multiple
times to change to CD or to a SYNC-Media device or scroll through the media
sources using the arrow buttons. Press
OK to select a source.
P
DIGITAL RADIO
Note: HD Radio broadcasts are not
available in all markets. HD Radio technology is the digital
evolution of analog AM/FM radio. Your
system has a special receiver that allows
it to receive digital broadcasts (where
available) in addition to the analog
broadcasts, it already receives. Digital
broadcasts provide a better sound quality
292
Focus (CDH) Canada/United States of America, HM5J 19A321 AA enUSA, Edition date: 201608, First Printing Audio System
Page 340 of 467

Action and Description
Menu Item
Item
This bar displays icons and messages pertaining to current
system activities including climate settings, voice
commands and phone functions such as text messages.
Status Bar
A
This button is available on the main screens. Pressing it
takes you to the home screen view.
Home
B
This shows the current time. You can set the clock manually
or have it controlled by the vehicle's GPS location. See
Settings (page 380).
Clock
C
This displays the current outside temperature.
Outside
Temperature
D
You can touch any of the buttons on this bar to select a
feature.
Feature Bar
E
The touchscreen allows you quick access
to all of your comfort, navigation,
communication and entertainment
options. Using the status and feature bar
you can quickly select the feature you want
to use.
Note: Your system is equipped with a
feature that allows you to access and
control audio features for 10 minutes after
you switch the ignition off (and no doors
open). The Status Bar
Additional icons also display in the status
bar depending on market, vehicle options
and current operation. If a feature is not
active, the icon does not display. Certain
icons may move to the left or right
depending on what options are active.
337
Focus (CDH) Canada/United States of America, HM5J 19A321 AA enUSA, Edition date: 201608, First Printing SYNC™ 3
Page 384 of 467

Media Player
This button is available when a media
device such as a Bluetooth Stereo or USB
device is the active audio source. Pressing
the button allows you to access the
following options for active devices only. Action and Description
Menu Item
For some Apple devices, SYNC 3 can adjust the playback speed of
podcasts. When a podcast is playing, you can choose:
Podcast Speed
Faster
Normal
Slower
For some Apple devices, SYNC 3 can adjust the playback speed of
audiobooks. When an audiobook is playing, you can choose:
Audiobook Speed
Faster
Normal
Slower
Cover art displays from your device ’s music
files. If no cover art for the files exists on the
device, then the Gracenote Database provides
cover art.
Media Player
Cover Art Priority
The Gracenote Database supplied cover art is
used for your music files. This overrides any
cover art from your device.
Gracenote®
Switches on and off Gracenote® to provide metadata information
such as genre, artist, album.
Gracenote®
Management
This allows you to view the version level of the Gracenote Database.
Gracenote® Data-
base Info
This allows you to view the manufacturer and model number of your
media device.
Device Informa-
tion
Erase the stored in media information in order to re-index.
Update Media
Index
Clock
To adjust the time, select the up and down
arrows on either side of the screen. The
arrows on the left adjust the hour and
arrows on the right adjust the minute. You
can then select AM or PM. You can adjust the following features:
381
Focus (CDH) Canada/United States of America, HM5J 19A321 AA enUSA, Edition date: 201608, First Printing SYNC™ 3
Page 385 of 467

Action and Description
Menu Item
Select how time displays.
Clock Format
When active, the clock adjusts to time zone changes.
Auto Time Zone
Update This feature is only available in vehicles with navigation.
When selected, the vehicle clock resets to GPS satellite time.
Reset Clock to
GPS Time
The system automatically saves any
updates you make to the settings. Bluetooth
Pressing this button allows you to access
the following: Action
Menu Item
Turning Bluetooth off disconnects all devices and does not permit
new connections.
Bluetooth
You must activate Bluetooth to pair a
Bluetooth-enabled device.
The processes of pairing a Bluetooth
device is the same as pairing a phone. See
Pairing a Device in Phone settings for how
to pair a device and the available options.
Phone
Pair your Bluetooth-enabled phone with
the system before using the functions in
hands-free mode.
Switch on Bluetooth on your device to
begin pairing. See your phone ’s manual if
necessary.
To add a phone, select: Menu Item
Add Phone
1. Follow the on-screen instructions.
2. A prompt alerts you to search for the system on your phone. 3. Select your vehicle's make and model
as it displays on your phone.
4. Confirm that the six-digit number appearing on your phone matches the
six-digit number on the touchscreen.
5. The touchscreen indicates when the pairing is successful.
6. Your phone may prompt you to give the system permission to access
information. To check your phone ’s
compatibility, see your phone ’s manual
or visit the website.
Alternatively, to add a phone, select: Menu Item
Add Phone
Then select:
Discover Other Bluetooth Devices
1. Follow the on-screen instructions.
2. Select your phone's name when it appears on the touchscreen.
382
Focus (CDH) Canada/United States of America, HM5J 19A321 AA enUSA, Edition date: 201608, First Printing SYNC™ 3