2017 FORD FOCUS warning
[x] Cancel search: warningPage 231 of 467

2. Remove the screws.
3. Pull the headlamp as far as possible
towards the front of the vehicle to
disengage it from the lower fixing point.
4. Lift the outer side of the headlamp and
remove it. 5. Disconnect the electrical connector. CHANGING A BULB WARNING
Handle a halogen headlamp bulb
carefully and keep out of children
’s
reach. Grasp the bulb by only its
plastic base and do not touch the glass.
The oil from your hand could cause the
bulb to break the next time the headlamps
are operated. Note:
If you accidently touch the bulb, you
should clean it with rubbing alcohol.
Headlamp Side marker bulb.
A.
Low beam headlamp bulb.
B.
High beam headlamp bulb.
C.
Direction indicator bulb.
Cornering lamp bulb.
D.
Headlamp Low Beam
1. Remove the headlamp. See Removing a Headlamp (page 227).
228
Focus (CDH) Canada/United States of America, HM5J 19A321 AA enUSA, Edition date: 201608, First Printing MaintenanceE133215
2
2
4
3 E133750
5 E184152
BACD
Page 238 of 467
CHANGING THE ENGINE AIR
FILTER
WARNING
To reduce the risk of vehicle damage
and personal burn injuries, do not
start your engine with the air cleaner
removed. Do not remove the air cleaner
while the engine is running. When changing the air filter element, use
only the air filter element listed in the
Motorcraft Parts table. See Motorcraft
Parts (page 272).
For EcoBoost equipped vehicles: When
servicing the air cleaner, it is important that
no foreign material enter the air induction
system. The engine and turbocharger are
susceptible to damage from even small
particles.
Change the air filter element at the proper
interval. See
Scheduled Maintenance
(page 409).
Note: Failure to use the correct air filter
element may result in severe engine
damage. The customer warranty may be
void for any damage to the engine if the
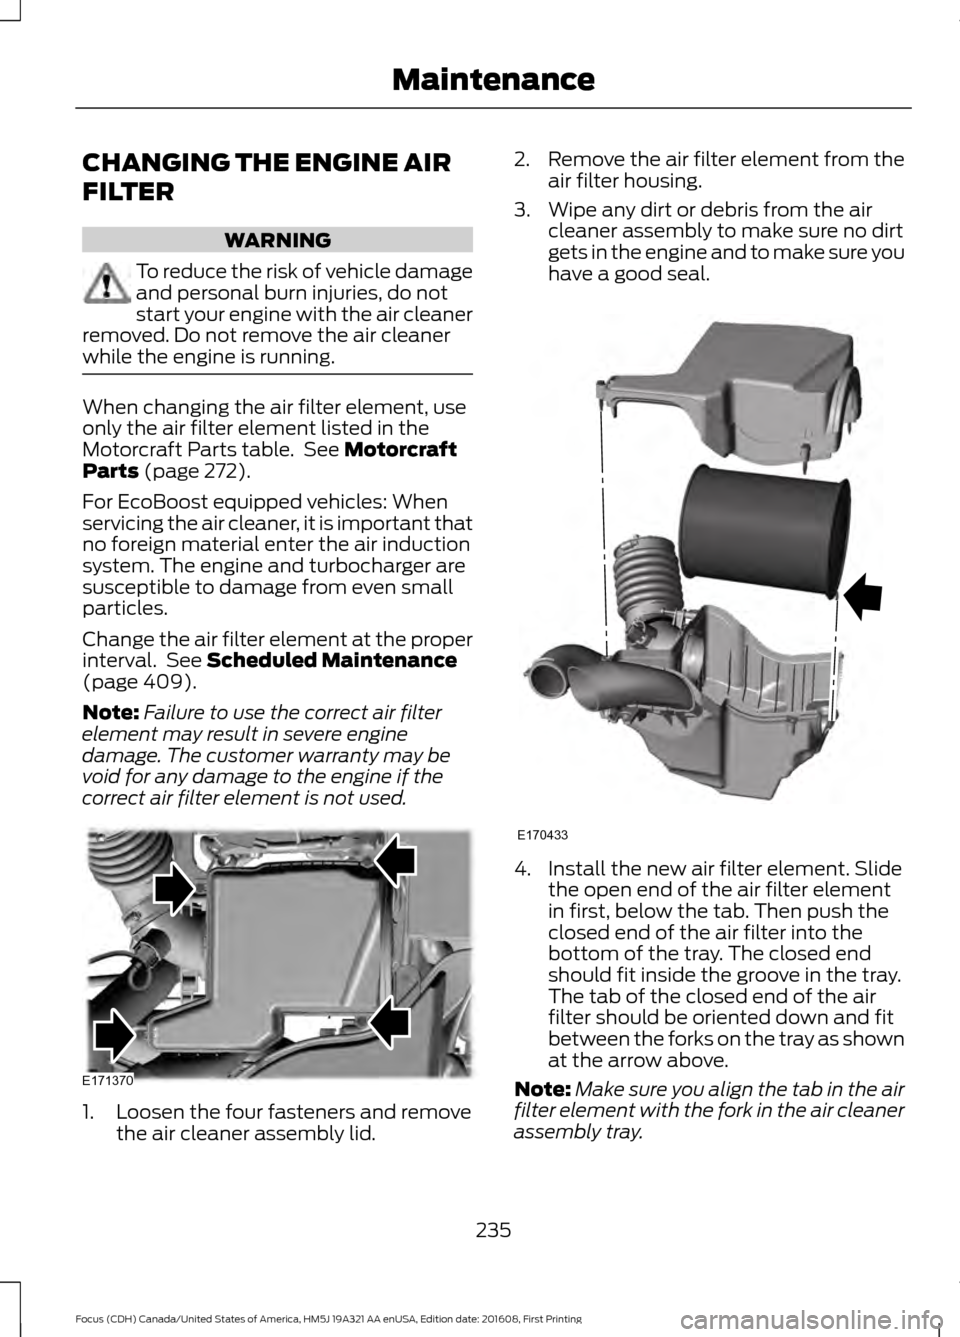
correct air filter element is not used. 1. Loosen the four fasteners and remove
the air cleaner assembly lid. 2.
Remove the air filter element from the
air filter housing.
3. Wipe any dirt or debris from the air cleaner assembly to make sure no dirt
gets in the engine and to make sure you
have a good seal. 4. Install the new air filter element. Slide
the open end of the air filter element
in first, below the tab. Then push the
closed end of the air filter into the
bottom of the tray. The closed end
should fit inside the groove in the tray.
The tab of the closed end of the air
filter should be oriented down and fit
between the forks on the tray as shown
at the arrow above.
Note: Make sure you align the tab in the air
filter element with the fork in the air cleaner
assembly tray.
235
Focus (CDH) Canada/United States of America, HM5J 19A321 AA enUSA, Edition date: 201608, First Printing MaintenanceE171370 E170433
Page 243 of 467
•
Never wash or rinse any ignition coil,
spark plug wire or spark plug well, or
the area in and around these locations.
• Cover the battery, power distribution
box, and air filter assembly to prevent
water damage when cleaning the
engine.
CLEANING THE WINDOWS AND
WIPER BLADES
Car wash chemicals and environmental
fallout can result in windshield and wiper
blade contamination. Dirty windshield and
wipers will result in poor windshield wiper
operation. Keep the windshield and wiper
blades clean to maintain windshield wiper
performance.
To clean the windshield and wiper blades:
• Clean the windshield with a
non-abrasive glass cleaner. When
cleaning the interior of the windshield,
avoid getting any glass cleaner on the
instrument panel or door panels. Wipe
any glass cleaner off these surfaces
immediately.
• For windshields contaminated with
tree sap, chemicals, wax or bugs, clean
the entire windshield using steel wool
(no greater than 0000 grade) in a
circular motion and rinse with water.
• Clean the wiper blades with isopropyl
rubbing alcohol or windshield washer
concentrate.
Note: Do not use razor blades or other
sharp objects to clean or remove decals
from the inside of the heated rear window.
The vehicle warranty does not cover
damage caused to the heated rear window
grid lines. CLEANING THE INTERIOR WARNINGS
Do not use cleaning solvents, bleach
or dye on the vehicle
’s safety belts,
as these actions may weaken the
belt webbing. On vehicles equipped with
seat-mounted airbags, do not use
chemical solvents or strong
detergents. Such products could
contaminate the side airbag system and
affect performance of the side airbag in a
collision. For fabric, carpets, cloth seats, safety belts
and seats equipped with side airbags:
•
Remove dust and loose dirt with a
vacuum cleaner.
• Remove light stains and soil with
Motorcraft Professional Strength
Carpet & Upholstery Cleaner.
• If grease or tar is present on the
material, spot-clean the area first with
Motorcraft Spot and Stain Remover. In
Canada, use Motorcraft Multi-Purpose
Cleaner.
• If a ring forms on the fabric after spot
cleaning, clean the entire area
immediately (but do not oversaturate)
or the ring will set.
• Do not use household cleaning
products or glass cleaners, which can
stain and discolor the fabric and affect
the flame retardant abilities of the seat
materials.
240
Focus (CDH) Canada/United States of America, HM5J 19A321 AA enUSA, Edition date: 201608, First Printing Vehicle Care
Page 244 of 467
CLEANING THE INSTRUMENT
PANEL AND INSTRUMENT
CLUSTER LENS
WARNING
Do not use chemical solvents or
strong detergents when cleaning the
steering wheel or instrument panel
to avoid contamination of the airbag
system. Note:
Follow the same procedure as
cleaning leather seats for cleaning leather
instrument panels and leather interior trim
surfaces. See Cleaning Leather Seats
(page 241).
Clean the instrument panel and cluster
lens with a clean, damp and soft cloth,
then use a clean, dry and soft cloth to dry
these areas.
• Avoid cleaners or polishes that increase
the gloss of the upper portion of the
instrument panel. The dull finish in this
area helps protect you from
undesirable windshield reflection.
• Do not use any household cleaning
products or glass cleaners as these
may damage the finish of the
instrument panel, interior trim and
cluster lens.
• Wash or wipe your hands clean if you
have been in contact with certain
products such as insect repellent and
suntan lotion to avoid possible damage
to the interior painted surfaces.
• Do not allow air fresheners and hand
sanitizers to spill onto interior surfaces.
If a spill occurs, wipe off immediately.
Your warranty may not cover these
damages.
If a staining liquid like coffee or juice has
been spilled on the instrument panel or on
interior trim surfaces: 1. Wipe up spilled liquid using a clean,
soft cloth as quickly as possible.
2. Use Motorcraft Premium Leather and Vinyl Cleaner or a commercially
available leather cleaning product for
automotive interiors. Test any cleaner
or stain remover on an inconspicuous
area.
3. Alternatively, wipe the surface with a clean, soft cloth and a mild soap and
water solution. Dry the area with a
clean, soft cloth.
4. If necessary, apply more soap and water solution or cleaning product to
a clean, soft cloth and press it onto the
soiled area. Allow this to set at room
temperature for 30 minutes.
5. Remove the soaked cloth, then with a clean, damp cloth, use a rubbing
motion for 60 seconds on the soiled
area.
6. Dry the area with a clean, soft cloth.
CLEANING LEATHER SEATS
(If
Equipped)
Note: Follow the same procedure as
cleaning leather seats for cleaning leather
instrument panels and leather interior trim
surfaces.
For routine cleaning, wipe the surface with
a soft, damp cloth and a mild soap and
water solution. Dry the area with a clean,
soft cloth.
For cleaning and removing stains such as
dye transfer, use Motorcraft Premium
Leather and Vinyl Cleaner or a
commercially available leather cleaning
product for automotive interiors.
Note: Test any cleaner or stain remover on
an inconspicuous area.
241
Focus (CDH) Canada/United States of America, HM5J 19A321 AA enUSA, Edition date: 201608, First Printing Vehicle Care
Page 249 of 467
U.S. Department of
Transportation-Tire quality
grades: The U.S. Department of
Transportation requires Ford
Motor Company to give you the
following information about tire
grades exactly as the government
has written it.
Treadwear
The treadwear grade is a
comparative rating based on the
wear rate of the tire when tested
under controlled conditions on a
specified government test course.
For example, a tire graded 150
would wear 1½ times as well on
the government course as a tire
graded 100. The relative
performance of tires depends
upon the actual conditions of their
use, however, and may depart
significantly from the norm due to
variations in driving habits, service
practices, and differences in road
characteristics and climate.
Traction AA A B C WARNING
The traction grade assigned
to this tire is based on
straight-ahead braking traction
tests, and does not include
acceleration, cornering,
hydroplaning or peak traction
characteristics. The traction grades, from highest
to lowest are AA, A, B, and C. The
grades represent the tire
’s ability
to stop on wet pavement as
measured under controlled
conditions on specified
government test surfaces of
asphalt and concrete. A tire
marked C may have poor traction
performance.
Temperature A B C WARNING
The temperature grade for
this tire is established for a
tire that is properly inflated and
not overloaded. Excessive speed,
under-inflation, or excessive
loading, either separately or in
combination, can cause heat
buildup and possible tire failure. The temperature grades are A
(the highest), B and C,
representing the tire
’s resistance
to the generation of heat and its
ability to dissipate heat when
tested under controlled conditions
on a specified indoor laboratory
test wheel. Sustained high
temperature can cause the
material of the tire to degenerate
and reduce tire life, and excessive
temperature can lead to sudden
tire failure. The grade C
corresponds to a level of
performance which all passenger
car tires must meet under the
246
Focus (CDH) Canada/United States of America, HM5J 19A321 AA enUSA, Edition date: 201608, First Printing Wheels and Tires
Page 254 of 467
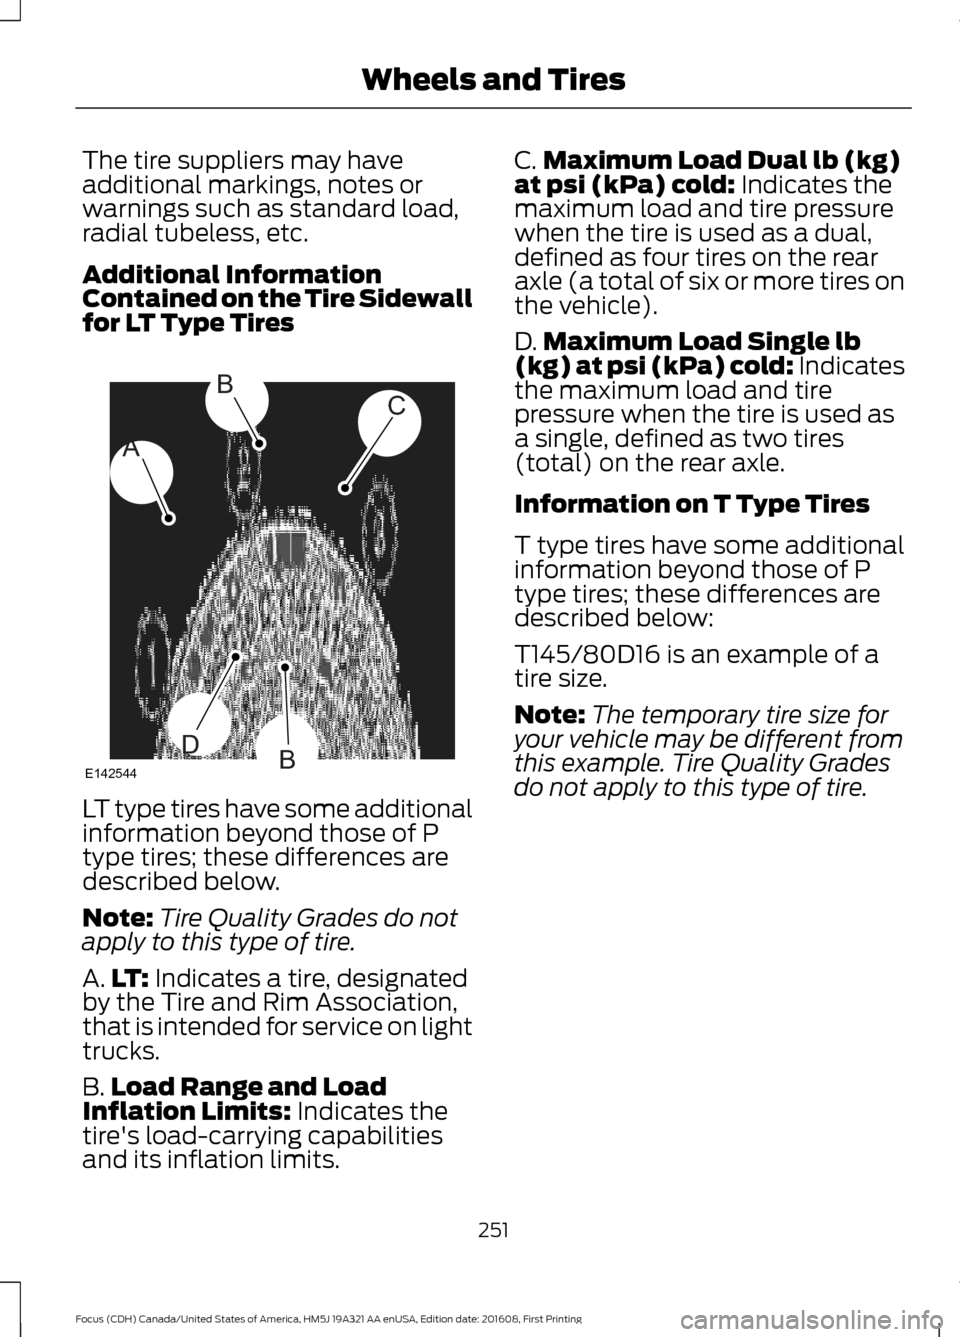
The tire suppliers may have
additional markings, notes or
warnings such as standard load,
radial tubeless, etc.
Additional Information
Contained on the Tire Sidewall
for LT Type Tires
LT type tires have some additional
information beyond those of P
type tires; these differences are
described below.
Note:
Tire Quality Grades do not
apply to this type of tire.
A. LT: Indicates a tire, designated
by the Tire and Rim Association,
that is intended for service on light
trucks.
B. Load Range and Load
Inflation Limits:
Indicates the
tire's load-carrying capabilities
and its inflation limits. C.
Maximum Load Dual lb (kg)
at psi (kPa) cold:
Indicates the
maximum load and tire pressure
when the tire is used as a dual,
defined as four tires on the rear
axle (a total of six or more tires on
the vehicle).
D. Maximum Load Single lb
(kg) at psi (kPa) cold:
Indicates
the maximum load and tire
pressure when the tire is used as
a single, defined as two tires
(total) on the rear axle.
Information on T Type Tires
T type tires have some additional
information beyond those of P
type tires; these differences are
described below:
T145/80D16 is an example of a
tire size.
Note: The temporary tire size for
your vehicle may be different from
this example. Tire Quality Grades
do not apply to this type of tire.
251
Focus (CDH) Canada/United States of America, HM5J 19A321 AA enUSA, Edition date: 201608, First Printing Wheels and TiresA
BC
BDE142544
Page 256 of 467
WARNING
Under-inflation is the most
common cause of tire failures
and may result in severe tire
cracking, tread separation or
blowout, with unexpected loss of
vehicle control and increased risk
of injury. Under-inflation increases
sidewall flexing and rolling
resistance, resulting in heat
buildup and internal damage to
the tire. It also may result in
unnecessary tire stress, irregular
wear, loss of vehicle control and
accidents. A tire can lose up to
half of its air pressure and not
appear to be flat! You are strongly urged to buy a
reliable tire pressure gauge, as
automatic service station gauges
may be inaccurate. Ford
recommends the use of a digital
or dial-type tire pressure gauge
rather than a stick-type tire
pressure gauge.
Use the recommended cold
inflation pressure for optimum tire
performance and wear.
Under-inflation or over-inflation
may cause uneven treadwear
patterns.
Always inflate your tires to the
Ford recommended inflation
pressure even if it is less than the
maximum inflation pressure
information found on the tire. The
Ford recommended tire inflation
pressure is found on the Safety
Compliance Certification Label (affixed to either the door hinge
pillar, door-latch post, or the door
edge that meets the door-latch
post, next to the driver's seating
position), or Tire Label which is
located on the B-Pillar or the edge
of the driver door. Failure to follow
the tire pressure
recommendations can cause
uneven treadwear patterns and
adversely affect the way your
vehicle handles.
Maximum Inflation Pressure is
the tire manufacturer's maximum
permissible pressure or the
pressure at which the maximum
load can be carried by the tire. This
pressure is normally higher than
the manufacturer ’s recommended
cold inflation pressure, which can
be found on the Safety
Compliance Certification Label
(affixed to either the door hinge
pillar, door-latch post, or the door
edge that meets the door-latch
post, next to the driver's seating
position), or Tire Label which is
located on the B-Pillar or the edge
of the driver ’s door. The cold
inflation pressure should never be
set lower than the recommended
pressure on the Safety
Compliance Certification Label or
Tire Label.
253
Focus (CDH) Canada/United States of America, HM5J 19A321 AA enUSA, Edition date: 201608, First Printing Wheels and Tires
Page 259 of 467
or suspected have the tire
inspected by a tire professional.
Tires can be damaged during
off-road use, so inspection after
off-road use is also
recommended.
Age
WARNING
Tires degrade over time
depending on many factors
such as weather, storage
conditions, and conditions of use
(such as load, speed, inflation
pressure, etc.) the tires experience
throughout their lives.
In general, tires should be
replaced after six years regardless
of tread wear. However, heat
caused by hot climates or
frequent high loading conditions
can accelerate the aging process
and may require tires to be
replaced more frequently.
You should replace your spare tire
when you replace the road tires or
after six years due to aging even if
it has not been used. U.S. DOT Tire Identification
Number
Both United States and Canada
Federal regulations require tire
manufacturers to place
standardized information on the
sidewall of all tires. This
information identifies and describes the fundamental
characteristics of the tire and also
provides a United States DOT Tire
Identification Number for safety
standard certification and in case
of a recall.
This begins with the letters DOT
and indicates that the tire meets
all federal standards. The next
two numbers or letters are the
plant code designating where it
was manufactured, the next two
are the tire size code and the last
four numbers represent the week
and year the tire was built. For
example, the numbers 317 mean
the 31st week of 1997. After 2000
the numbers go to four digits. For
example, 2501 means the 25th
week of 2001. The numbers in
between are identification codes
used for traceability. This
information is used to contact
customers if a tire defect requires
a recall.
Tire Replacement
Requirements
Your vehicle is equipped with tires
designed to provide a safe ride
and handling capability.
WARNINGS
Only use replacement tires
and wheels that are the same
size, load index, speed rating and
type (such as P-metric versus
LT-metric or all-season versus
all-terrain) as those originally
provided by Ford. The
recommended tire and wheel size
256
Focus (CDH) Canada/United States of America, HM5J 19A321 AA enUSA, Edition date: 201608, First Printing Wheels and Tires