2017 FORD FIESTA set clock
[x] Cancel search: set clockPage 4 of 450

Audio Control...................................................67
Voice Control
...................................................68
Cruise Control.................................................68
Wipers and Washers
Windshield Wipers
........................................69
Windshield Washers.....................................69
Rear Window Wiper and Washers...........70
Lighting
General Information.......................................71
Lighting Control................................................71
Autolamps.........................................................72
Instrument Lighting Dimmer......................73
Headlamp Exit Delay.....................................73
Daytime Running Lamps
.............................73
Front Fog Lamps
............................................74
Direction Indicators
........................................74
Interior Lamps..................................................74
Ambient Lighting
............................................75
Windows and Mirrors
Power Windows
..............................................76
Exterior Mirrors
.................................................77
Interior Mirror
....................................................78
Moonroof...........................................................79
Instrument Cluster
Gauges...............................................................80
Warning Lamps and Indicators..................81
Audible Warnings and Indicators.............84
Information Displays
General Information
.....................................85
Clock...................................................................86
Trip Computer
.................................................86
Personalized Settings
...................................87
Information Messages
..................................87 Climate Control
Manual Climate Control..............................95
Automatic Climate Control........................96
Hints on Controlling the Interior
Climate...........................................................97
Heated Windows and Mirrors.................100
Cabin Air Filter...............................................100
Seats
Sitting in the Correct Position..................102
Head Restraints
............................................102
Manual Seats
.................................................104
Rear Seats
.......................................................105
Heated Seats.................................................106
Auxiliary Power Points
Auxiliary Power Points...............................108
Cigar Lighter
...................................................108
Storage Compartments
Center Console
...............................................110
Overhead Console
........................................110
Starting and Stopping the Engine
General Information
......................................111
Ignition Switch
.................................................111
Keyless Starting
...............................................111
Starting a Gasoline Engine.........................113
Switching Off the Engine
............................114
Engine Block Heater.....................................114
Fuel and Refueling
Safety Precautions
.......................................116
Fuel Quality
......................................................117
Fuel Filler Funnel Location
.........................117
Running Out of Fuel
......................................117
Catalytic Converter
.......................................119
Refueling...........................................................119
2
Fiesta (CCT) Canada/United States of America, HE8J 19A321 AA enUSA, Edition date: 201607, First Printing Table of Contents
Page 88 of 450
Reset all settings
Adaptive volume
Audio settings
Sound
Nav audio mixing
DSP settings
DSP equaliser
Traffic
News
Alt. frequency
RDS regional
Traction control
Vehicle settings
Hill start assist
Alarm system
Power mirror
Indicator
Ambient light
Chimes
Auto time (GPS)
Clock settings
Set time
Set date
Set time zone
24-hour mode
Measure unit
Display settings
Language
Dimming
Create MyKey
MyKey
Traction control
ESC Max Speed
Speed warning
MyKey Volume
limit
Information
Clear MyKeys
CLOCK
Type 1
To adjust the clock, switch the ignition on
and press buttons H or M on the
information and entertainment display as
necessary.
Type 2
Note: Use the information display to adjust
the clock. See General Information (page
85).
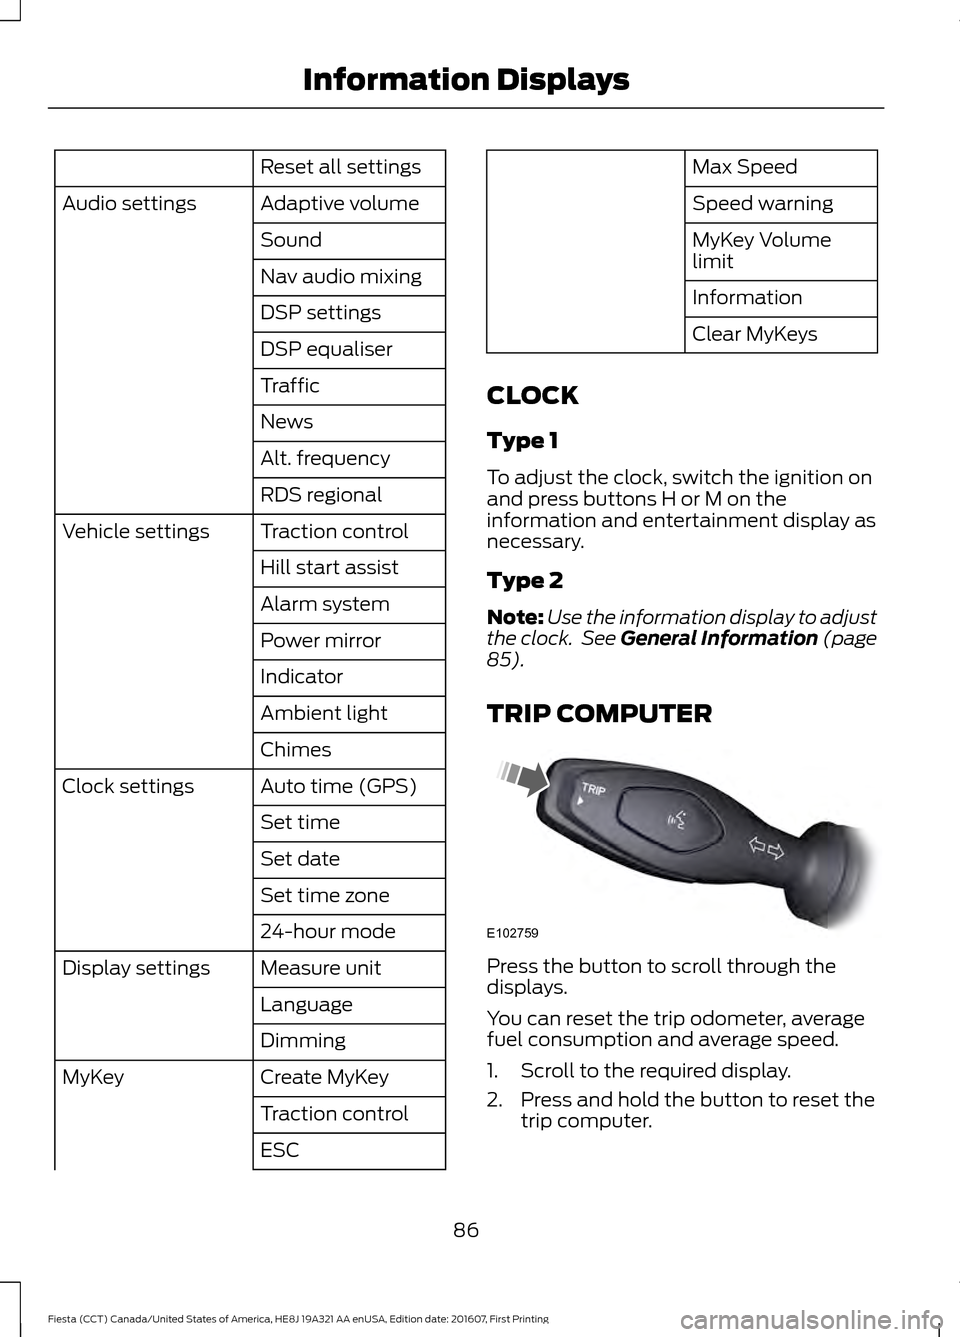
TRIP COMPUTER Press the button to scroll through the
displays.
You can reset the trip odometer, average
fuel consumption and average speed.
1. Scroll to the required display.
2. Press and hold the button to reset the
trip computer.
86
Fiesta (CCT) Canada/United States of America, HE8J 19A321 AA enUSA, Edition date: 201607, First Printing Information DisplaysE102759
Page 189 of 450

WARNINGS
Do not remove the filler cap when
the engine is running.
Do not use supplemental engine oil
additives because they are unnecessary
and could lead to engine damage that may
not be covered by the vehicle Warranty.
Only use oils certified for gasoline engines
by the American Petroleum Institute (API).
An oil with this trademark symbol
conforms to the current engine and
emission system protection standards and
fuel economy requirements of the
International Lubricants Specification
Advisory Committee (ILSAC).
To top up the engine oil level do the
following:
1. Clean the area surrounding the engine
oil filler cap before you remove it.
2. Remove the engine oil filler cap. See Under Hood Overview (page 184).
Turn it counterclockwise and remove
it.
3. Add engine oil that meets Ford specifications. See
Capacities and
Specifications (page 250). You may
have to use a funnel to pour the engine
oil into the opening.
4. Recheck the oil level. 5. If the oil level is correct, replace the
dipstick and make sure it is fully seated.
6. Replace the engine oil filler cap. Turn it clockwise until you feel a strong
resistance.
Note: Do not add oil further than the
maximum mark. Oil levels above the
maximum mark may cause engine damage.
Note: Make sure you install the oil filler cap
correctly.
Note: Soak up any spillage with an
absorbent cloth immediately.
OIL CHANGE INDICATOR
RESET
(If Equipped)
Resetting the Oil Life Monitoring
System
Only reset the oil life monitoring system
after changing the engine oil and oil filter.
1. Switch the ignition on. Do not start the
engine. For vehicles with push-button
start, press and hold the start button
for two seconds without pressing the
brake pedal. Do not start the engine.
2. Press the accelerator and brake pedals
at the same time.
3. Keep the accelerator and brake pedals
fully pressed.
4. After three seconds, a message confirming that the reset is in progress
will be displayed.
5. After 25 seconds, a message confirming that the reset is complete
will be displayed.
6. Release the accelerator and brake pedals.
7. The message confirming that the reset
is complete will no longer be displayed.
8. Switch the ignition off. For vehicles with
push-button start, press the start
button to switch the ignition off.
187
Fiesta (CCT) Canada/United States of America, HE8J 19A321 AA enUSA, Edition date: 201607, First Printing MaintenanceE142732
Page 196 of 450
Note:
Electrical accessories or components
added to your vehicle by you or an
authorized dealer, may adversely affect
battery performance, durability and the
performance of other electrical systems on
your vehicle.
If a replacement battery is required, we
recommend you use a Ford replacement
battery that matches the electrical
requirements of your vehicle.
If you disconnect or replace the battery
and your vehicle has an automatic
transmission, transmission must relearn
its adaptive strategy. Because of this, the
transmission may shift firmly when first
driven. This is normal operation while the
transmission fully updates its operation to
optimum shift feel.
Remove and Reinstall the Battery
To disconnect or remove the battery, do
the following:
1. Apply the parking brake and switch the
ignition off.
2. Switch all electrical equipment off, for
example lights and radio.
3. Wait a minimum of two minutes before
disconnecting the battery.
Note: The engine management system has
a power hold function and remains powered
for a period after you switch the ignition off.
This is to allow diagnostic and adaptive
tables to be stored. Disconnecting the
battery without waiting can cause damage
not covered by the vehicle Warranty.
4. Disconnect the negative (-) battery cable terminal first.
5. Disconnect the positive (+) battery cable terminal last.
6. Remove the battery securing clamp.
7. Remove the battery.
8. Install in the reverse order. Note:
Before reconnecting the battery,
make sure the ignition remains switched off.
Note: If you only disconnect the negative
battery cable terminal, make sure it is
isolated or placed away from the battery
terminal to avoid un-intended connection
or arcing.
Note: Make sure the battery cable terminals
are fully tightened.
Note: If you disconnect or replace the
battery, you must reset the clock and the
pre-set radio stations once the battery is
reconnected.
Battery Disposal Make sure that you dispose of
old batteries in an
environmentally friendly way.
Seek advice from your local authority
about recycling old batteries.
CHECKING THE WIPER
BLADES Run the tip of your fingers over the edge of
the blade to check for roughness.
Clean the wiper blades with washer fluid
or water applied with a soft sponge or
cloth.
194
Fiesta (CCT) Canada/United States of America, HE8J 19A321 AA enUSA, Edition date: 201607, First Printing MaintenanceE107998 E142463
Page 242 of 450

WARNINGS
Do not attempt to change a tire on
the side of the vehicle close to
moving traffic. Pull far enough off the
road to avoid the danger of being hit when
operating the jack or changing the wheel. Always use the jack provided as
original equipment with your vehicle.
If using a jack other than the one
provided as original equipment with your
vehicle, make sure the jack capacity is
adequate for the vehicle weight, including
any vehicle cargo or modifications. Make sure there is no lubrication
(grease or oil) on the threads or the
surface between the wheel lugs and
nuts. This can cause the lug nuts to loosen
while driving. Note:
Passengers should not remain in the
vehicle when the vehicle is being jacked.
1. Park on a level surface, set the parking
brake and activate the hazard flashers.
2. Place the transmission in park (P) (automatic transmission) or reverse
(R) (manual transmission) and turn
the engine off.
3. Remove the carpeted wheel cover.
4. Remove the spare tire bolt securing the
spare tire by turning it
counterclockwise.
5. Remove the spare tire from the spare tire compartment.
6. Remove the retaining bolt securing the
jack by turning it counterclockwise.
7. Remove the jack. 8. To remove the wrench from the jack,
turn the hex nut on the jack
counterclockwise. This will lower the
jack and loosen the mechanical lock. 9. Block the diagonally opposite wheel.
10. Loosen each wheel lug nut one-half
turn counterclockwise but do not
remove them until the wheel is raised
off the ground.
Note: Jack at the specified locations to
avoid damage to the vehicle.
11. The vehicle jacking points are shown
here, and are depicted on the yellow
warning label on the jack.
240
Fiesta (CCT) Canada/United States of America, HE8J 19A321 AA enUSA, Edition date: 201607, First Printing Wheels and TiresE175694 E142551
Page 261 of 450
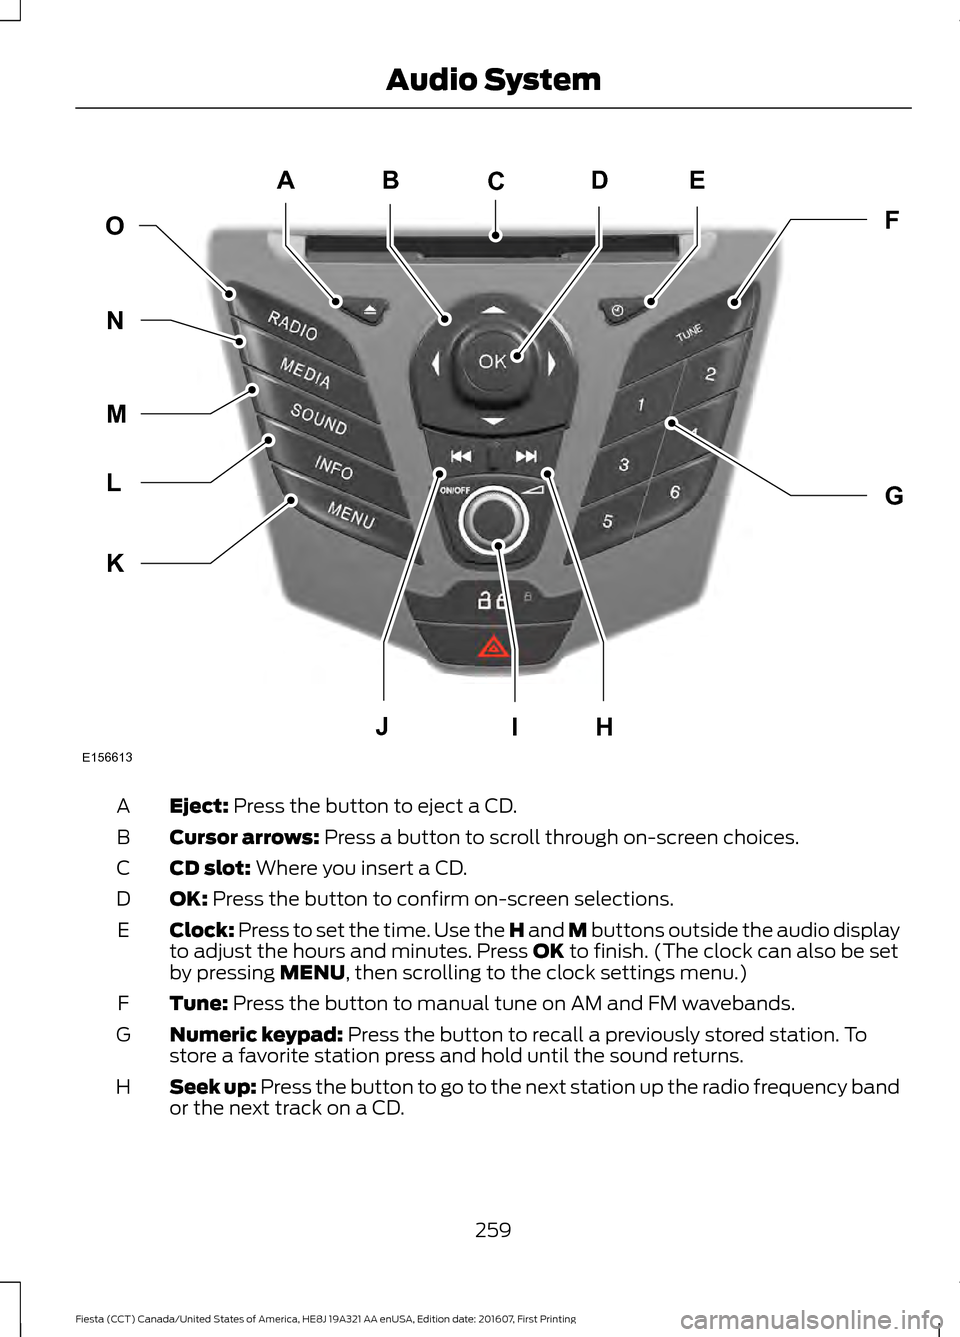
Eject: Press the button to eject a CD.
A
Cursor arrows:
Press a button to scroll through on-screen choices.
B
CD slot:
Where you insert a CD.
C
OK:
Press the button to confirm on-screen selections.
D
Clock:
Press to set the time. Use the H and M buttons outside the audio display
to adjust the hours and minutes. Press OK to finish. (The clock can also be set
by pressing MENU, then scrolling to the clock settings menu.)
E
Tune:
Press the button to manual tune on AM and FM wavebands.
F
Numeric keypad:
Press the button to recall a previously stored station. To
store a favorite station press and hold until the sound returns.
G
Seek up: Press the button to go to the next station up the radio frequency band
or the next track on a CD.
H
259
Fiesta (CCT) Canada/United States of America, HE8J 19A321 AA enUSA, Edition date: 201607, First Printing Audio SystemE156613
ED
OF
G
K
L
M
N
JHI
C
A
B
Page 265 of 450
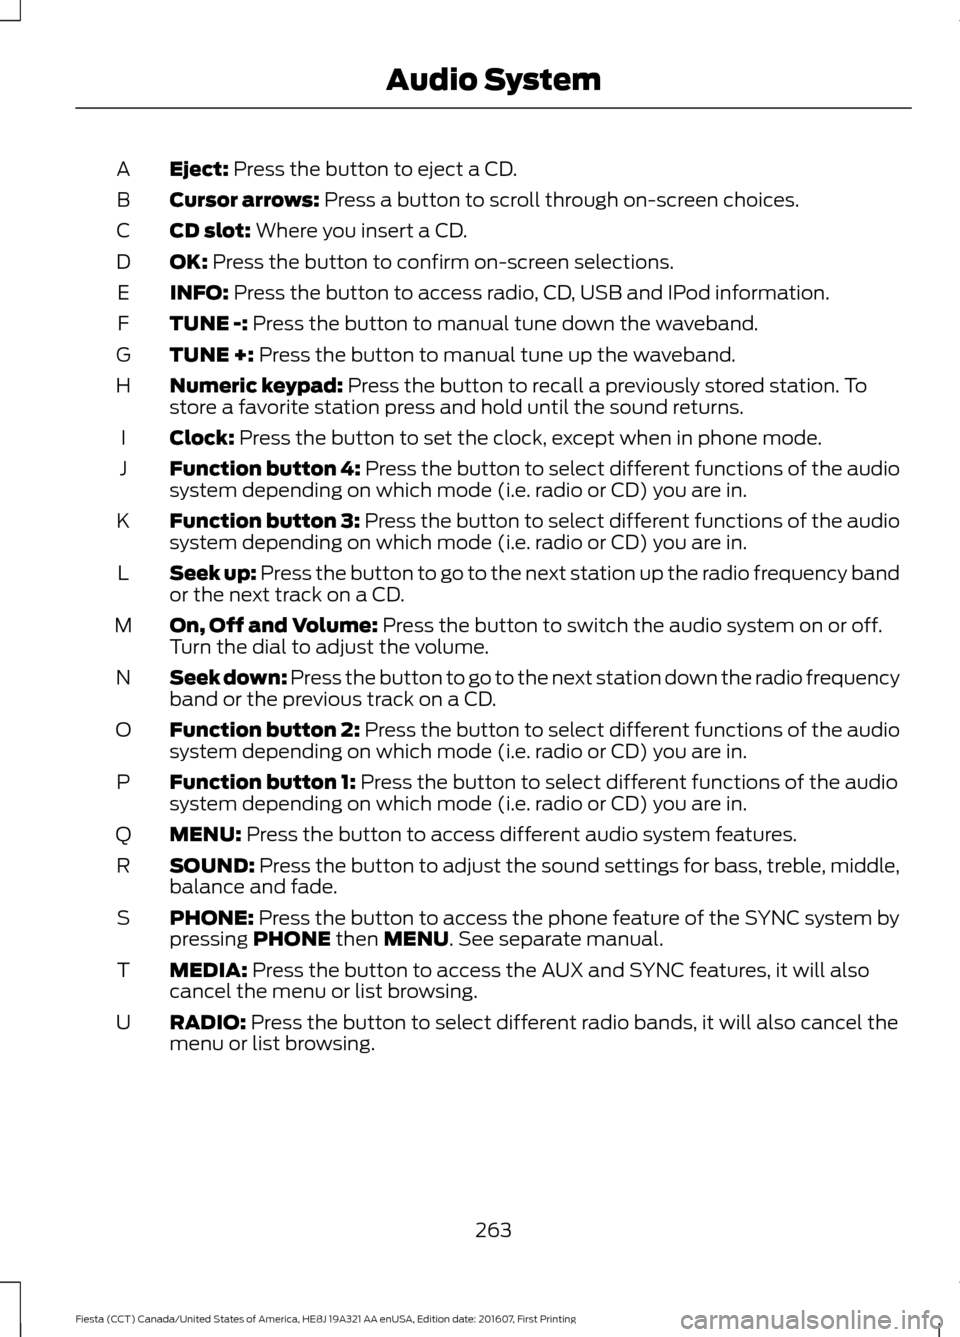
Eject: Press the button to eject a CD.
A
Cursor arrows:
Press a button to scroll through on-screen choices.
B
CD slot:
Where you insert a CD.
C
OK:
Press the button to confirm on-screen selections.
D
INFO:
Press the button to access radio, CD, USB and IPod information.
E
TUNE -:
Press the button to manual tune down the waveband.
F
TUNE +:
Press the button to manual tune up the waveband.
G
Numeric keypad:
Press the button to recall a previously stored station. To
store a favorite station press and hold until the sound returns.
H
Clock:
Press the button to set the clock, except when in phone mode.
I
Function button 4:
Press the button to select different functions of the audio
system depending on which mode (i.e. radio or CD) you are in.
J
Function button 3:
Press the button to select different functions of the audio
system depending on which mode (i.e. radio or CD) you are in.
K
Seek up: Press the button to go to the next station up the radio frequency band
or the next track on a CD.
L
On, Off and Volume:
Press the button to switch the audio system on or off.
Turn the dial to adjust the volume.
M
Seek down: Press the button to go to the next station down the radio frequency
band or the previous track on a CD.
N
Function button 2:
Press the button to select different functions of the audio
system depending on which mode (i.e. radio or CD) you are in.
O
Function button 1:
Press the button to select different functions of the audio
system depending on which mode (i.e. radio or CD) you are in.
P
MENU:
Press the button to access different audio system features.
Q
SOUND:
Press the button to adjust the sound settings for bass, treble, middle,
balance and fade.
R
PHONE:
Press the button to access the phone feature of the SYNC system by
pressing PHONE then MENU. See separate manual.
S
MEDIA:
Press the button to access the AUX and SYNC features, it will also
cancel the menu or list browsing.
T
RADIO:
Press the button to select different radio bands, it will also cancel the
menu or list browsing.
U
263
Fiesta (CCT) Canada/United States of America, HE8J 19A321 AA enUSA, Edition date: 201607, First Printing Audio System
Page 326 of 450
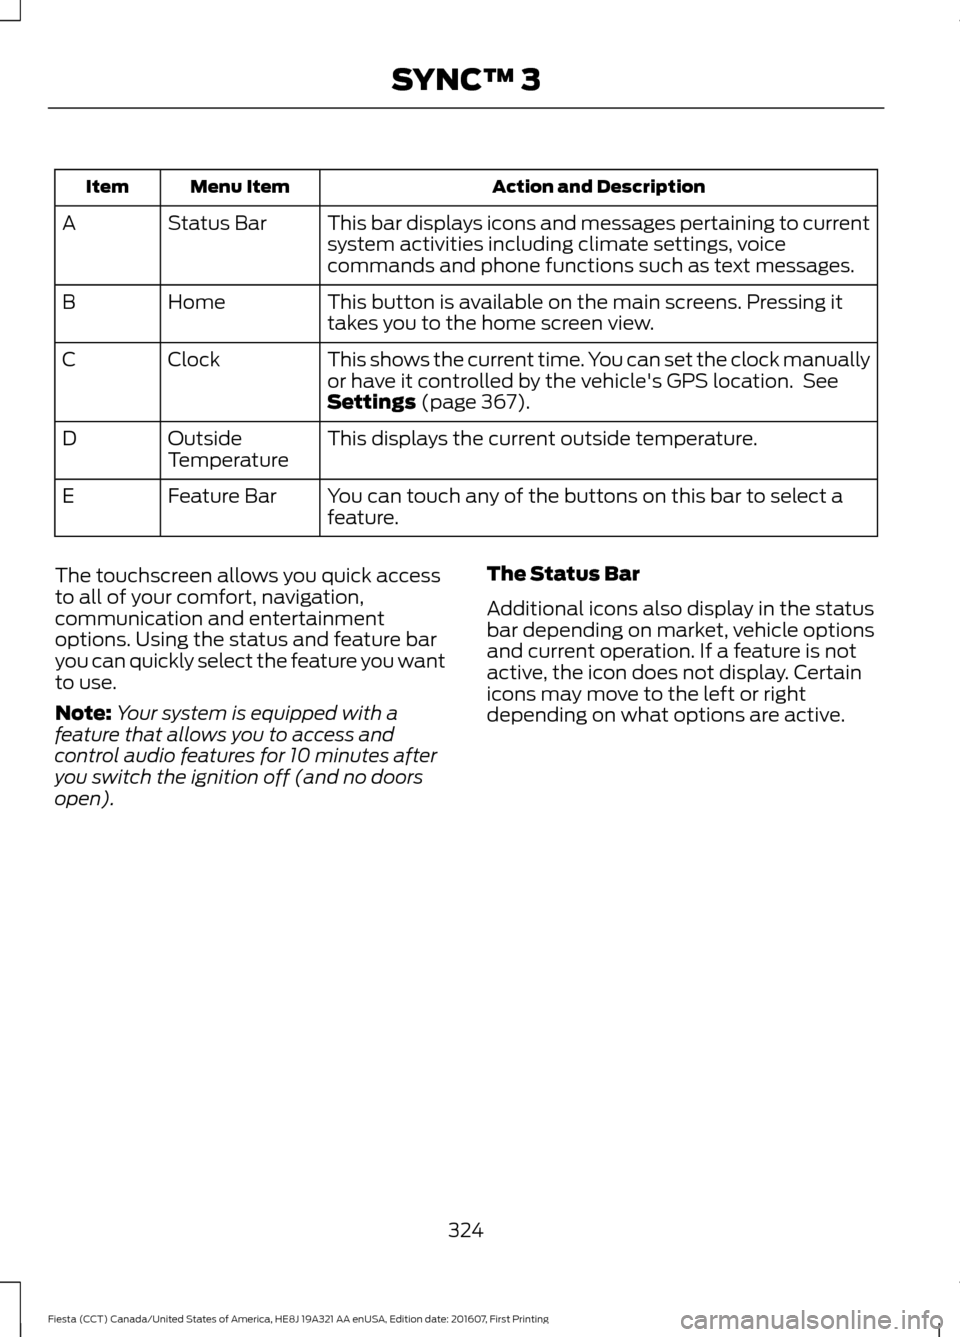
Action and Description
Menu Item
Item
This bar displays icons and messages pertaining to current
system activities including climate settings, voice
commands and phone functions such as text messages.
Status Bar
A
This button is available on the main screens. Pressing it
takes you to the home screen view.
Home
B
This shows the current time. You can set the clock manually
or have it controlled by the vehicle's GPS location. See
Settings (page 367).
Clock
C
This displays the current outside temperature.
Outside
Temperature
D
You can touch any of the buttons on this bar to select a
feature.
Feature Bar
E
The touchscreen allows you quick access
to all of your comfort, navigation,
communication and entertainment
options. Using the status and feature bar
you can quickly select the feature you want
to use.
Note: Your system is equipped with a
feature that allows you to access and
control audio features for 10 minutes after
you switch the ignition off (and no doors
open). The Status Bar
Additional icons also display in the status
bar depending on market, vehicle options
and current operation. If a feature is not
active, the icon does not display. Certain
icons may move to the left or right
depending on what options are active.
324
Fiesta (CCT) Canada/United States of America, HE8J 19A321 AA enUSA, Edition date: 201607, First Printing SYNC™ 3