Page 175 of 450
Protected Component
Fuse Rating
Fuse Number
Anti-lock brake system module.
Cooling fan relay.
40A
F2 High-speed cooling fan relay. 5
60A
Passenger compartment fuse box.
60A
F3
Body control module.
20A
F4
Power door locks.
Not used.
-
F5
Blower motor relay.
40A
F6
Blower motor.
Not used.
-
F7
Not used.
-
F8
Front fog lamp relay.
7.5A
F9
Headlamp high beam relay.
Body control module.
15A
F10
Right-hand exterior lamps.
Body control module.
15A
F11
Left-hand exterior lamps.
Not used.
-
F14
Not used.
-
F15
Not used.
-
F16
Not used.
-
F17
Not used.
-
F18
Fuel injectors.
30A
F19
Not used.
-
F20
Mass air flow sensor.2
7.5A
F21
Fuel injectors.
10A
Powertrain control module.
15A
F22
Camshaft position sensor.
15A
F23
Heated oxygen sensor.
173
Fiesta (CCT) Canada/United States of America, HE8J 19A321 AA enUSA, Edition date: 201607, First Printing Fuses
Page 177 of 450
Protected Component
Fuse Rating
Fuse Number
Air conditioning clutch.
10A
F41
Powertrain control module.
7.5A
F42 Transmission control module.
Evaporative emission canister purge valve.
Left-hand front fog lamp.
10A
F48
Right-hand front fog lamp.
10A
F49
Left-hand high beam.
10A
F55
Right-hand high beam.
10A
F56
1 1.0L EcoBoost.
2 1.0L and 1.6L EcoBoost.
3 1.6L Sigma.
4 1.6L Flex-fuel.
5 1.6L Ecoboost.
6 6-Speed PowerShift Transmission. Protected Component
Relay Number
Powertrain control module relay.
R12
Headlamp high beam relay.
R13
Not used.
R43
Front fog lamp relay.
R44
A/C clutch relay.
R45
Not used.
R46
Fuel pump relay.
R47
High speed cooling fan. 1
R50
Start inhibit relay.
R51
Blower motor relay.
R52
Not used.
R53
175
Fiesta (CCT) Canada/United States of America, HE8J 19A321 AA enUSA, Edition date: 201607, First Printing Fuses
Page 197 of 450

CHANGING THE FRONT WIPER
BLADES
Note:
Do not hold the wiper blade when
lifting the wiper arm.
Note: Make sure that the wiper arm does
not spring back against the glass when the
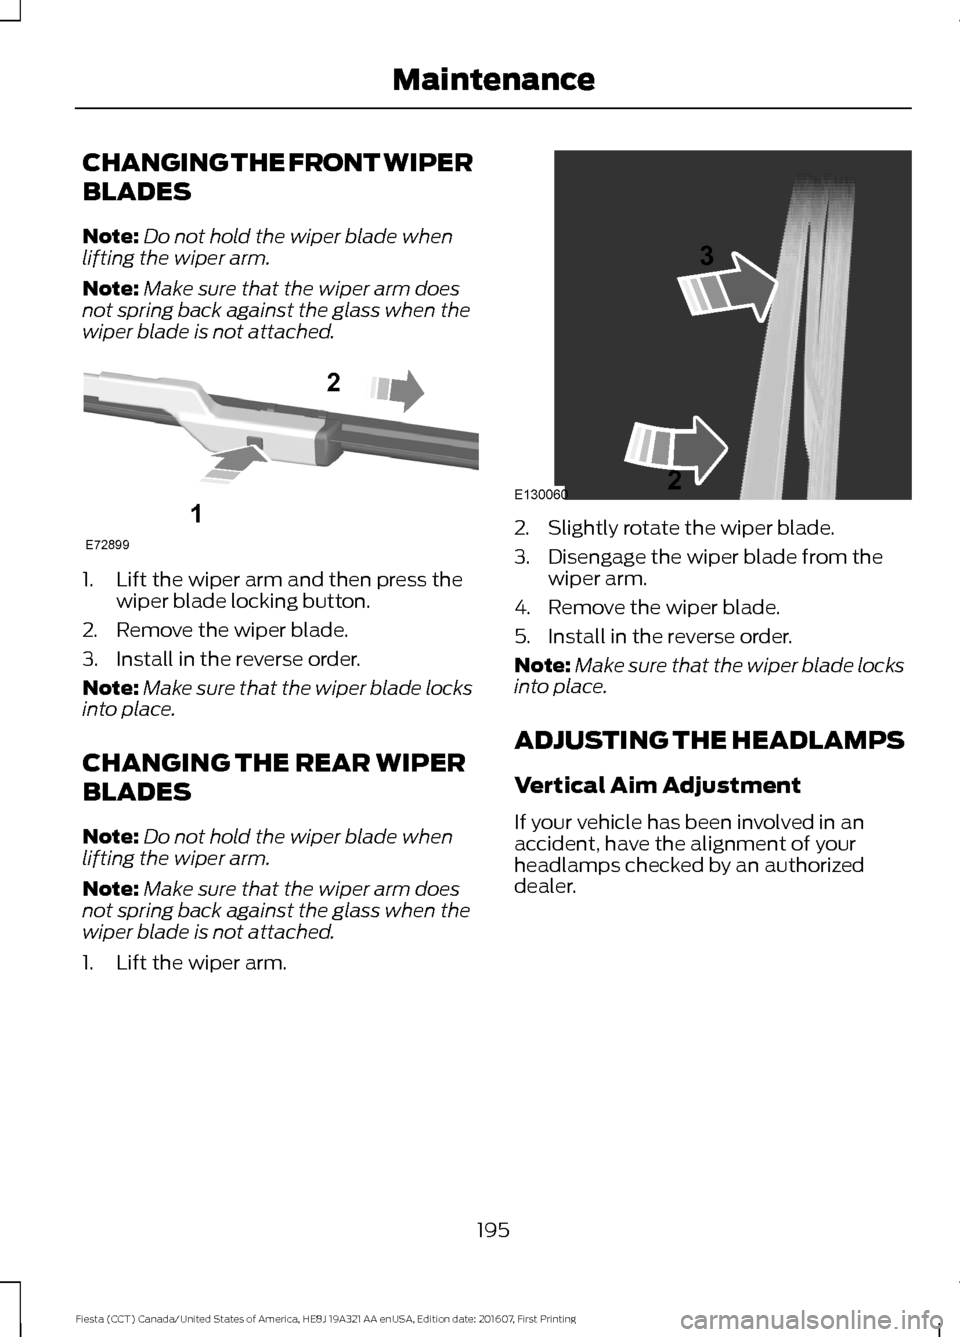
wiper blade is not attached. 1. Lift the wiper arm and then press the
wiper blade locking button.
2. Remove the wiper blade.
3. Install in the reverse order.
Note: Make sure that the wiper blade locks
into place.
CHANGING THE REAR WIPER
BLADES
Note: Do not hold the wiper blade when
lifting the wiper arm.
Note: Make sure that the wiper arm does
not spring back against the glass when the
wiper blade is not attached.
1. Lift the wiper arm. 2. Slightly rotate the wiper blade.
3. Disengage the wiper blade from the
wiper arm.
4. Remove the wiper blade.
5. Install in the reverse order.
Note: Make sure that the wiper blade locks
into place.
ADJUSTING THE HEADLAMPS
Vertical Aim Adjustment
If your vehicle has been involved in an
accident, have the alignment of your
headlamps checked by an authorized
dealer.
195
Fiesta (CCT) Canada/United States of America, HE8J 19A321 AA enUSA, Edition date: 201607, First Printing MaintenanceE72899
1
2 E130060
3
2
Page 198 of 450

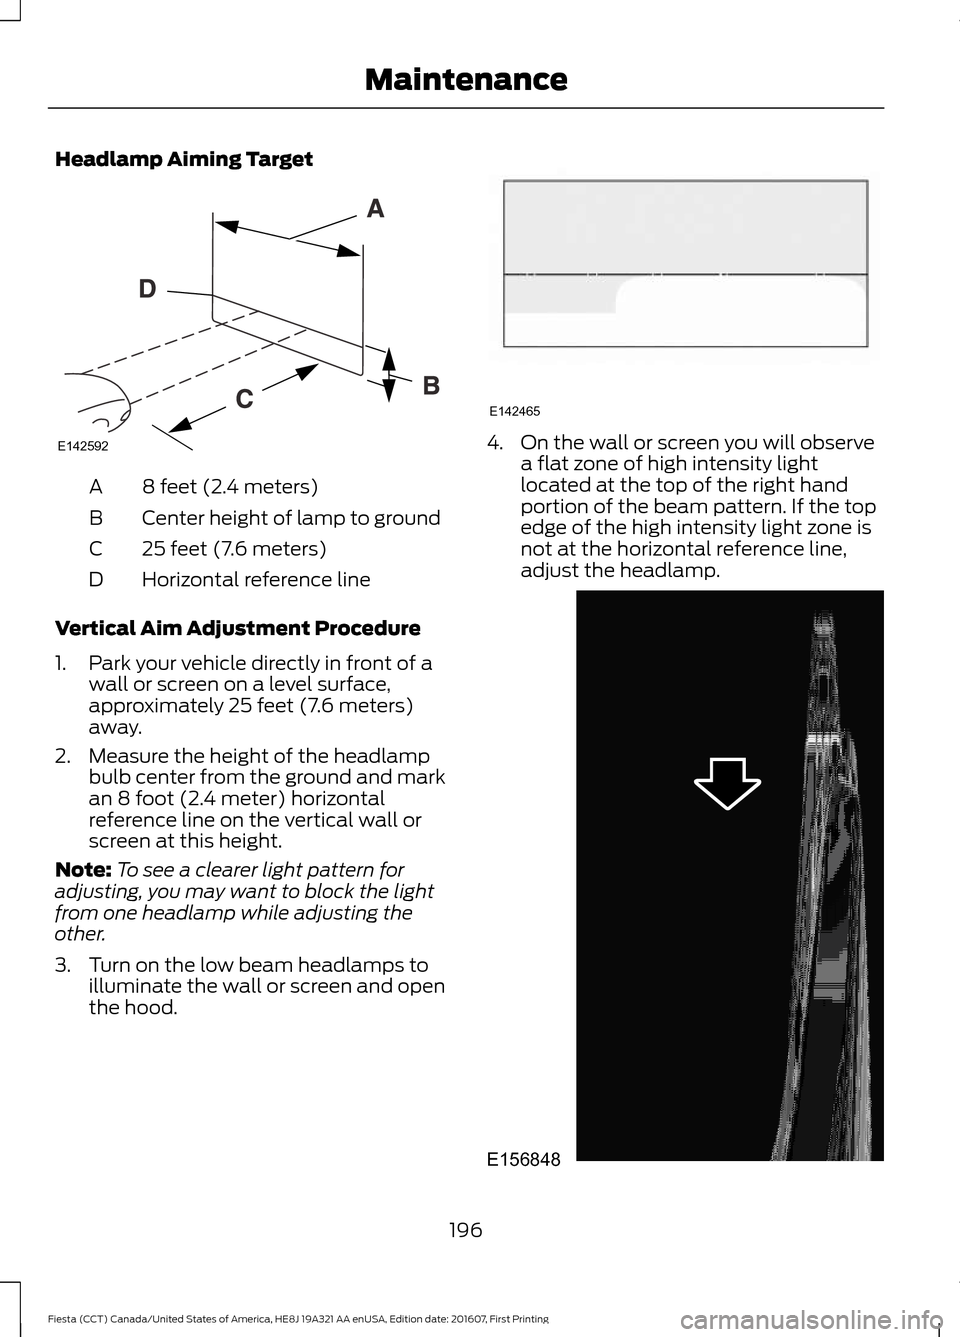
Headlamp Aiming Target
8 feet (2.4 meters)
A
Center height of lamp to ground
B
25 feet (7.6 meters)
C
Horizontal reference line
D
Vertical Aim Adjustment Procedure
1. Park your vehicle directly in front of a wall or screen on a level surface,
approximately 25 feet (7.6 meters)
away.
2. Measure the height of the headlamp bulb center from the ground and mark
an 8 foot (2.4 meter) horizontal
reference line on the vertical wall or
screen at this height.
Note: To see a clearer light pattern for
adjusting, you may want to block the light
from one headlamp while adjusting the
other.
3. Turn on the low beam headlamps to illuminate the wall or screen and open
the hood. 4. On the wall or screen you will observe
a flat zone of high intensity light
located at the top of the right hand
portion of the beam pattern. If the top
edge of the high intensity light zone is
not at the horizontal reference line,
adjust the headlamp. 196
Fiesta (CCT) Canada/United States of America, HE8J 19A321 AA enUSA, Edition date: 201607, First Printing MaintenanceE142592 E142465 E156848
Page 199 of 450

5. Locate the vertical adjuster on each
headlamp. Using a Phillips #2
screwdriver, turn the adjuster either
clockwise or counterclockwise in order
to adjust the vertical aim of the
headlamp. The horizontal edge of the
brighter light should touch the
horizontal reference line.
6. Close the hood and turn the lamps off.
Horizontal Aim Adjustment
Horizontal aim is not required for this
vehicle and is not adjustable.
REMOVING A HEADLAMP
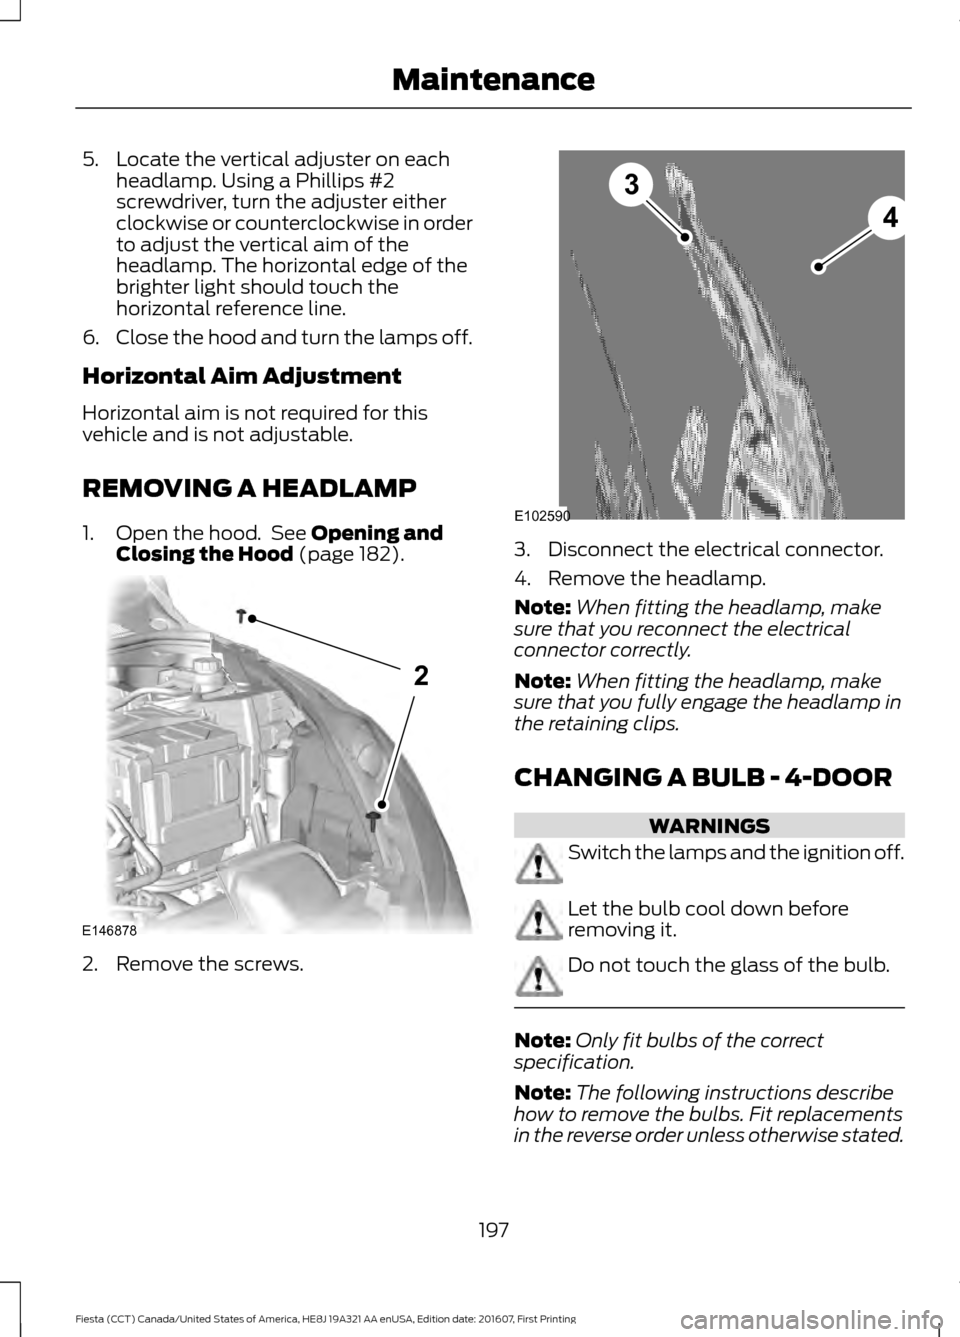
1. Open the hood. See Opening and
Closing the Hood (page 182). 2. Remove the screws. 3. Disconnect the electrical connector.
4. Remove the headlamp.
Note:
When fitting the headlamp, make
sure that you reconnect the electrical
connector correctly.
Note: When fitting the headlamp, make
sure that you fully engage the headlamp in
the retaining clips.
CHANGING A BULB - 4-DOOR WARNINGS
Switch the lamps and the ignition off.
Let the bulb cool down before
removing it.
Do not touch the glass of the bulb.
Note:
Only fit bulbs of the correct
specification.
Note: The following instructions describe
how to remove the bulbs. Fit replacements
in the reverse order unless otherwise stated.
197
Fiesta (CCT) Canada/United States of America, HE8J 19A321 AA enUSA, Edition date: 201607, First Printing MaintenanceE146878
2 E102590
3
4
Page 200 of 450
Headlamp
Note:
Remove the covers to gain access to
the bulbs. Side marker
A
Headlamp low beam
B
Headlamp high beam
C
Direction indicator
D
Side Marker
1. Remove the headlamp. See Removing a Headlamp (page 197). 2. Remove the bulb holder.
3. Remove the bulb.
Headlamp Low Beam
1. Remove the headlamp. See
Removing a Headlamp
(page 197). 2. Remove the cover.
3. Disconnect the electrical connector.
4. Release the clip and remove the bulb.
Note:
Do not touch the glass of the bulb.
Headlamp High Beam
1. Remove the headlamp. See Removing a Headlamp
(page 197). 2. Remove the cover.
198
Fiesta (CCT) Canada/United States of America, HE8J 19A321 AA enUSA, Edition date: 201607, First Printing MaintenanceBACD
E159827 E161707
A E146803
4
2 E146804
2
3
Page 201 of 450
3. Turn the bulb counterclockwise and
remove it.
Note: Do not touch the glass of the bulb.
Direction Indicator
1. Remove the headlamp. See Removing a Headlamp (page 197). 2.
Turn the bulb holder counterclockwise
and remove it.
3. Gently press the bulb into the bulb holder, turn it counterclockwise and
remove it. Side Direction Indicator
1. Press the side of the cover to release
the clips.
2. Remove the cover. 3. Remove the bulb and bulb holder.
Remove the bulb.
199
Fiesta (CCT) Canada/United States of America, HE8J 19A321 AA enUSA, Edition date: 201607, First Printing MaintenanceE146805
3 1
2
E112777 3
E112778
Page 205 of 450
CHANGING A BULB - 5-DOOR
WARNINGS
Switch the lamps and the ignition off.
Let the bulb cool down before
removing it.
Do not touch the glass of the bulb.
Note:
Only fit bulbs of the correct
specification.
Note: The following instructions describe
how to remove the bulbs. Fit replacements
in the reverse order unless otherwise stated.
Headlamp
Note: Remove the covers to gain access to
the bulbs. Side marker
A
Headlamp low beam
B
Headlamp high beam
C
Direction indicator
D
Side Marker
1. Remove the headlamp. See Removing a Headlamp (page 197). 2. Remove the bulb holder.
3. Remove the bulb.
Headlamp Low Beam
1. Remove the headlamp. See
Removing a Headlamp
(page 197). 2. Remove the cover.
3. Disconnect the electrical connector.
4. Release the clip and remove the bulb.
Note:
Do not touch the glass of the bulb.
203
Fiesta (CCT) Canada/United States of America, HE8J 19A321 AA enUSA, Edition date: 201607, First Printing MaintenanceBACD
E159827 E161707
A E146803
4
2