2017 FORD F450 SUPER DUTY check engine light
[x] Cancel search: check engine lightPage 198 of 642
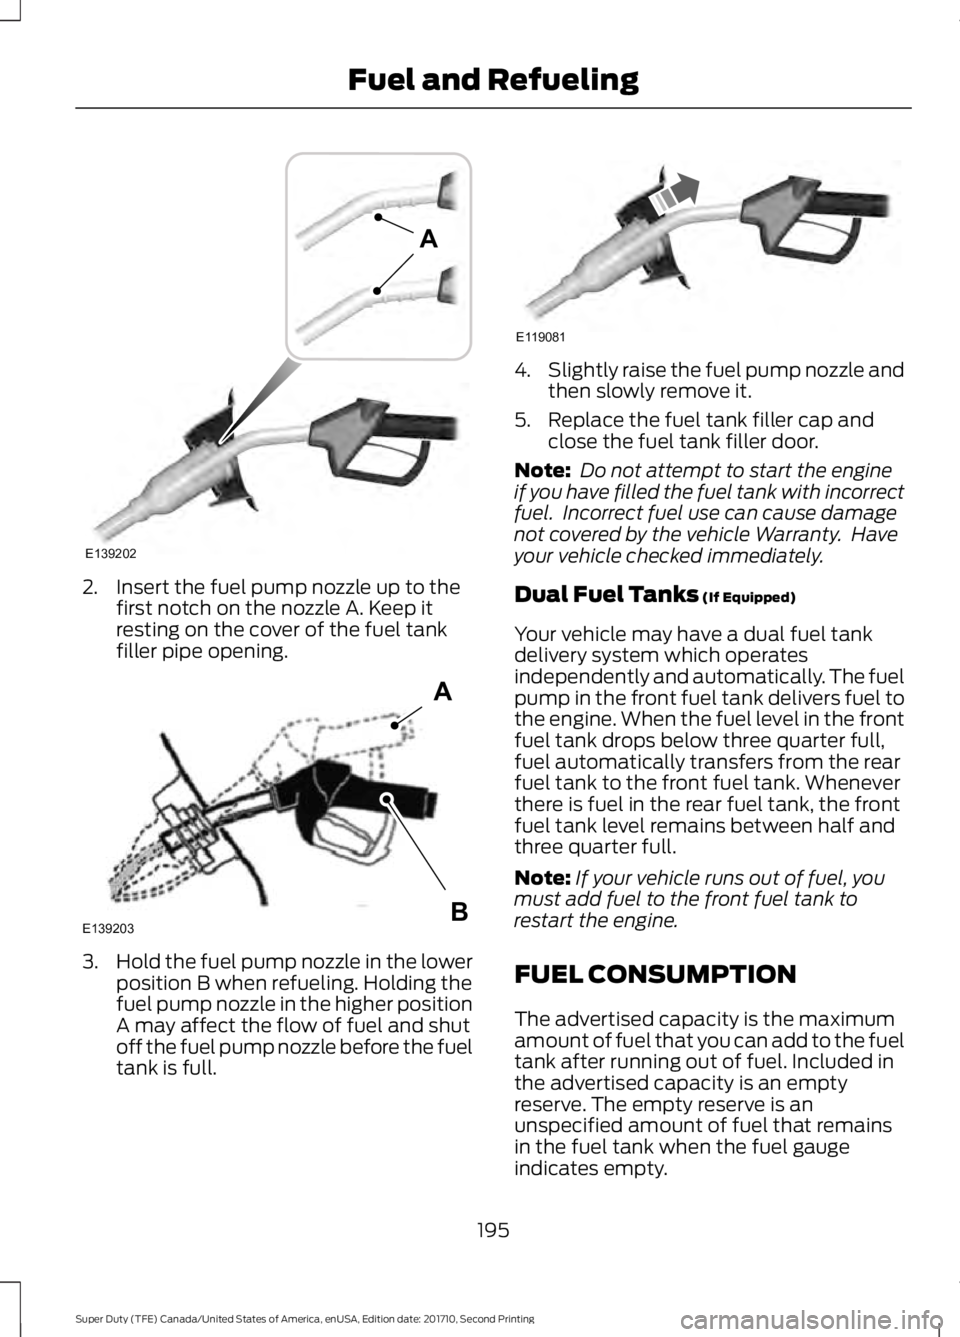
2. Insert the fuel pump nozzle up to thefirst notch on the nozzle A. Keep itresting on the cover of the fuel tankfiller pipe opening.
3.Hold the fuel pump nozzle in the lowerposition B when refueling. Holding thefuel pump nozzle in the higher positionA may affect the flow of fuel and shutoff the fuel pump nozzle before the fueltank is full.
4.Slightly raise the fuel pump nozzle andthen slowly remove it.
5. Replace the fuel tank filler cap andclose the fuel tank filler door.
Note: Do not attempt to start the engineif you have filled the fuel tank with incorrectfuel. Incorrect fuel use can cause damagenot covered by the vehicle Warranty. Haveyour vehicle checked immediately.
Dual Fuel Tanks (If Equipped)
Your vehicle may have a dual fuel tankdelivery system which operatesindependently and automatically. The fuelpump in the front fuel tank delivers fuel tothe engine. When the fuel level in the frontfuel tank drops below three quarter full,fuel automatically transfers from the rearfuel tank to the front fuel tank. Wheneverthere is fuel in the rear fuel tank, the frontfuel tank level remains between half andthree quarter full.
Note:If your vehicle runs out of fuel, youmust add fuel to the front fuel tank torestart the engine.
FUEL CONSUMPTION
The advertised capacity is the maximumamount of fuel that you can add to the fueltank after running out of fuel. Included inthe advertised capacity is an emptyreserve. The empty reserve is anunspecified amount of fuel that remainsin the fuel tank when the fuel gaugeindicates empty.
195
Super Duty (TFE) Canada/United States of America, enUSA, Edition date: 201710, Second Printing
Fuel and RefuelingE139202
A E139203
A
B E119081
Page 204 of 642
•Park your vehicle 10–15 ft (3–5 m)away from any obstructions and awayfrom materials that can easily combustor melt, for example paper, leaves,petroleum products, fuels, plastics andother dry organic material.
•Make sure there is a minimum of 1/8tank of fuel.
•Make sure all fluids are at proper levels.
How to Start Operator CommandedRegeneration
WARNING
Stay clear of the exhaust tailpipeduring regeneration. Hot exhaustgases can burn you badly.
Note:You cannot use the operatorcommanded regeneration until the dieselparticulate filter load percentage hasreached 100%. The diesel particulate filterload percentage fluctuates up and downwhen driving your vehicle due to active andpassive regenerations.
Note:During the use of operatorcommanded regeneration, you may observea light amount of white smoke. This isnormal.
You may not be able to useoperator commandedregeneration if the service enginesoon warning lamp appears in theinformation display
Information Display Procedure
Start with your vehicle engine and when ithas reached the normal operatingtemperature, press the information displaycontrol button on the steering wheel. SeeGeneral Information (page 111). If amessage advising that the exhaust filter isfull appears in the information display,press the OK button to set the display toY. Answer yes to this prompt and then
follow the next prompts regarding exhaustposition required to initiate operatorcommanded regeneration. Be sure tounderstand each prompt. If you are notsure what is being asked by each prompt,contact an authorized dealer. The displayconfirms the operation has started andwhen it has finished.
If the diesel particulate filter is near or atsaturation, a message requestingpermission to initiate filter cleaningappears in the information display. SeeInformation Messages (page 128).Answer yes to this prompt and then followthe next prompts regarding exhaustposition required to initiate operatorcommanded regeneration. Be sure tounderstand each prompt. If you are notsure what is being asked by each prompt,contact an authorized dealer. The displayconfirms the operation has started andwhen it has finished. You can also drive toclean the filter.
When the system is at the pointof oversaturation, the serviceengine warning lamp illuminatesand a message appears in the informationdisplay. You cannot initiate filter cleaning.You must have your vehicle checked assoon as possible.
Once operator commanded regenerationstarts, engine speed increases toapproximately 2000–2500 rpm and thecooling fan speed increases. You will heara change in audible sound due to enginespeed and cooling fan speed increases.
It is not necessary to open the hood on theengine compartment. Once operatorcommanded regeneration completes, theengine speed returns to normal idling. Theexhaust system remains very hot forseveral minutes even after regeneration iscomplete. Do not reposition the vehicleover materials that could burn until the
201
Super Duty (TFE) Canada/United States of America, enUSA, Edition date: 201710, Second Printing
Fuel and Refueling
Page 205 of 642
exhaust system has had sufficient time tocool. Depending on the amount of sootcollected by the diesel particulate filter,ambient temperature and altitude,operator commanded regeneration lastsapproximately 30 minutes.
Operator Commanded Regenerationwith Automatic Regeneration Control(If Equipped)
If your vehicle is operated with significantstationary operation, low speed drivecycles less than 25 mph (40 km/h), shortdrive cycles, drive time less than 15 minutesor the vehicle does not fully warm up,passive and active regeneration may notsufficiently clean the diesel particulatefilter system. You can switch off automaticregeneration until better driving conditionsare available, for example steady highspeed driving. You can then switchautomatic regeneration back on to cleanthe diesel particulate filter.
Switching Automatic RegenerationControl On and Off
To switch operator commandedregeneration on and off, use theinformation display control on the steeringwheel. See General Information (page111). Scroll to the exhaust cleaningmessage and then select Y or N to switchit On or Off.
How to Interrupt or Cancel OperatorCommanded Regeneration
If you need to cancel the operatorcommanded regeneration, pressing thebrake, accelerator or switching the engineoff stops the procedure. Depending on theamount of time you allowed the operatorcommanded regeneration to operate, sootmay not have had sufficient time to be fullyeliminated, but the exhaust system andexhaust gas may still be hot. If you shut
your vehicle off during operatorcommanded regeneration, you may noticeturbo flutter. This is a normal consequencecaused by shutting off a diesel engineduring boosted operation and is considerednormal.
Filter Service and Maintenance
Over time, a slight amount of ash buildsup in the diesel particulate filter, which isnot removed during the regenerationprocess. The filter may need to be removedfor ash cleaning at approximately120,000 mi (190,000 km) or it may needto be replaced with a new orremanufactured part. Actual mileagevaries depending on engine and vehicleoperating conditions. The filter may needto be replaced with a new orremanufactured part at approximately250,000 mi (400,000 km). Actualmileage varies depending on engine andvehicle operating conditions.
If filter service is required, theengine control system warninglamp illuminates in theinformation display.
If there are any issues with thediesel particulate filter system,the engine control systemwarning lamp and a serviceengine soon warning lampilluminate to inform you thatyour vehicle requires service. Have yourvehicle checked as soon as possible.
202
Super Duty (TFE) Canada/United States of America, enUSA, Edition date: 201710, Second Printing
Fuel and Refueling
Page 219 of 642
After driving through mud, clean off residuestuck to rotating driveshafts and tires.Excess mud stuck on tires and rotatingdriveshafts can cause an imbalance thatcould damage drive components.
Water
If you must drive through high water, driveslowly. Traction or brake capability maybe limited.
When driving through water, determine thedepth and avoid water higher than thebottom of the hubs. If the ignition systemgets wet, your vehicle may stall.
Once through water, always try the brakes.Wet brakes do not stop your vehicle aseffectively as dry brakes. Drying can beimproved by applying light pressure to thebrake pedal while moving slowly.
Note:Driving through deep water maydamage the transmission. If the front or rearaxle is submerged in water, the axlelubricant and power transfer unit lubricantshould be checked and changed ifnecessary.
Driving on Hilly or Sloping Terrain
Although natural obstacles may make itnecessary to travel diagonally up or downa hill or steep incline, you should alwaystry to drive straight up or straight down.
Note:Avoid turning on steep slopes or hills.A danger lies in losing traction, slippingsideways and possible vehicle roll over.Whenever driving on a hill, determinebeforehand the route you will use. Do notdrive over the crest of a hill without seeingwhat conditions are on the other side. Donot drive in reverse over a hill without theaid of an observer.
When climbing a steep slope or hill, startin a lower gear rather than downshifting toa lower gear from a higher gear once theascent has started. This reduces strain onthe engine and the possibility of stalling.
If your vehicle stalls, do not try to turnaround because this could cause vehicleroll over. It is better to reverse back to asafe location.
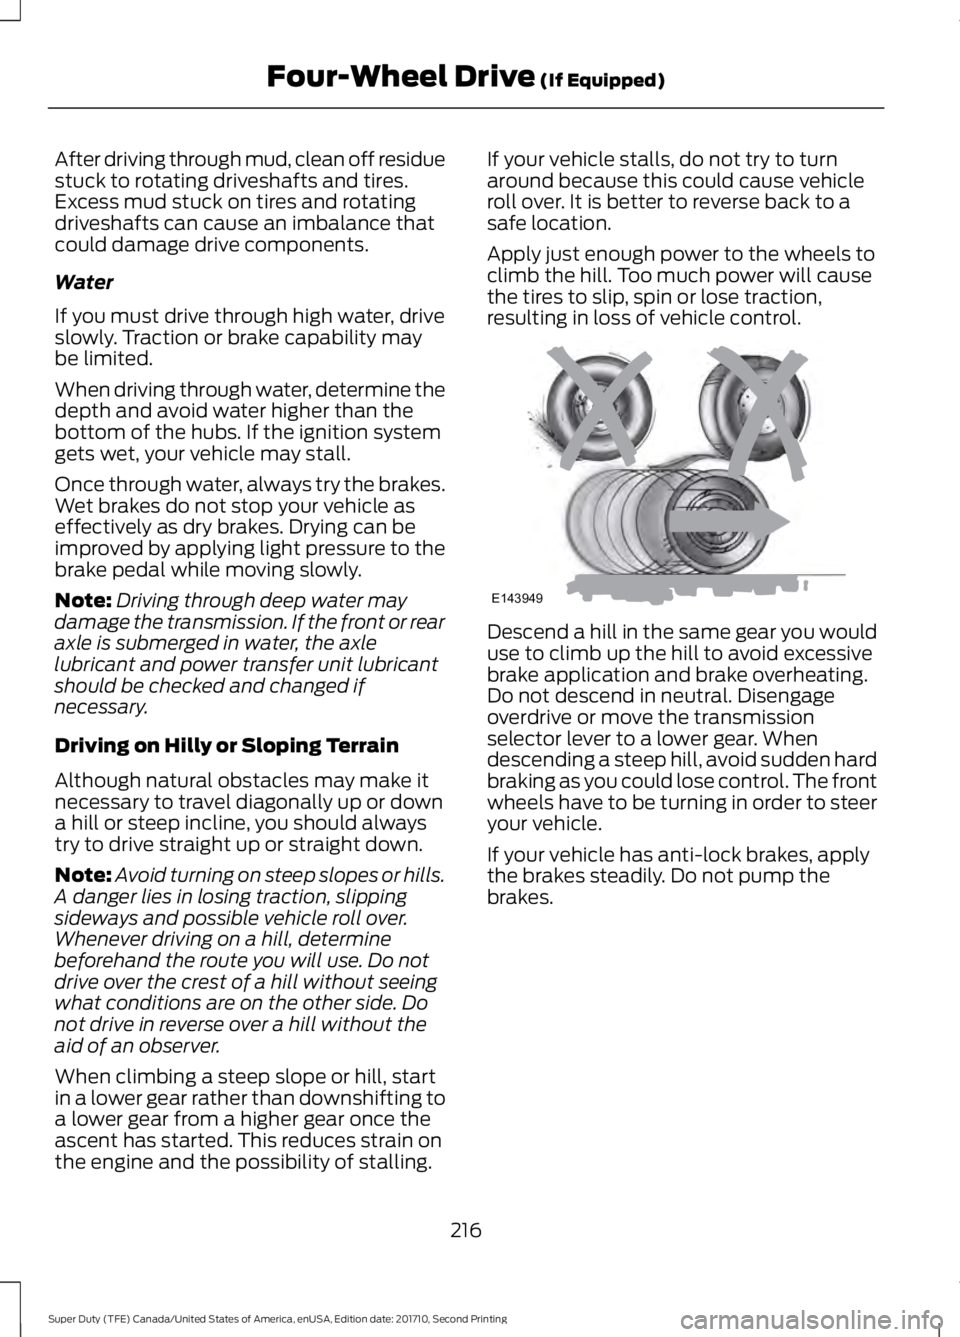
Apply just enough power to the wheels toclimb the hill. Too much power will causethe tires to slip, spin or lose traction,resulting in loss of vehicle control.
Descend a hill in the same gear you woulduse to climb up the hill to avoid excessivebrake application and brake overheating.Do not descend in neutral. Disengageoverdrive or move the transmissionselector lever to a lower gear. Whendescending a steep hill, avoid sudden hardbraking as you could lose control. The frontwheels have to be turning in order to steeryour vehicle.
If your vehicle has anti-lock brakes, applythe brakes steadily. Do not pump thebrakes.
216
Super Duty (TFE) Canada/United States of America, enUSA, Edition date: 201710, Second Printing
Four-Wheel Drive (If Equipped)E143949
Page 220 of 642
Driving on Snow and Ice
WARNING
If you are driving in slipperyconditions that require tire chains orcables, then it is critical that you drivecautiously. Keep speeds down, allow forlonger stopping distances and avoidaggressive steering to reduce the chancesof a loss of vehicle control which can leadto serious injury or death. If the rear end ofyour vehicle slides while cornering, steer inthe direction of the slide until you regaincontrol of your vehicle.
Note:Excessive tire slippage can causetransmission damage.
Four-wheel drive vehicles have advantagesover two-wheel drive vehicles in snow andice but can skid like any other vehicle.Should you start to slide while driving onsnowy or icy roads, turn the steering wheelin the direction of the slide until you regaincontrol.
Avoid sudden applications of power andquick changes of direction on snow andice. Apply the accelerator slowly andsteadily when starting from a full stop.
Avoid sudden braking. Although afour-wheel drive vehicle may acceleratebetter than a two-wheel drive vehicle insnow and ice, it will not stop any faster asbraking occurs at all four wheels. Do notbecome overconfident as to roadconditions.
Make sure you allow sufficient distancebetween you and other vehicles forstopping. Drive slower than usual andconsider using one of the lower gears. Inemergency stopping situations, apply thebrake steadily. Do not pump the brakepedal. See Hints on Driving WithAnti-Lock Brakes (page 222).
If Your Vehicle Gets Stuck In Mud orSnow
WARNING
Do not spin the wheels at over34 mph (55 km/h). The tires may failand injure a passenger or bystander.
If your vehicle gets stuck in mud or snow,it may be rocked out by shifting betweenforward and reverse gears, stoppingbetween shifts in a steady pattern. Presslightly on the accelerator in each gear.
Note:Do not rock your vehicle if the engineis not at normal operating temperature,damage to the transmission may occur.
Note:Do not rock your vehicle for morethan a minute, damage to the transmissionand tires may occur or the engine mayoverheat.
Parking
WARNINGS
If the parking brake is fully released,but the brake warning lamp remainsilluminated, the brakes may not beworking properly. Have your vehiclechecked as soon as possible.
Always set the parking brake andleave your vehicle with thetransmission in park (P).
On some four-wheel drive vehicles, whenthe transfer case is in the N (Neutral)position, the engine and transmission aredisconnected from the rest of the driveline.Therefore, the vehicle is free to roll even ifthe automatic transmission is in P (Park)or the manual transmission is in gear. Donot leave the vehicle unattended with thetransfer case in the N (Neutral) position.Always set the parking brake fully and turnoff the ignition when leaving the vehicle.
217
Super Duty (TFE) Canada/United States of America, enUSA, Edition date: 201710, Second Printing
Four-Wheel Drive (If Equipped)
Page 224 of 642
GENERAL INFORMATION
Note:Occasional brake noise is normal. Ifa metal-to-metal, continuous grinding orcontinuous squeal sound is present, thebrake linings may be worn-out. Have thesystem checked by an authorized dealer. Ifyour vehicle has continuous vibration orshudder in the steering wheel while braking,have it checked by an authorized dealer.
Note:Brake dust may accumulate on thewheels, even under normal drivingconditions. Some dust is inevitable as thebrakes wear and does not contribute tobrake noise. See Cleaning the Wheels(page 370).
See Warning Lamps andIndicators (page 105).
Wet brakes result in reduced brakingefficiency. Gently press the brake pedal afew times when driving from a car wash orstanding water to dry the brakes.
Brake Over Accelerator
In the event the accelerator pedalbecomes stuck or entrapped, apply steadyand firm pressure to the brake pedal toslow the vehicle and reduce engine power.If you experience this condition, apply thebrakes and bring your vehicle to a safestop. Move the transmission to park (P),switch the engine off and apply the parkingbrake. Inspect the accelerator pedal forany interference. If none are found and thecondition persists, have your vehicle towedto the nearest authorized dealer.
Brake Assist
Brake assist detects when you brakerapidly by measuring the rate at which youpress the brake pedal. It providesmaximum braking efficiency as long as youpress the pedal, and can reduce stoppingdistances in critical situations.
Anti-lock Brake System
This system helps you maintain steeringcontrol during emergency stops by keepingthe brakes from locking.
This lamp momentarilyilluminates when you switch theignition on. If the light does notilluminate during start up, remains on orflashes, the system may be disabled. Havethe system checked by an authorizeddealer. If the anti-lock brake system isdisabled, normal braking is still effective.
If the brake warning lampremains illuminated after yourelease the parking brake, havethe system checked by an authorizeddealer.
Diesel Engine Braking (If Equipped)
WARNING
Do not use tow/haul or enginebraking when driving in icy or slipperyconditions as the increased brakingcan cause the rear wheels to slide and yourvehicle to swing around with the possibleloss of vehicle control.
This feature increases engine braking athigher engine speeds to provide bettergrade descent control with less brake andtransmission wear and tear. It alsoimproves engine braking when towing orcarrying heavy loads.
Press the button on the switchbank next to the audio unit toswitch the system on or off.
There are two engine brake modes, manualand automatic.
Manual Engine Braking
1. Press the button to switch on manualengine braking.
221
Super Duty (TFE) Canada/United States of America, enUSA, Edition date: 201710, Second Printing
BrakesE144522 E144522 E171217
Page 280 of 642
slowly turning the wheel until the traileris following your desired path and thenholding the wheel in that position. Ifyou would like to recalibrate thesystem for straight backing, you can doso with the following procedure.
•Go into the trailer menu, selecttrailer options, select change trailersetting and then select the changesticker option. Your savedmeasurements will be displayed.Do not change them but continueto confirm measurements. Onceyou confirm the measurements, thesystem will then prompt you toperform the calibration procedure.
Note:The system is designed to be usedwith the same trailer connection every timethe trailer is chosen from the selectionmenu. Using a different drawbar or adifferent pin hole (on drawbars with morethan one) when connecting the drawbar toyour vehicle will affect the trailermeasurements. Take the measurementsagain and update if required.
TRAILER SWAY CONTROL (If
Equipped)
WARNING
Turning off trailer sway controlincreases the risk of loss of vehiclecontrol, serious injury or death. Forddoes not recommend disabling this featureexcept in situations where speed reductionmay be detrimental (such as hill climbing),the driver has significant trailer towingexperience, and can control trailer swayand maintain safe operation.
Note:This feature does not prevent trailersway, but reduces it once it begins.
Note:This feature cannot stop all trailersfrom swaying.
Note:In some cases, if vehicle speed is toohigh, the system may activate multipletimes, gradually reducing vehicle speed.
This feature applies your vehicle brakes atindividual wheels and, if necessary, reducesengine power. If the trailer begins to sway,the stability control light flashes and themessage TRAILER SWAY REDUCESPEED appears in the information display.The first thing to do is slow your vehicledown, then pull safely to the side of theroad and check for proper tongue load andtrailer load distribution. See LoadCarrying (page 261).
RECOMMENDED TOWING
WEIGHTS
WARNING
You must use the heavy-dutydrawbar pin supplied with
your vehicle when using theheavy-duty hitch. Failure to followthis instruction could result in theloss of control of your vehicle,personal injury or death.
Note:Vehicles with a heavy-dutyhitch must use the drawbar pinstamped 21,000 LBS. You canobtain a replacement drawbar pinat your Ford dealer.
Note:Make sure to take intoconsideration trailer frontal area.Do not exceed 60 feet2 (5.6
meters2) trailer frontal area for
conventional trailers. Do notexceed 75 feet2 (6.9 meters2) trailer
frontal area for 5th wheel andgooseneck trailers.
277
Super Duty (TFE) Canada/United States of America, enUSA, Edition date: 201710, Second Printing
Towing
Page 294 of 642
Note:You can check four-wheel-downtowing status at any time by opening thedriver's door or turning the ignition to theaccessory or on position and verifying amessage displays in the cluster.
To exit four-wheel-down towing and returnthe transfer case to its 2H position:
1.With your vehicle still properly securedto the tow vehicle, put the ignition inthe on position, but do not start theengine. If your vehicle has an ignitionkey, switch the key to on. If your vehiclehas intelligent access, press the engineSTART/STOP button once withoutpressing the brake pedal.
2. Press and hold the brake pedal.
3. Shift the transmission out of neutral(N) and into any other gear.
4. Release the brake pedal.
Note:If completed successfully, the 2Hindicator light illuminates and aconfirmation message displays in theinstrument cluster.
Note:If the indicator light and message donot display, you must perform the procedureagain from the beginning.
Note:You may hear an audible noise as thetransfer case shifts out of its neutralposition. This is normal.
Note:If a message displays in theinstrument cluster stating there is a shiftdelay, transfer case gear tooth blockagemay be present. See Resolving the ShiftDelay Issue after this section.
5.Apply the parking brake and disconnectthe vehicle from the tow vehicle.
6. Release the parking brake, start theengine and shift the transmission todrive (D) to make sure the transfercase is out of neutral (N).
7. If the transfer case does notsuccessfully shift out of neutral (N),set the parking brake until you can haveyour vehicle serviced.
Resolving the Shift Delay Issue
If the instrument cluster displays a shiftdelay message, See InformationMessages (page 128). You need toperform the following steps:
1. Press and hold the brake pedal.
2. Put the transmission into neutral (N),and then start the engine.
3. With the engine running, shift thetransmission to drive (D) and let thevehicle roll forward, up to 3 ft (1 m).You may hear an audible noise as thetransfer case shifts out of its neutralposition. This is normal.
4. When the issue is resolved, theinstrument cluster displays a messagestating neutral tow is disabled.
291
Super Duty (TFE) Canada/United States of America, enUSA, Edition date: 201710, Second Printing
Towing