2017 FORD F SERIES MOTORHOME AND COMMERCIAL CHASSIS transmission
[x] Cancel search: transmissionPage 85 of 164
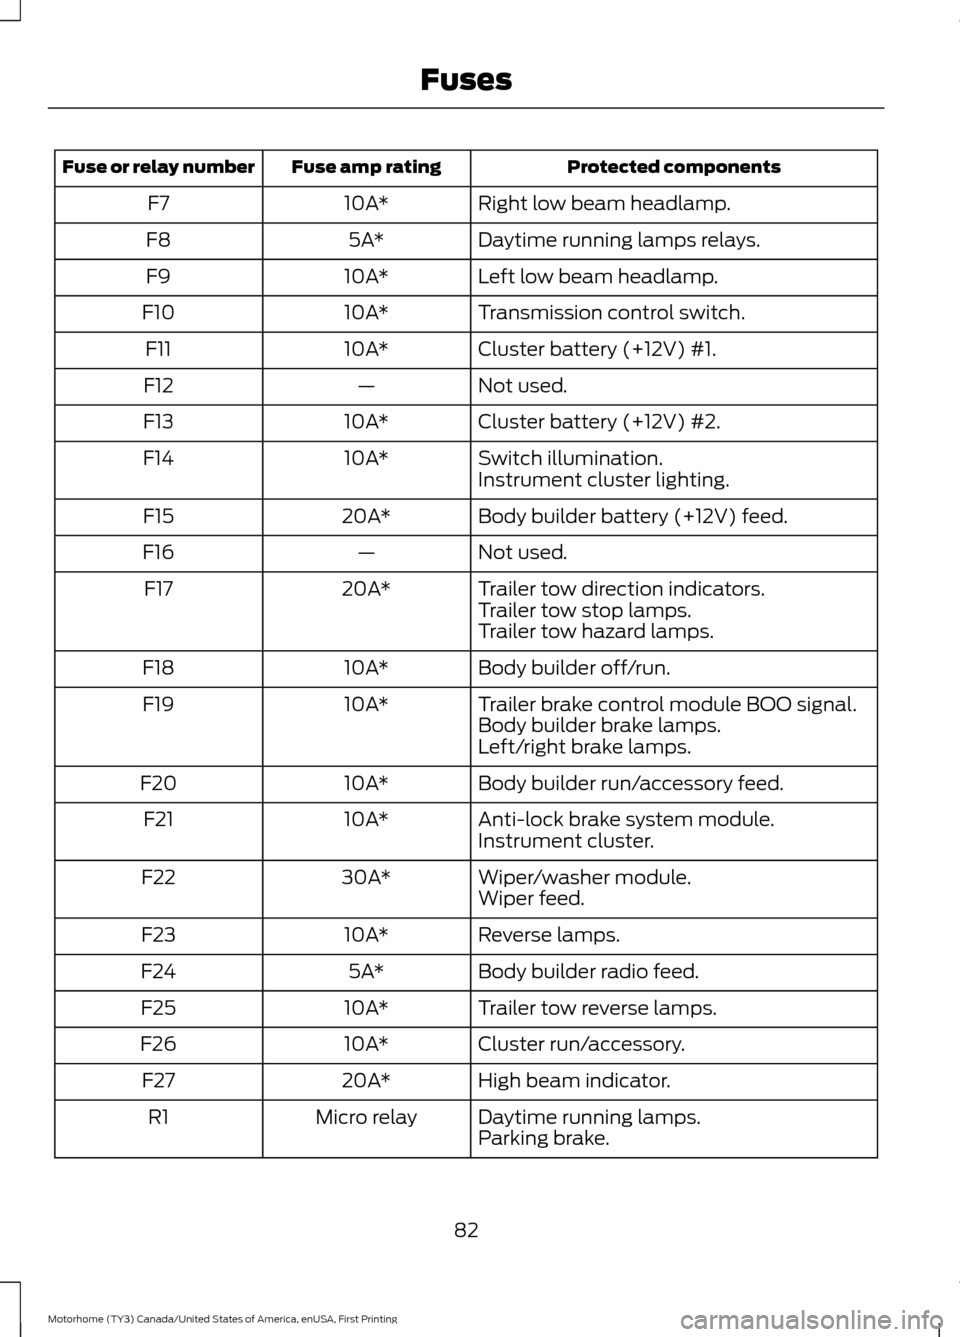
Protected components
Fuse amp rating
Fuse or relay number
Right low beam headlamp.
10A*
F7
Daytime running lamps relays.
5A*
F8
Left low beam headlamp.
10A*
F9
Transmission control switch.
10A*
F10
Cluster battery (+12V) #1.
10A*
F11
Not used.
—
F12
Cluster battery (+12V) #2.
10A*
F13
Switch illumination.
10A*
F14
Instrument cluster lighting.
Body builder battery (+12V) feed.
20A*
F15
Not used.
—
F16
Trailer tow direction indicators.
20A*
F17
Trailer tow stop lamps.
Trailer tow hazard lamps.
Body builder off/run.
10A*
F18
Trailer brake control module BOO signal.
10A*
F19
Body builder brake lamps.
Left/right brake lamps.
Body builder run/accessory feed.
10A*
F20
Anti-lock brake system module.
10A*
F21
Instrument cluster.
Wiper/washer module.
30A*
F22
Wiper feed.
Reverse lamps.
10A*
F23
Body builder radio feed.
5A*
F24
Trailer tow reverse lamps.
10A*
F25
Cluster run/accessory.
10A*
F26
High beam indicator.
20A*
F27
Daytime running lamps.
Micro relay
R1
Parking brake.
82
Motorhome (TY3) Canada/United States of America, enUSA, First Printing Fuses
Page 89 of 164
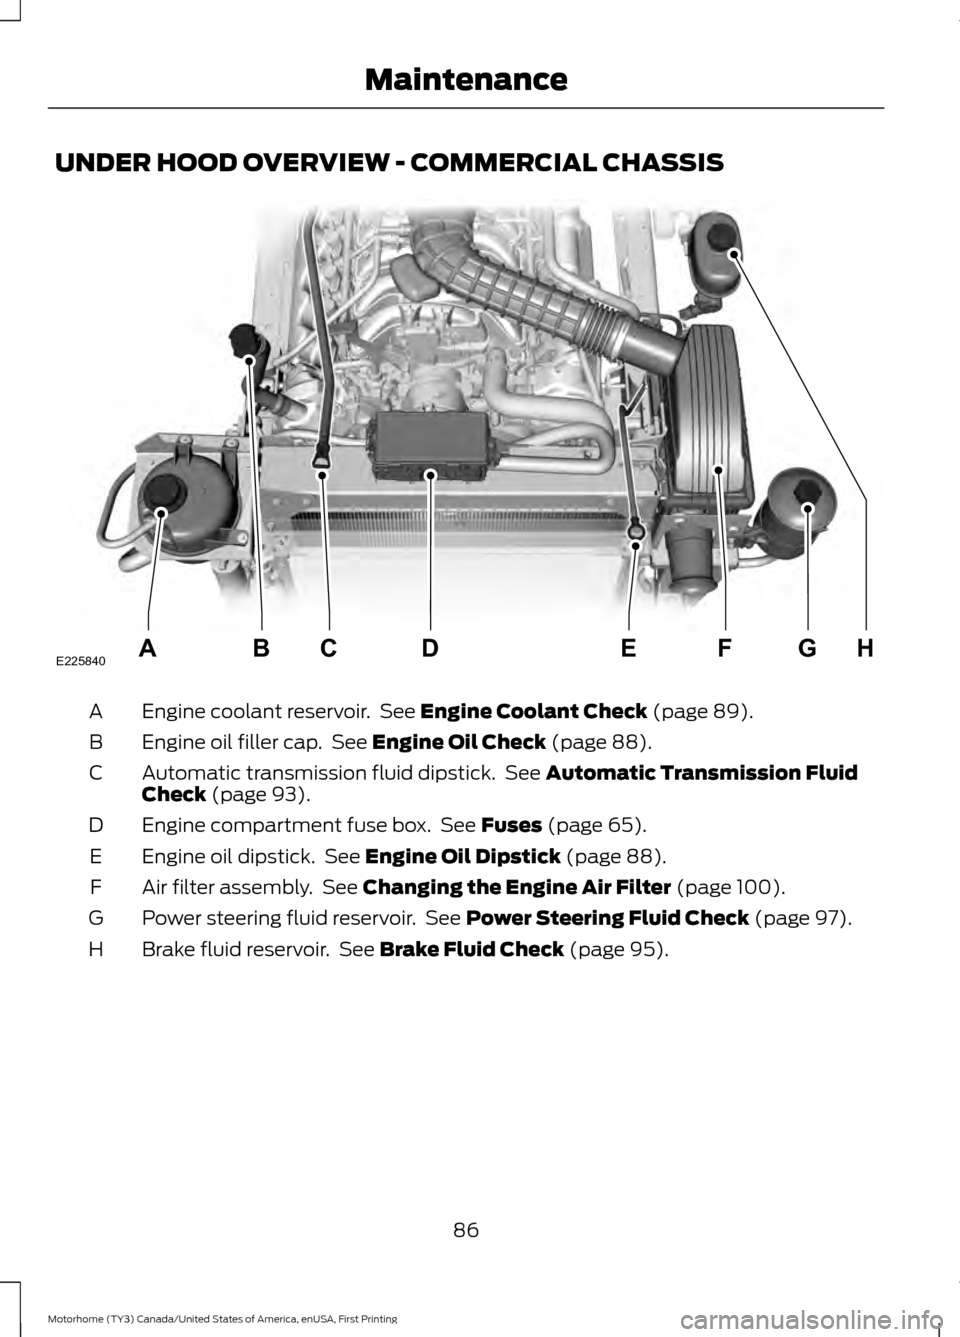
UNDER HOOD OVERVIEW - COMMERCIAL CHASSIS
Engine coolant reservoir. See Engine Coolant Check (page 89).
A
Engine oil filler cap. See
Engine Oil Check (page 88).
B
Automatic transmission fluid dipstick. See
Automatic Transmission Fluid
Check (page 93).
C
Engine compartment fuse box. See
Fuses (page 65).
D
Engine oil dipstick. See
Engine Oil Dipstick (page 88).
E
Air filter assembly. See
Changing the Engine Air Filter (page 100).
F
Power steering fluid reservoir. See
Power Steering Fluid Check (page 97).
G
Brake fluid reservoir. See
Brake Fluid Check (page 95).
H
86
Motorhome (TY3) Canada/United States of America, enUSA, First Printing MaintenanceE225840HGFEABCD
Page 90 of 164
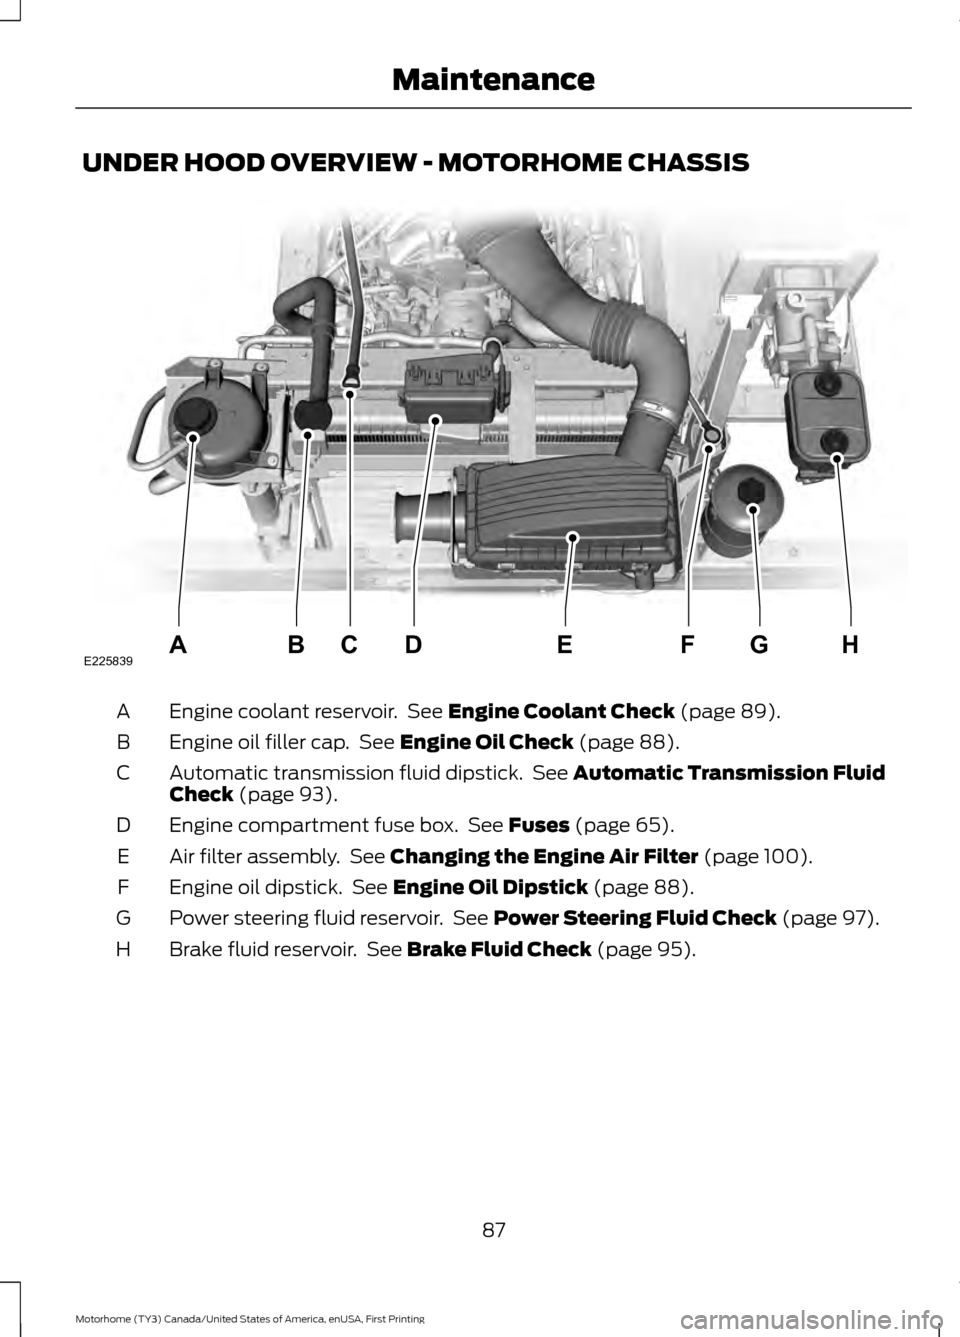
UNDER HOOD OVERVIEW - MOTORHOME CHASSIS
Engine coolant reservoir. See Engine Coolant Check (page 89).
A
Engine oil filler cap. See
Engine Oil Check (page 88).
B
Automatic transmission fluid dipstick. See
Automatic Transmission Fluid
Check (page 93).
C
Engine compartment fuse box. See
Fuses (page 65).
D
Air filter assembly. See
Changing the Engine Air Filter (page 100).
E
Engine oil dipstick. See
Engine Oil Dipstick (page 88).
F
Power steering fluid reservoir. See
Power Steering Fluid Check (page 97).
G
Brake fluid reservoir. See
Brake Fluid Check (page 95).
H
87
Motorhome (TY3) Canada/United States of America, enUSA, First Printing MaintenanceE225839HGFEABCD
Page 91 of 164
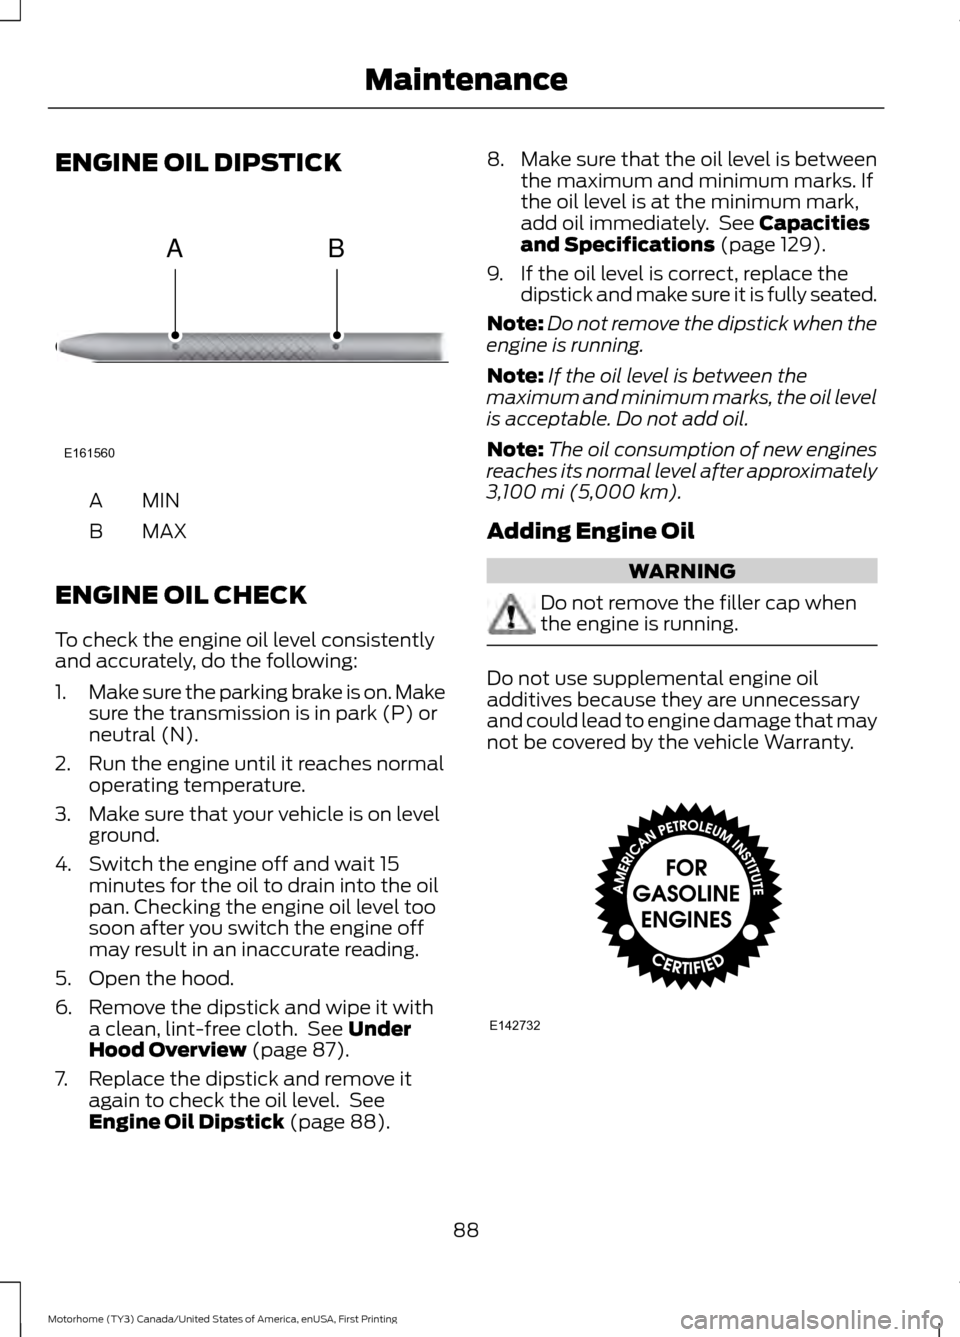
ENGINE OIL DIPSTICK
MINA
MAX
B
ENGINE OIL CHECK
To check the engine oil level consistently
and accurately, do the following:
1. Make sure the parking brake is on. Make
sure the transmission is in park (P) or
neutral (N).
2. Run the engine until it reaches normal operating temperature.
3. Make sure that your vehicle is on level ground.
4. Switch the engine off and wait 15 minutes for the oil to drain into the oil
pan. Checking the engine oil level too
soon after you switch the engine off
may result in an inaccurate reading.
5. Open the hood.
6. Remove the dipstick and wipe it with a clean, lint-free cloth. See Under
Hood Overview (page 87).
7. Replace the dipstick and remove it again to check the oil level. See
Engine Oil Dipstick
(page 88). 8.
Make sure that the oil level is between
the maximum and minimum marks. If
the oil level is at the minimum mark,
add oil immediately. See
Capacities
and Specifications (page 129).
9. If the oil level is correct, replace the dipstick and make sure it is fully seated.
Note: Do not remove the dipstick when the
engine is running.
Note: If the oil level is between the
maximum and minimum marks, the oil level
is acceptable. Do not add oil.
Note: The oil consumption of new engines
reaches its normal level after approximately
3,100 mi (5,000 km)
.
Adding Engine Oil WARNING
Do not remove the filler cap when
the engine is running.
Do not use supplemental engine oil
additives because they are unnecessary
and could lead to engine damage that may
not be covered by the vehicle Warranty.
88
Motorhome (TY3) Canada/United States of America, enUSA, First Printing MaintenanceE161560
AB E142732
Page 96 of 164
Engine Coolant Temperature
Management (If Equipped)
WARNING
To reduce the risk of crash and injury,
be prepared that the vehicle speed
may reduce and the vehicle may not
be able to accelerate with full power until
the coolant temperature reduces. If you tow a trailer with your vehicle, the
engine may temporarily reach higher a
temperature during severe operating
conditions, for example ascending a long
or steep grade in high ambient
temperatures.
At this time, you may notice the coolant
temperature gauge moves toward the red
zone and a message may appear in the
information display.
You may notice a reduction in vehicle
speed caused by reduced engine power.
In order to manage the engine coolant
temperature. Your vehicle may enter this
mode if certain high-temperature and
high-load conditions take place. The
amount of speed reduction depends on
vehicle loading, grade and ambient
temperature. If this occurs, there is no need
to pull off the road. You can continue to
drive your vehicle.
The air conditioning may automatically
turn on and off during severe operating
conditions to protect the engine from
overheating. When the coolant
temperature decreases to the normal
operating temperature, the air conditioning
turns on.
If the coolant temperature gauge moves
fully into the red zone, or if the coolant
temperature warning or service engine
soon messages appear in your information
display, do the following: 1. Pull off the road as soon as safely
possible and shift the transmission into
park (P).
2. Leave the engine running until the coolant temperature gauge needle
returns to the normal position. After
several minutes, if the temperature
does not drop, follow the remaining
steps.
3. Switch the engine off and wait for it to
cool. Check the coolant level.
4. If the coolant level is at or below the minimum mark, add prediluted coolant
immediately.
5. If the coolant level is normal, restart the engine and continue.
AUTOMATIC TRANSMISSION
FLUID CHECK WARNING
The dipstick cap and surrounding
components may be hot; gloves are
recommended.
Note:
Automatic transmission fluid
expands when warmed. To obtain an
accurate fluid check, drive the vehicle until
it is at normal operating temperature
(approximately 20 miles [30 km]). If your
vehicle has been operated for an extended
period at high speeds, in city traffic during
hot weather or pulling a trailer, the vehicle
should be turned off for about 30 minutes
to allow fluid to cool to normal operating
temperature 196°F - 215°F (91°C - 102°C)
before checking.
Refer to your scheduled maintenance
information for scheduled intervals for fluid
checks and changes.
93
Motorhome (TY3) Canada/United States of America, enUSA, First Printing Maintenance
Page 97 of 164
Your transmission does not consume fluid.
However, the fluid level should be checked
if the transmission is not working properly,
(i.e., if the transmission slips or shifts
slowly) or if you notice some sign of fluid
leakage. To check the fluid level:
1. Drive the vehicle 20 miles (30 km) or
until it reaches normal operating
temperature
2. Park the vehicle on a level surface and
engage the parking brake
3. With the engine running, parking brake
engaged and your foot on the brake
pedal, move the gearshift lever through
all of the gear ranges. Allow sufficient
time for each gear to engage
4. Latch the gearshift lever in P (Park) and leave the engine running.
5. Remove the dipstick, wiping it clean with a clean, dry lint free rag. If
necessary, refer to Under Hood
Overview in this chapter for the
location of the dipstick.
6. Install the dipstick making sure it is fully
seated in the filler tube.
7. Remove the dipstick and inspect the fluid level. The fluid should be in the
designated area for normal operating
temperature or ambient temperature.
Do not use supplemental transmission
fluid additives, treatments or cleaning
agents. The use of these materials may
affect transmission operation and result
in damage to internal transmission
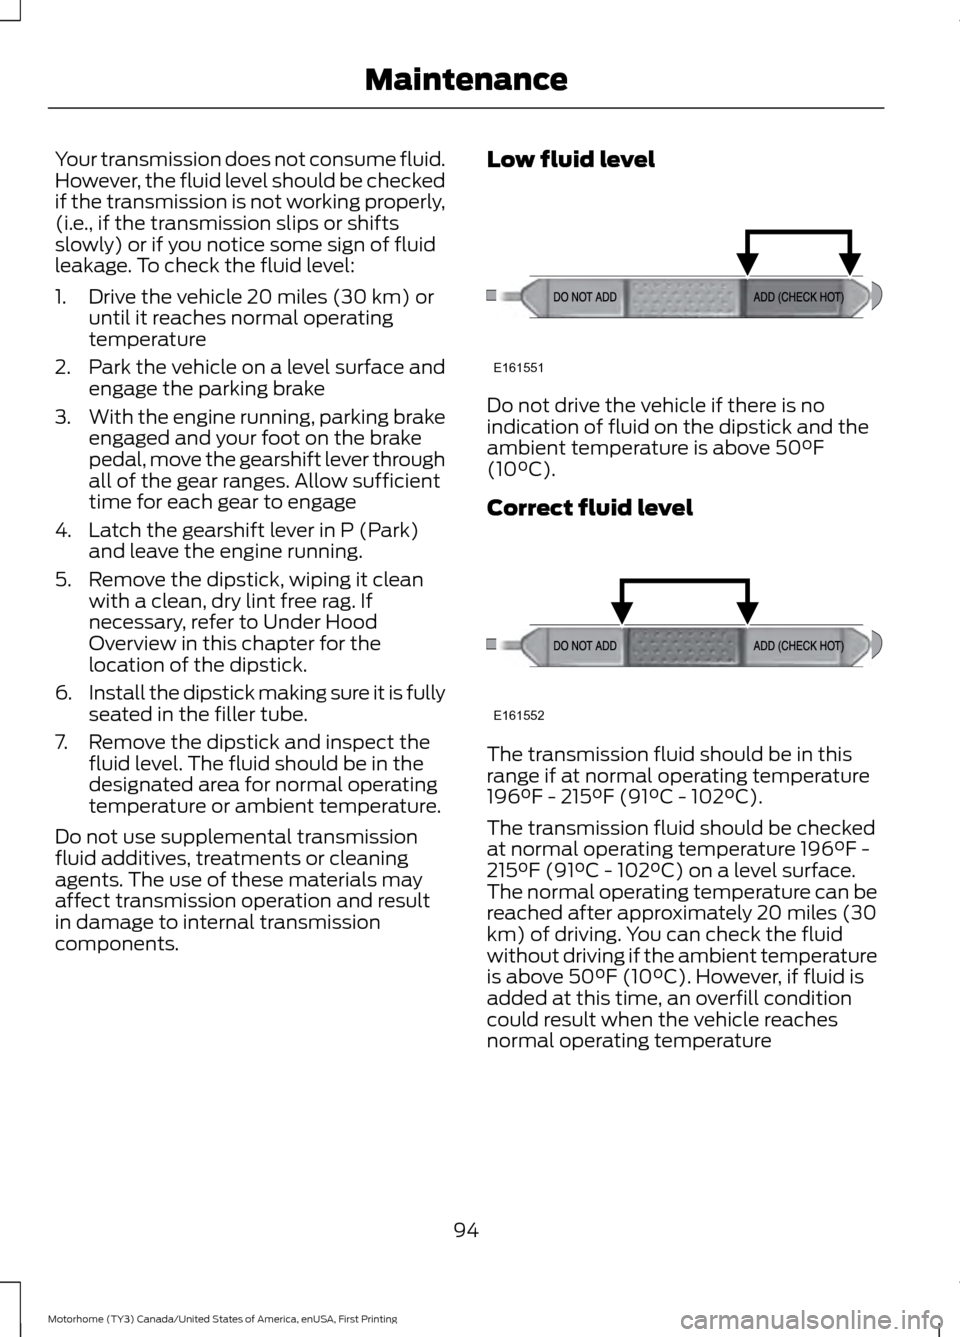
components. Low fluid level Do not drive the vehicle if there is no
indication of fluid on the dipstick and the
ambient temperature is above 50°F
(10°C).
Correct fluid level
The transmission fluid should be in this
range if at normal operating temperature
196°F - 215°F (91°C - 102°C).
The transmission fluid should be checked
at normal operating temperature 196°F -
215°F (91°C - 102°C) on a level surface.
The normal operating temperature can be
reached after approximately 20 miles (30
km) of driving. You can check the fluid
without driving if the ambient temperature
is above 50°F (10°C). However, if fluid is
added at this time, an overfill condition
could result when the vehicle reaches
normal operating temperature
94
Motorhome (TY3) Canada/United States of America, enUSA, First Printing MaintenanceE161551 E161552
Page 98 of 164
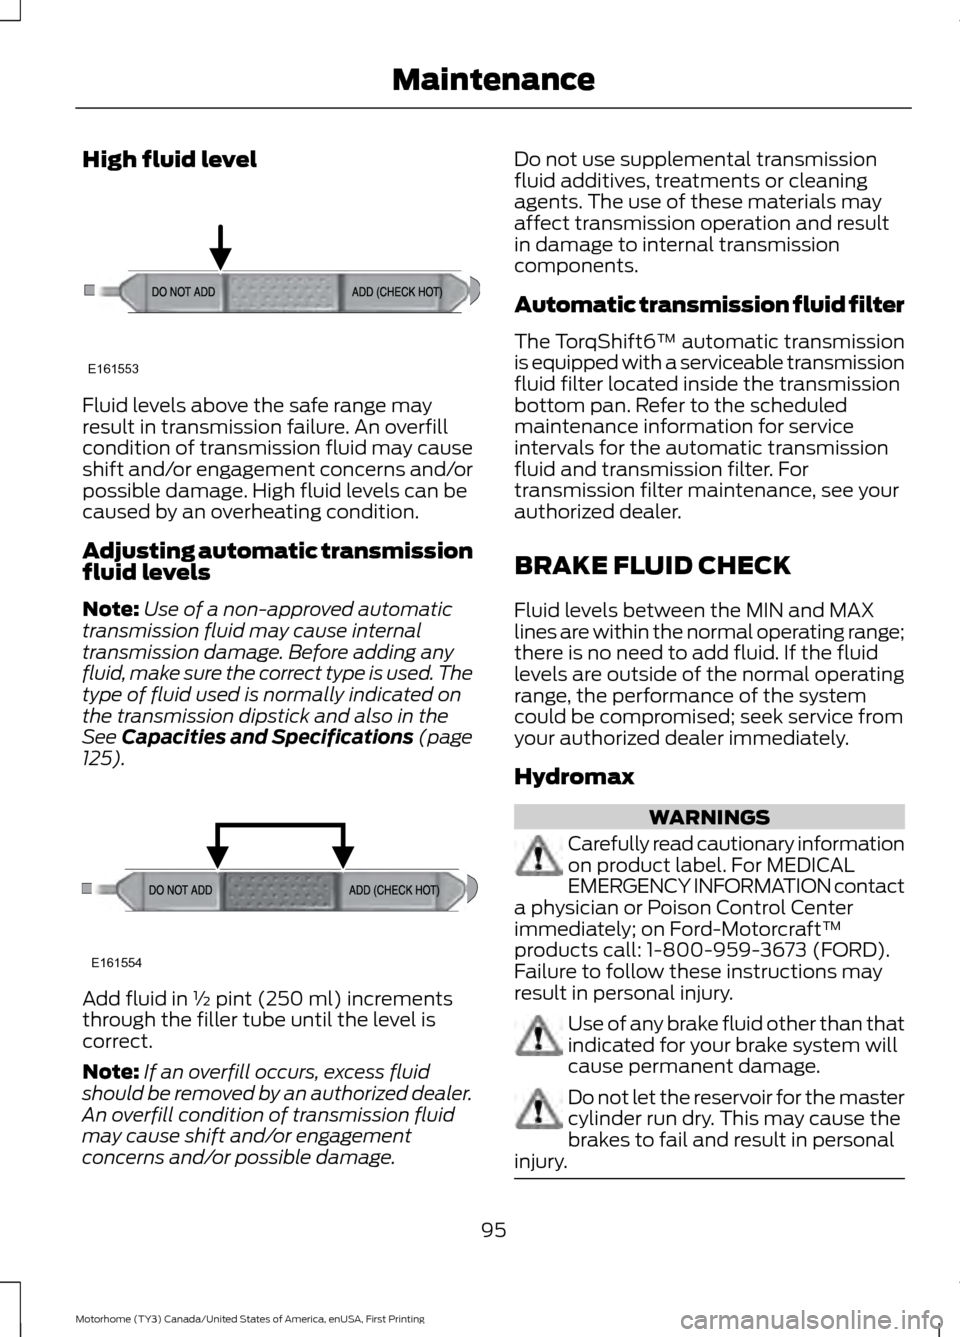
High fluid level
Fluid levels above the safe range may
result in transmission failure. An overfill
condition of transmission fluid may cause
shift and/or engagement concerns and/or
possible damage. High fluid levels can be
caused by an overheating condition.
Adjusting automatic transmission
fluid levels
Note:
Use of a non-approved automatic
transmission fluid may cause internal
transmission damage. Before adding any
fluid, make sure the correct type is used. The
type of fluid used is normally indicated on
the transmission dipstick and also in the
See Capacities and Specifications (page
125). Add fluid in ½ pint (250 ml) increments
through the filler tube until the level is
correct.
Note:
If an overfill occurs, excess fluid
should be removed by an authorized dealer.
An overfill condition of transmission fluid
may cause shift and/or engagement
concerns and/or possible damage. Do not use supplemental transmission
fluid additives, treatments or cleaning
agents. The use of these materials may
affect transmission operation and result
in damage to internal transmission
components.
Automatic transmission fluid filter
The TorqShift6™ automatic transmission
is equipped with a serviceable transmission
fluid filter located inside the transmission
bottom pan. Refer to the scheduled
maintenance information for service
intervals for the automatic transmission
fluid and transmission filter. For
transmission filter maintenance, see your
authorized dealer.
BRAKE FLUID CHECK
Fluid levels between the MIN and MAX
lines are within the normal operating range;
there is no need to add fluid. If the fluid
levels are outside of the normal operating
range, the performance of the system
could be compromised; seek service from
your authorized dealer immediately.
Hydromax
WARNINGS
Carefully read cautionary information
on product label. For MEDICAL
EMERGENCY INFORMATION contact
a physician or Poison Control Center
immediately; on Ford-Motorcraft™
products call: 1-800-959-3673 (FORD).
Failure to follow these instructions may
result in personal injury. Use of any brake fluid other than that
indicated for your brake system will
cause permanent damage.
Do not let the reservoir for the master
cylinder run dry. This may cause the
brakes to fail and result in personal
injury. 95
Motorhome (TY3) Canada/United States of America, enUSA, First Printing MaintenanceE161553 E161554
Page 102 of 164
Your vehicle is equipped with a
Motorcraft® maintenance-free battery
which normally does not require additional
water during its life of service.
For longer, trouble-free operation, keep the
top of the battery clean and dry. Also,
make certain the battery cables are always
tightly fastened to the battery terminals.
If you see any corrosion on the battery or
terminals, remove the cables from the
terminals and clean with a wire brush. You
can neutralize the acid with a solution of
baking soda and water.
It is recommended that the negative
battery cable terminal be disconnected
from the battery if you plan to store your
vehicle for an extended period of time.
To ensure proper operation of the battery
management system (BMS), any electrical
devices that are added to the vehicle
should not have their ground connection
made directly at the negative battery post.
A connection at the negative battery post
can cause inaccurate measurements of
the battery condition and potential
incorrect system operation.
Note:
Electrical or electronic accessories
or components added to the vehicle by the
dealer or the owner may adversely affect
battery performance and durability and may
also affect the performance of other
electrical systems in the vehicle.
When a battery replacement is required,
the battery should only be replaced with
a Ford recommended replacement battery
that matches the electrical requirements
of the vehicle.
Note: Always dispose of automotive
batteries in a responsible manner. Follow
your local authorized standards for disposal.
Call your local authorized recycling center
to find out more about recycling automotive
batteries. Battery relearn
When the battery is disconnected or a new
battery installed:
•
The transmission must relearn its
adaptive strategy. As a result of this,
the transmission may shift firmly. This
operation is considered normal and will
not affect function or durability of the
transmission. Over time the adaptive
learning process will fully update
transmission operation to its optimum
shift feel.
• The clock and the preset radio stations
must be reset once the battery is
reconnected.
• Your vehicle ’s engine is electronically
controlled by a computer, some control
conditions are maintained by power
from the battery, the engine must
relearn its idle and fuel trim strategy.
When the battery is disconnected or a new
battery is installed, begin the battery
relearn process:
1. With the vehicle at a complete stop, set the parking brake.
2. Put the gearshift lever in P (Park), turn
off all accessories and start the engine.
3. Run the engine until it reaches normal operating temperature.
4. Allow the engine to idle for at least one
minute.
5. Turn the A/C on and allow the engine to idle for at least one minute.
6. Drive the vehicle to complete the relearning process.
•The vehicle may need to be driven
to relearn the idle and fuel trim
strategy.
99
Motorhome (TY3) Canada/United States of America, enUSA, First Printing Maintenance