2017 FORD F SERIES MOTORHOME AND COMMERCIAL CHASSIS parking brake
[x] Cancel search: parking brakePage 82 of 164
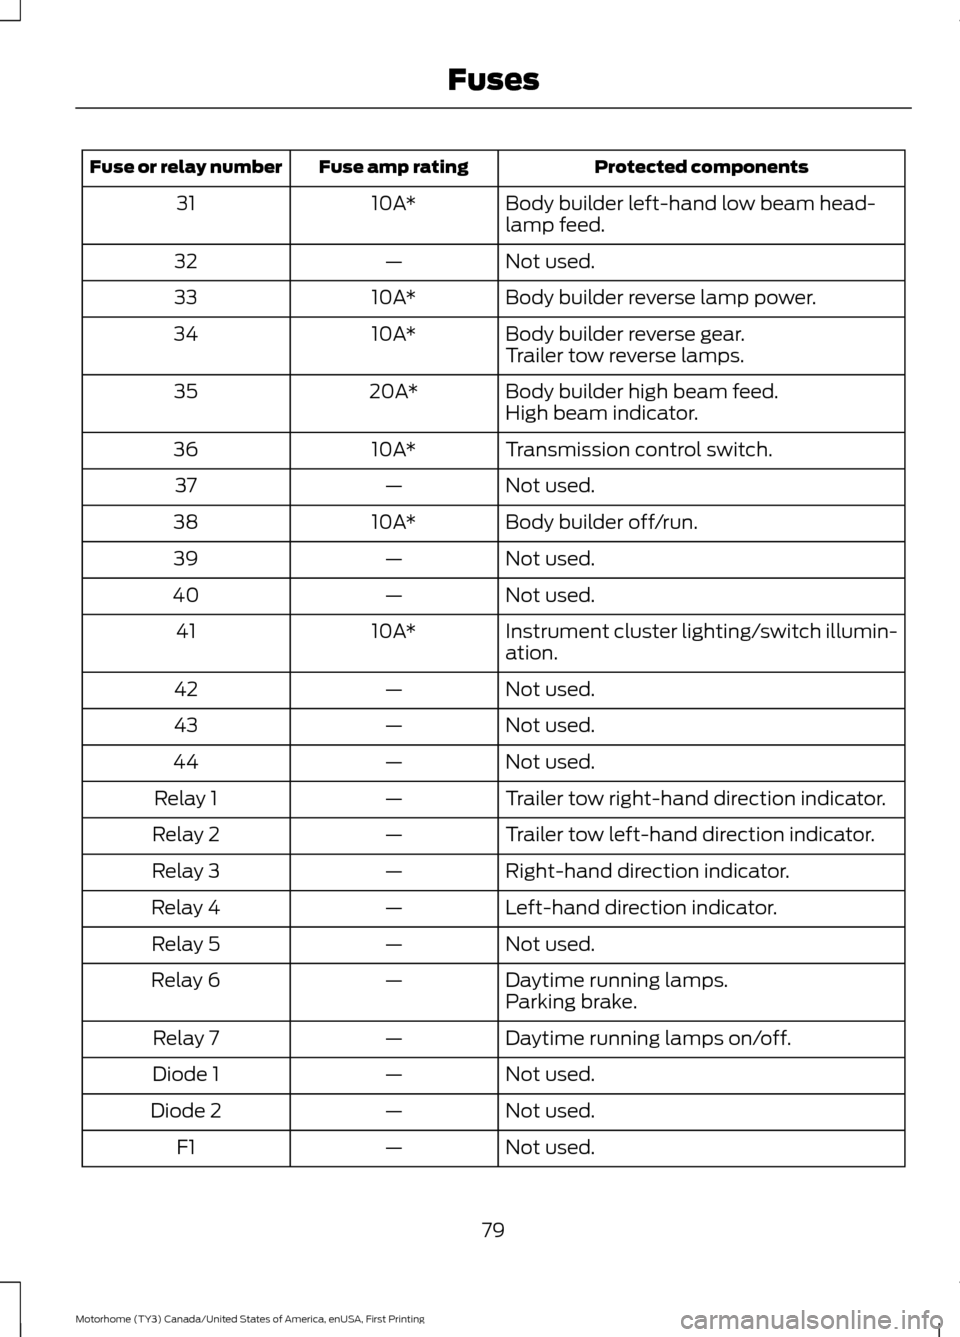
Protected components
Fuse amp rating
Fuse or relay number
Body builder left-hand low beam head-
lamp feed.
10A*
31
Not used.
—
32
Body builder reverse lamp power.
10A*
33
Body builder reverse gear.
10A*
34
Trailer tow reverse lamps.
Body builder high beam feed.
20A*
35
High beam indicator.
Transmission control switch.
10A*
36
Not used.
—
37
Body builder off/run.
10A*
38
Not used.
—
39
Not used.
—
40
Instrument cluster lighting/switch illumin-
ation.
10A*
41
Not used.
—
42
Not used.
—
43
Not used.
—
44
Trailer tow right-hand direction indicator.
—
Relay 1
Trailer tow left-hand direction indicator.
—
Relay 2
Right-hand direction indicator.
—
Relay 3
Left-hand direction indicator.
—
Relay 4
Not used.
—
Relay 5
Daytime running lamps.
—
Relay 6
Parking brake.
Daytime running lamps on/off.
—
Relay 7
Not used.
—
Diode 1
Not used.
—
Diode 2
Not used.
—
F1
79
Motorhome (TY3) Canada/United States of America, enUSA, First Printing Fuses
Page 85 of 164
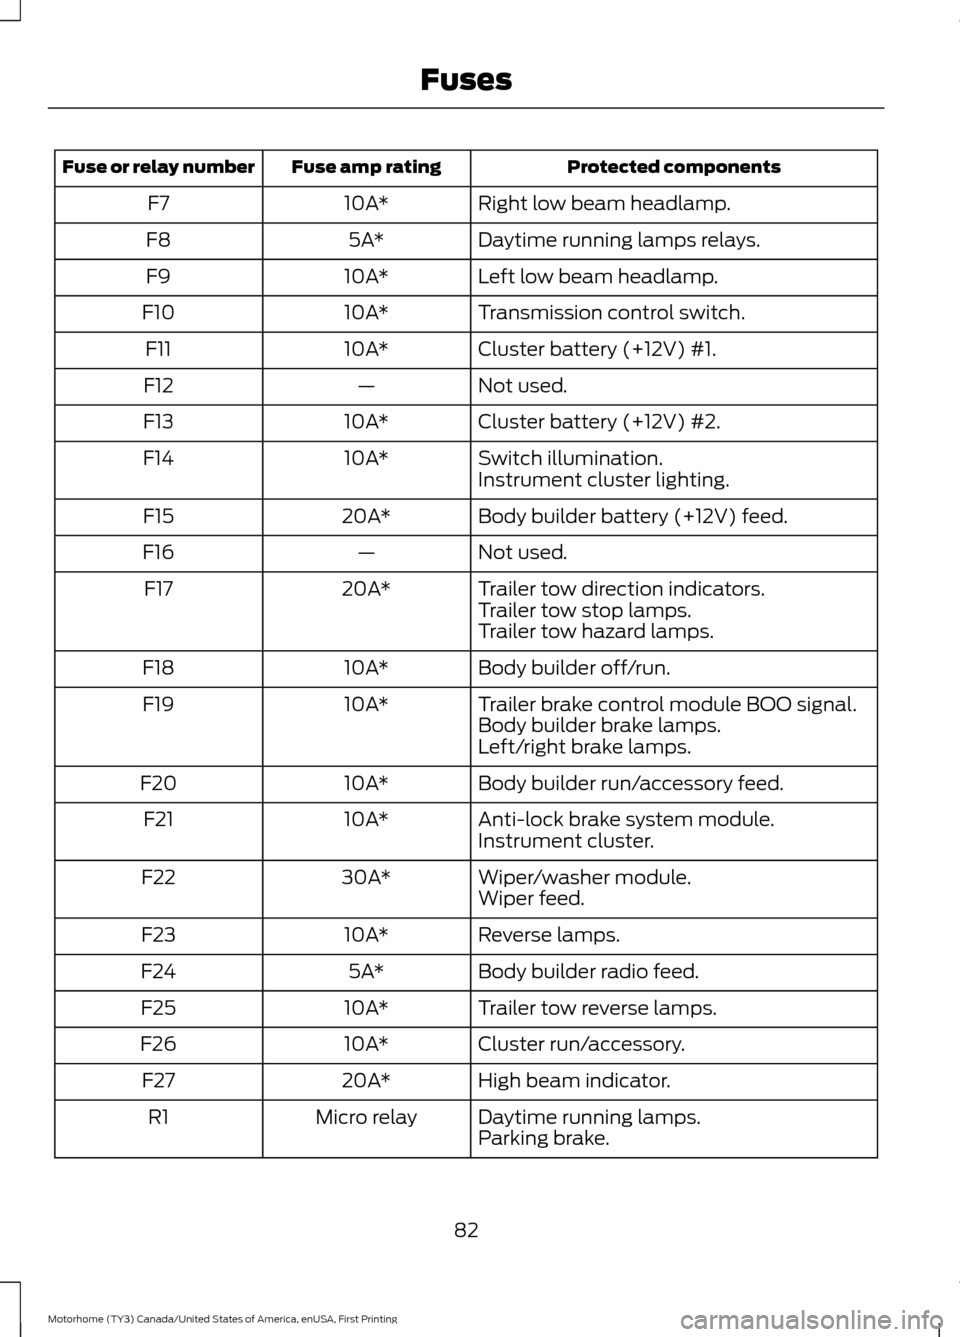
Protected components
Fuse amp rating
Fuse or relay number
Right low beam headlamp.
10A*
F7
Daytime running lamps relays.
5A*
F8
Left low beam headlamp.
10A*
F9
Transmission control switch.
10A*
F10
Cluster battery (+12V) #1.
10A*
F11
Not used.
—
F12
Cluster battery (+12V) #2.
10A*
F13
Switch illumination.
10A*
F14
Instrument cluster lighting.
Body builder battery (+12V) feed.
20A*
F15
Not used.
—
F16
Trailer tow direction indicators.
20A*
F17
Trailer tow stop lamps.
Trailer tow hazard lamps.
Body builder off/run.
10A*
F18
Trailer brake control module BOO signal.
10A*
F19
Body builder brake lamps.
Left/right brake lamps.
Body builder run/accessory feed.
10A*
F20
Anti-lock brake system module.
10A*
F21
Instrument cluster.
Wiper/washer module.
30A*
F22
Wiper feed.
Reverse lamps.
10A*
F23
Body builder radio feed.
5A*
F24
Trailer tow reverse lamps.
10A*
F25
Cluster run/accessory.
10A*
F26
High beam indicator.
20A*
F27
Daytime running lamps.
Micro relay
R1
Parking brake.
82
Motorhome (TY3) Canada/United States of America, enUSA, First Printing Fuses
Page 88 of 164
GENERAL INFORMATION
Have your vehicle serviced regularly to help
maintain its roadworthiness and resale
value. There is a large network of
authorized dealers that are there to help
you with their professional servicing
expertise. We believe that their specially
trained technicians are best qualified to
service your vehicle properly and expertly.
They are supported by a wide range of
highly specialized tools developed
specifically for servicing your vehicle.
If your vehicle requires professional service,
an authorized dealer can provide the
necessary parts and service. Check your
warranty information to find out which
parts and services are covered.
Use only recommended fuels, lubricants,
fluids and service parts conforming to
specifications. Motorcraft® parts are
designed and built to provide the best
performance in your vehicle.
Precautions
•
Do not work on a hot engine.
• Make sure that nothing gets caught in
moving parts. •
Do not work on a vehicle with the
engine running in an enclosed space,
unless you are sure you have enough
ventilation.
• Keep all open flames and other burning
material (such as cigarettes) away
from the battery and all fuel related
parts.
Working with the Engine Off
1. Set the parking brake and shift to park
(P).
2. Switch off the engine.
3. Block the wheels.
Working with the Engine On WARNING
To reduce the risk of vehicle damage
and/or personal burn injuries, do not
start your engine with the air cleaner
removed and do not remove it while the
engine is running. 1.
Set the parking brake and shift to park
(P).
2. Block the wheels.
85
Motorhome (TY3) Canada/United States of America, enUSA, First Printing Maintenance
Page 91 of 164
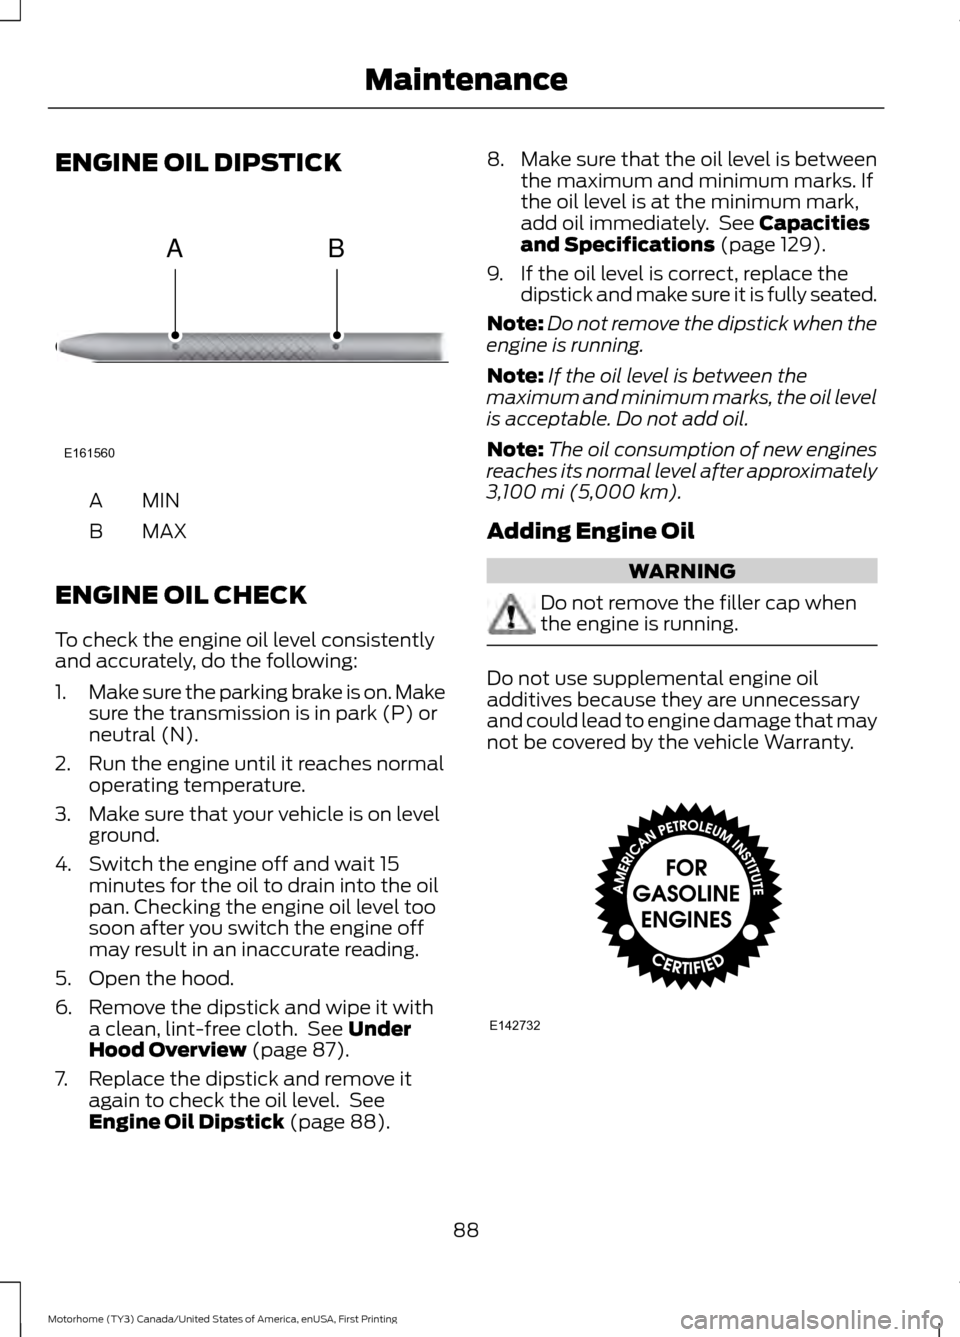
ENGINE OIL DIPSTICK
MINA
MAX
B
ENGINE OIL CHECK
To check the engine oil level consistently
and accurately, do the following:
1. Make sure the parking brake is on. Make
sure the transmission is in park (P) or
neutral (N).
2. Run the engine until it reaches normal operating temperature.
3. Make sure that your vehicle is on level ground.
4. Switch the engine off and wait 15 minutes for the oil to drain into the oil
pan. Checking the engine oil level too
soon after you switch the engine off
may result in an inaccurate reading.
5. Open the hood.
6. Remove the dipstick and wipe it with a clean, lint-free cloth. See Under
Hood Overview (page 87).
7. Replace the dipstick and remove it again to check the oil level. See
Engine Oil Dipstick
(page 88). 8.
Make sure that the oil level is between
the maximum and minimum marks. If
the oil level is at the minimum mark,
add oil immediately. See
Capacities
and Specifications (page 129).
9. If the oil level is correct, replace the dipstick and make sure it is fully seated.
Note: Do not remove the dipstick when the
engine is running.
Note: If the oil level is between the
maximum and minimum marks, the oil level
is acceptable. Do not add oil.
Note: The oil consumption of new engines
reaches its normal level after approximately
3,100 mi (5,000 km)
.
Adding Engine Oil WARNING
Do not remove the filler cap when
the engine is running.
Do not use supplemental engine oil
additives because they are unnecessary
and could lead to engine damage that may
not be covered by the vehicle Warranty.
88
Motorhome (TY3) Canada/United States of America, enUSA, First Printing MaintenanceE161560
AB E142732
Page 97 of 164
Your transmission does not consume fluid.
However, the fluid level should be checked
if the transmission is not working properly,
(i.e., if the transmission slips or shifts
slowly) or if you notice some sign of fluid
leakage. To check the fluid level:
1. Drive the vehicle 20 miles (30 km) or
until it reaches normal operating
temperature
2. Park the vehicle on a level surface and
engage the parking brake
3. With the engine running, parking brake
engaged and your foot on the brake
pedal, move the gearshift lever through
all of the gear ranges. Allow sufficient
time for each gear to engage
4. Latch the gearshift lever in P (Park) and leave the engine running.
5. Remove the dipstick, wiping it clean with a clean, dry lint free rag. If
necessary, refer to Under Hood
Overview in this chapter for the
location of the dipstick.
6. Install the dipstick making sure it is fully
seated in the filler tube.
7. Remove the dipstick and inspect the fluid level. The fluid should be in the
designated area for normal operating
temperature or ambient temperature.
Do not use supplemental transmission
fluid additives, treatments or cleaning
agents. The use of these materials may
affect transmission operation and result
in damage to internal transmission
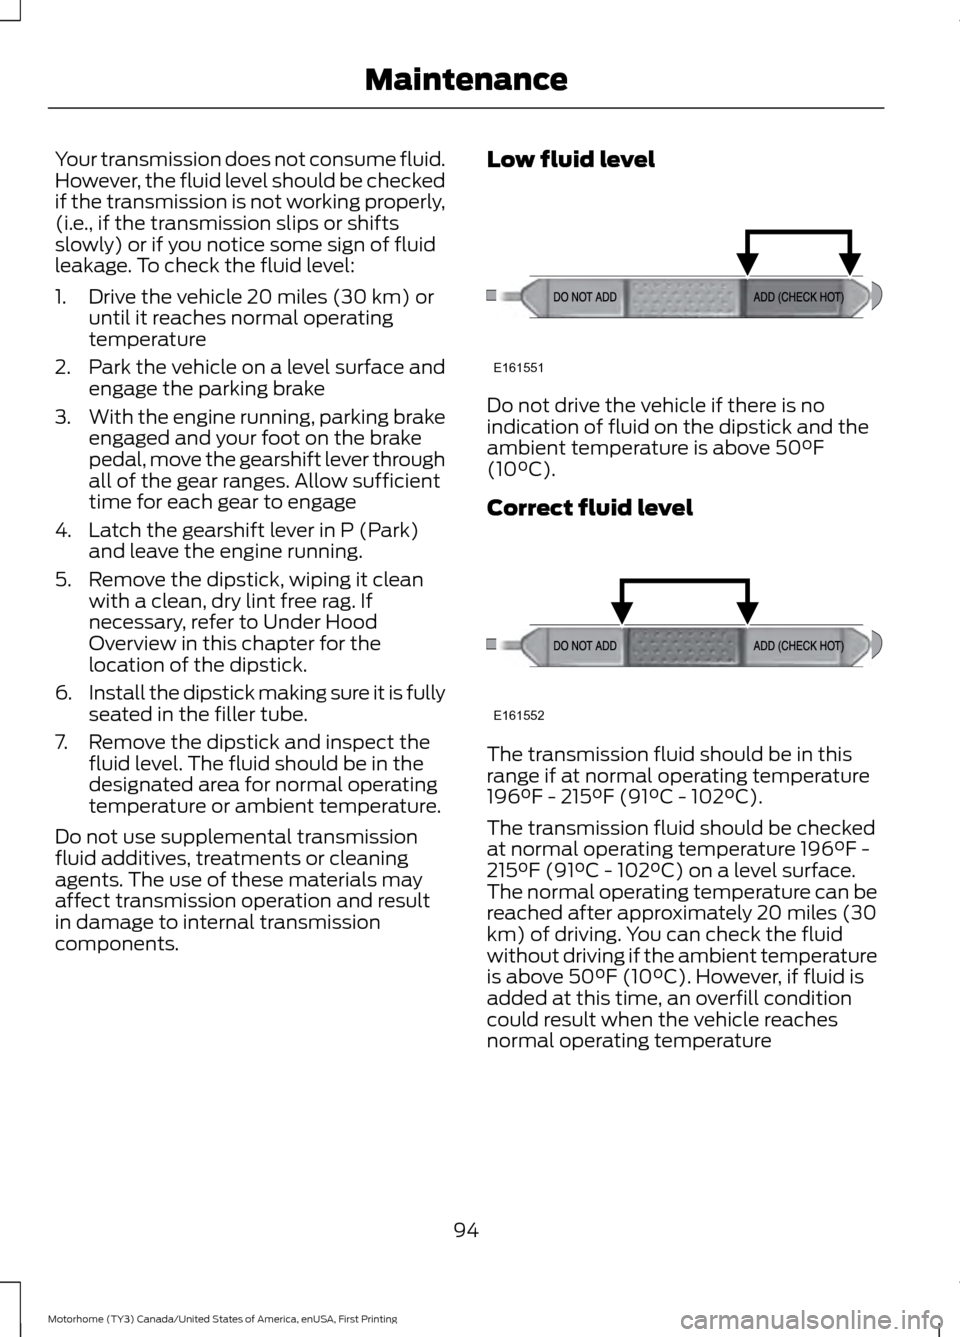
components. Low fluid level Do not drive the vehicle if there is no
indication of fluid on the dipstick and the
ambient temperature is above 50°F
(10°C).
Correct fluid level
The transmission fluid should be in this
range if at normal operating temperature
196°F - 215°F (91°C - 102°C).
The transmission fluid should be checked
at normal operating temperature 196°F -
215°F (91°C - 102°C) on a level surface.
The normal operating temperature can be
reached after approximately 20 miles (30
km) of driving. You can check the fluid
without driving if the ambient temperature
is above 50°F (10°C). However, if fluid is
added at this time, an overfill condition
could result when the vehicle reaches
normal operating temperature
94
Motorhome (TY3) Canada/United States of America, enUSA, First Printing MaintenanceE161551 E161552
Page 102 of 164
Your vehicle is equipped with a
Motorcraft® maintenance-free battery
which normally does not require additional
water during its life of service.
For longer, trouble-free operation, keep the
top of the battery clean and dry. Also,
make certain the battery cables are always
tightly fastened to the battery terminals.
If you see any corrosion on the battery or
terminals, remove the cables from the
terminals and clean with a wire brush. You
can neutralize the acid with a solution of
baking soda and water.
It is recommended that the negative
battery cable terminal be disconnected
from the battery if you plan to store your
vehicle for an extended period of time.
To ensure proper operation of the battery
management system (BMS), any electrical
devices that are added to the vehicle
should not have their ground connection
made directly at the negative battery post.
A connection at the negative battery post
can cause inaccurate measurements of
the battery condition and potential
incorrect system operation.
Note:
Electrical or electronic accessories
or components added to the vehicle by the
dealer or the owner may adversely affect
battery performance and durability and may
also affect the performance of other
electrical systems in the vehicle.
When a battery replacement is required,
the battery should only be replaced with
a Ford recommended replacement battery
that matches the electrical requirements
of the vehicle.
Note: Always dispose of automotive
batteries in a responsible manner. Follow
your local authorized standards for disposal.
Call your local authorized recycling center
to find out more about recycling automotive
batteries. Battery relearn
When the battery is disconnected or a new
battery installed:
•
The transmission must relearn its
adaptive strategy. As a result of this,
the transmission may shift firmly. This
operation is considered normal and will
not affect function or durability of the
transmission. Over time the adaptive
learning process will fully update
transmission operation to its optimum
shift feel.
• The clock and the preset radio stations
must be reset once the battery is
reconnected.
• Your vehicle ’s engine is electronically
controlled by a computer, some control
conditions are maintained by power
from the battery, the engine must
relearn its idle and fuel trim strategy.
When the battery is disconnected or a new
battery is installed, begin the battery
relearn process:
1. With the vehicle at a complete stop, set the parking brake.
2. Put the gearshift lever in P (Park), turn
off all accessories and start the engine.
3. Run the engine until it reaches normal operating temperature.
4. Allow the engine to idle for at least one
minute.
5. Turn the A/C on and allow the engine to idle for at least one minute.
6. Drive the vehicle to complete the relearning process.
•The vehicle may need to be driven
to relearn the idle and fuel trim
strategy.
99
Motorhome (TY3) Canada/United States of America, enUSA, First Printing Maintenance
Page 105 of 164
Underbody
Flush the complete underside of your
vehicle frequently. Keep body and door
drain holes free of debris or foreign
material.
Under Hood
For removing black rubber marks from
under the hood we recommend Motorcraft
Wheel and Tire Cleaner or Motorcraft Bug
and Tar Remover.
CLEANING THE ENGINE
Engines are more efficient when they are
clean because grease and dirt buildup keep
the engine warmer than normal.
When washing:
•
Take care when using a power washer
to clean the engine. The high-pressure
fluid could penetrate the sealed parts
and cause damage.
• Do not spray a hot engine with cold
water to avoid cracking the engine
block or other engine components.
• Spray Motorcraft Engine Shampoo and
Degreaser on all parts that require
cleaning and pressure rinse clean. In
Canada, use Motorcraft Engine
Shampoo.
• Never wash or rinse the engine while it
is hot or running; water in the running
engine may cause internal damage.
• Never wash or rinse any ignition coil,
spark plug wire or spark plug well, or
the area in and around these locations.
• Cover the battery, power distribution
box, and air filter assembly to prevent
water damage when cleaning the
engine. CLEANING THE ALLOY
WHEELS (If Equipped)
Note: Do not apply a cleaning chemical to
warm or hot wheel rims and covers.
Note: Some automatic car washes may
cause damage to the finish on your wheel
rims and covers.
Note: Industrial-strength or heavy-duty
cleaners in combination with brush agitation
to remove brake dust and dirt, could wear
away the clear coat finish over a period time.
Note: Do not use hydrofluoric acid-based
or high caustic-based wheel cleaners, steel
wool, fuels or strong household detergents.
Note: If you intend parking your vehicle for
an extended period after cleaning the
wheels with a wheel cleaner, drive your
vehicle for a few minutes before doing so.
This will reduce the risk of increased
corrosion of the brake discs.
Alloy wheels and wheel covers are coated
with a clear coat paint finish. To maintain
their condition we recommend that you:
• Clean the wheels weekly using
Motorcraft Wheel and Tire Cleaner.
Apply using manufacturer's
instructions.
• Use a sponge to remove heavy
deposits of dirt and brake dust
accumulation.
• Rinse thoroughly with a strong stream
of water when you have completed the
cleaning process.
• To remove tar and grease, use
Motorcraft Bug and Tar Remover.
102
Motorhome (TY3) Canada/United States of America, enUSA, First Printing Vehicle Care
Page 107 of 164
Brakes
•
Make sure the brakes and parking brake
release fully.
Tires
• Maintain recommended air pressure.
Miscellaneous
• Make sure all linkages, cables, levers
and pins under your vehicle are covered
with grease to prevent rust.
• Move vehicles at least 25 ft (7.5 m)
every 15 days to lubricate working parts
and prevent corrosion.
Removing Vehicle From Storage
When your vehicle is ready to come out of
storage, do the following:
• Wash your vehicle to remove any dirt
or grease film build-up on window
surfaces.
• Check windshield wipers for any
deterioration.
• Check under the hood for any foreign
material that may have collected
during storage such as mice or squirrel
nests.
• Check the exhaust for any foreign
material that may have collected
during storage.
• Check tire pressures and set tire
inflation per the Tire Label.
• Check brake pedal operation. Drive
your vehicle
15 ft (4.5 m) back and
forth to remove rust build-up.
• Check fluid levels (including coolant,
oil and gas) to make sure there are no
leaks, and fluids are at recommended
levels.
• If you remove the battery, clean the
battery cable ends and check for
damage. Contact an authorized dealer if you have
any concerns or issues.
104
Motorhome (TY3) Canada/United States of America, enUSA, First Printing Vehicle Care