2017 FORD F SERIES MOTORHOME AND COMMERCIAL CHASSIS air condition
[x] Cancel search: air conditionPage 74 of 164
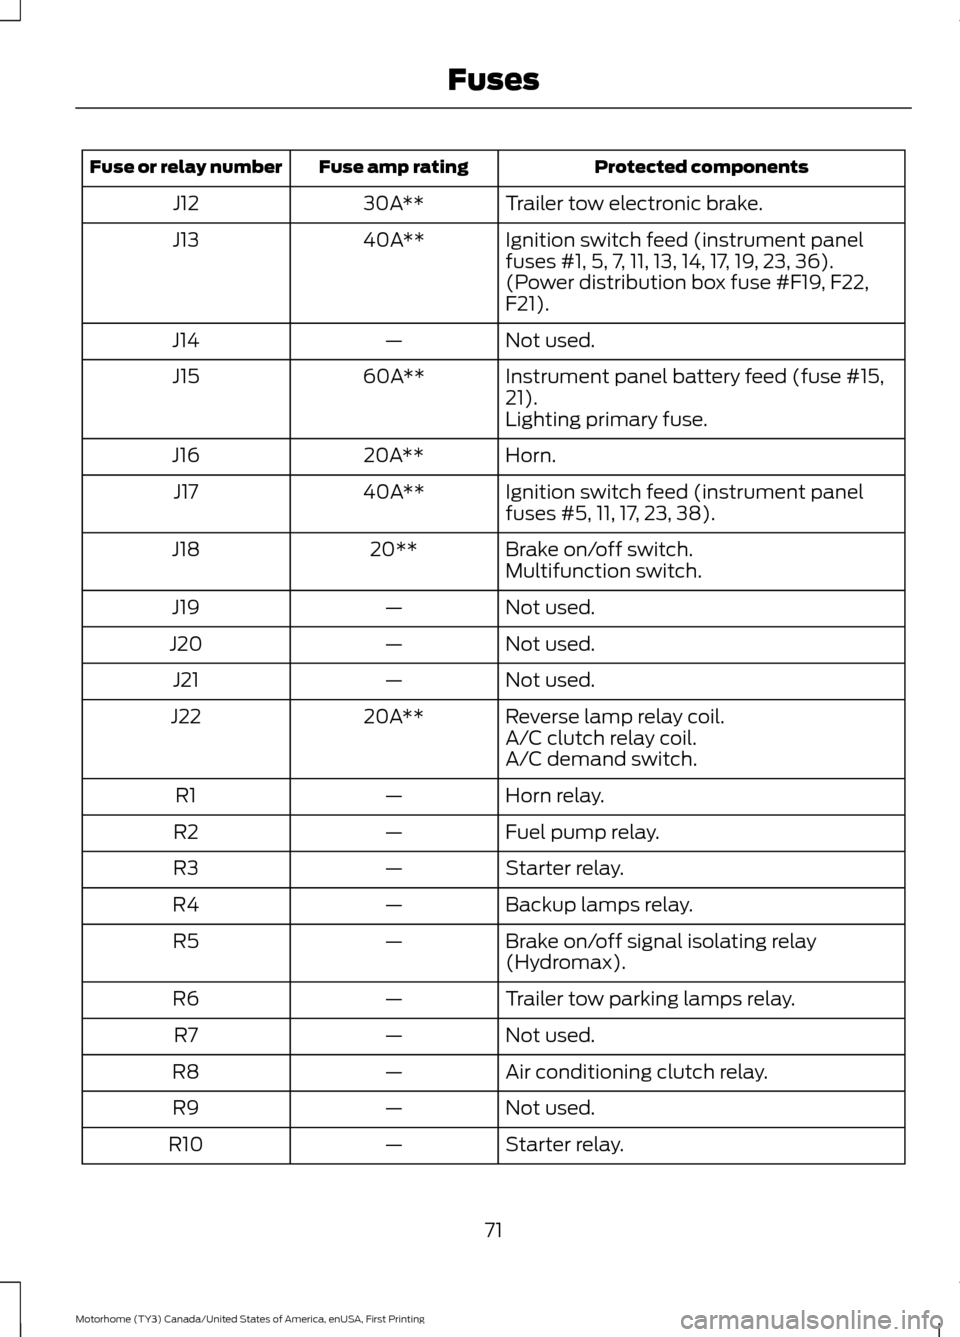
Protected components
Fuse amp rating
Fuse or relay number
Trailer tow electronic brake.
30A**
J12
Ignition switch feed (instrument panel
fuses #1, 5, 7, 11, 13, 14, 17, 19, 23, 36).
40A**
J13
(Power distribution box fuse #F19, F22,
F21).
Not used.
—
J14
Instrument panel battery feed (fuse #15,
21).
60A**
J15
Lighting primary fuse.
Horn.
20A**
J16
Ignition switch feed (instrument panel
fuses #5, 11, 17, 23, 38).
40A**
J17
Brake on/off switch.
20**
J18
Multifunction switch.
Not used.
—
J19
Not used.
—
J20
Not used.
—
J21
Reverse lamp relay coil.
20A**
J22
A/C clutch relay coil.
A/C demand switch.
Horn relay.
—
R1
Fuel pump relay.
—
R2
Starter relay.
—
R3
Backup lamps relay.
—
R4
Brake on/off signal isolating relay
(Hydromax).
—
R5
Trailer tow parking lamps relay.
—
R6
Not used.
—
R7
Air conditioning clutch relay.
—
R8
Not used.
—
R9
Starter relay.
—
R10
71
Motorhome (TY3) Canada/United States of America, enUSA, First Printing Fuses
Page 75 of 164
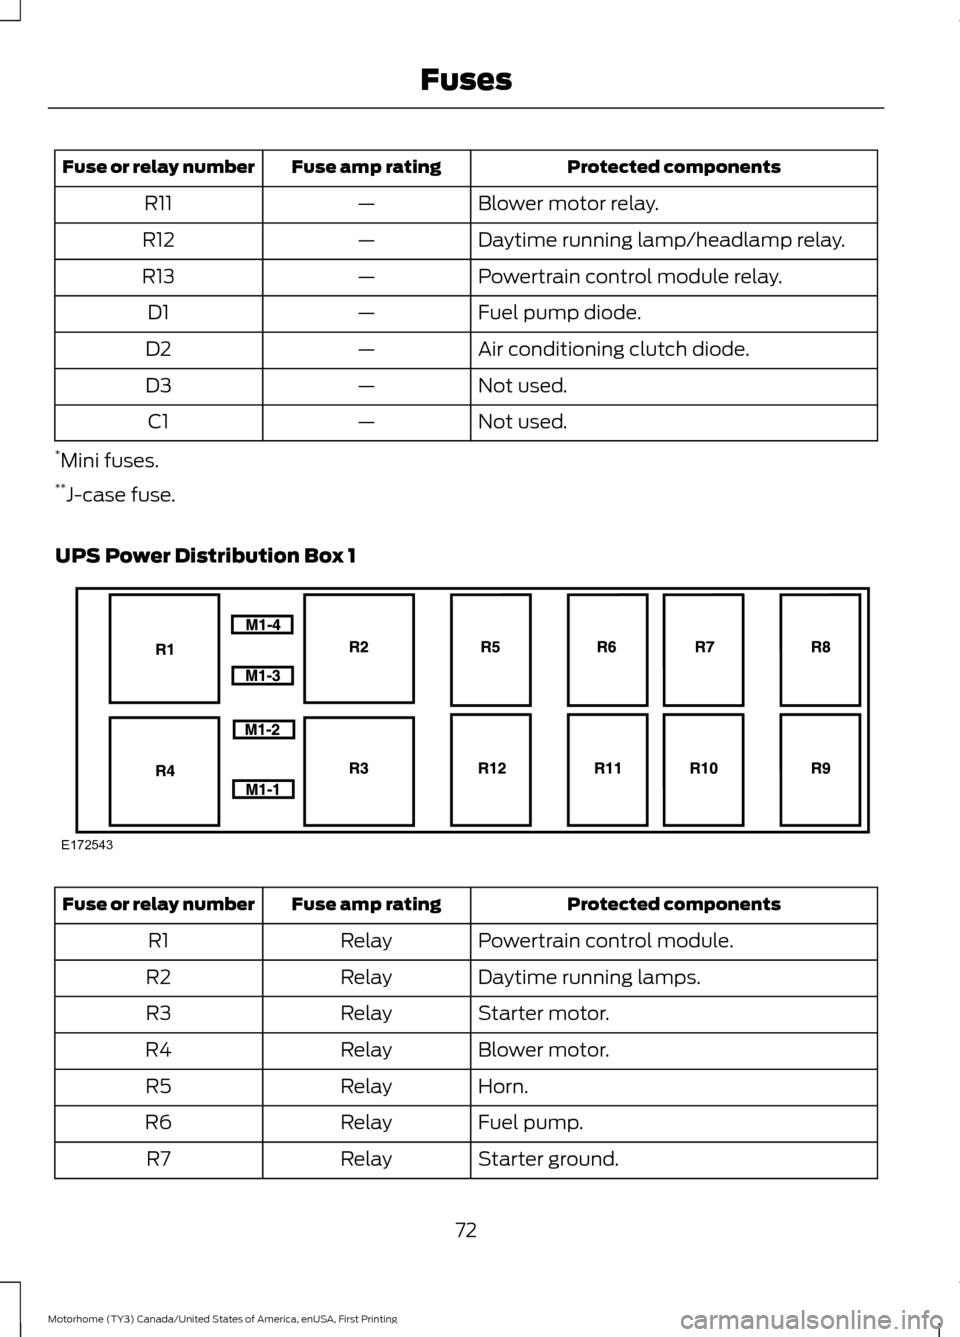
Protected components
Fuse amp rating
Fuse or relay number
Blower motor relay.
—
R11
Daytime running lamp/headlamp relay.
—
R12
Powertrain control module relay.
—
R13
Fuel pump diode.
—
D1
Air conditioning clutch diode.
—
D2
Not used.
—
D3
Not used.
—
C1
* Mini fuses.
** J-case fuse.
UPS Power Distribution Box 1 Protected components
Fuse amp rating
Fuse or relay number
Powertrain control module.
Relay
R1
Daytime running lamps.
Relay
R2
Starter motor.
Relay
R3
Blower motor.
Relay
R4
Horn.
Relay
R5
Fuel pump.
Relay
R6
Starter ground.
Relay
R7
72
Motorhome (TY3) Canada/United States of America, enUSA, First Printing FusesE172543
Page 77 of 164
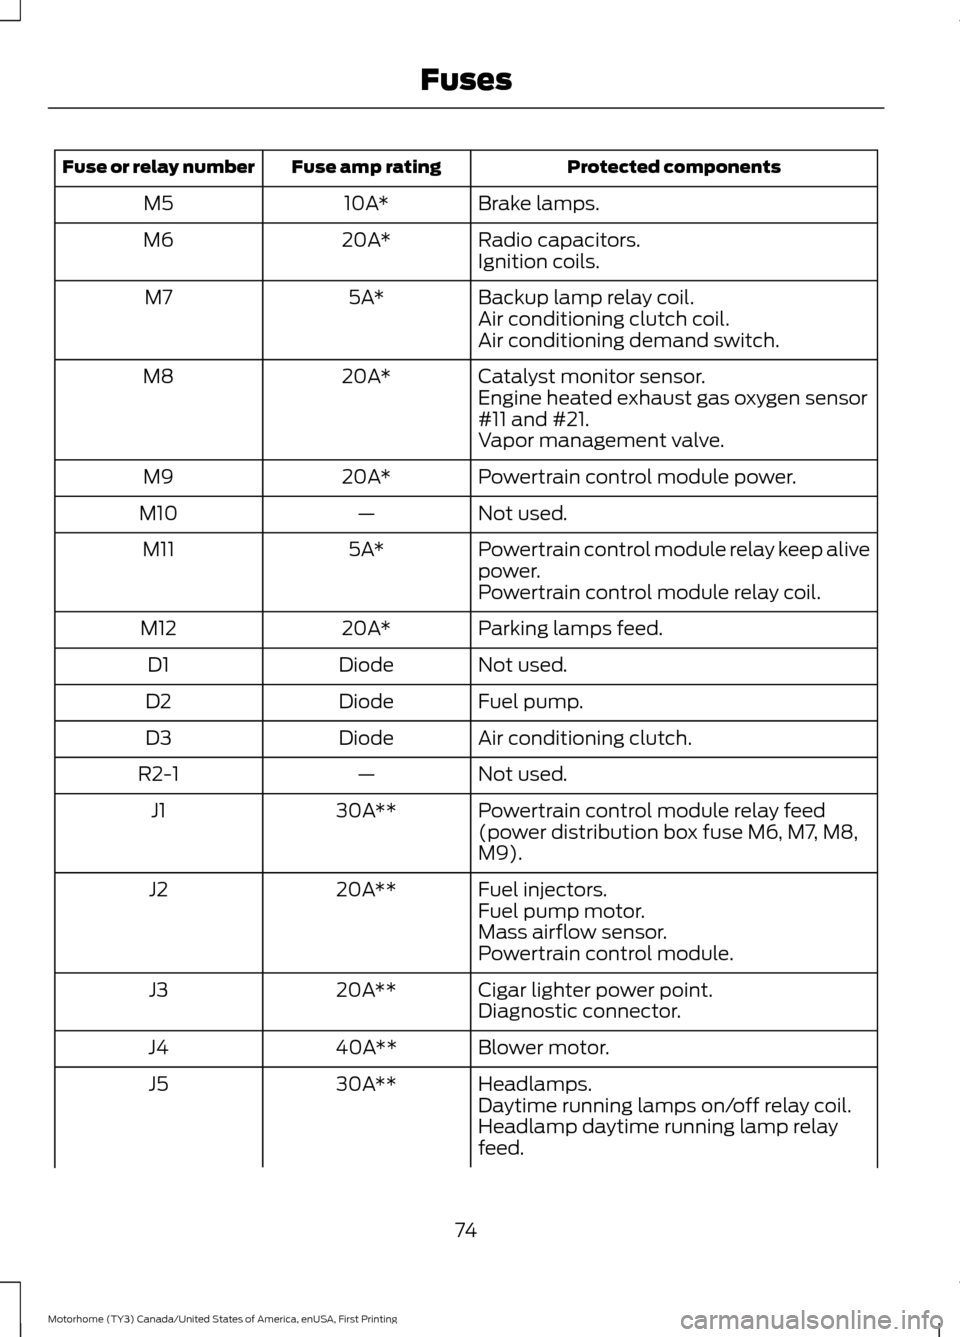
Protected components
Fuse amp rating
Fuse or relay number
Brake lamps.
10A*
M5
Radio capacitors.
20A*
M6
Ignition coils.
Backup lamp relay coil.
5A*
M7
Air conditioning clutch coil.
Air conditioning demand switch.
Catalyst monitor sensor.
20A*
M8
Engine heated exhaust gas oxygen sensor
#11 and #21.
Vapor management valve.
Powertrain control module power.
20A*
M9
Not used.
—
M10
Powertrain control module relay keep alive
power.
5A*
M11
Powertrain control module relay coil.
Parking lamps feed.
20A*
M12
Not used.
Diode
D1
Fuel pump.
Diode
D2
Air conditioning clutch.
Diode
D3
Not used.
—
R2-1
Powertrain control module relay feed
(power distribution box fuse M6, M7, M8,
M9).
30A**
J1
Fuel injectors.
20A**
J2
Fuel pump motor.
Mass airflow sensor.
Powertrain control module.
Cigar lighter power point.
20A**
J3
Diagnostic connector.
Blower motor.
40A**
J4
Headlamps.
30A**
J5
Daytime running lamps on/off relay coil.
Headlamp daytime running lamp relay
feed.
74
Motorhome (TY3) Canada/United States of America, enUSA, First Printing Fuses
Page 95 of 164
Coolant Change
At specific mileage intervals, as listed in
the scheduled maintenance information,
the coolant should be changed. Add
prediluted coolant approved to the correct
specification. See Capacities and
Specifications (page 129).
Fail-Safe Cooling
Fail-safe cooling allows you to temporarily
drive your vehicle before any incremental
component damage occurs. The fail-safe
distance depends on ambient
temperature, vehicle load and terrain.
How Fail-Safe Cooling Works
If the engine begins to overheat, the
coolant temperature gauge moves toward
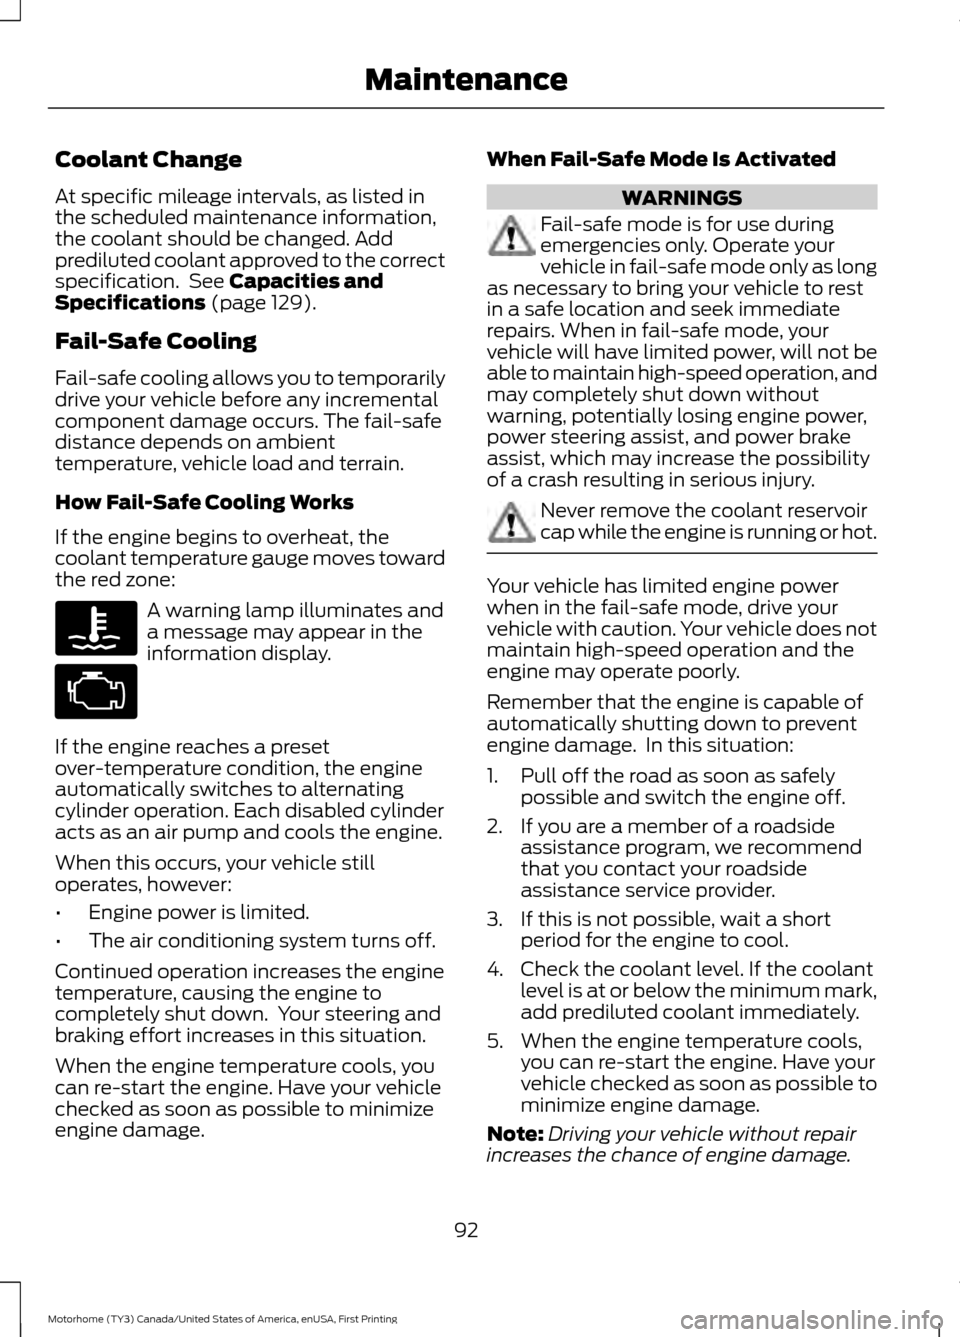
the red zone: A warning lamp illuminates and
a message may appear in the
information display.
If the engine reaches a preset
over-temperature condition, the engine
automatically switches to alternating
cylinder operation. Each disabled cylinder
acts as an air pump and cools the engine.
When this occurs, your vehicle still
operates, however:
• Engine power is limited.
• The air conditioning system turns off.
Continued operation increases the engine
temperature, causing the engine to
completely shut down. Your steering and
braking effort increases in this situation.
When the engine temperature cools, you
can re-start the engine. Have your vehicle
checked as soon as possible to minimize
engine damage. When Fail-Safe Mode Is Activated WARNINGS
Fail-safe mode is for use during
emergencies only. Operate your
vehicle in fail-safe mode only as long
as necessary to bring your vehicle to rest
in a safe location and seek immediate
repairs. When in fail-safe mode, your
vehicle will have limited power, will not be
able to maintain high-speed operation, and
may completely shut down without
warning, potentially losing engine power,
power steering assist, and power brake
assist, which may increase the possibility
of a crash resulting in serious injury. Never remove the coolant reservoir
cap while the engine is running or hot.
Your vehicle has limited engine power
when in the fail-safe mode, drive your
vehicle with caution. Your vehicle does not
maintain high-speed operation and the
engine may operate poorly.
Remember that the engine is capable of
automatically shutting down to prevent
engine damage. In this situation:
1. Pull off the road as soon as safely
possible and switch the engine off.
2. If you are a member of a roadside assistance program, we recommend
that you contact your roadside
assistance service provider.
3. If this is not possible, wait a short period for the engine to cool.
4. Check the coolant level. If the coolant level is at or below the minimum mark,
add prediluted coolant immediately.
5. When the engine temperature cools, you can re-start the engine. Have your
vehicle checked as soon as possible to
minimize engine damage.
Note: Driving your vehicle without repair
increases the chance of engine damage.
92
Motorhome (TY3) Canada/United States of America, enUSA, First Printing Maintenance
Page 96 of 164
Engine Coolant Temperature
Management (If Equipped)
WARNING
To reduce the risk of crash and injury,
be prepared that the vehicle speed
may reduce and the vehicle may not
be able to accelerate with full power until
the coolant temperature reduces. If you tow a trailer with your vehicle, the
engine may temporarily reach higher a
temperature during severe operating
conditions, for example ascending a long
or steep grade in high ambient
temperatures.
At this time, you may notice the coolant
temperature gauge moves toward the red
zone and a message may appear in the
information display.
You may notice a reduction in vehicle
speed caused by reduced engine power.
In order to manage the engine coolant
temperature. Your vehicle may enter this
mode if certain high-temperature and
high-load conditions take place. The
amount of speed reduction depends on
vehicle loading, grade and ambient
temperature. If this occurs, there is no need
to pull off the road. You can continue to
drive your vehicle.
The air conditioning may automatically
turn on and off during severe operating
conditions to protect the engine from
overheating. When the coolant
temperature decreases to the normal
operating temperature, the air conditioning
turns on.
If the coolant temperature gauge moves
fully into the red zone, or if the coolant
temperature warning or service engine
soon messages appear in your information
display, do the following: 1. Pull off the road as soon as safely
possible and shift the transmission into
park (P).
2. Leave the engine running until the coolant temperature gauge needle
returns to the normal position. After
several minutes, if the temperature
does not drop, follow the remaining
steps.
3. Switch the engine off and wait for it to
cool. Check the coolant level.
4. If the coolant level is at or below the minimum mark, add prediluted coolant
immediately.
5. If the coolant level is normal, restart the engine and continue.
AUTOMATIC TRANSMISSION
FLUID CHECK WARNING
The dipstick cap and surrounding
components may be hot; gloves are
recommended.
Note:
Automatic transmission fluid
expands when warmed. To obtain an
accurate fluid check, drive the vehicle until
it is at normal operating temperature
(approximately 20 miles [30 km]). If your
vehicle has been operated for an extended
period at high speeds, in city traffic during
hot weather or pulling a trailer, the vehicle
should be turned off for about 30 minutes
to allow fluid to cool to normal operating
temperature 196°F - 215°F (91°C - 102°C)
before checking.
Refer to your scheduled maintenance
information for scheduled intervals for fluid
checks and changes.
93
Motorhome (TY3) Canada/United States of America, enUSA, First Printing Maintenance
Page 105 of 164
Underbody
Flush the complete underside of your
vehicle frequently. Keep body and door
drain holes free of debris or foreign
material.
Under Hood
For removing black rubber marks from
under the hood we recommend Motorcraft
Wheel and Tire Cleaner or Motorcraft Bug
and Tar Remover.
CLEANING THE ENGINE
Engines are more efficient when they are
clean because grease and dirt buildup keep
the engine warmer than normal.
When washing:
•
Take care when using a power washer
to clean the engine. The high-pressure
fluid could penetrate the sealed parts
and cause damage.
• Do not spray a hot engine with cold
water to avoid cracking the engine
block or other engine components.
• Spray Motorcraft Engine Shampoo and
Degreaser on all parts that require
cleaning and pressure rinse clean. In
Canada, use Motorcraft Engine
Shampoo.
• Never wash or rinse the engine while it
is hot or running; water in the running
engine may cause internal damage.
• Never wash or rinse any ignition coil,
spark plug wire or spark plug well, or
the area in and around these locations.
• Cover the battery, power distribution
box, and air filter assembly to prevent
water damage when cleaning the
engine. CLEANING THE ALLOY
WHEELS (If Equipped)
Note: Do not apply a cleaning chemical to
warm or hot wheel rims and covers.
Note: Some automatic car washes may
cause damage to the finish on your wheel
rims and covers.
Note: Industrial-strength or heavy-duty
cleaners in combination with brush agitation
to remove brake dust and dirt, could wear
away the clear coat finish over a period time.
Note: Do not use hydrofluoric acid-based
or high caustic-based wheel cleaners, steel
wool, fuels or strong household detergents.
Note: If you intend parking your vehicle for
an extended period after cleaning the
wheels with a wheel cleaner, drive your
vehicle for a few minutes before doing so.
This will reduce the risk of increased
corrosion of the brake discs.
Alloy wheels and wheel covers are coated
with a clear coat paint finish. To maintain
their condition we recommend that you:
• Clean the wheels weekly using
Motorcraft Wheel and Tire Cleaner.
Apply using manufacturer's
instructions.
• Use a sponge to remove heavy
deposits of dirt and brake dust
accumulation.
• Rinse thoroughly with a strong stream
of water when you have completed the
cleaning process.
• To remove tar and grease, use
Motorcraft Bug and Tar Remover.
102
Motorhome (TY3) Canada/United States of America, enUSA, First Printing Vehicle Care
Page 109 of 164
The traction grades, from highest
to lowest are AA, A, B, and C. The
grades represent the tire
’s ability
to stop on wet pavement as
measured under controlled
conditions on specified
government test surfaces of
asphalt and concrete. A tire
marked C may have poor traction
performance.
Temperature A B C WARNING
The temperature grade for
this tire is established for a
tire that is properly inflated and
not overloaded. Excessive speed,
underinflation, or excessive
loading, either separately or in
combination, can cause heat
buildup and possible tire failure. The temperature grades are A
(the highest), B and C,
representing the tire
’s resistance
to the generation of heat and its
ability to dissipate heat when
tested under controlled conditions
on a specified indoor laboratory
test wheel. Sustained high
temperature can cause the
material of the tire to degenerate
and reduce tire life, and excessive
temperature can lead to sudden
tire failure. The grade C
corresponds to a level of
performance which all passenger
car tires must meet under the Federal Motor Vehicle Safety
Standard No. 139. Grades B and A
represent higher levels of
performance on the laboratory
test wheel than the minimum
required by law.
Glossary of Tire Terminology
*Tire label: A label showing the
original equipment tire sizes,
recommended inflation pressure
and the maximum weight the
vehicle can carry.
*
Tire Identification Number: A
number on the sidewall of each
tire providing information about
the tire brand and manufacturing
plant, tire size and date of
manufacture. Also referred to as
DOT code.
*
Inflation pressure: A measure
of the amount of air in a tire.
*
Standard load: A class of
P-metric or Metric tires designed
to carry a maximum load at set
pressure. For example: For
P-metric tires 35 psi (2.4 bar) and
for Metric tires 36 psi (2.5 bar).
Increasing the inflation pressure
beyond this pressure will not
increase the tire ’s load carrying
capability.
*
Extra load: A class of P-metric
or Metric tires designed to carry a
heavier maximum load at 42 psi
(2.9 bar). Increasing the inflation
pressure beyond this pressure will
not increase the tire ’s load
carrying capability.
106
Motorhome (TY3) Canada/United States of America, enUSA, First Printing Wheels and Tires
Page 118 of 164
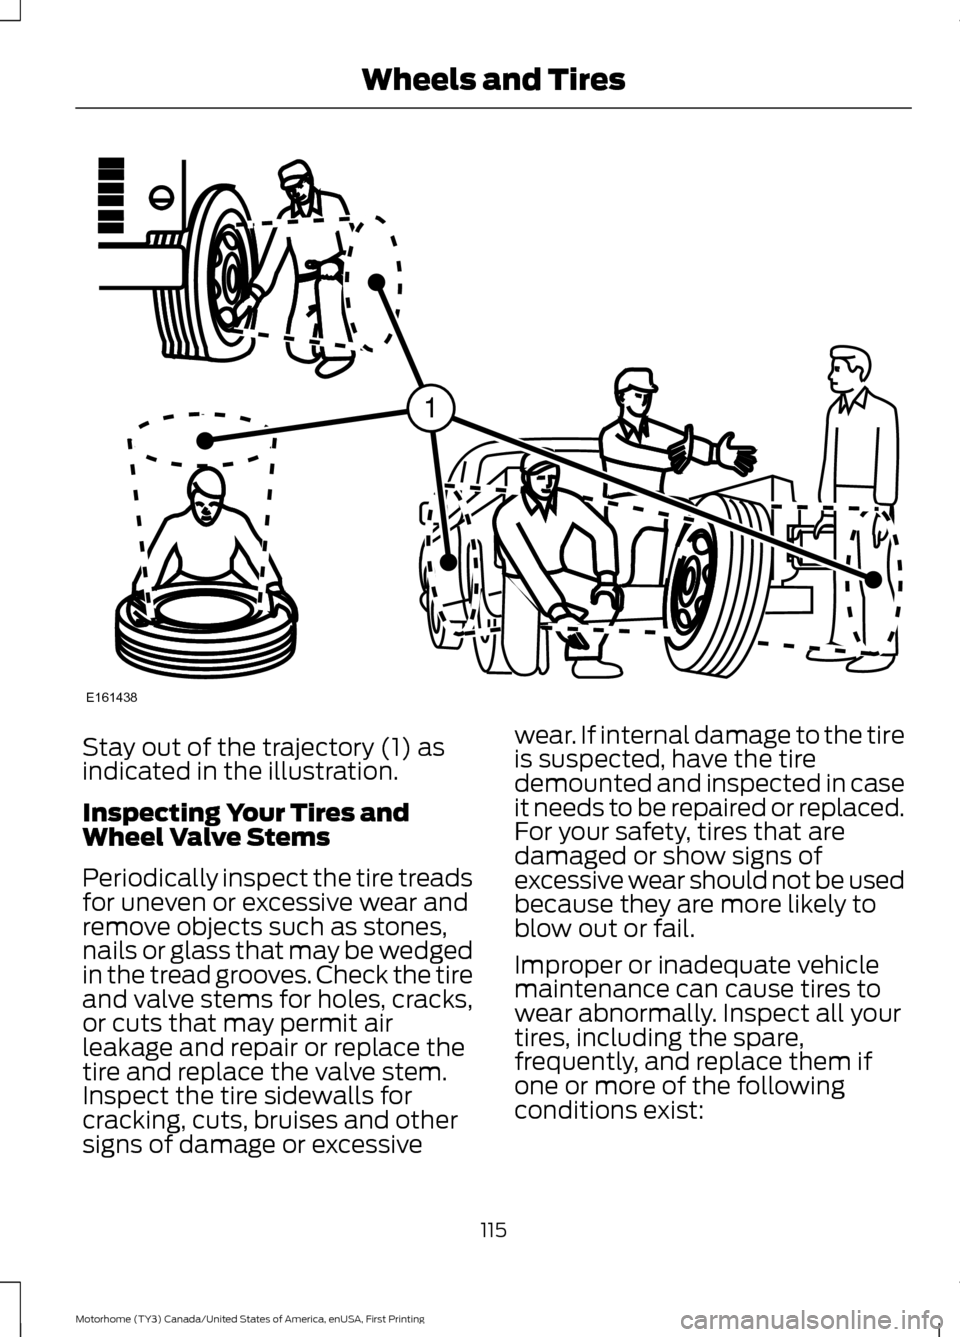
Stay out of the trajectory (1) as
indicated in the illustration.
Inspecting Your Tires and
Wheel Valve Stems
Periodically inspect the tire treads
for uneven or excessive wear and
remove objects such as stones,
nails or glass that may be wedged
in the tread grooves. Check the tire
and valve stems for holes, cracks,
or cuts that may permit air
leakage and repair or replace the
tire and replace the valve stem.
Inspect the tire sidewalls for
cracking, cuts, bruises and other
signs of damage or excessive
wear. If internal damage to the tire
is suspected, have the tire
demounted and inspected in case
it needs to be repaired or replaced.
For your safety, tires that are
damaged or show signs of
excessive wear should not be used
because they are more likely to
blow out or fail.
Improper or inadequate vehicle
maintenance can cause tires to
wear abnormally. Inspect all your
tires, including the spare,
frequently, and replace them if
one or more of the following
conditions exist:
115
Motorhome (TY3) Canada/United States of America, enUSA, First Printing Wheels and TiresE161438
1