2017 FORD F SERIES MOTORHOME AND COMMERCIAL CHASSIS steering wheel
[x] Cancel search: steering wheelPage 53 of 164
2. Set your vehicle parking brake.
3. Place the automatic transmission in
park (P).
4. Place wheel chocks in the front and back of the trailer wheels. (Chocks not
included with vehicle.)
Launching or Retrieving a Boat or
Personal Watercraft (PWC)
Note: Disconnect the wiring to the trailer
before backing the trailer into the water.
Note: Reconnect the wiring to the trailer
after
removing the trailer from the water.
When backing down a ramp during boat
launching or retrieval:
• Do not allow the static water level to
rise above the bottom edge of the rear
bumper.
• Do not allow waves to break higher
than
6 in (15 cm) above the bottom
edge of the rear bumper.
Exceeding these limits may allow water to
enter vehicle components:
• Causing internal damage to the
components.
• Affecting driveability, emissions and
reliability.
Replace the rear axle lubricant anytime
the rear axle has been submerged in water.
Water may have contaminated the rear
axle lubricant, which is not normally
checked or changed unless a leak is
suspected or other axle repair is required. TOWING THE VEHICLE ON
FOUR WHEELS
Emergency Towing WARNING
If your vehicle has a steering wheel
lock make sure the ignition is in the
accessory or on position when being
towed. If your vehicle becomes inoperable
(without access to wheel dollies,
car-hauling trailer, or flatbed transport
vehicle), it can be flat-towed (all wheels
on the ground, regardless of the powertrain
and transmission configuration) under the
following conditions:
•
Your vehicle is facing forward for
towing in a forward direction.
• Place the transmission in position N. If
you cannot move the transmission into
N
, you may need to override it.
• Maximum speed is 35 mph (56 km/h).
• Maximum distance is
50 mi (80 km).
50
Motorhome (TY3) Canada/United States of America, enUSA, First Printing Towing
Page 55 of 164
•
Use the speed control in hilly terrain.
• Rest your foot on the brake pedal while
driving.
• Drive a heavily loaded vehicle or tow a
trailer.
• Carry unnecessary weight
(approximately 1 mpg [0.4 km/L] is
lost for every 400 lb [180 kilogram] of
weight carried).
• Driving with the wheels out of
alignment.
Conditions
• Heavily loading a vehicle or towing a
trailer may reduce fuel economy at any
speed.
• Adding certain accessories to your
vehicle (for example bug deflectors,
rollbars, light bars, running boards, ski
racks or luggage racks) may reduce
fuel economy.
• To maximize the fuel economy, drive
with the tonneau cover installed (if
equipped).
• Using fuel blended with alcohol may
lower fuel economy.
• Fuel economy may decrease with lower
temperatures during the first 8– 10
miles (12 –16 kilometers) of driving.
• Driving on flat terrain offers improved
fuel economy as compared to driving
on hilly terrain.
• Transmissions give their best fuel
economy when operated in the top
cruise gear and with steady pressure
on the gas pedal.
• Four-wheel-drive operation (if
equipped) is less fuel efficient than
two-wheel-drive operation.
• Close the windows for high-speed
driving. DRIVING THROUGH WATER WARNING
Do not drive through flowing or deep
water as you may lose control of your
vehicle.
Note:
Driving through standing water can
cause vehicle damage.
Note: Engine damage can occur if water
enters the air filter.
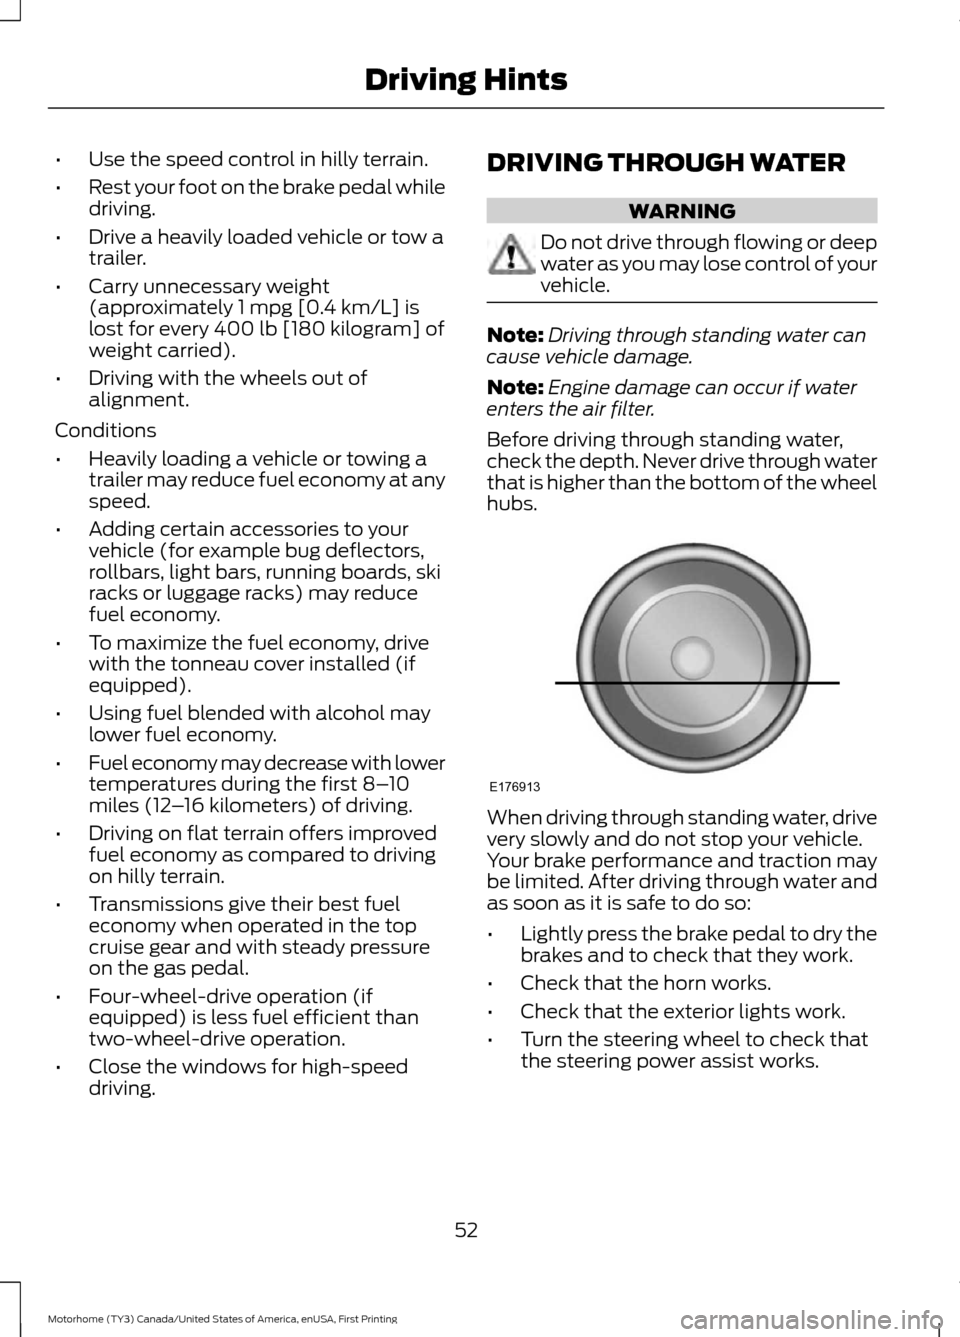
Before driving through standing water,
check the depth. Never drive through water
that is higher than the bottom of the wheel
hubs. When driving through standing water, drive
very slowly and do not stop your vehicle.
Your brake performance and traction may
be limited. After driving through water and
as soon as it is safe to do so:
•
Lightly press the brake pedal to dry the
brakes and to check that they work.
• Check that the horn works.
• Check that the exterior lights work.
• Turn the steering wheel to check that
the steering power assist works.
52
Motorhome (TY3) Canada/United States of America, enUSA, First Printing Driving HintsE176913
Page 57 of 164
This program is separate from the New
Vehicle Limited Warranty, but the coverage
is concurrent with the powertrain coverage
period of your vehicle.
Canadian customers who require roadside
assistance, call 1-800-665-2006.
Vehicles Sold in Canada: Using
Roadside Assistance
Complete the roadside assistance
identification card and place it in your
wallet for quick reference.
In Canada, this card is found in the
Warranty Guide in the glove compartment
of your vehicle.
Vehicles Sold in Canada: Roadside
Assistance Program Coverage
The service is available 24 hours a day,
seven days a week.
Canadian roadside coverage and benefits
may differ from the U.S. coverage.
For complete program coverage details
you may contact your dealer, you can call
us in Canada at 1-800-665-2006, or visit
our website at www.ford.ca.
HAZARD WARNING FLASHERS
Note:
The hazard warning flashers will
operate when the ignition is in any position
or if the key is not in the ignition. If used
when the engine is not running, the battery
will lose charge. As a result, there may be
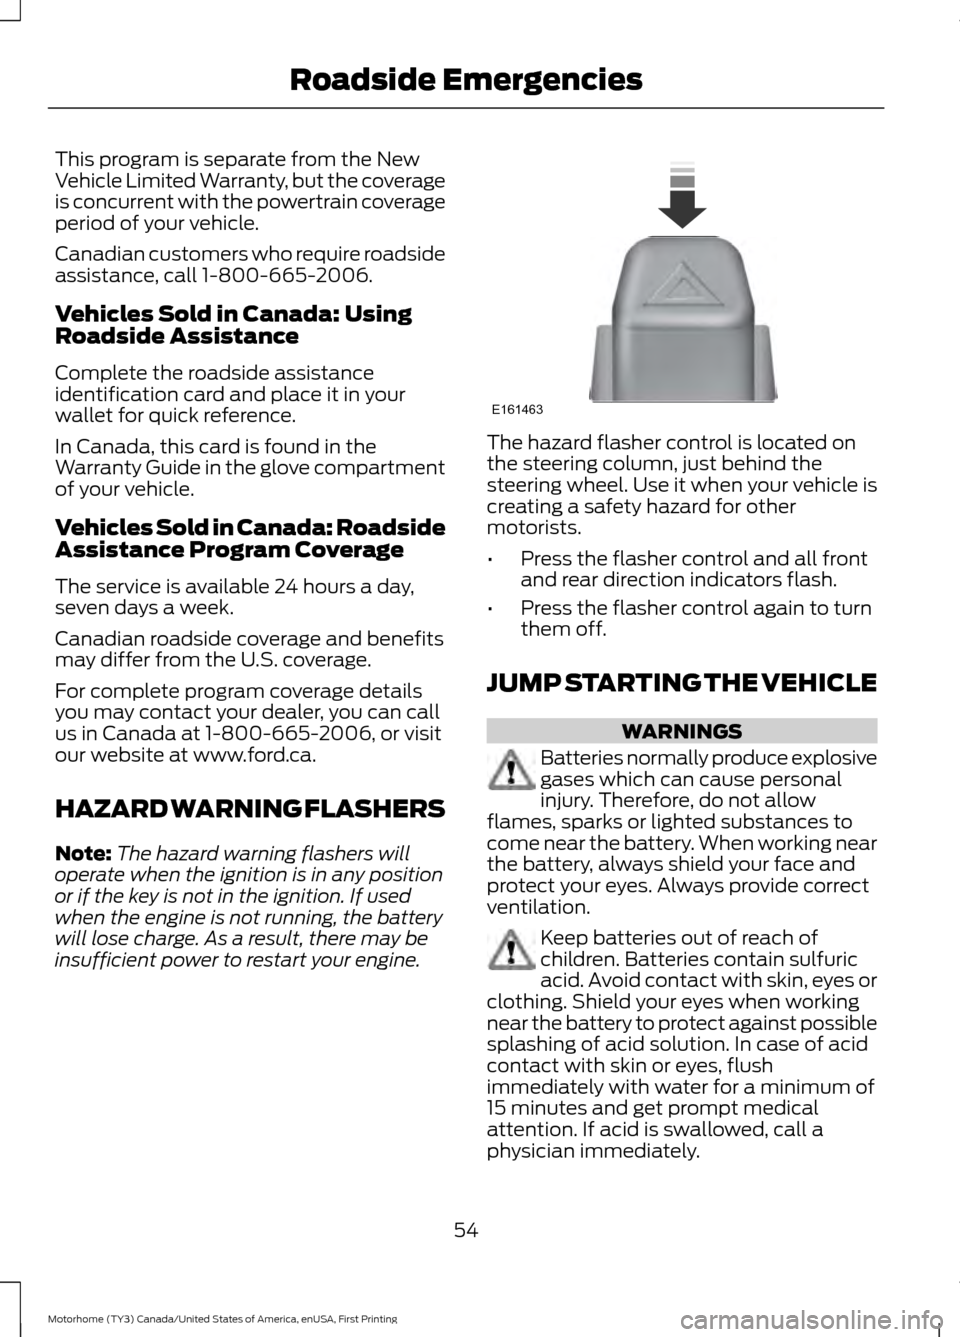
insufficient power to restart your engine. The hazard flasher control is located on
the steering column, just behind the
steering wheel. Use it when your vehicle is
creating a safety hazard for other
motorists.
•
Press the flasher control and all front
and rear direction indicators flash.
• Press the flasher control again to turn
them off.
JUMP STARTING THE VEHICLE WARNINGS
Batteries normally produce explosive
gases which can cause personal
injury. Therefore, do not allow
flames, sparks or lighted substances to
come near the battery. When working near
the battery, always shield your face and
protect your eyes. Always provide correct
ventilation. Keep batteries out of reach of
children. Batteries contain sulfuric
acid. Avoid contact with skin, eyes or
clothing. Shield your eyes when working
near the battery to protect against possible
splashing of acid solution. In case of acid
contact with skin or eyes, flush
immediately with water for a minimum of
15 minutes and get prompt medical
attention. If acid is swallowed, call a
physician immediately.
54
Motorhome (TY3) Canada/United States of America, enUSA, First Printing Roadside EmergenciesE161463
Page 80 of 164
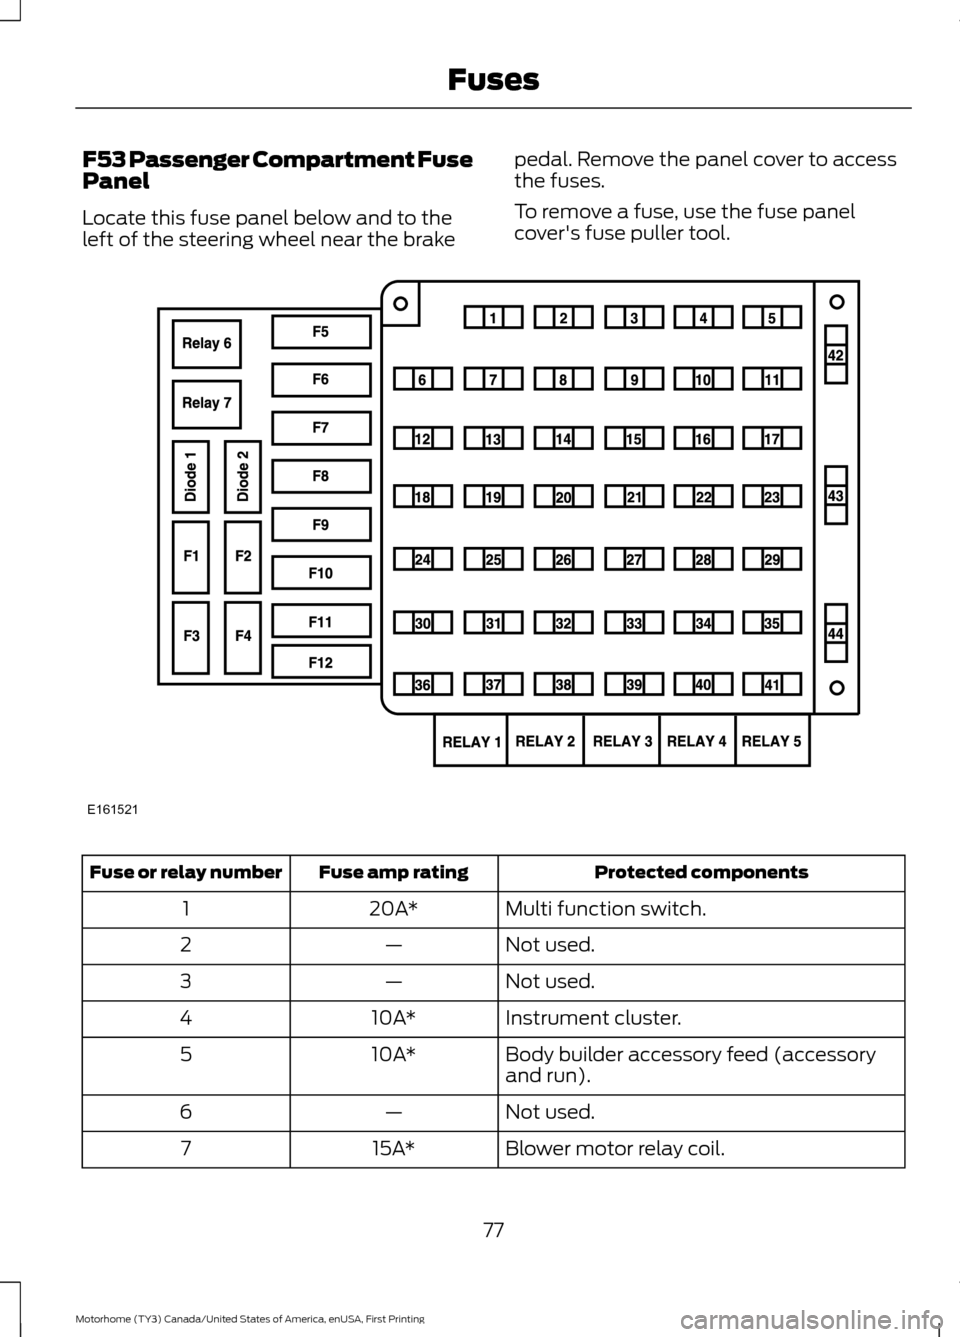
F53 Passenger Compartment Fuse
Panel
Locate this fuse panel below and to the
left of the steering wheel near the brake
pedal. Remove the panel cover to access
the fuses.
To remove a fuse, use the fuse panel
cover's fuse puller tool. Protected components
Fuse amp rating
Fuse or relay number
Multi function switch.
20A*
1
Not used.
—
2
Not used.
—
3
Instrument cluster.
10A*
4
Body builder accessory feed (accessory
and run).
10A*
5
Not used.
—
6
Blower motor relay coil.
15A*
7
77
Motorhome (TY3) Canada/United States of America, enUSA, First Printing FusesE161521
Page 100 of 164
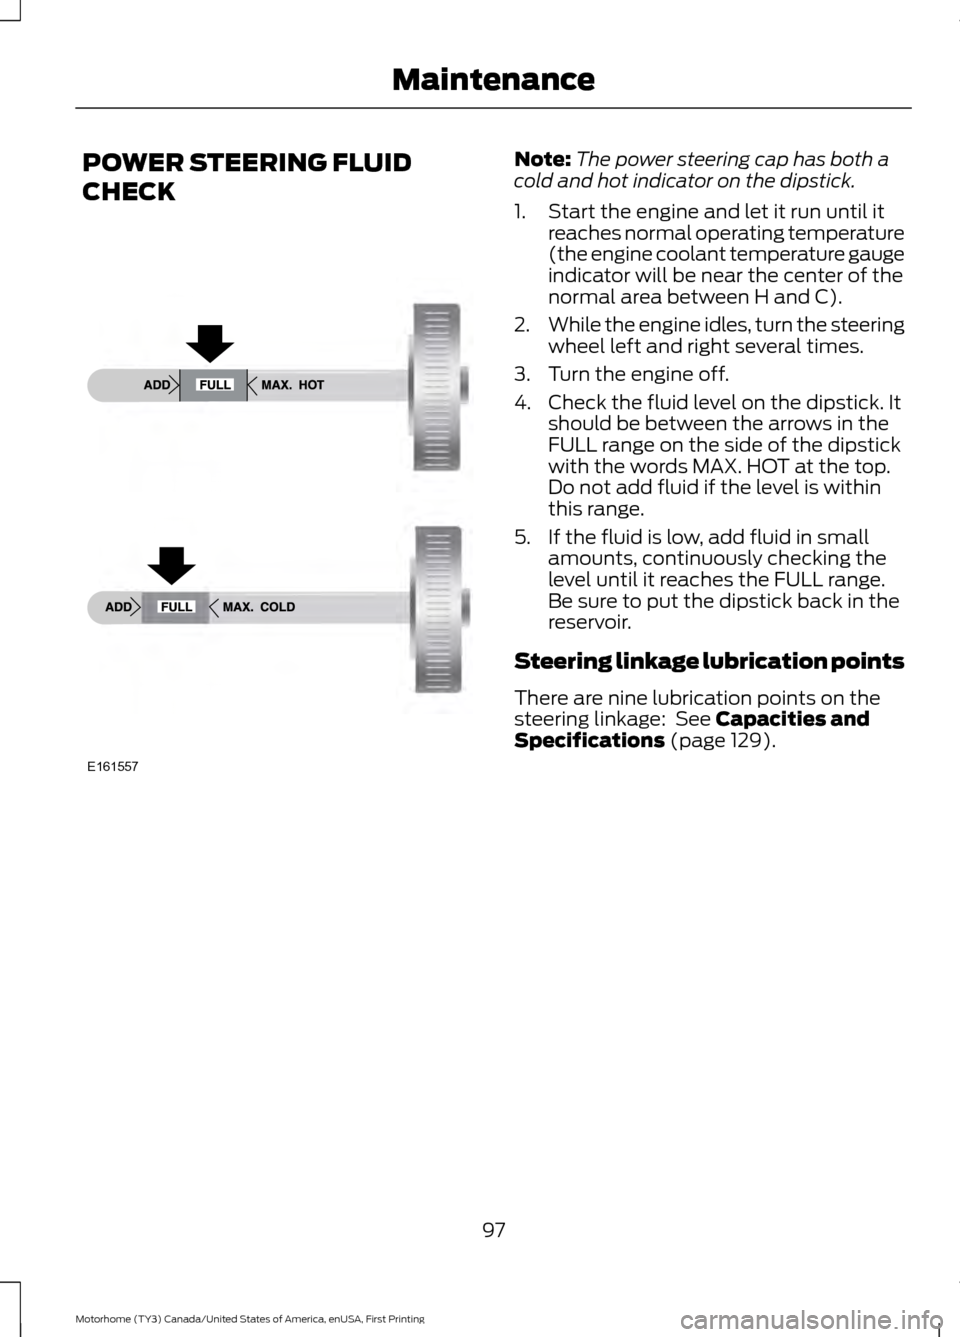
POWER STEERING FLUID
CHECK Note:
The power steering cap has both a
cold and hot indicator on the dipstick.
1. Start the engine and let it run until it reaches normal operating temperature
(the engine coolant temperature gauge
indicator will be near the center of the
normal area between H and C).
2. While the engine idles, turn the steering
wheel left and right several times.
3. Turn the engine off.
4. Check the fluid level on the dipstick. It should be between the arrows in the
FULL range on the side of the dipstick
with the words MAX. HOT at the top.
Do not add fluid if the level is within
this range.
5. If the fluid is low, add fluid in small amounts, continuously checking the
level until it reaches the FULL range.
Be sure to put the dipstick back in the
reservoir.
Steering linkage lubrication points
There are nine lubrication points on the
steering linkage: See Capacities and
Specifications (page 129).
97
Motorhome (TY3) Canada/United States of America, enUSA, First Printing MaintenanceE161557
Page 123 of 164
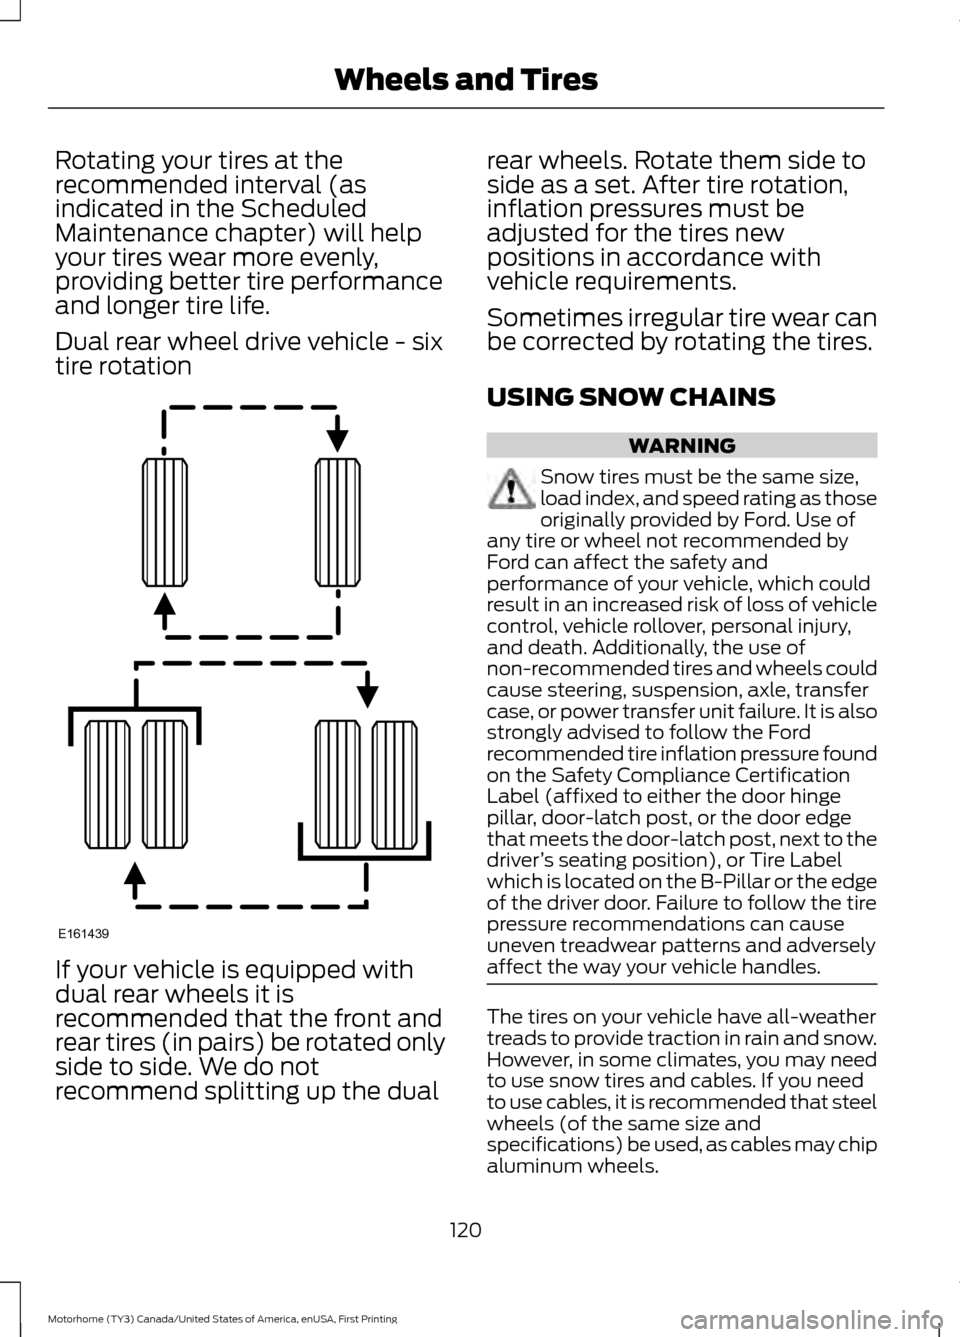
Rotating your tires at the
recommended interval (as
indicated in the Scheduled
Maintenance chapter) will help
your tires wear more evenly,
providing better tire performance
and longer tire life.
Dual rear wheel drive vehicle - six
tire rotation
If your vehicle is equipped with
dual rear wheels it is
recommended that the front and
rear tires (in pairs) be rotated only
side to side. We do not
recommend splitting up the dual rear wheels. Rotate them side to
side as a set. After tire rotation,
inflation pressures must be
adjusted for the tires new
positions in accordance with
vehicle requirements.
Sometimes irregular tire wear can
be corrected by rotating the tires.
USING SNOW CHAINS
WARNING
Snow tires must be the same size,
load index, and speed rating as those
originally provided by Ford. Use of
any tire or wheel not recommended by
Ford can affect the safety and
performance of your vehicle, which could
result in an increased risk of loss of vehicle
control, vehicle rollover, personal injury,
and death. Additionally, the use of
non-recommended tires and wheels could
cause steering, suspension, axle, transfer
case, or power transfer unit failure. It is also
strongly advised to follow the Ford
recommended tire inflation pressure found
on the Safety Compliance Certification
Label (affixed to either the door hinge
pillar, door-latch post, or the door edge
that meets the door-latch post, next to the
driver ’s seating position), or Tire Label
which is located on the B-Pillar or the edge
of the driver door. Failure to follow the tire
pressure recommendations can cause
uneven treadwear patterns and adversely
affect the way your vehicle handles. The tires on your vehicle have all-weather
treads to provide traction in rain and snow.
However, in some climates, you may need
to use snow tires and cables. If you need
to use cables, it is recommended that steel
wheels (of the same size and
specifications) be used, as cables may chip
aluminum wheels.
120
Motorhome (TY3) Canada/United States of America, enUSA, First Printing Wheels and TiresE161439
Page 124 of 164
Note:
The suspension insulation and
bumpers help prevent vehicle damage. Do
not remove these components from your
vehicle when using snow tires and chains.
Follow these guidelines when using snow
tires and chains:
• If possible, avoid fully loading your
vehicle.
• Use only SAE Class S chains.
• Install chains securely, verifying that
the chains do not touch any wiring,
brake lines or fuel lines.
• Drive cautiously. If you hear the chains
rub or bang against your vehicle, stop
and retighten the chains. If this does
not work, remove the chains to prevent
damage to your vehicle.
• Remove the tire chains when they are
no longer needed. Do not use tire
chains on dry roads.
If you have any questions regarding snow
chains or cables, please contact your
authorized dealer.
CHANGING A ROAD WHEEL
If you get a flat tire while driving, do not
apply the brake heavily. Instead, gradually
decrease your speed. Hold the steering
wheel firmly and slowly move to a safe
place on the side of the road.
Dissimilar Spare Wheel and Tire
Assembly Information WARNING
Failure to follow these guidelines
could result in an increased risk of
loss of vehicle control, injury or death. If you have a dissimilar spare wheel and
tire, then it is intended for temporary use
only. This means that if you need to use it,
you should replace it as soon as possible
with a road wheel and tire assembly that
is the same size and type as the road tires
and wheels that were originally provided
by Ford. If the dissimilar spare tire or wheel
is damaged, it should be replaced rather
than repaired.
A dissimilar spare wheel and tire assembly
is defined as a spare wheel and tire
assembly that is different in brand, size or
appearance from the road tires and wheels
and can be one of three types:
1.
T-type mini-spare: This spare tire
begins with the letter T for tire size and
may have Temporary Use Only molded in
the sidewall.
2. Full-size dissimilar spare with label
on wheel:
This spare tire has a label on
the wheel that states: THIS WHEEL AND
TIRE ASSEMBLY FOR TEMPORARY USE
ONLY.
When driving with one of the dissimilar
spare tires listed above, do not:
• Exceed
50 mph (80 km/h).
• Load the vehicle beyond maximum
vehicle load rating listed on the Safety
Compliance Label.
• Tow a trailer.
• Use snow chains on the end of the
vehicle with the dissimilar spare tire.
• Use more than one dissimilar spare tire
at a time.
• Use commercial car washing
equipment.
• Try to repair the dissimilar spare tire.
121
Motorhome (TY3) Canada/United States of America, enUSA, First Printing Wheels and Tires
Page 142 of 164
Be sure to ask your dealership service
advisor or technician about the multi-point
vehicle inspection. It is a comprehensive
way to perform a thorough inspection of
your vehicle. Your checklist gives you
immediate feedback on the overall
condition of your vehicle.
NORMAL SCHEDULED MAINTENANCE Every 7500 miles (12000 km) or six months (whichever comes first)
Change engine oil and filter.
Rotate tires *
, inspect tire wear and measure tread depth.
Inspect wheels and related components for abnormal noise, wear, looseness or drag.
Perform multi-point inspection (recommended).
* Vehicles with dual rear wheels should rotate the front wheels when specified; rear wheels
only if unusual wear is noted. Every 15000 miles (24000 km) or 12 months (whichever comes first)
Inspect automatic transmission fluid level. Consult dealer for requirements.
Inspect brake pads, shoes, rotors, drums, brake linings, hoses and parking brake.
Inspect engine cooling system strength and hoses.
Inspect exhaust system and heat shields.
Inspect steering linkage, ball joints, suspension, tie-rod ends, drive shaft and U-joints.
Lubricate if equipped with grease fittings. Other maintenance items
Replace engine air filter.
Every 30000 miles (48000
km)
Change automatic transmission fluid. Consult dealer for
requirements.
Every 60000 miles (96000
km) Replace front wheel bearing grease and grease seal if non-
sealed bearings are used.
Replace spark plugs.
Every 97,500 miles (157000
km)
139
Motorhome (TY3) Canada/United States of America, enUSA, First Printing Scheduled Maintenance