2017 FORD EXPLORER light
[x] Cancel search: lightPage 196 of 541
USING HILL DESCENT
CONTROL
Principle of operation
WARNINGS
Hill descent control cannot control
descent in all surface conditions and
circumstances, such as ice or
extremely steep grades. Hill descent
control is a driver assist system and cannot
substitute for good judgment by the driver.
Failure to do so may result in loss of vehicle
control, crash or serious injury. Hill descent control does not provide
hill hold at zero miles per hour (0
kilometers per hour). When stopped,
the parking brake must be applied or the
vehicle must be placed in P (Park) or it
may roll away. Hill descent control allows the driver to set
and maintain vehicle speed while
descending steep grades in various surface
conditions.
Hill descent control can maintain vehicle
speeds on downhill grades between 3 mph
(5 km/h)
and 20 mph (32 km/h). Above
20 mph (32 km/h), the system remains
armed, but descent speed cannot be set
or maintained.
Hill descent control requires a cooling
down interval after a period of sustained
use. The amount of time that the feature
can remain active before cooling varies
with conditions. The system provides a
warning in the message center and a chime
sounds when the system is about to
disengage for cooling. At this time,
manually apply the brakes as needed to
maintain descent speed. Using hill descent control Press and release the hill
descent button located in the
center of the terrain
management control. A light in the control
illuminates and a chime sounds when this
feature activates.
To increase descent speed, press the
accelerator pedal until you reach the
desired speed. To decrease descent speed,
press the brake pedal until you reach the
desired speed.
Whether accelerating or decelerating, once
you reach the desired descent speed,
remove your feet from the pedals and hill
descent control maintains the chosen
vehicle speed.
Note: You may observe noise from the ABS
pump motor during hill descent control
operation. This is a normal characteristic of
the ABS and should be no reason for
concern.
Hill descent modes
• At speeds below
20 mph (32 km/h):
When you press the Hill Descent
Control and Hill Descent Control
activates, HILL DESCENT CONTROL
ACTIVE
appears in the message
center for several seconds.
• At speeds below
20 mph (32 km/h):
When you press the Hill Descent
Control switch and conditions are not
correct for hill descent activation, the
Hill Descent Control system enables,
the light on the button is solid and HILL
DESCENT CONTROL READY
displays in the message center for
several seconds.
193
Explorer (TUB) Canada/United States of America, enUSA, Edition date: 03/2016, First Printing Terrain Response
(If Equipped)
Page 197 of 541
•
At speeds above 20 mph (32 km/h):
When you press the Hill Descent
Control switch, the Hill Descent Control
system enables, the light on the button
illuminates and FOR HILL CNTRL, 20
MPH OR LESS
displays in the
message center for several seconds.
• For Hill Descent Control to enable, the
vehicle must be in a drive gear or (R)
Reverse. If the vehicle is in P (Park) or
N (Neutral) and you press the button,
FOR HILL CNTRL, SELECT GEAR
displays in the message center for
several seconds.
Refer to the Information Displays for
additional Hill Descent Control messages.
See
Information Messages (page 113).
194
Explorer (TUB) Canada/United States of America, enUSA, Edition date: 03/2016, First Printing Terrain Response
(If Equipped)
Page 210 of 541

The fixed and active guidelines fade in and
out depending on the steering wheel
position. The active guidelines do not
display when the steering wheel position
is straight.
Always use caution while reversing.
Objects in the red zone are closest to your
vehicle and objects in the green zone are
farther away. Objects are getting closer to
your vehicle as they move from the green
zone to the yellow or red zones. Use the
side view mirrors and rear view mirror to
get better coverage on both sides and rear
of the vehicle.
Obstacle Distance Indicator (If
Equipped) The system will provide an image of your
vehicle and the sensor zones. The zones
will highlight green, yellow and red when
the parking aid sensors detect an object in
the coverage area. Manual Zoom WARNING
When manual zoom is on, the full
area behind your vehicle may not
show. Be aware of your surroundings
when using the manual zoom feature. Note:
Manual zoom is only available when
the transmission is in reverse (R).
Note: When you enable manual zoom, only
the centerline is shown.
Selectable settings for this feature are
Zoom in (+) and Zoom out (-). Press the
symbol in the camera screen to change the
view. The default setting is Zoom OFF.
This allows you to get a closer view of an
object behind your vehicle. The zoomed
image keeps the bumper in the image to
provide a reference. The zoom is only
active while the transmission is in reverse
(R).
Rear Camera Delay
Selectable settings for this feature are ON
and OFF.
The default setting for the rear camera
delay is OFF.
When shifting the transmission out of
reverse (R) and into any gear other than
park (P), the camera image remains in the
display until:
• Your vehicle speed reaches
approximately
5 mph (8 km/h).
• You shift your vehicle into park (P).
207
Explorer (TUB) Canada/United States of America, enUSA, Edition date: 03/2016, First Printing Parking AidsE190459
Page 214 of 541

Setting the Adaptive Cruise Speed
1. Drive to desired speed.
2. Press and release SET+.
3. A green indicator light, the current gap
setting and your set speed appear in
the information display.
4. Take your foot off the accelerator pedal. 5. A vehicle graphic illuminates if there is
a vehicle detected in front of you.
Note: When adaptive cruise control is
active, the speedometer may vary slightly
from the set speed displayed in the
information display.
Following a Vehicle WARNINGS
When following a vehicle, your
vehicle does not decelerate
automatically to a stop, nor does
your vehicle always decelerate quickly
enough to avoid a crash without driver
intervention. Always apply the brakes when
necessary. Failing to do so may result in a
crash, serious injury or death. Adaptive cruise control only warns
of vehicles detected by the radar
sensor. In some cases there may be
no warning or a delayed warning. You
should always apply the brakes when
necessary. Failure to do so may result in a
crash, serious injury or death. Note:
The brakes may emit noise when
applied by the system.
When a vehicle ahead of you enters the
same lane or a slower vehicle is ahead in
the same lane, the vehicle speed adjusts
to maintain a preset gap distance.
A vehicle graphic illuminates in the
instrument cluster.
Your vehicle will maintain a consistent gap
from the vehicle ahead until:
• The vehicle in front of you accelerates
to a speed above the set speed.
• The vehicle in front of you moves out
of the lane you are in.
• Your vehicle speed falls below
12 mph
(20 km/h).
• You set a new gap distance.
The system applies the brakes to slow your
vehicle to maintain a safe gap distance
from the vehicle in front. The brake lamps
automatically turn on when the system
applies the brakes. The maximum braking
which the system applies is limited. You
can override the system by applying the
brakes.
If the system determines that its maximum
braking level will not be sufficient, an
audible warning sounds while the system
continues to brake. A red warning bar
displays on the windshield and you must
take immediate action.
Note: When you are following a vehicle and
you switch on a direction indicator, adaptive
cruise control may provide a small
temporary acceleration to help you pass.
Setting the Gap Distance
You can decrease or increase the gap
between your vehicle and the vehicle in
front of you by pressing the gap control.
You can select five gap settings.
Note: It is your responsibility to select a gap
appropriate to the driving conditions.
211
Explorer (TUB) Canada/United States of America, enUSA, Edition date: 03/2016, First Printing Cruise ControlE164805
Page 215 of 541
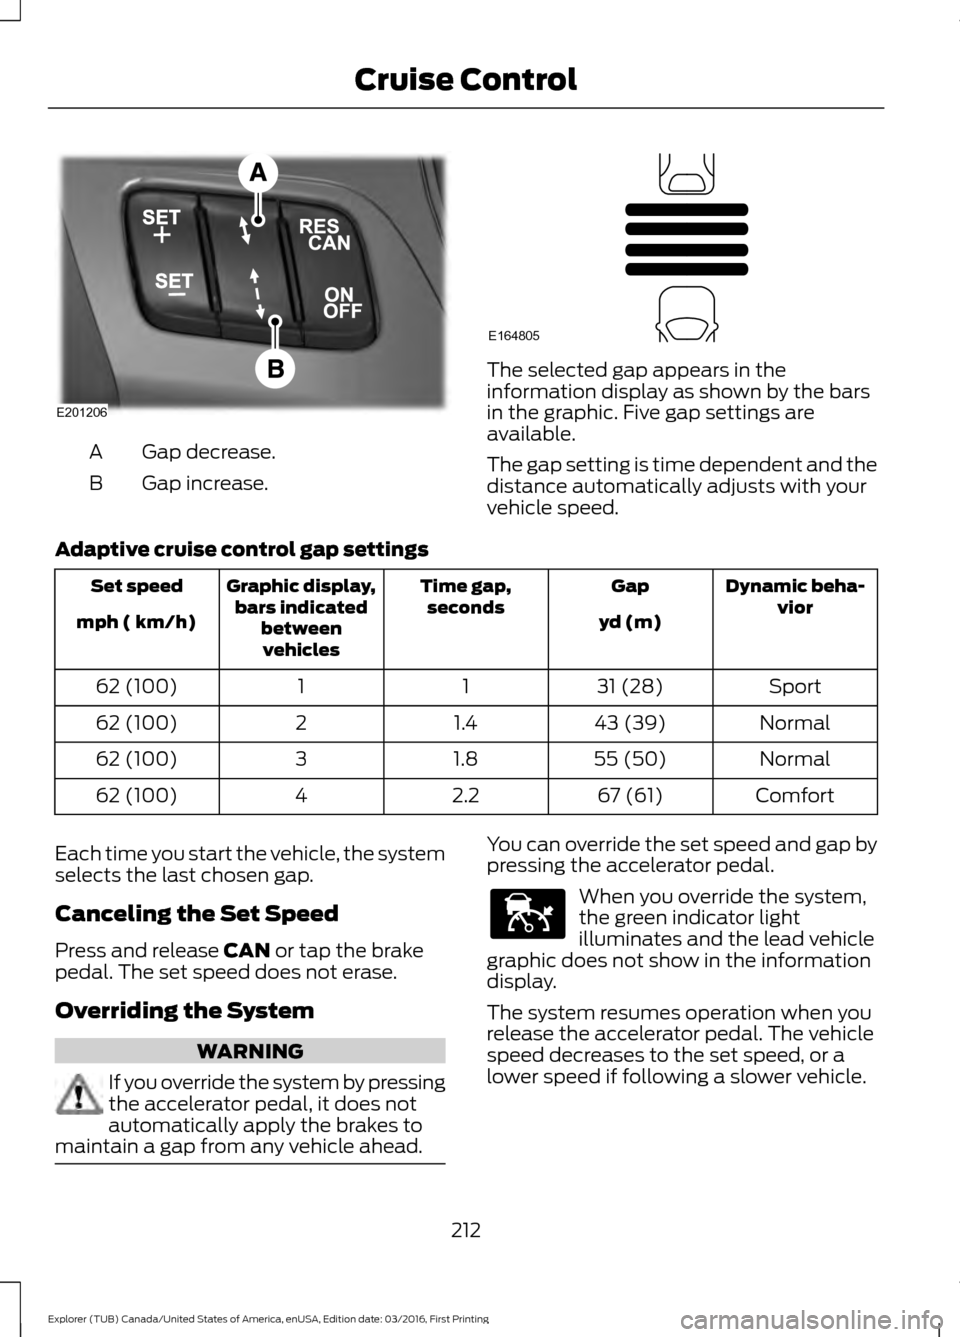
Gap decrease.
A
Gap increase.
B The selected gap appears in the
information display as shown by the bars
in the graphic. Five gap settings are
available.
The gap setting is time dependent and the
distance automatically adjusts with your
vehicle speed.
Adaptive cruise control gap settings Dynamic beha-
vior
Gap
Time gap,
seconds
Graphic display,
bars indicated betweenvehicles
Set speed
yd (m)
mph ( km/h)
Sport
31 (28)
1
1
62 (100)
Normal
43 (39)
1.4
2
62 (100)
Normal
55 (50)
1.8
3
62 (100)
Comfort
67 (61)
2.2
4
62 (100)
Each time you start the vehicle, the system
selects the last chosen gap.
Canceling the Set Speed
Press and release CAN or tap the brake
pedal. The set speed does not erase.
Overriding the System WARNING
If you override the system by pressing
the accelerator pedal, it does not
automatically apply the brakes to
maintain a gap from any vehicle ahead. You can override the set speed and gap by
pressing the accelerator pedal.
When you override the system,
the green indicator light
illuminates and the lead vehicle
graphic does not show in the information
display.
The system resumes operation when you
release the accelerator pedal. The vehicle
speed decreases to the set speed, or a
lower speed if following a slower vehicle.
212
Explorer (TUB) Canada/United States of America, enUSA, Edition date: 03/2016, First Printing Cruise ControlE201206 E164805 E144529
Page 218 of 541
The following table lists possible causes and actions for this message displaying.
Action
Cause
Clean the grille surface in front of the radar
or remove the object causing the obstruc-
tion.
The surface of the radar in the grille is dirty
or obstructed in some way.
Wait a short time. It may take several
minutes for the radar to detect that it is free
from obstruction.
The surface of the radar in the grille is clean
but the message remains in the display.
Do not use the system in these conditions
because it may not detect any vehicles
ahead.
Heavy rain or snow is interfering with the
radar signals.
Do not use the system in these conditions
because it may not detect any vehicles
ahead.
Swirling water, or snow or ice on the surface
of the road may interfere with the radar
signals.
Wait a short time or switch to normal cruise
control.
You are in a desert or remote area with no
other vehicles and no roadside objects.
Due to the nature of radar technology, it is
possible to get a blockage warning and not
be blocked. This can happen, for example,
when driving in sparse rural environments.
A false blocked condition self clears or
clears after a key cycle.
Switching to Normal Cruise
Control WARNING
Normal cruise control will not brake
when your vehicle is approaching
slower vehicles. Always be aware of
which mode you have selected and apply
the brakes when necessary. You can manually change from adaptive
cruise control to normal cruise control
through the information display. The cruise control indicator light
replaces the adaptive cruise
control indicator light if you
select normal cruise control. The gap
setting does not display, the system does
not automatically respond to lead vehicles
and automatic braking does not activate.
215
Explorer (TUB) Canada/United States of America, enUSA, Edition date: 03/2016, First Printing Cruise ControlE71340
Page 220 of 541

WARNINGS
Large contrasts in outside lighting
can limit sensor performance.
The system will not operate if the
sensor cannot track the road lane
markings.
If damage occurs in the immediate
area surrounding the sensor, have
your vehicle checked as soon as
possible. Note:
The system works above 40 mph
(64 km/h).
Note: The system works as long as the
camera can detect one lane marking.
Note: The system may not function if the
camera is blocked or there is damage to the
windshield.
Note: When Aid mode is on and the system
detects no steering activity for a short
period, the system will alert you to put your
hands on the steering wheel. The system
may detect a light grip or touch on the
steering wheel as hands off driving.
The system notifies you to stay in your lane
through the steering system and the
instrument cluster display when the front
camera detects an unintentional drift out
of your lane is likely to occur. The system
automatically detects and tracks the road
lane markings using a camera mounted
behind the interior rear view mirror.
Switching the System On and Off
Note: The system on or off setting is stored
until it is manually changed, unless a MyKey
is detected. If the system detects a MyKey
it defaults to on and the mode is set to Alert.
Note: If a MyKey is detected, pressing the
button will not affect the on or off status of
the system. Press the button on the steering
wheel stalk to switch the system
on or off.
System Settings
The system has optional setting menus
available. The system stores the
last-known selection for each of these
settings. You do not need to readjust your
settings each time you turn on the system.
Mode:
This setting allows you to select
which of the system features you can
enable. Alert only – Provides a steering wheel
vibration when the system detects an
unintended lane departure.
217
Explorer (TUB) Canada/United States of America, enUSA, Edition date: 03/2016, First Printing Driving AidsE144813 E165515 E165516
Page 222 of 541
•
The road has no or poor lane markings
in the camera field-of-view.
• The camera is obscured or unable to
detect the lane markings due to
environmental conditions (significant
sun angles, shadows, snow, heavy rain
or fog), traffic conditions (following a
large vehicle that is blocking or
shadowing the lane), or vehicle
conditions (poor headlamp
illumination).
See Troubleshooting for additional
information.
Green: Indicates that the system is
available or ready to provide a warning or
intervention, on the indicated side(s). Yellow: Indicates that the system is
providing or has just provided a lane
keeping aid intervention.
Red: Indicates that the system is providing
or has just provided a lane keeping alert
warning.
The system can be temporarily suppressed
at any time by the following:
•
Quick braking.
• Fast acceleration.
• Using the turn signal indicator.
• Evasive steering maneuver.
Troubleshooting Why is the feature not available (line markings are gray) when I can see the lane markings
on the road?
Vehicle speed is outside the operational range of the feature
Sun is shining directly into the camera lens
Quick intentional lane change
Staying too close to the lane marking
Driving at high speeds in curves
The last Alert warning or Aid intervention occurred a short time ago
Ambiguous lane markings (mainly in construction zones)
Rapid transition from light to dark or vice versa
Sudden offset in lane markings
ABS or AdvanceTrac activation
Camera blockage due to dirt, grime, fog, frost or water on the windshield
Driving too close to the vehicle in front of you
Transitioning between no lane markings to lane markings or vice versa
Standing water on the road
Faint lane markings (partial yellow lane markings on concrete roads)
219
Explorer (TUB) Canada/United States of America, enUSA, Edition date: 03/2016, First Printing Driving Aids