2017 FORD EXPLORER lock
[x] Cancel search: lockPage 127 of 541

Seats
Action
Message
Objects are by the passenger seat. After you move the objectsaway from the seat, if the warning stays on or continues to
come on, contact an authorized dealer as soon as possible.
Occupant Sensor
BLOCKED Remove
Objects Near Passenger Seat
A reminder that memory seats are not available while driving.
Memory Recall Not
Permitted While Driving
Shows where you have saved your memory setting.
Memory X Saved
Starting System Action
Message
A reminder to apply the brake when starting your vehicle.
To START Press Brake
The starter has exceeded its cranking time in attempting tostart your vehicle.
Cranking Time Exceeded
The starter is attempting to start your vehicle.
Engine Start Pending
Please Wait
The system has cancelled the pending start.
Pending Start Cancelled
Tire Pressure Monitoring System Action
Message
One or more tires on your vehicle have low tire pressure. SeeTire Pressure Monitoring System (page 322).
LOW Tire Pressure
The tire pressure monitoring system is malfunctioning. If thewarning stays on or continues to come on, contact an
authorized dealer.
See Tire Pressure Monitoring System (page 322).
Tire Pressure Monitor
Fault
A tire pressure sensor is malfunctioning, or your spare tire is
in use. If the warning stays on or continues to come on, contact
an authorized dealer as soon as possible. See Tire Pressure Monitoring System
(page 322).
Tire Pressure Sensor
Fault
124
Explorer (TUB) Canada/United States of America, enUSA, Edition date: 03/2016, First Printing Information Displays
Page 129 of 541

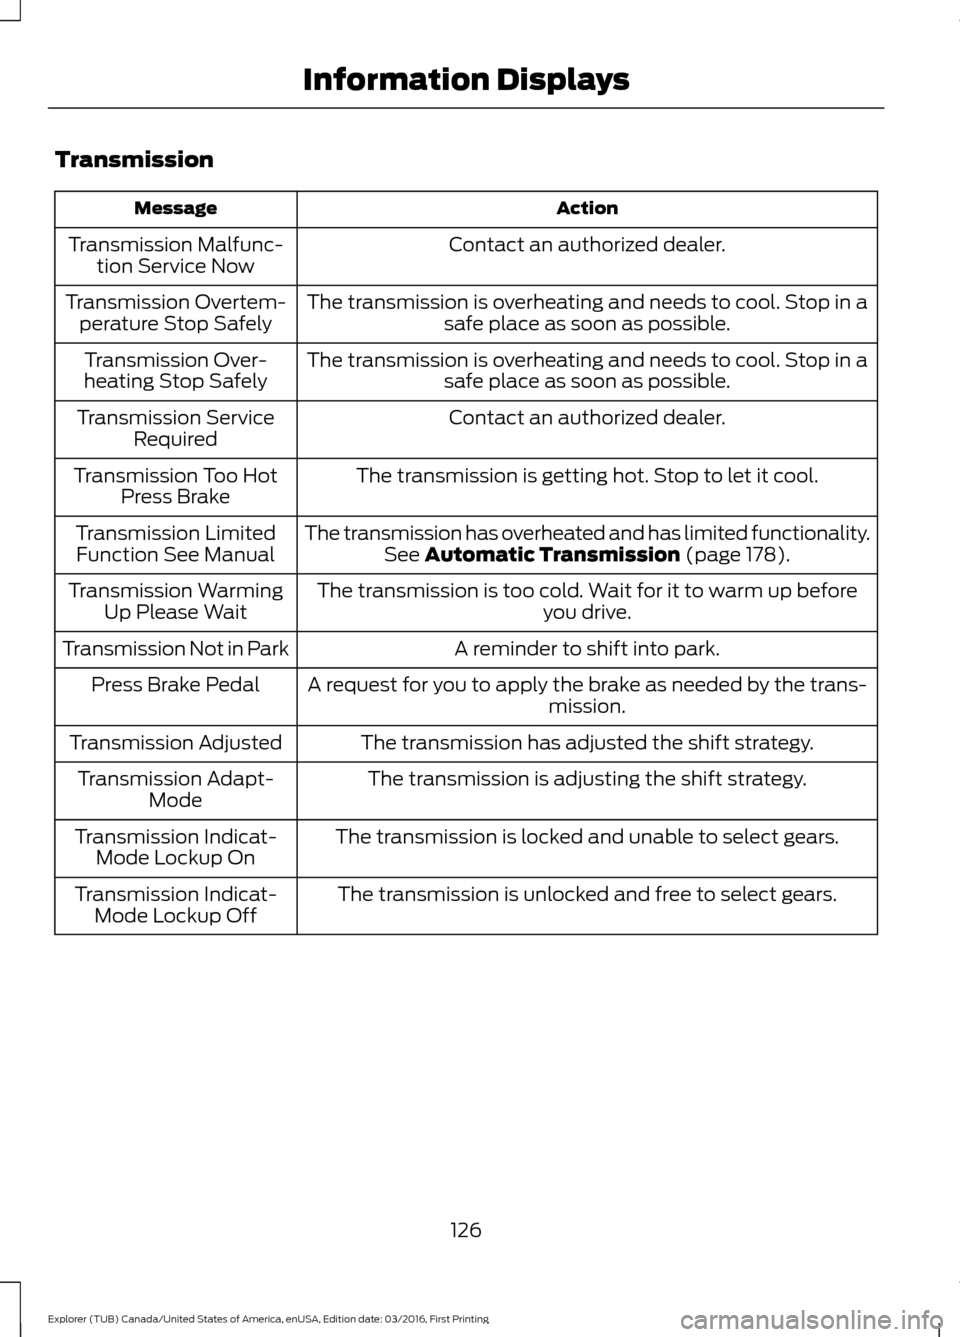
Transmission
Action
Message
Contact an authorized dealer.
Transmission Malfunc-
tion Service Now
The transmission is overheating and needs to cool. Stop in asafe place as soon as possible.
Transmission Overtem-
perature Stop Safely
The transmission is overheating and needs to cool. Stop in asafe place as soon as possible.
Transmission Over-
heating Stop Safely
Contact an authorized dealer.
Transmission Service
Required
The transmission is getting hot. Stop to let it cool.
Transmission Too Hot
Press Brake
The transmission has overheated and has limited functionality.See Automatic Transmission (page 178).
Transmission Limited
Function See Manual
The transmission is too cold. Wait for it to warm up beforeyou drive.
Transmission Warming
Up Please Wait
A reminder to shift into park.
Transmission Not in Park
A request for you to apply the brake as needed by the trans-mission.
Press Brake Pedal
The transmission has adjusted the shift strategy.
Transmission Adjusted
The transmission is adjusting the shift strategy.
Transmission Adapt-
Mode
The transmission is locked and unable to select gears.
Transmission Indicat-
Mode Lockup On
The transmission is unlocked and free to select gears.
Transmission Indicat-
Mode Lockup Off
126
Explorer (TUB) Canada/United States of America, enUSA, Edition date: 03/2016, First Printing Information Displays
Page 131 of 541

Temperature control: Controls the temperature of the air circulated in your
vehicle.
F
Recirculated air:
Press to switch between outside air and recirculated air. The
air currently in the passenger compartment recirculates. This can reduce the
time needed to cool the interior and reduce unwanted odors from entering your
vehicle.
G
Rear passenger temperature control:
Adjust the temperature to the rear of
the passenger compartment.
H
Rear climate control lock:
When illuminated, you can only operate the rear
passenger settings through the front controls.
I
Rear passenger power:
Press to switch the rear system on and off.
J
Rear fan speed control:
Adjust the volume of air circulated to the rear of the
passenger compartment.
K
Heated rear window:
Press to switch the heated rear window on and off.
L
AUTOMATIC CLIMATE CONTROL - VEHICLES WITH: PREMIUM
AM/FM/CD Power:
Press to switch the system on and off. When the system is off, it
prevents outside air from entering the vehicle.
A
Heated seats:
Press to switch the heated seats on and off.
B
128
Explorer (TUB) Canada/United States of America, enUSA, Edition date: 03/2016, First Printing Climate ControlE193399
Page 138 of 541

Fan speed control: Adjust the volume of air circulated in the vehicle.
A
Heated seats (if equipped):
Press the button to switch the heated seats on
and off. See Heated Seats (page 151).
B
Temperature control:
Control the temperature of the air circulated in your
vehicle.
C
Air distribution control:
Adjust the control to turn airflow from the instrument
panel or footwell vents on or off. You can distribute air through any combination
of these vents.
D
Fan speed control lock:
When illuminated, you can only operate the rear
passenger settings through the front controls.
E
HEATED WINDOWS AND
MIRRORS
Note: Make sure the engine is running
before operating the heated windows.
Note: Depending on your remote start
settings, the heated windows, mirrors and
wipers may remain on after remote starting
the vehicle.
Heated Rear Window Press the button to clear the
heated rear window of thin ice
and fog. The heated rear window
will automatically turn off after a short
period of time. Press the button again to
switch it off.
Note: An indicator on the button illuminates
when active.
Note: Do not use razor blades or other
sharp objects to clean or remove decals
from the inside of the heated rear window.
The vehicle warranty does not cover
damage caused to the heated rear window
grid lines.
Heated Exterior Mirrors
(If Equipped)
When you switch the heated rear window
on, the heated exterior mirrors will
automatically turn on. Note:
Do not remove ice from the mirrors
with a scraper or adjust the mirror glass
when it is frozen in place.
Note: Do not clean the mirror housing or
glass with harsh abrasives, fuel or other
petroleum-based cleaning products.
Heated Wiper Park
(If Equipped)
When you switch the heated rear window
on, the heated wiper park automatically
turns on.
CABIN AIR FILTER
Your vehicle is equipped with a cabin air
filter, which gives you and your passengers
the following benefits:
• It improves your driving comfort by
reducing particle concentration.
• It improves the interior compartment
cleanliness.
• It protects the climate control
components from particle deposits.
You can locate the cabin air filter behind
the glove box.
Note: Make sure you have a cabin air filter
installed at all times. This prevents foreign
objects from entering the system. Running
the system without a filter in place could
result in degradation or damage to the
system.
135
Explorer (TUB) Canada/United States of America, enUSA, Edition date: 03/2016, First Printing Climate ControlE184884
Page 141 of 541

WARNINGS
Install the head restraint properly to
help minimize the risk of neck injury
in the event of a crash.
Note:
Adjust the seatback to an upright
driving position before adjusting the head
restraint. Adjust the head restraint so that
the top of it is level with the top of your head
and as far forward as possible. Make sure
that you remain comfortable. If you are
extremely tall, adjust the head restraint to
its highest position.
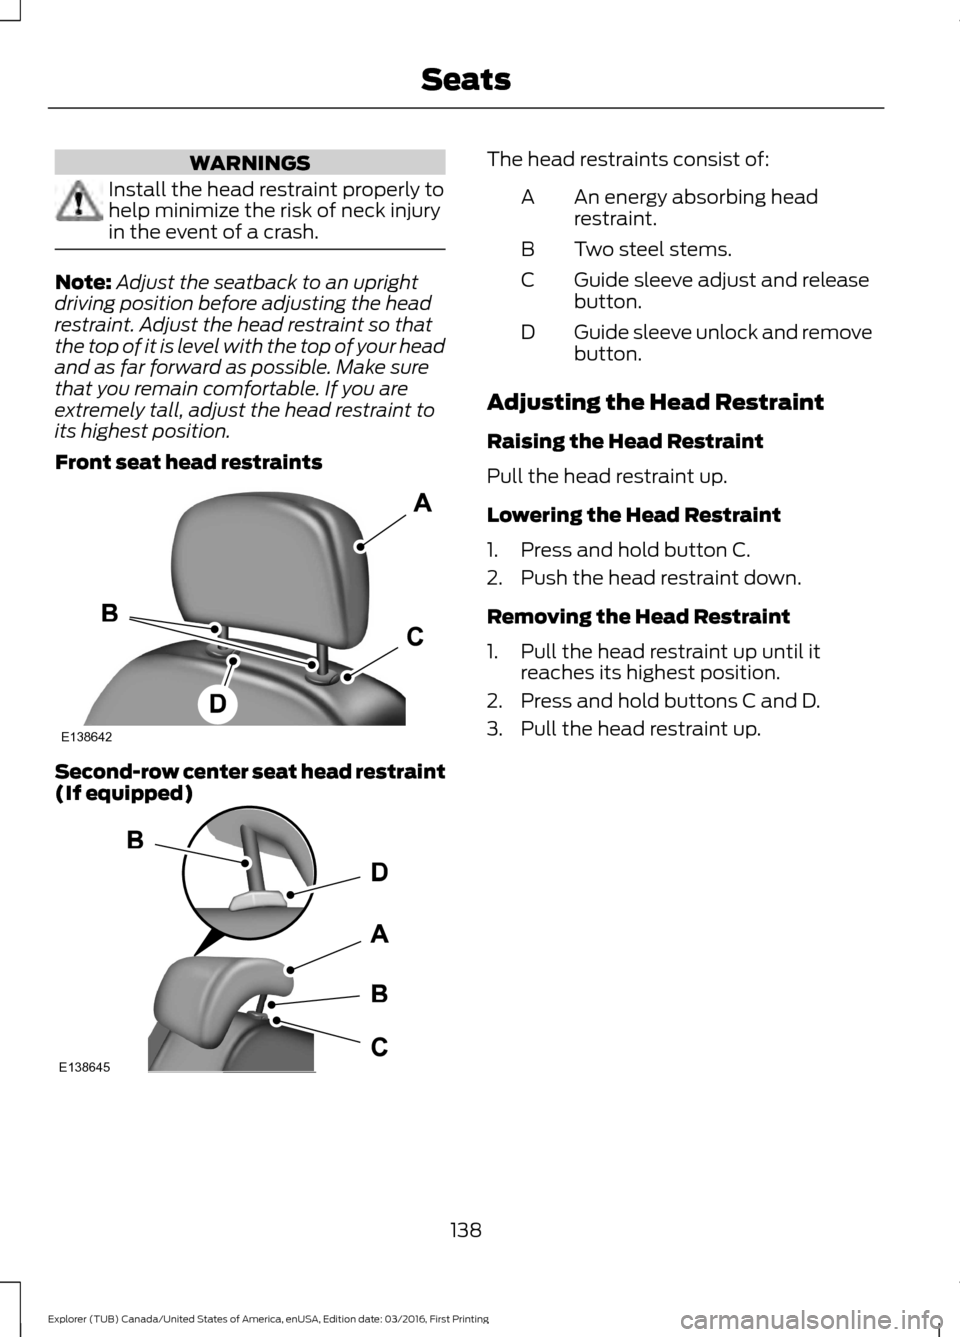
Front seat head restraints Second-row center seat head restraint
(If equipped) The head restraints consist of:
An energy absorbing head
restraint.
A
Two steel stems.
B
Guide sleeve adjust and release
button.
C
Guide sleeve unlock and remove
button.
D
Adjusting the Head Restraint
Raising the Head Restraint
Pull the head restraint up.
Lowering the Head Restraint
1. Press and hold button C.
2. Push the head restraint down.
Removing the Head Restraint
1. Pull the head restraint up until it reaches its highest position.
2. Press and hold buttons C and D.
3. Pull the head restraint up.
138
Explorer (TUB) Canada/United States of America, enUSA, Edition date: 03/2016, First Printing SeatsE138642 E138645
Page 142 of 541

Installing the Head Restraint
Align the steel stems into the guide sleeves
and push the head restraint down until it
locks.
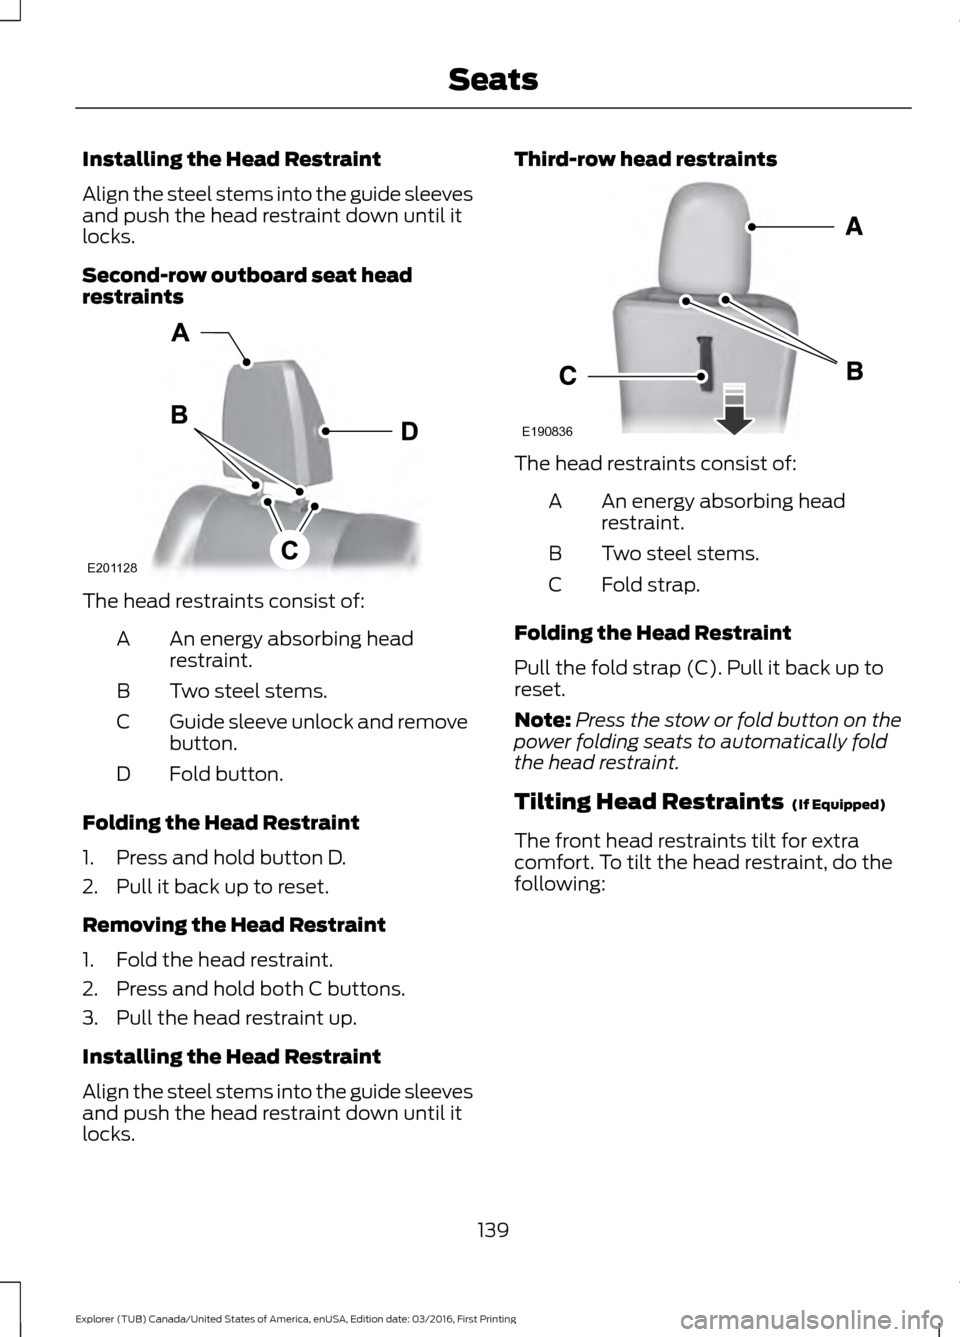
Second-row outboard seat head
restraints
The head restraints consist of:
An energy absorbing head
restraint.
A
Two steel stems.
B
Guide sleeve unlock and remove
button.
C
Fold button.
D
Folding the Head Restraint
1. Press and hold button D.
2. Pull it back up to reset.
Removing the Head Restraint
1. Fold the head restraint.
2. Press and hold both C buttons.
3. Pull the head restraint up.
Installing the Head Restraint
Align the steel stems into the guide sleeves
and push the head restraint down until it
locks. Third-row head restraints
The head restraints consist of:
An energy absorbing head
restraint.
A
Two steel stems.
B
Fold strap.
C
Folding the Head Restraint
Pull the fold strap (C). Pull it back up to
reset.
Note: Press the stow or fold button on the
power folding seats to automatically fold
the head restraint.
Tilting Head Restraints (If Equipped)
The front head restraints tilt for extra
comfort. To tilt the head restraint, do the
following:
139
Explorer (TUB) Canada/United States of America, enUSA, Edition date: 03/2016, First Printing SeatsE201128 E190836
Page 146 of 541

To access and make adjustments to the
massage setting:
1.
Press the Menu Settings icon > Vehicle
>Multi-contour Seat.
2. Choose the desired seat to adjust.
3. Press Off, Lo or Hi.
MEMORY FUNCTION (If Equipped) WARNINGS
Before activating the memory seat,
make sure that the area immediately
surrounding the seat is clear of
obstructions and that all occupants are
clear of moving parts. Do not use the memory function
when your vehicle is moving.
This feature automatically recalls the
position of the following:
•
Driver seat.
• Power mirrors.
• Optional power adjustable foot pedals.
• Optional steering column.
The memory control is on the driver door. Saving a PreSet Position
1. Switch the ignition on.
2. Adjust the memory features to your
desired position.
3. Press and hold the desired preset button until you hear a single tone.
You can save up to three preset memory
positions. You can save a memory preset
at any time.
Recalling a PreSet Position
Press and release the preset button
associated with your desired driving
position. The memory features move to
the position stored for that preset.
Note: You can only recall a preset memory
position when the ignition is off, or when the
transmission is in park (P) or neutral (N) if
the ignition is on.
You can also recall a preset memory
position by:
• Pressing the unlock button on your
intelligent access key fob if it is linked
to a preset position.
• Unlocking the intelligent driver door
handle if a linked key fob is present.
• Entering a personal entry code on the
Securicode keypad. See
Doors and
Locks (page 59).
Note: Using a linked key fob to recall your
memory position when the ignition is off
moves the seat to the Easy Entry position.
Note: Pressing any active memory feature
adjustment control (or any memory button)
during a memory recall cancels the
operation.
143
Explorer (TUB) Canada/United States of America, enUSA, Edition date: 03/2016, First Printing SeatsE142554
Page 147 of 541

Linking a PreSet Position to your
Remote Control or Intelligent
Access Key Fob
Your vehicle can save the preset memory
positions for up to three remote controls
or intelligent access (IA) keys.
1.
With the ignition on, move the memory
positions to the desired positions.
2. Press and hold the desired preset button for about five seconds. A tone
sounds after about two seconds.
Continue holding until you hear a
second tone.
3. Within three seconds, press the lock button on the remote control you are
linking.
To unlink a remote control, follow the
same procedure – except in step 3, press
the unlock button on the remote control.
Note: If more than one linked remote
control or intelligent access key is in range,
the memory function moves to the settings
of the first key to recall a memory position.
Easy Entry and Exit Feature
If you enable the easy entry and exit
feature, it automatically moves the driver
seat position rearward up to two inches
(five centimeters) when you switch the
ignition off.
The driver seat returns to the previous
position when you switch the ignition on.
You can enable or disable this feature in
the information display. See Information
Displays (page 99). REAR SEATS
Adjusting the Rear Seats
Second Row Seats WARNINGS
Always drive and ride with your
seatback upright and the lap belt
snug and low across the hips.
Reclining the seatback can cause an
occupant to slide under the seat’
s
safety belt, resulting in severe
personal injuries in the event of a crash. Recline Adjustment
Lift the handle to adjust the seatback
rearward or forward. The seatback can
also fold forward until it is flat.
Fold flat seatback
144
Explorer (TUB) Canada/United States of America, enUSA, Edition date: 03/2016, First Printing SeatsE190840 E213288