2017 FORD EXPLORER buttons
[x] Cancel search: buttonsPage 160 of 541
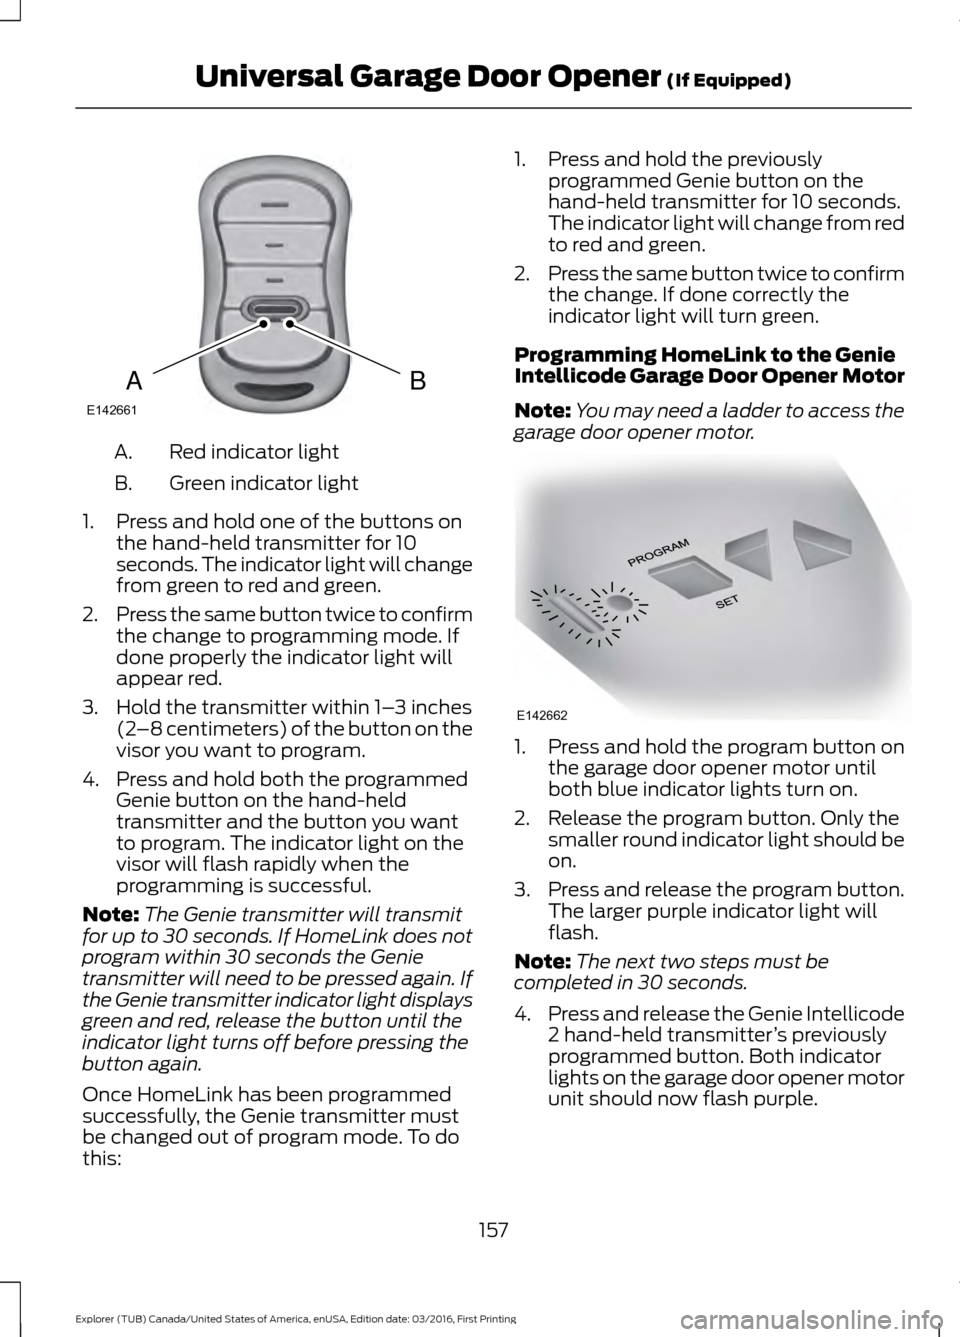
Red indicator light
A.
Green indicator light
B.
1. Press and hold one of the buttons on the hand-held transmitter for 10
seconds. The indicator light will change
from green to red and green.
2. Press the same button twice to confirm
the change to programming mode. If
done properly the indicator light will
appear red.
3. Hold the transmitter within 1– 3 inches
(2 –8 centimeters) of the button on the
visor you want to program.
4. Press and hold both the programmed Genie button on the hand-held
transmitter and the button you want
to program. The indicator light on the
visor will flash rapidly when the
programming is successful.
Note: The Genie transmitter will transmit
for up to 30 seconds. If HomeLink does not
program within 30 seconds the Genie
transmitter will need to be pressed again. If
the Genie transmitter indicator light displays
green and red, release the button until the
indicator light turns off before pressing the
button again.
Once HomeLink has been programmed
successfully, the Genie transmitter must
be changed out of program mode. To do
this: 1. Press and hold the previously
programmed Genie button on the
hand-held transmitter for 10 seconds.
The indicator light will change from red
to red and green.
2. Press the same button twice to confirm
the change. If done correctly the
indicator light will turn green.
Programming HomeLink to the Genie
Intellicode Garage Door Opener Motor
Note: You may need a ladder to access the
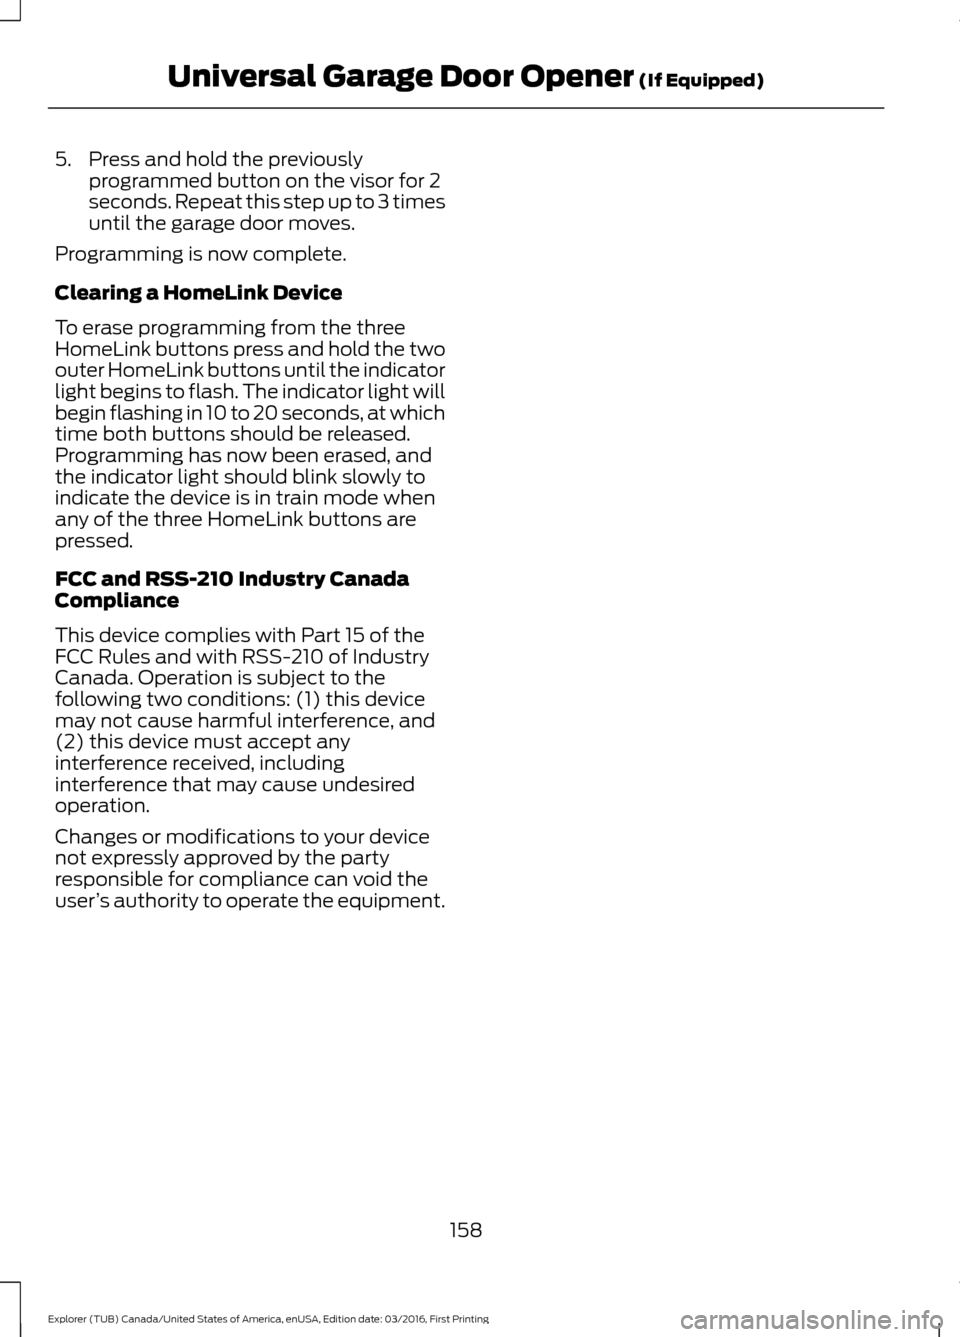
garage door opener motor. 1. Press and hold the program button on
the garage door opener motor until
both blue indicator lights turn on.
2. Release the program button. Only the smaller round indicator light should be
on.
3. Press and release the program button.
The larger purple indicator light will
flash.
Note: The next two steps must be
completed in 30 seconds.
4. Press and release the Genie Intellicode
2 hand-held transmitter ’s previously
programmed button. Both indicator
lights on the garage door opener motor
unit should now flash purple.
157
Explorer (TUB) Canada/United States of America, enUSA, Edition date: 03/2016, First Printing Universal Garage Door Opener (If Equipped)BAE142661 E142662
Page 161 of 541
5. Press and hold the previously
programmed button on the visor for 2
seconds. Repeat this step up to 3 times
until the garage door moves.
Programming is now complete.
Clearing a HomeLink Device
To erase programming from the three
HomeLink buttons press and hold the two
outer HomeLink buttons until the indicator
light begins to flash. The indicator light will
begin flashing in 10 to 20 seconds, at which
time both buttons should be released.
Programming has now been erased, and
the indicator light should blink slowly to
indicate the device is in train mode when
any of the three HomeLink buttons are
pressed.
FCC and RSS-210 Industry Canada
Compliance
This device complies with Part 15 of the
FCC Rules and with RSS-210 of Industry
Canada. Operation is subject to the
following two conditions: (1) this device
may not cause harmful interference, and
(2) this device must accept any
interference received, including
interference that may cause undesired
operation.
Changes or modifications to your device
not expressly approved by the party
responsible for compliance can void the
user ’s authority to operate the equipment.
158
Explorer (TUB) Canada/United States of America, enUSA, Edition date: 03/2016, First Printing Universal Garage Door Opener (If Equipped)
Page 291 of 541
Replace the wiper blades at least annually
for optimum performance.
Front Wiper Blades
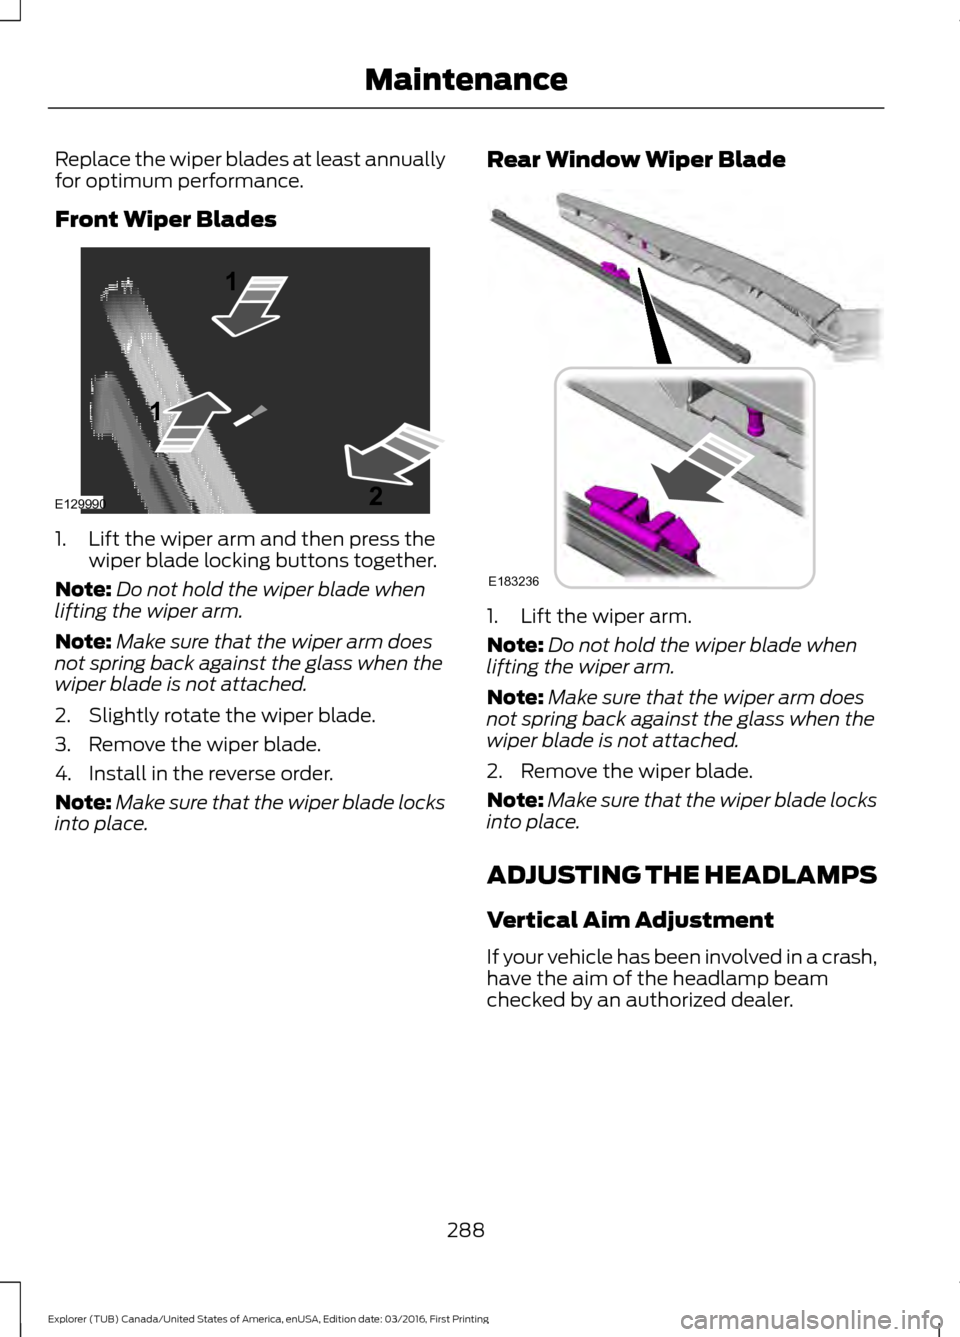
1. Lift the wiper arm and then press the
wiper blade locking buttons together.
Note: Do not hold the wiper blade when
lifting the wiper arm.
Note: Make sure that the wiper arm does
not spring back against the glass when the
wiper blade is not attached.
2. Slightly rotate the wiper blade.
3. Remove the wiper blade.
4. Install in the reverse order.
Note: Make sure that the wiper blade locks
into place. Rear Window Wiper Blade
1. Lift the wiper arm.
Note:
Do not hold the wiper blade when
lifting the wiper arm.
Note: Make sure that the wiper arm does
not spring back against the glass when the
wiper blade is not attached.
2. Remove the wiper blade.
Note: Make sure that the wiper blade locks
into place.
ADJUSTING THE HEADLAMPS
Vertical Aim Adjustment
If your vehicle has been involved in a crash,
have the aim of the headlamp beam
checked by an authorized dealer.
288
Explorer (TUB) Canada/United States of America, enUSA, Edition date: 03/2016, First Printing MaintenanceE129990
1
1 2 E183236
Page 356 of 541

SOUND: Press to access settings for Treble, Midrange, Bass, Fade or Balance.
Use the up and down arrow buttons to select the various settings. When you
make your selection, press the left and right arrow buttons to change the
settings. Press
OK to set or press MENU to exit. Sound settings can be set for
each audio source independently.
A
MUTE:
Press to mute the playing audio.
B
CLOCK:
If not in phone mode, press to display the clock.
C
MENU:
Press to access different audio system features.
D
Number block:
In radio mode, store and recall your favorite radio stations. To
store a radio station, tune to the station, then press and hold a preset button
until sound returns. In CD mode, select a track. In phone mode, enter a phone
number.
E
Function buttons:
Select different functions of the audio system depending
on which mode you are in (such as Radio mode or CD mode).
F
353
Explorer (TUB) Canada/United States of America, enUSA, Edition date: 03/2016, First Printing Audio SystemE194335
Page 357 of 541
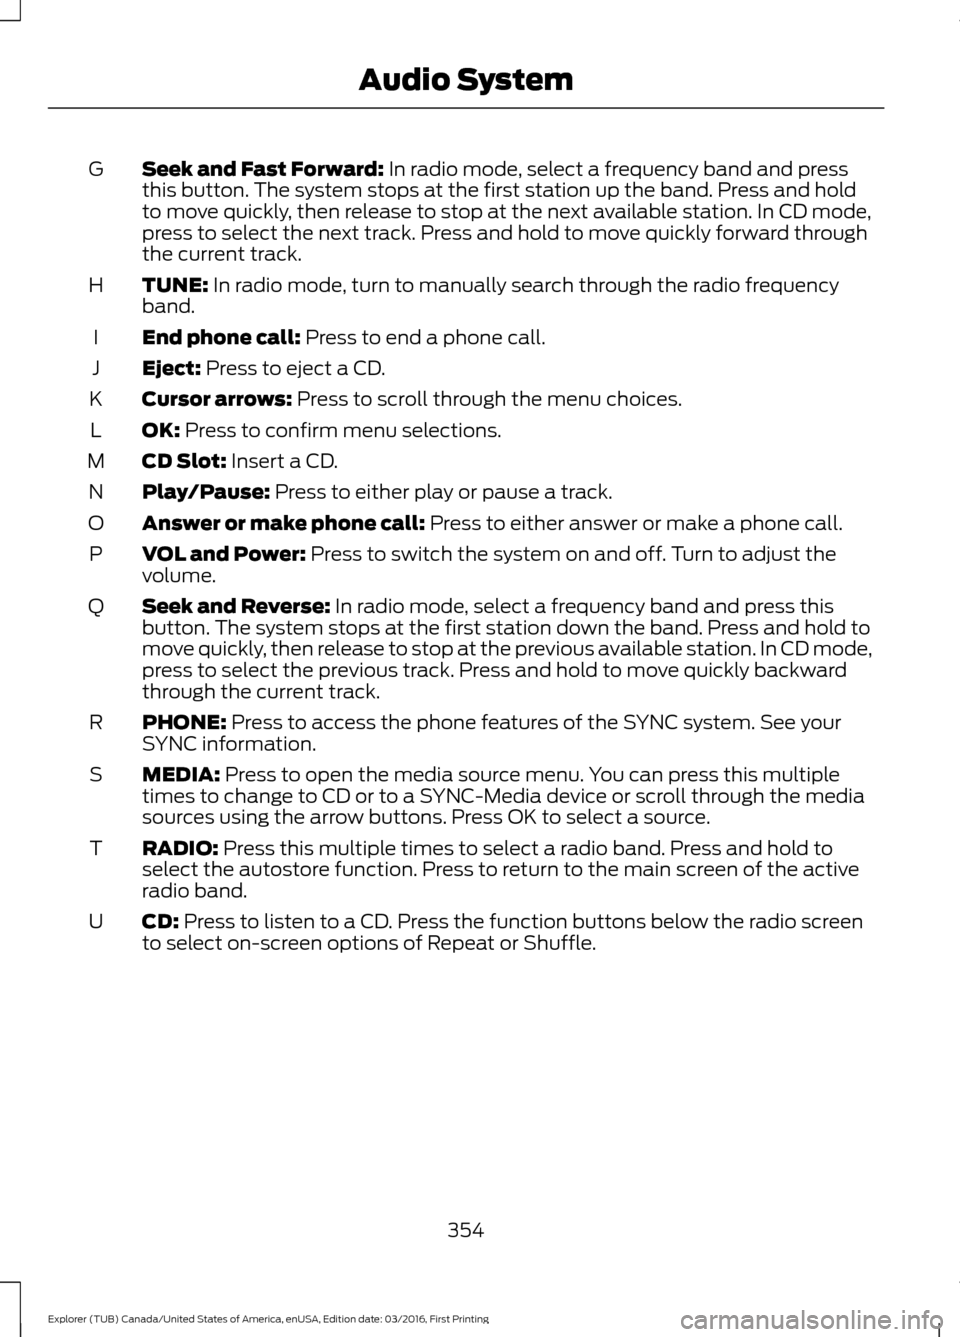
Seek and Fast Forward: In radio mode, select a frequency band and press
this button. The system stops at the first station up the band. Press and hold
to move quickly, then release to stop at the next available station. In CD mode,
press to select the next track. Press and hold to move quickly forward through
the current track.
G
TUNE:
In radio mode, turn to manually search through the radio frequency
band.
H
End phone call:
Press to end a phone call.
I
Eject:
Press to eject a CD.
J
Cursor arrows:
Press to scroll through the menu choices.
K
OK:
Press to confirm menu selections.
L
CD Slot:
Insert a CD.
M
Play/Pause:
Press to either play or pause a track.
N
Answer or make phone call:
Press to either answer or make a phone call.
O
VOL and Power:
Press to switch the system on and off. Turn to adjust the
volume.
P
Seek and Reverse:
In radio mode, select a frequency band and press this
button. The system stops at the first station down the band. Press and hold to
move quickly, then release to stop at the previous available station. In CD mode,
press to select the previous track. Press and hold to move quickly backward
through the current track.
Q
PHONE:
Press to access the phone features of the SYNC system. See your
SYNC information.
R
MEDIA:
Press to open the media source menu. You can press this multiple
times to change to CD or to a SYNC-Media device or scroll through the media
sources using the arrow buttons. Press OK to select a source.
S
RADIO:
Press this multiple times to select a radio band. Press and hold to
select the autostore function. Press to return to the main screen of the active
radio band.
T
CD:
Press to listen to a CD. Press the function buttons below the radio screen
to select on-screen options of Repeat or Shuffle.
U
354
Explorer (TUB) Canada/United States of America, enUSA, Edition date: 03/2016, First Printing Audio System
Page 361 of 541

Menu Structure
Note:
Depending on your system, some
options may appear slightly different.
Press MENU. Press the up and down arrow buttons to
scroll through the options.
Press the right arrow to enter a menu.
Press the left arrow to exit a menu.
Press OK to confirm a selection. Radio
Use the left and right arrows to go up or down the
frequency band.
Manual tune
Select for a brief sampling of all available channels.
Scan
Select to store the six strongest local stations on the AM-
AST and FM-AST frequency bands.
AST
Select to view additional broadcast data, if available. This
feature defaults to off. RBDS must be on for you to set a
category.
RBDS/RDS SIRIUS
Select for a brief sampling of all available channels.
Scan
Select to view your satellite radio electronic serial number
(ESN). You will need this number when communicating
with Sirius to activate, modify or track your account.
Show ESN
Select to view available satellite radio channels. Press OK
to open a list of the following options for this channel:
Tune Channel, Skip Channel or Lock Channel. Once you
skip or lock a channel, you can only access it by pressing
Direct and entering the channel number. Locking or
unlocking a channel requires your PIN.
Channel Guide
Select to view channel categories (such as Pop, Rock or
News). If you select a category, seek and scan functions
only stop on channels in that category.
Set Category
Select to turn off or turn on alerts for songs, artists or
teams. The system alerts you when the selection is playing
on another channel. Save up to 20 alerts.
Alerts
358
Explorer (TUB) Canada/United States of America, enUSA, Edition date: 03/2016, First Printing Audio System
Page 381 of 541

Accessing Your Phone Settings
These are phone-dependent features. Your
phone settings allow you to access and
adjust features such as your ring tone and
text message notification, modify your
phonebook, and set up automatic
download.
1. Press the PHONE button.
2. Scroll until the phone settings option appears, and then press the OK button.
Scroll to select from the following options: Description and action
Menu Item
If this option is checked, the system uses the cellular phone
as the master when there is more than one cellular phone
paired to the system. This option can be changed for all
cellular phones (not only the active phone) using the
Bluetooth Devices menu.
Set as master
See the cellular phone name, provider name, cellular
phone number, and signal level. When done, press the left
arrow buttons to return to the phone status menu.
Phone status
Select which ringtone sounds during an incoming call (one
of the system's tones or your cellular phone's). If your
phone supports in-band ringing, your phone's ringtone
sounds when you choose the cellular phone ringtone
option.
Set ringtone
1. Press the
OK button to select and scroll to hear each
ringtone.
2. Press the
OK button to select a ringtone.
Have the option of hearing an audible tone to notify you
when a text message arrives. Press the
OK button to
switch the audible tone off or on.
Text msg notify
Modify the contents of your phonebook (such as add,
delete or download). Press the
OK button to select and
scroll between the choices in the phonebook preferences
table below.
Phonebook pref.
378
Explorer (TUB) Canada/United States of America, enUSA, Edition date: 03/2016, First Printing SYNC™
(If Equipped)
Page 384 of 541
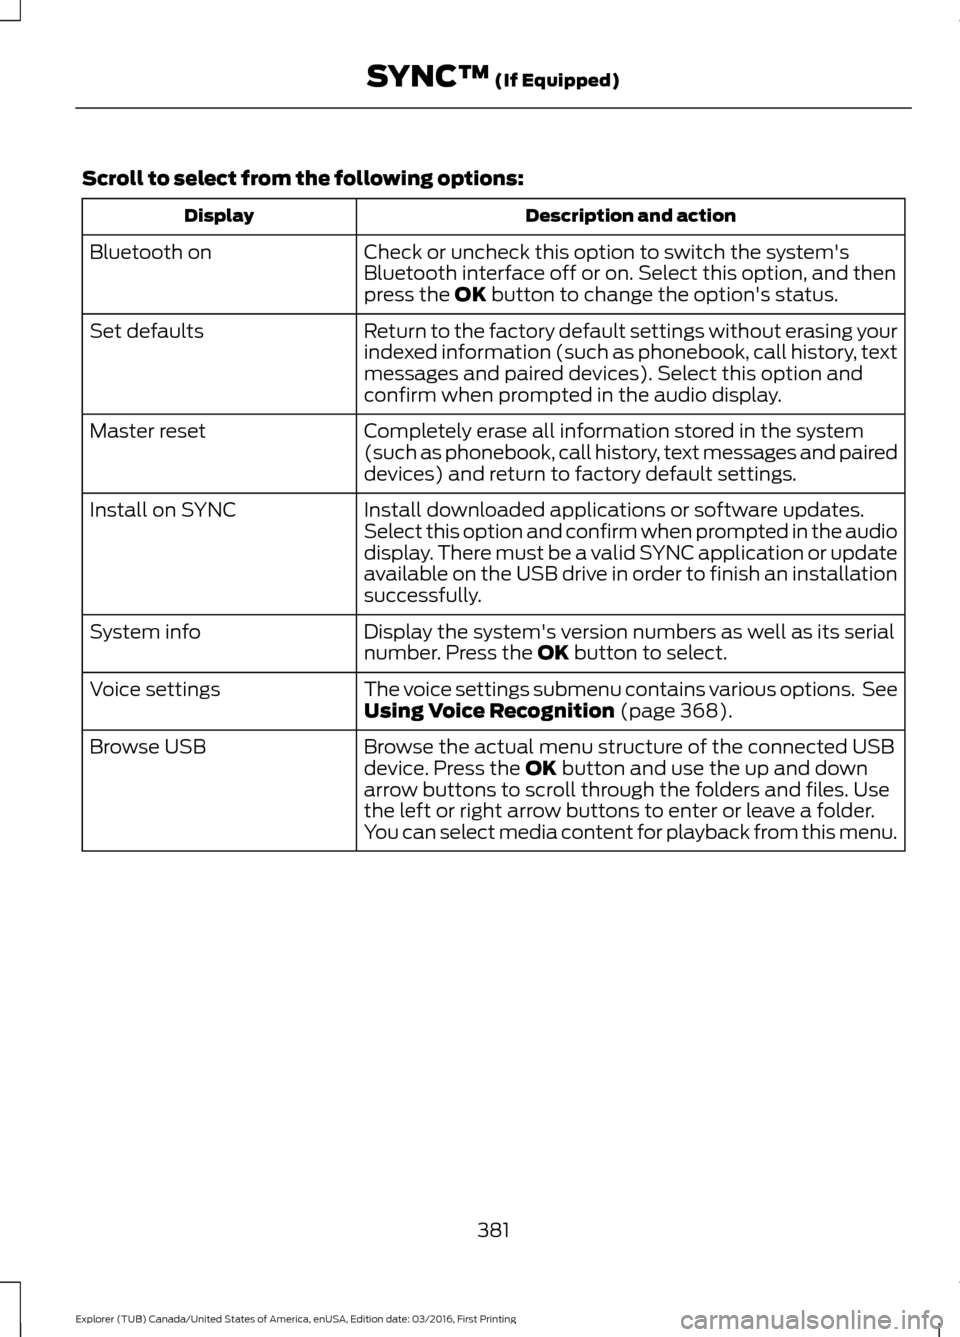
Scroll to select from the following options:
Description and action
Display
Check or uncheck this option to switch the system's
Bluetooth interface off or on. Select this option, and then
press the OK button to change the option's status.
Bluetooth on
Return to the factory default settings without erasing your
indexed information (such as phonebook, call history, text
messages and paired devices). Select this option and
confirm when prompted in the audio display.
Set defaults
Completely erase all information stored in the system
(such as phonebook, call history, text messages and paired
devices) and return to factory default settings.
Master reset
Install downloaded applications or software updates.
Select this option and confirm when prompted in the audio
display. There must be a valid SYNC application or update
available on the USB drive in order to finish an installation
successfully.
Install on SYNC
Display the system's version numbers as well as its serial
number. Press the
OK button to select.
System info
The voice settings submenu contains various options. See
Using Voice Recognition
(page 368).
Voice settings
Browse the actual menu structure of the connected USB
device. Press the
OK button and use the up and down
arrow buttons to scroll through the folders and files. Use
the left or right arrow buttons to enter or leave a folder.
You can select media content for playback from this menu.
Browse USB
381
Explorer (TUB) Canada/United States of America, enUSA, Edition date: 03/2016, First Printing SYNC™
(If Equipped)