2017 FORD EXPLORER automatic transmission
[x] Cancel search: automatic transmissionPage 108 of 541

Display Mode
Tire pressure on demand screen
Digital speedometer - XXX MPH - Press OK for km/h
Intelligent 4WD - 4WD Gauge with Terrain Management System
* Vehicles with Intelligent 4WD only. You can choose to have only the fuel gauge show in
this mode. Refer to Display > Gauge Display found in the table under the Settings section
later in this chapter.
XXX mi (km) to empty
Shows approximate fuel level before the
fuel tank reaches empty. The value is
dynamic and can change (raise or lower)
depending on driving style.
Fuel gauge
Switch the ignition on. The fuel gauge
indicates approximately how much fuel is
in the fuel tank. The arrow next to the fuel
pump symbol shows the fuel filler door
side of your vehicle. When the fuel level
becomes low, the level indicator changes
to amber. When the fuel level becomes
critically low, the level indicator changes
to red.
Note: The fuel gauge level may vary slightly
when your vehicle is moving or when driving
on a slope.
Note: When a MyKey is in use, low fuel
warnings display earlier.
Bar or Round tachometer
Indicates the engine speed in revolutions
per minute. Driving with your tachometer
pointer continuously at the top of the scale
may damage the engine. During SelectShift
Automatic ™ transmission (SST) use, the
currently selected gear appears in the
display. Engine coolant temperature gauge
Indicates engine coolant temperature. At
normal operating temperature, the level
indicator is in the normal range. If the
engine coolant temperature exceeds the
normal range, stop your vehicle as soon as
safely possible, switch off the engine and
let the engine cool.
Intelligent 4WD (if equipped)
Displays power distribution between the
front and rear wheels. More power to either
the front or rear wheels displays by more
area filled in. Intelligent 4WD also displays
the currently selected terrain management
mode.
Trip 1 & 2
You can access the menu using the
information display control.
Note:
Some options may appear slightly
different or not at all if the items are
optional.
105
Explorer (TUB) Canada/United States of America, enUSA, Edition date: 03/2016, First Printing Information Displays
Page 129 of 541

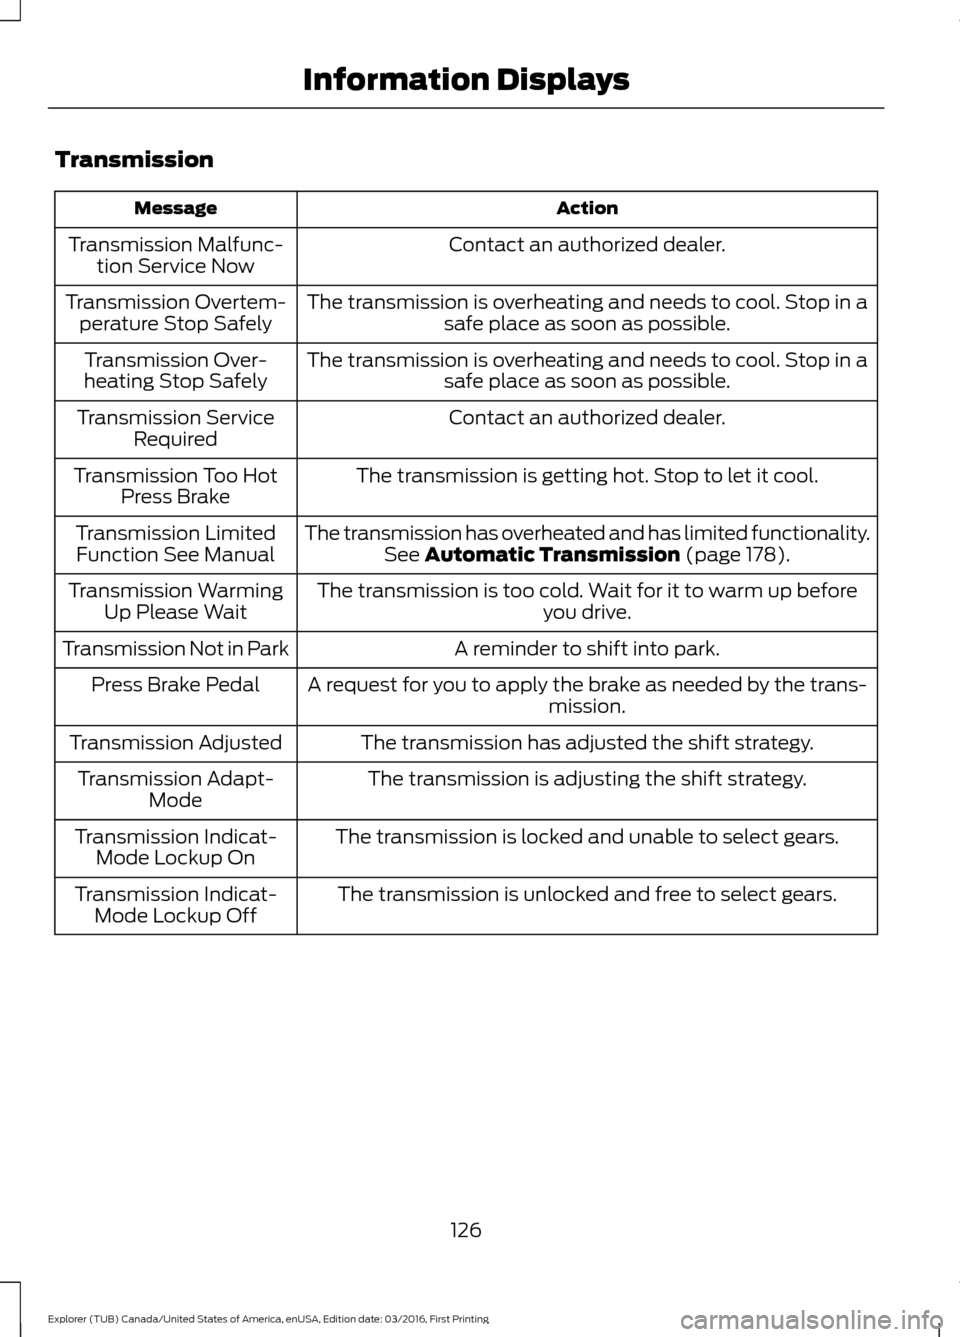
Transmission
Action
Message
Contact an authorized dealer.
Transmission Malfunc-
tion Service Now
The transmission is overheating and needs to cool. Stop in asafe place as soon as possible.
Transmission Overtem-
perature Stop Safely
The transmission is overheating and needs to cool. Stop in asafe place as soon as possible.
Transmission Over-
heating Stop Safely
Contact an authorized dealer.
Transmission Service
Required
The transmission is getting hot. Stop to let it cool.
Transmission Too Hot
Press Brake
The transmission has overheated and has limited functionality.See Automatic Transmission (page 178).
Transmission Limited
Function See Manual
The transmission is too cold. Wait for it to warm up beforeyou drive.
Transmission Warming
Up Please Wait
A reminder to shift into park.
Transmission Not in Park
A request for you to apply the brake as needed by the trans-mission.
Press Brake Pedal
The transmission has adjusted the shift strategy.
Transmission Adjusted
The transmission is adjusting the shift strategy.
Transmission Adapt-
Mode
The transmission is locked and unable to select gears.
Transmission Indicat-
Mode Lockup On
The transmission is unlocked and free to select gears.
Transmission Indicat-
Mode Lockup Off
126
Explorer (TUB) Canada/United States of America, enUSA, Edition date: 03/2016, First Printing Information Displays
Page 146 of 541

To access and make adjustments to the
massage setting:
1.
Press the Menu Settings icon > Vehicle
>Multi-contour Seat.
2. Choose the desired seat to adjust.
3. Press Off, Lo or Hi.
MEMORY FUNCTION (If Equipped) WARNINGS
Before activating the memory seat,
make sure that the area immediately
surrounding the seat is clear of
obstructions and that all occupants are
clear of moving parts. Do not use the memory function
when your vehicle is moving.
This feature automatically recalls the
position of the following:
•
Driver seat.
• Power mirrors.
• Optional power adjustable foot pedals.
• Optional steering column.
The memory control is on the driver door. Saving a PreSet Position
1. Switch the ignition on.
2. Adjust the memory features to your
desired position.
3. Press and hold the desired preset button until you hear a single tone.
You can save up to three preset memory
positions. You can save a memory preset
at any time.
Recalling a PreSet Position
Press and release the preset button
associated with your desired driving
position. The memory features move to
the position stored for that preset.
Note: You can only recall a preset memory
position when the ignition is off, or when the
transmission is in park (P) or neutral (N) if
the ignition is on.
You can also recall a preset memory
position by:
• Pressing the unlock button on your
intelligent access key fob if it is linked
to a preset position.
• Unlocking the intelligent driver door
handle if a linked key fob is present.
• Entering a personal entry code on the
Securicode keypad. See
Doors and
Locks (page 59).
Note: Using a linked key fob to recall your
memory position when the ignition is off
moves the seat to the Easy Entry position.
Note: Pressing any active memory feature
adjustment control (or any memory button)
during a memory recall cancels the
operation.
143
Explorer (TUB) Canada/United States of America, enUSA, Edition date: 03/2016, First Printing SeatsE142554
Page 166 of 541

Ignition Modes
The keyless starting system has three
modes:
Off: Turns the ignition off.
• Without applying the brake pedal,
press and release the button once
when the ignition is in the on mode, or
when the engine is running but the
vehicle is not moving.
On:
All electrical circuits are operational
and the warning lamps and indicators
illuminate.
• Without applying the brake pedal,
press and release the button once.
Start:
Starts the engine.
• Press the brake pedal (automatic
transmission) or clutch pedal (manual
transmission), and then press the
button for any length of time. An
indicator light on the button illuminates
when the ignition is on and when the
engine starts.
STARTING A GASOLINE
ENGINE
When you start the engine, the idle speed
increases. This helps to warm up the
engine. If the engine idle speed does not
slow down automatically, have your
vehicle checked by an authorized dealer. Note:
You can crank the engine for a total
of 60 seconds without the engine starting
before the starting system temporarily
disables. The 60 seconds does not have to
be all at once. For example, if you crank the
engine three times for 20 seconds each
time, without the engine starting, you
reached the 60-second time limit. A
message appears in the information display
alerting you that you exceeded the cranking
time. You cannot attempt to start the
engine for at least 15 minutes. After 15
minutes, you are limited to a 15-second
engine cranking time. You need to wait 60
minutes before you can crank the engine for
60 seconds again.
Before starting your vehicle, check the
following:
• Make sure all occupants have fastened
their safety belts.
• Make sure the headlamps and
electrical accessories are off.
• Make sure the parking brake is on.
• Make sure the transmission is in park
(P).
• Switch the ignition on. For vehicles with
a keyless ignition, see the following
instructions.
Vehicles with an Ignition Key
Note: Do not touch the accelerator pedal.
1. Fully depress the brake pedal.
2. Turn the key to the start position to start the engine.
Note: The engine may continue cranking
for up to 15 seconds or until it starts.
Note: If you cannot start the engine on the
first try, wait for a short period and try again.
Vehicles with Keyless Start
Note: Do not touch the accelerator pedal.
163
Explorer (TUB) Canada/United States of America, enUSA, Edition date: 03/2016, First Printing Starting and Stopping the EngineE146431
Page 181 of 541

AUTOMATIC TRANSMISSION
WARNINGS
Always set the parking brake fully
and make sure you shift the gearshift
lever to park (P). Switch the ignition
off and remove the key whenever you leave
your vehicle. Do not apply the brake pedal and
accelerator pedal simultaneously.
Applying both pedals simultaneously
for more than a few seconds will limit
engine rpm, which may result in difficulty
maintaining speed in traffic and could lead
to serious injury. Understanding the Positions of
Your Automatic Transmission
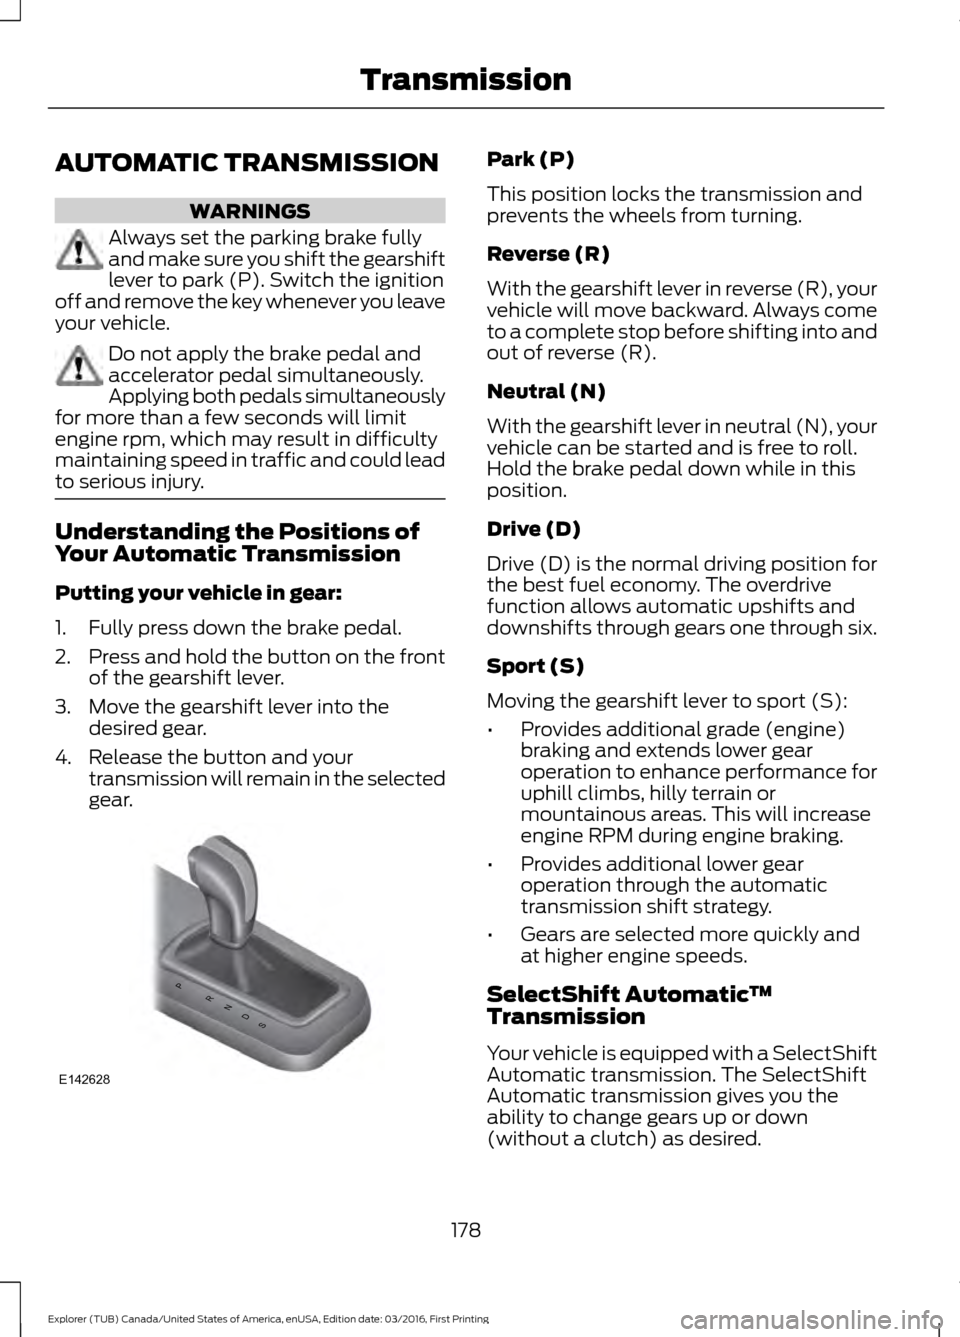
Putting your vehicle in gear:
1. Fully press down the brake pedal.
2.
Press and hold the button on the front
of the gearshift lever.
3. Move the gearshift lever into the desired gear.
4. Release the button and your transmission will remain in the selected
gear. Park (P)
This position locks the transmission and
prevents the wheels from turning.
Reverse (R)
With the gearshift lever in reverse (R), your
vehicle will move backward. Always come
to a complete stop before shifting into and
out of reverse (R).
Neutral (N)
With the gearshift lever in neutral (N), your
vehicle can be started and is free to roll.
Hold the brake pedal down while in this
position.
Drive (D)
Drive (D) is the normal driving position for
the best fuel economy. The overdrive
function allows automatic upshifts and
downshifts through gears one through six.
Sport (S)
Moving the gearshift lever to sport (S):
•
Provides additional grade (engine)
braking and extends lower gear
operation to enhance performance for
uphill climbs, hilly terrain or
mountainous areas. This will increase
engine RPM during engine braking.
• Provides additional lower gear
operation through the automatic
transmission shift strategy.
• Gears are selected more quickly and
at higher engine speeds.
SelectShift Automatic ™
Transmission
Your vehicle is equipped with a SelectShift
Automatic transmission. The SelectShift
Automatic transmission gives you the
ability to change gears up or down
(without a clutch) as desired.
178
Explorer (TUB) Canada/United States of America, enUSA, Edition date: 03/2016, First Printing TransmissionPRNDS
E142628
Page 182 of 541

In order to prevent the engine from running
at too low an RPM, which may cause it to
stall, SelectShift still automatically makes
some downshifts if it has determined that
you have not downshifted in time.
Although SelectShift makes some
downshifts for you, it still allows you to
downshift at any time as long as the
SelectShift determines that damage will
not be caused to the engine from
over-revving.
Note:
Engine damage may occur if you
maintain excessive engine revving without
shifting.
SelectShift does not automatically upshift,
even if the engine is approaching the RPM
limit. It must be shifted manually by
pressing the + button. Notice should be
taken of the shift indicator lamp, which
alerts you when to shift to make sure you
achieve the highest level or efficiency and
fuel economy.
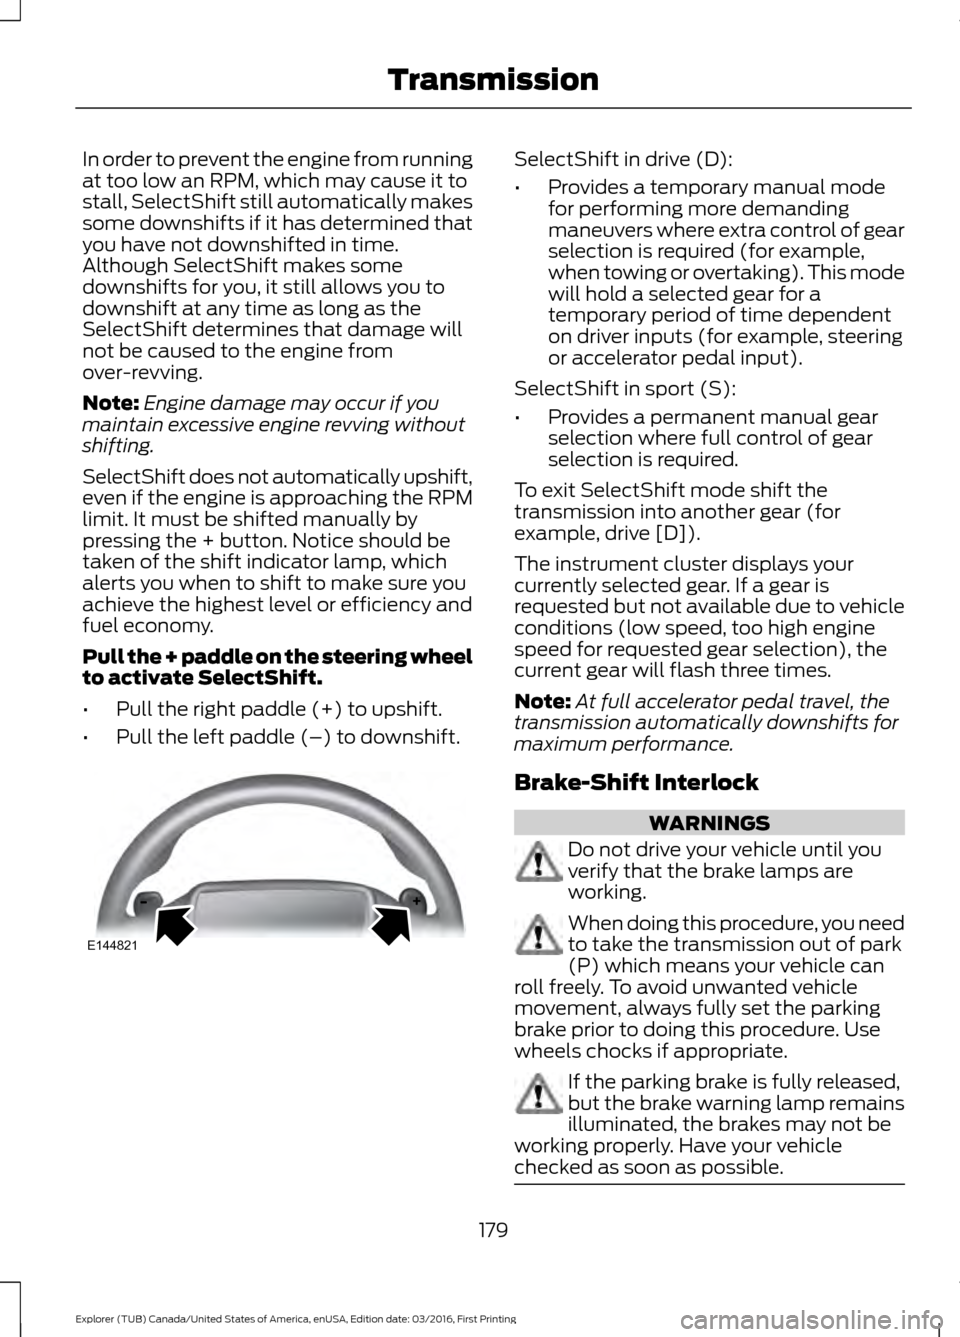
Pull the + paddle on the steering wheel
to activate SelectShift.
• Pull the right paddle (+) to upshift.
• Pull the left paddle (–) to downshift. SelectShift in drive (D):
•
Provides a temporary manual mode
for performing more demanding
maneuvers where extra control of gear
selection is required (for example,
when towing or overtaking). This mode
will hold a selected gear for a
temporary period of time dependent
on driver inputs (for example, steering
or accelerator pedal input).
SelectShift in sport (S):
• Provides a permanent manual gear
selection where full control of gear
selection is required.
To exit SelectShift mode shift the
transmission into another gear (for
example, drive [D]).
The instrument cluster displays your
currently selected gear. If a gear is
requested but not available due to vehicle
conditions (low speed, too high engine
speed for requested gear selection), the
current gear will flash three times.
Note: At full accelerator pedal travel, the
transmission automatically downshifts for
maximum performance.
Brake-Shift Interlock WARNINGS
Do not drive your vehicle until you
verify that the brake lamps are
working.
When doing this procedure, you need
to take the transmission out of park
(P) which means your vehicle can
roll freely. To avoid unwanted vehicle
movement, always fully set the parking
brake prior to doing this procedure. Use
wheels chocks if appropriate. If the parking brake is fully released,
but the brake warning lamp remains
illuminated, the brakes may not be
working properly. Have your vehicle
checked as soon as possible. 179
Explorer (TUB) Canada/United States of America, enUSA, Edition date: 03/2016, First Printing TransmissionE144821
Page 190 of 541

PARKING BRAKE
WARNING
Always set the parking brake fully
and make sure the transmission is
locked in park (P). Failure to set the
parking brake and engage park could result
in vehicle roll-away, property damage or
bodily injury. To set the parking brake, press the parking
brake pedal down to its fullest extent. The
brake warning lamp in the instrument
cluster will illuminate and remains
illuminated until the parking brake is
released.
To release the parking brake, press the
parking brake pedal down again.
If you are parking your vehicle on a grade
or with a trailer, press and hold the brake
pedal down, then set the parking brake.
There may be a little vehicle movement as
the parking brake sets to hold the vehicle's
weight. This is normal and should be no
reason for concern. If needed, press and
hold the service brake pedal down, then
try reapplying the parking brake. Chock the
wheels if required. If the parking brake
cannot hold the weight of the vehicle, the
parking brake may need to be serviced or
the vehicle may be overloaded.
HILL START ASSIST
WARNINGS
The system does not replace the
parking brake. When you leave your
vehicle, always apply the parking
brake. Failure to leave your vehicle securely
parked may lead to a crash or injury. See
Parking Brake (page 187). WARNINGS
You must remain in your vehicle
when the system turns on. At all
times, you are responsible for
controlling your vehicle, supervising the
system and intervening, if required. Failure
to take care may result in the loss of
control of your vehicle, serious personal
injury or death. The system will turn off if a
malfunction is apparent or if you rev
the engine excessively. Failure to
take care may result in the loss of control
of your vehicle, serious personal injury or
death. The system makes it easier to pull away
when your vehicle is on a slope without the
need to use the parking brake.
When the system is active, your vehicle
remains stationary on the slope for two to
three seconds after you release the brake
pedal. This allows time to move your foot
from the brake to the accelerator pedal.
The system releases the brakes
automatically once the engine has
developed sufficient torque to prevent your
vehicle from rolling down the slope. This
is an advantage when pulling away on a
slope, for example from a car park ramp,
traffic lights or when reversing uphill into
a parking space.
Note:
The system only functions when you
bring your vehicle to a complete standstill
in an uphill gear (for example, drive (D)
when facing uphill or reverse (R) when
facing downhill).
Note: There is no warning light to indicate
the system is either on or off.
Using Hill Start Assist
1. Press the brake pedal to bring your vehicle to a complete standstill. Keep
the brake pedal pressed.
187
Explorer (TUB) Canada/United States of America, enUSA, Edition date: 03/2016, First Printing Brakes
Page 191 of 541

2. If the sensors detect that your vehicle
is on a slope, the system activates
automatically.
3. When you remove your foot from the brake pedal, your vehicle remains on
the slope without rolling away for
about two to three seconds. This hold
time automatically extends if you are
in the process of driving off.
4. Drive off in the normal manner. The system releases the brakes
automatically.
Note: When you remove your foot from the
brake pedal and press the pedal again when
the system is active, you will experience
significantly reduced brake pedal travel. This
is normal.
Switching the System On and Off
Vehicles with Manual Transmission
You can switch this feature on or off in the
information display. The system
remembers the last setting when you start
your vehicle.
Vehicles with Automatic Transmission
You cannot turn the system on or off.
When you switch the ignition on, the
system automatically turns on.
188
Explorer (TUB) Canada/United States of America, enUSA, Edition date: 03/2016, First Printing Brakes