2017 FORD EXPLORER lock
[x] Cancel search: lockPage 294 of 541

Headlamp
Headlamp high beam.
A
Front direction indicator.
B
Front Direction Indicator 1.
Switch all of the lamps and the ignition
off.
2. Disconnect the electrical connector. 3.
Turn the bulb holder counterclockwise
and remove it.
4. Remove the bulb by pulling it straight out.
Headlamp High Beam 1.
Switch all of the lamps and the ignition
off.
2. Carefully remove the cover.
3. Disconnect the electrical connector.
4. Turn the bulb holder counterclockwise
and remove it.
Note: You cannot separate the bulb from
the bulb holder.
Note: Do not touch the bulb glass.
291
Explorer (TUB) Canada/United States of America, enUSA, Edition date: 03/2016, First Printing MaintenanceE203696
AB E203698
4
23 E203697
2
3
4
4
Page 295 of 541

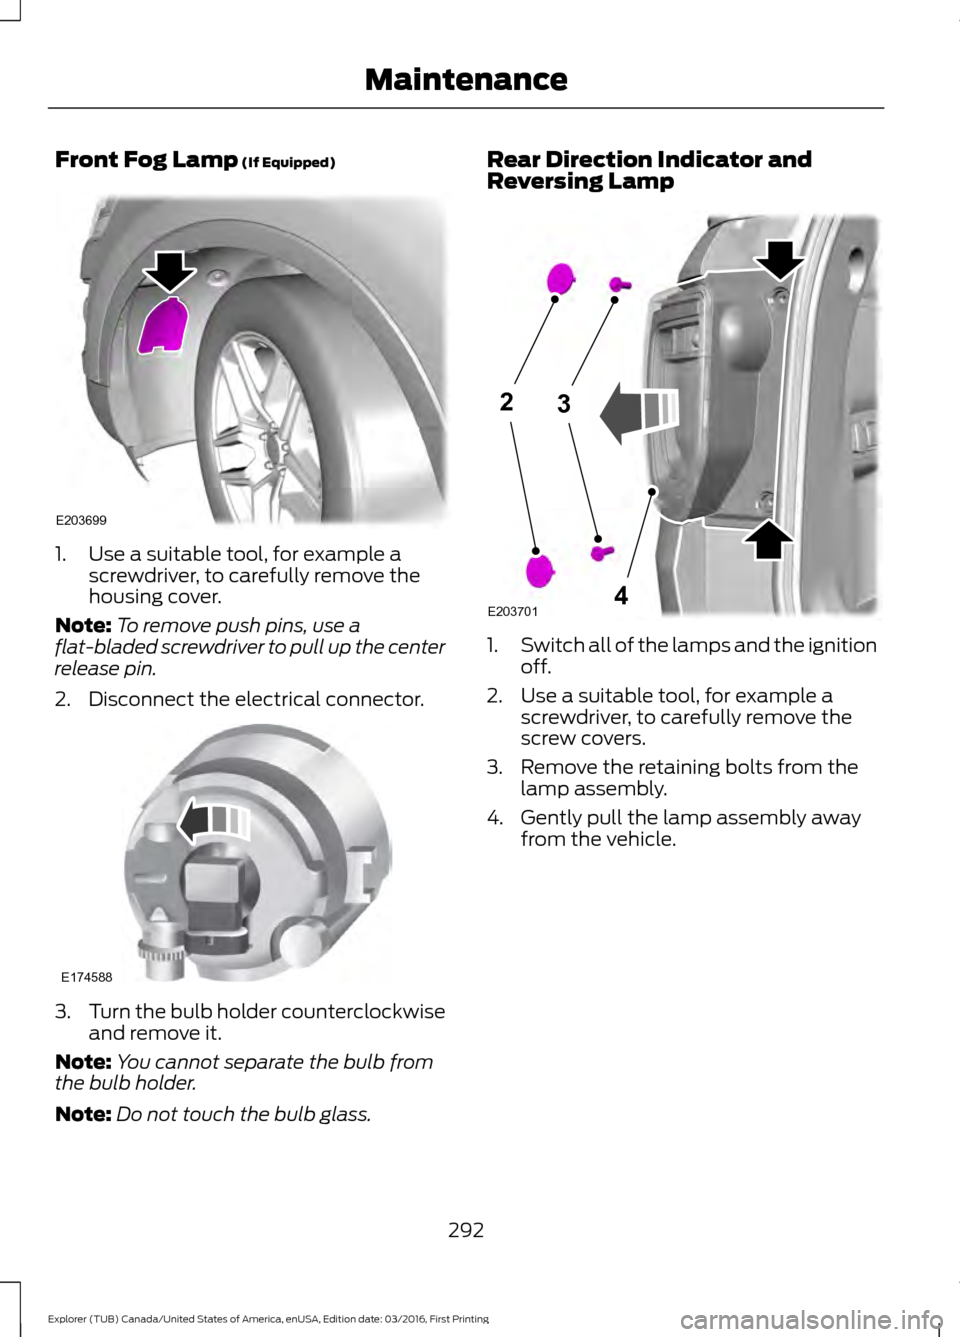
Front Fog Lamp (If Equipped)
1. Use a suitable tool, for example a
screwdriver, to carefully remove the
housing cover.
Note: To remove push pins, use a
flat-bladed screwdriver to pull up the center
release pin.
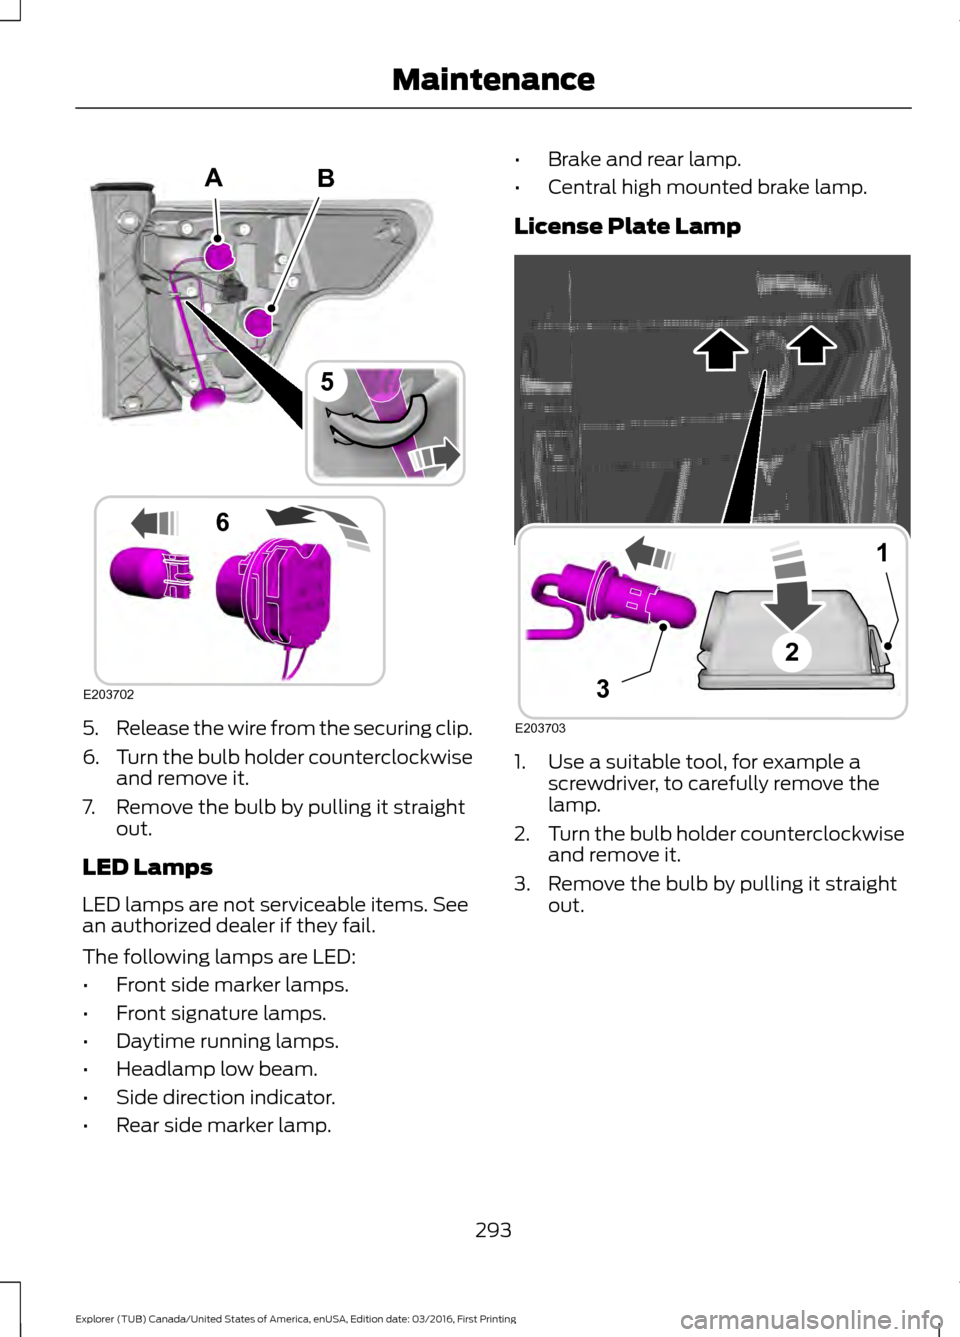
2. Disconnect the electrical connector. 3.
Turn the bulb holder counterclockwise
and remove it.
Note: You cannot separate the bulb from
the bulb holder.
Note: Do not touch the bulb glass. Rear Direction Indicator and
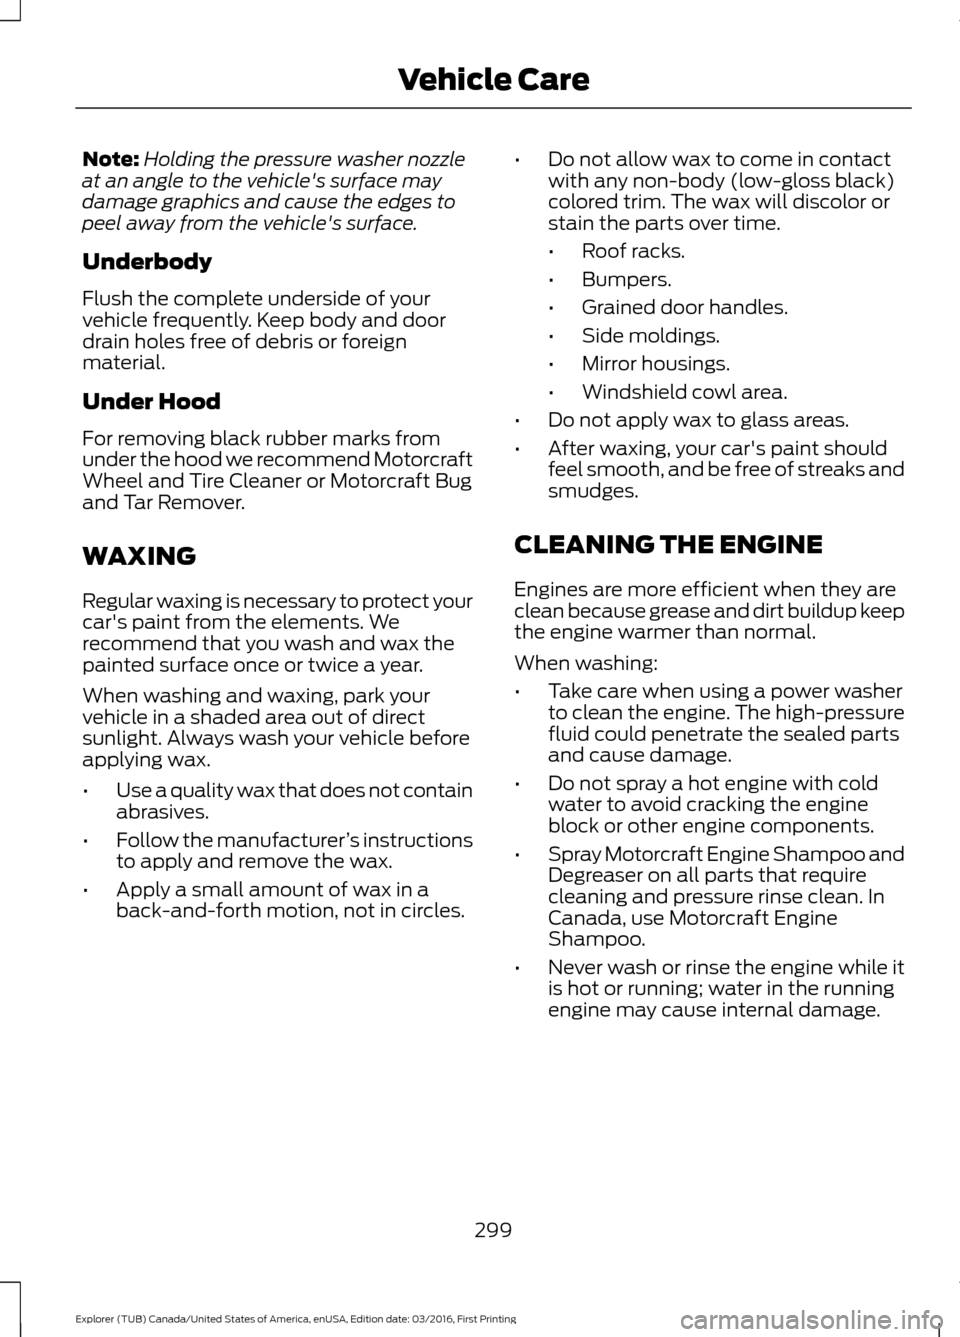
Reversing Lamp
1.
Switch all of the lamps and the ignition
off.
2. Use a suitable tool, for example a screwdriver, to carefully remove the
screw covers.
3. Remove the retaining bolts from the lamp assembly.
4. Gently pull the lamp assembly away from the vehicle.
292
Explorer (TUB) Canada/United States of America, enUSA, Edition date: 03/2016, First Printing MaintenanceE203699 E174588 23
4E203701
Page 296 of 541

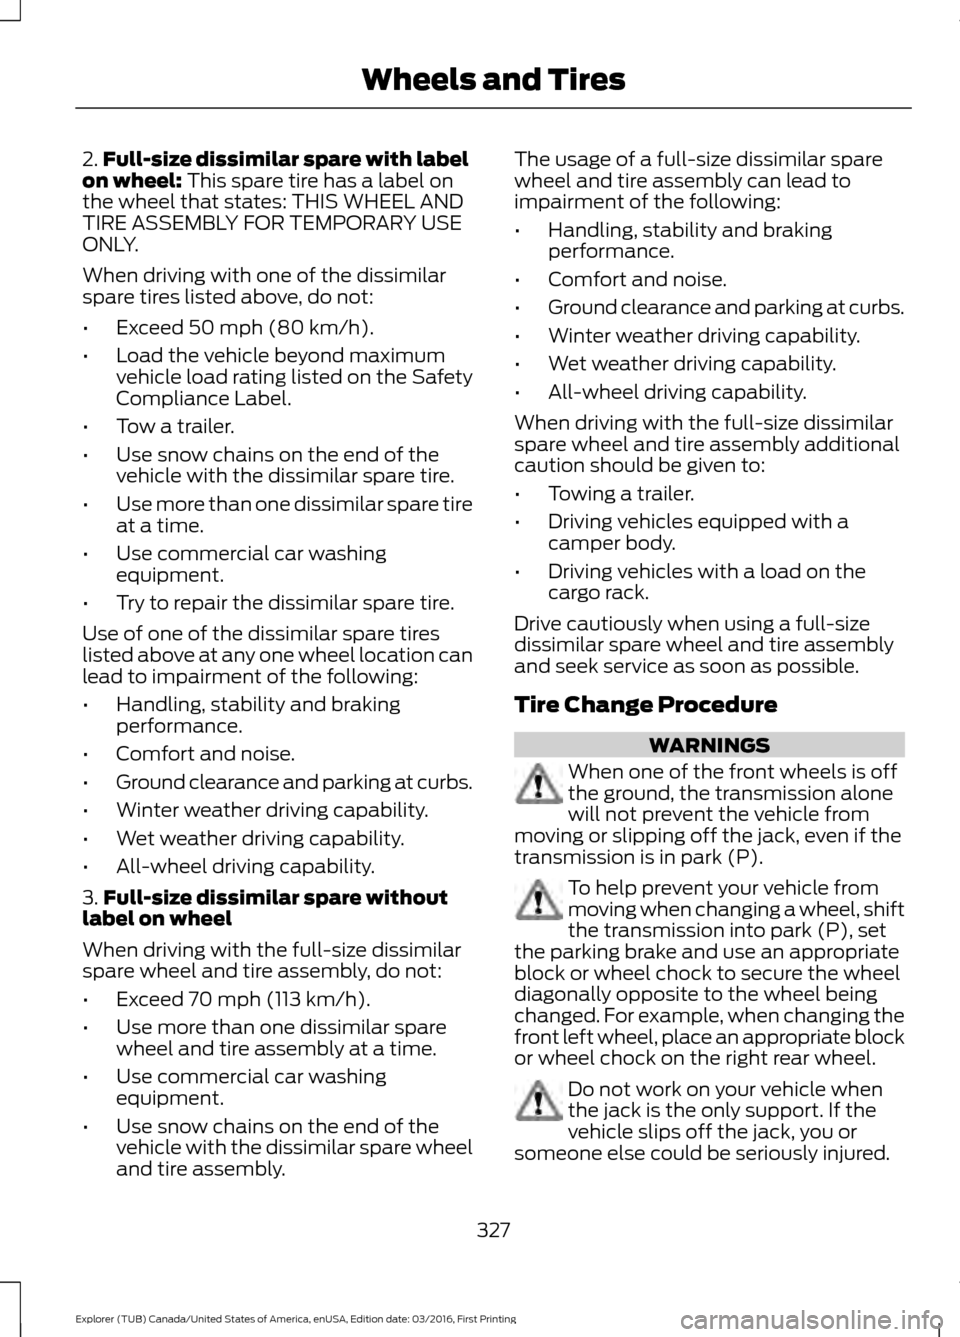
5.
Release the wire from the securing clip.
6. Turn the bulb holder counterclockwise
and remove it.
7. Remove the bulb by pulling it straight out.
LED Lamps
LED lamps are not serviceable items. See
an authorized dealer if they fail.
The following lamps are LED:
• Front side marker lamps.
• Front signature lamps.
• Daytime running lamps.
• Headlamp low beam.
• Side direction indicator.
• Rear side marker lamp. •
Brake and rear lamp.
• Central high mounted brake lamp.
License Plate Lamp 1. Use a suitable tool, for example a
screwdriver, to carefully remove the
lamp.
2. Turn the bulb holder counterclockwise
and remove it.
3. Remove the bulb by pulling it straight out.
293
Explorer (TUB) Canada/United States of America, enUSA, Edition date: 03/2016, First Printing MaintenanceB
E203702
5
6
A E203703
1
3
2
Page 302 of 541

Note:
Holding the pressure washer nozzle
at an angle to the vehicle's surface may
damage graphics and cause the edges to
peel away from the vehicle's surface.
Underbody
Flush the complete underside of your
vehicle frequently. Keep body and door
drain holes free of debris or foreign
material.
Under Hood
For removing black rubber marks from
under the hood we recommend Motorcraft
Wheel and Tire Cleaner or Motorcraft Bug
and Tar Remover.
WAXING
Regular waxing is necessary to protect your
car's paint from the elements. We
recommend that you wash and wax the
painted surface once or twice a year.
When washing and waxing, park your
vehicle in a shaded area out of direct
sunlight. Always wash your vehicle before
applying wax.
• Use a quality wax that does not contain
abrasives.
• Follow the manufacturer ’s instructions
to apply and remove the wax.
• Apply a small amount of wax in a
back-and-forth motion, not in circles. •
Do not allow wax to come in contact
with any non-body (low-gloss black)
colored trim. The wax will discolor or
stain the parts over time.
•Roof racks.
• Bumpers.
• Grained door handles.
• Side moldings.
• Mirror housings.
• Windshield cowl area.
• Do not apply wax to glass areas.
• After waxing, your car's paint should
feel smooth, and be free of streaks and
smudges.
CLEANING THE ENGINE
Engines are more efficient when they are
clean because grease and dirt buildup keep
the engine warmer than normal.
When washing:
• Take care when using a power washer
to clean the engine. The high-pressure
fluid could penetrate the sealed parts
and cause damage.
• Do not spray a hot engine with cold
water to avoid cracking the engine
block or other engine components.
• Spray Motorcraft Engine Shampoo and
Degreaser on all parts that require
cleaning and pressure rinse clean. In
Canada, use Motorcraft Engine
Shampoo.
• Never wash or rinse the engine while it
is hot or running; water in the running
engine may cause internal damage.
299
Explorer (TUB) Canada/United States of America, enUSA, Edition date: 03/2016, First Printing Vehicle Care
Page 330 of 541

2.
Full-size dissimilar spare with label
on wheel: This spare tire has a label on
the wheel that states: THIS WHEEL AND
TIRE ASSEMBLY FOR TEMPORARY USE
ONLY.
When driving with one of the dissimilar
spare tires listed above, do not:
• Exceed
50 mph (80 km/h).
• Load the vehicle beyond maximum
vehicle load rating listed on the Safety
Compliance Label.
• Tow a trailer.
• Use snow chains on the end of the
vehicle with the dissimilar spare tire.
• Use more than one dissimilar spare tire
at a time.
• Use commercial car washing
equipment.
• Try to repair the dissimilar spare tire.
Use of one of the dissimilar spare tires
listed above at any one wheel location can
lead to impairment of the following:
• Handling, stability and braking
performance.
• Comfort and noise.
• Ground clearance and parking at curbs.
• Winter weather driving capability.
• Wet weather driving capability.
• All-wheel driving capability.
3. Full-size dissimilar spare without
label on wheel
When driving with the full-size dissimilar
spare wheel and tire assembly, do not:
• Exceed
70 mph (113 km/h).
• Use more than one dissimilar spare
wheel and tire assembly at a time.
• Use commercial car washing
equipment.
• Use snow chains on the end of the
vehicle with the dissimilar spare wheel
and tire assembly. The usage of a full-size dissimilar spare
wheel and tire assembly can lead to
impairment of the following:
•
Handling, stability and braking
performance.
• Comfort and noise.
• Ground clearance and parking at curbs.
• Winter weather driving capability.
• Wet weather driving capability.
• All-wheel driving capability.
When driving with the full-size dissimilar
spare wheel and tire assembly additional
caution should be given to:
• Towing a trailer.
• Driving vehicles equipped with a
camper body.
• Driving vehicles with a load on the
cargo rack.
Drive cautiously when using a full-size
dissimilar spare wheel and tire assembly
and seek service as soon as possible.
Tire Change Procedure WARNINGS
When one of the front wheels is off
the ground, the transmission alone
will not prevent the vehicle from
moving or slipping off the jack, even if the
transmission is in park (P). To help prevent your vehicle from
moving when changing a wheel, shift
the transmission into park (P), set
the parking brake and use an appropriate
block or wheel chock to secure the wheel
diagonally opposite to the wheel being
changed. For example, when changing the
front left wheel, place an appropriate block
or wheel chock on the right rear wheel. Do not work on your vehicle when
the jack is the only support. If the
vehicle slips off the jack, you or
someone else could be seriously injured.
327
Explorer (TUB) Canada/United States of America, enUSA, Edition date: 03/2016, First Printing Wheels and Tires
Page 331 of 541

WARNINGS
Do not attempt to change a tire on
the side of the vehicle close to
moving traffic. Pull far enough off the
road to avoid the danger of being hit when
operating the jack or changing the wheel. Always use the jack provided as
original equipment with your vehicle.
If using a jack other than the one
provided, make sure the jack capacity is
adequate for the vehicle weight, including
any vehicle cargo or modifications. If you
are unsure if the jack capacity is adequate,
contact the authorized dealer. Note:
Passengers should not remain in your
vehicle when the vehicle is being jacked.
Note: Jack at the specified locations to
avoid damage to the vehicle.
1. Park on a level surface, set the parking
brake and activate the hazard flashers.
2. Place the transmission in park (P) and
turn the engine off. 3. Block the diagonally opposite wheel. 4. Turn the two knobs on the floor filler
counterclockwise, then remove the
floor filler and carpeted floor panel
located in the rear of the vehicle. 5. Remove the wing nut securing the
spare tire by turning it
counterclockwise.
6. Remove the spare tire from the spare tire well.
7. Remove the wing nut bolt that secures
the jack kit by turning it
counterclockwise.
8. Remove the jack kit, which includes the
jack, lug wrench, L-shaped bolt and
tow recovery hook.
328
Explorer (TUB) Canada/United States of America, enUSA, Edition date: 03/2016, First Printing Wheels and TiresE142551 E194295 E226763
Page 332 of 541

9. Turn the lead screw (where the lug
wrench attaches) of the jack by hand
to release the lug wrench from the jack.
Press the button on the wrench to
extend the handle. Fold down the
wrench socket.
10. Loosen each wheel lug nut one-half turn counterclockwise, but do not
remove them until the wheel is raised
off the ground. 11.
The vehicle jacking points are shown
here, and are depicted on the warning
label on the jack.
12. Small arrow-shaped marks on the sills show the location of the jacking
points. 13. Raise the wheel by turning the jack
handle clockwise.
14. Remove the lug nuts with the lug wrench. 15. Replace the flat tire with the spare
tire, marking sure the valve stem is
facing outward. Reinstall the lug nuts
until the wheel is snug against the
hub. Do not fully tighten the lug nuts
until the wheel has been lowered.
16. Lower the wheel by turning the jack handle counterclockwise. 17.
Remove the jack and fully tighten the
lug nuts in the order shown. See
Technical Specifications (page
330).
Stowing the flat tire
1. Stand the flat tire vertically in the mini-spare tub with the tire's valve
stem facing rearward toward the
luggage compartment.
329
Explorer (TUB) Canada/United States of America, enUSA, Edition date: 03/2016, First Printing Wheels and TiresE145908 E201156 12
3
4
5
E75442
Page 333 of 541

2. Fasten the flat tire to the luggage
compartment back panel by inserting
the L-shaped bolt through one of the
lug bolt holes in the wheel.
3. Turn the L-shaped bolt clockwise into the threaded hole in the luggage
compartment back panel until the tire
is secured. 4.
Unblock the diagonally opposite wheel.
Stowing the jack With the road wheel in the vertical position
in the spare tire tub, the jack assembly will
not fit in its standard position. Secure the
jack in the alternate position by inserting
the wing bolt through the jack as shown.
TECHNICAL SPECIFICATIONS
Wheel Lug Nut Torque Specifications WARNING
When a wheel is installed, always remove any corrosion, dirt or foreign materials
present on the mounting surfaces of the wheel or the surface of the wheel hub,
brake drum or brake disc that contacts the wheel. Make sure that any fasteners
that attach the rotor to the hub are secured so they do not interfere with the mounting
surfaces of the wheel. Installing wheels without correct metal-to-metal contact at the
wheel mounting surfaces can cause the wheel nuts to loosen and the wheel to come off
while your vehicle is in motion, resulting in loss of control. Ib-ft (Nm)
*
Bolt size
100 (135)
1/2-20 x 1.5
* Torque specifications are for nut and bolt threads free of dirt and rust. Use only Ford
recommended replacement fasteners.
Retighten the lug nuts to the specified torque within 100 miles (160 kilometers) after any
wheel disturbance (such as tire rotation, changing a flat tire, wheel removal).
330
Explorer (TUB) Canada/United States of America, enUSA, Edition date: 03/2016, First Printing Wheels and TiresE194296 E194297