2017 FORD EXPEDITION EL oil
[x] Cancel search: oilPage 249 of 500
Do not use supplemental engine oiladditives because they are unnecessaryand could lead to engine damage that maynot be covered by the vehicle Warranty.
Only use oils certified for gasoline enginesby the American Petroleum Institute (API).An oil with this trademark symbolconforms to the current engine andemission system protection standards andfuel economy requirements of theInternational Lubricants SpecificationAdvisory Committee (ILSAC).
To top up the engine oil level do thefollowing:
1. Clean the area surrounding the engineoil filler cap before you remove it.
2. Remove the engine oil filler cap. SeeUnder Hood Overview (page 244).Turn it counterclockwise and removeit.
3. Add engine oil that meets Fordspecifications. See Capacities andSpecifications (page 308). You mayhave to use a funnel to pour the engineoil into the opening.
4. Recheck the oil level.
5. If the oil level is correct, replace thedipstick and make sure it is fully seated.
6. Replace the engine oil filler cap. Turnit clockwise until you feel a strongresistance.
Note: Do not add oil further than themaximum mark. Oil levels above themaximum mark may cause engine damage.
Note:Make sure you install the oil filler capcorrectly.
Note:Soak up any spillage with anabsorbent cloth immediately.
OIL CHANGE INDICATOR
RESET
Use the information display controls onthe steering wheel to reset the oil changeindicator.
From the main menu scroll to:
Action and descriptionMessage
Press the right arrow button,then from this menu scrollto the following message.
Settings
Press the right arrow button,then from this menu scrollto the following message.
Vehicle
Press the right arrow button,then from this menu scrollto the following message.
Oil Life
Press and hold the OKbutton until the instrumentcluster displays thefollowing message.
Hold OK toReset
Reset Successful
When the oil change indic-ator resets the instrumentcluster displays 100%.
Remaining Life
{00}%
246
Expedition (TB7) Canada/United States of America, enUSA, Edition date: 03/2016, First Printing
MaintenanceE142732
Page 259 of 500
3. Press the wiper blade secondarylocking clip.
4. Remove the wiper blade.
Note:Make sure that the wiper arm doesnot spring back against the glass when thewiper blade is not attached.
5. Install in the reverse order.
Note:Make sure that the wiper blade locksinto place.
ADJUSTING THE HEADLAMPS
Vertical Aim Adjustment
The headlamps on your vehicle areproperly aimed at the assembly plant. Ifyour vehicle has been in an accident,contact an authorized dealer to check andrealign your headlamps.
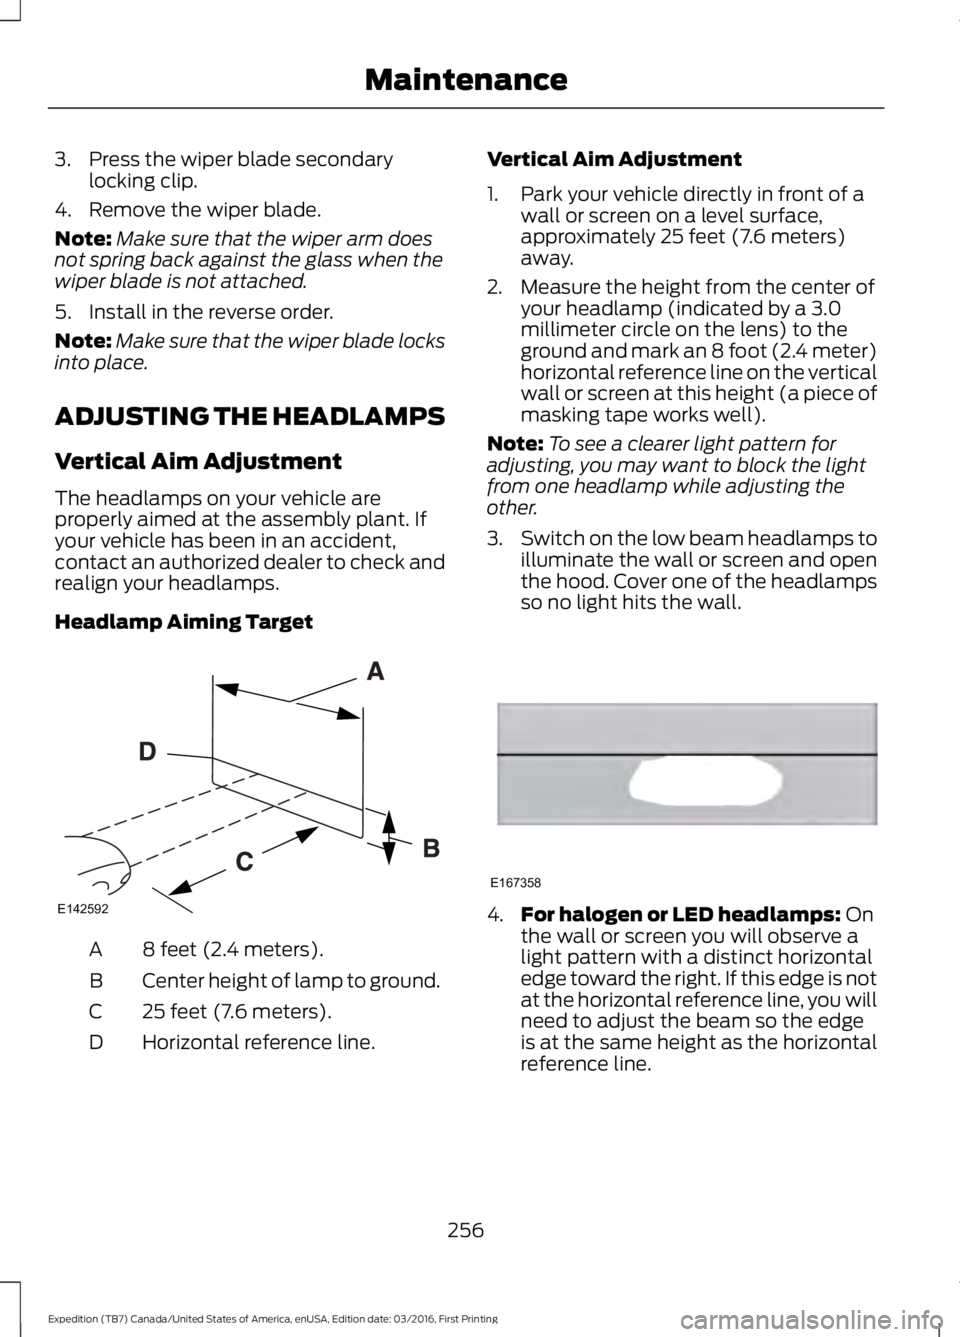
Headlamp Aiming Target
8 feet (2.4 meters).A
Center height of lamp to ground.B
25 feet (7.6 meters).C
Horizontal reference line.D
Vertical Aim Adjustment
1. Park your vehicle directly in front of awall or screen on a level surface,approximately 25 feet (7.6 meters)away.
2. Measure the height from the center ofyour headlamp (indicated by a 3.0millimeter circle on the lens) to theground and mark an 8 foot (2.4 meter)horizontal reference line on the verticalwall or screen at this height (a piece ofmasking tape works well).
Note:To see a clearer light pattern foradjusting, you may want to block the lightfrom one headlamp while adjusting theother.
3.Switch on the low beam headlamps toilluminate the wall or screen and openthe hood. Cover one of the headlampsso no light hits the wall.
4.For halogen or LED headlamps: Onthe wall or screen you will observe alight pattern with a distinct horizontaledge toward the right. If this edge is notat the horizontal reference line, you willneed to adjust the beam so the edgeis at the same height as the horizontalreference line.
256
Expedition (TB7) Canada/United States of America, enUSA, Edition date: 03/2016, First Printing
MaintenanceE142592 E167358
Page 270 of 500

•Never wash or rinse any ignition coil,spark plug wire or spark plug well, orthe area in and around these locations.
•Cover the battery, power distributionbox, and air filter assembly to preventwater damage when cleaning theengine.
CLEANING THE WINDOWS AND
WIPER BLADES
Car wash chemicals and environmentalfallout can result in windshield and wiperblade contamination. Dirty windshield andwipers will result in poor windshield wiperoperation. Keep the windshield and wiperblades clean to maintain windshield wiperperformance.
To clean the windshield and wiper blades:
•Clean the windshield with anon-abrasive glass cleaner. Whencleaning the interior of the windshield,avoid getting any glass cleaner on theinstrument panel or door panels. Wipeany glass cleaner off these surfacesimmediately.
•For windshields contaminated withtree sap, chemicals, wax or bugs, cleanthe entire windshield using steel wool(no greater than 0000 grade) in acircular motion and rinse with water.
•Clean the wiper blades with isopropylrubbing alcohol or windshield washerconcentrate.
Note: Do not use razor blades or othersharp objects to clean or remove decalsfrom the inside of the heated rear window.The vehicle warranty does not coverdamage caused to the heated rear windowgrid lines.
CLEANING THE INTERIOR
WARNINGS
Do not use cleaning solvents, bleachor dye on the vehicle’s safety belts,as these actions may weaken thebelt webbing.
On vehicles equipped withseat-mounted airbags, do not usechemical solvents or strongdetergents. Such products couldcontaminate the side airbag system andaffect performance of the side airbag in acollision.
For fabric, carpets, cloth seats, safety beltsand seats equipped with side airbags:
•Remove dust and loose dirt with avacuum cleaner.
•Remove light stains and soil withMotorcraft Professional StrengthCarpet & Upholstery Cleaner.
•If grease or tar is present on thematerial, spot-clean the area first withMotorcraft Spot and Stain Remover. InCanada, use Motorcraft Multi-PurposeCleaner.
•If a ring forms on the fabric after spotcleaning, clean the entire areaimmediately (but do not oversaturate)or the ring will set.
•Do not use household cleaningproducts or glass cleaners, which canstain and discolor the fabric and affectthe flame retardant abilities of the seatmaterials.
267
Expedition (TB7) Canada/United States of America, enUSA, Edition date: 03/2016, First Printing
Vehicle Care
Page 271 of 500
CLEANING THE INSTRUMENT
PANEL AND INSTRUMENT
CLUSTER LENS
WARNING
Do not use chemical solvents orstrong detergents when cleaning thesteering wheel or instrument panelto avoid contamination of the airbagsystem.
Note:Follow the same procedure ascleaning leather seats for cleaning leatherinstrument panels and leather interior trimsurfaces. See Cleaning Leather Seats(page 268).
Clean the instrument panel and clusterlens with a clean, damp and soft cloth,then use a clean, dry and soft cloth to drythese areas.
•Avoid cleaners or polishes that increasethe gloss of the upper portion of theinstrument panel. The dull finish in thisarea helps protect you fromundesirable windshield reflection.
•Do not use any household cleaningproducts or glass cleaners as thesemay damage the finish of theinstrument panel, interior trim andcluster lens.
•Wash or wipe your hands clean if youhave been in contact with certainproducts such as insect repellent andsuntan lotion to avoid possible damageto the interior painted surfaces.
•Do not allow air fresheners and handsanitizers to spill onto interior surfaces.If a spill occurs, wipe off immediately.Your warranty may not cover thesedamages.
If a staining liquid like coffee or juice hasbeen spilled on the instrument panel or oninterior trim surfaces:
1. Wipe up spilled liquid using a clean,soft cloth as quickly as possible.
2. Use Motorcraft Premium Leather andVinyl Cleaner or a commerciallyavailable leather cleaning product forautomotive interiors. Test any cleaneror stain remover on an inconspicuousarea.
3. Alternatively, wipe the surface with aclean, soft cloth and a mild soap andwater solution. Dry the area with aclean, soft cloth.
4. If necessary, apply more soap andwater solution or cleaning product toa clean, soft cloth and press it onto thesoiled area. Allow this to set at roomtemperature for 30 minutes.
5. Remove the soaked cloth, then with aclean, damp cloth, use a rubbingmotion for 60 seconds on the soiledarea.
6. Dry the area with a clean, soft cloth.
CLEANING LEATHER SEATS (If
Equipped)
Without King Ranch Edition
Note:Follow the same procedure ascleaning leather seats for cleaning leatherinstrument panels and leather interior trimsurfaces.
For routine cleaning, wipe the surface witha soft, damp cloth and a mild soap andwater solution. Dry the area with a clean,soft cloth.
For cleaning and removing spots and stainssuch as dye transfer, use MotorcraftPremium Leather and Vinyl Cleaner or acommercially available leather cleaningproduct for automotive interiors.
Note:Test any cleaner or stain remover onan inconspicuous area.
268
Expedition (TB7) Canada/United States of America, enUSA, Edition date: 03/2016, First Printing
Vehicle Care
Page 272 of 500
You should:
•Remove dust and loose dirt with avacuum cleaner.
•Clean and treat spills and stains assoon as possible.
Do not use the following products as thesemay damage the leather:
•Oil and petroleum or silicone-basedleather conditioners.
•Household cleaners.
•Alcohol solutions.
•Solvents or cleaners intendedspecifically for rubber, vinyl andplastics.
With King Ranch Edition
Your vehicle has seating covered inpremium, top-grain leather that isextremely durable, but still requires specialcare and maintenance in order to preservelongevity and comfort.
Regular cleaning and conditioningmaintains the appearance of the leather.
Cleaning
For dirt, use a vacuum cleaner then use aclean, damp cloth or soft brush.
For routine cleaning, wipe the surface witha soft, damp cloth. For more thoroughcleaning, wipe the surface with a mild soapand water solution.
•Clean spills as quickly as possible.
•Test any cleaner or stain remover onan inconspicuous part of the leather ascleaners may darken the leather.
•Do not spill coffee, ketchup, mustard,orange juice or oil-based products onthe leather as they may permanentlystain the leather.
•Do not use household cleaningproducts, alcohol solutions, solventsor cleaners intended for rubber, vinylor plastics.
Scratches
Because the leather in the seat comesfrom genuine steer hides, there may beevidence of naturally occurring markings,such as small scars. These markings givecharacter to the seating covers and areconsidered to be proof of a genuine leatherproduct.
In order to lessen the appearance ofcertain scratches and other wear marks,apply conditioner on the affected areafollowing the same instructions as in theConditioning section.
Conditioning
Bottles of King Ranch Leather Conditionerare available at the King Ranch SaddleShop. Visit the website atwww.krsaddleshop.com, or call1–800–282–KING (5464) in the UnitedStates. If you are unable to obtain KingRanch Leather Conditioner, use anotherpremium leather conditioner.
•Clean the surfaces using the stepsoutlined in the Cleaning section.
•Make sure the leather is dry then applya nickel-sized amount of conditionerto a clean, dry cloth.
•Rub the conditioner into the leatheruntil it disappears. Allow theconditioner to dry, then repeat theprocess for the entire interior. If a filmappears, wipe it off with a dry, cleancloth.
269
Expedition (TB7) Canada/United States of America, enUSA, Edition date: 03/2016, First Printing
Vehicle Care
Page 273 of 500
REPAIRING MINOR PAINT
DAMAGE
Authorized dealers have touch-up paint tomatch your vehicle’s color. Your vehiclecolor code is printed on a sticker on thefront, left-hand side door jamb. Take yourcolor code to your authorized dealer tomake sure you get the correct color.
Before repairing minor paint damage, usea cleaner such as Motorcraft Bug and TarRemover to remove particles such as birddroppings, tree sap, insect deposits, tarspots, road salt and industrial fallout.
Always read the instructions before usingcleaning products.
CLEANING THE ALLOY
WHEELS
Note:Do not apply a cleaning chemical towarm or hot wheel rims and covers.
Note:Some automatic car washes maycause damage to the finish on your wheelrims and covers.
Note:Industrial-strength or heavy-dutycleaners in combination with brush agitationto remove brake dust and dirt, could wearaway the clear coat finish over a period time.
Note:Do not use hydrofluoric acid-basedor high caustic-based wheel cleaners, steelwool, fuels or strong household detergents.
Note:If you intend parking your vehicle foran extended period after cleaning thewheels with a wheel cleaner, drive yourvehicle for a few minutes before doing so.This will reduce the risk of increasedcorrosion of the brake discs.
Alloy wheels and wheel covers are coatedwith a clear coat paint finish. To maintaintheir condition we recommend that you:
•Clean the wheels weekly usingMotorcraft Wheel and Tire Cleaner.Apply using manufacturer'sinstructions.
•Use a sponge to remove heavydeposits of dirt and brake dustaccumulation.
•Rinse thoroughly with a strong streamof water when you have completed thecleaning process.
•To remove tar and grease, useMotorcraft Bug and Tar Remover.
VEHICLE STORAGE
If you plan on storing your vehicle for 30days or more, read the followingmaintenance recommendations to makesure your vehicle stays in good operatingcondition.
We engineer and test all motor vehiclesand their components for reliable, regulardriving. Under various conditions,long-term storage may lead to degradedengine performance or failure unless youuse specific precautions to preserve enginecomponents.
General
•Store all vehicles in a dry, ventilatedplace.
•Protect from sunlight, if possible.
•If vehicles are stored outside, theyrequire regular maintenance to protectagainst rust and damage.
Body
•Wash your vehicle thoroughly toremove dirt, grease, oil, tar or mud fromexterior surfaces, rear-wheel housingand the underside of front fenders.
•Periodically wash your vehicle if it isstored in exposed locations.
270
Expedition (TB7) Canada/United States of America, enUSA, Edition date: 03/2016, First Printing
Vehicle Care
Page 274 of 500

•Touch-up exposed or primed metal toprevent rust.
•Cover chrome and stainless steel partswith a thick coat of auto wax to preventdiscoloration. Re-wax as necessarywhen you wash your vehicle.
•Lubricate all hood, door and luggagecompartment hinges and latches witha light grade oil.
•Cover interior trim to prevent fading.
•Keep all rubber parts free from oil andsolvents.
Engine
•Change the engine oil and filter prior tostorage because used engine oilcontains contaminates which maycause engine damage.
•Start the engine every 15 days for aminimum of 15 minutes. Run at fast idlewith the climate controls set to defrostuntil the engine reaches normaloperating temperature.
•With your foot on the brake, shiftthrough all the gears while the engineis running.
•We recommend that you change theengine oil before you use your vehicleagain.
Fuel system
•Fill the fuel tank with high-quality fueluntil the first automatic shutoff of thefuel pump nozzle.
Cooling system
•Protect against freezing temperatures.
•When removing your vehicle fromstorage, check coolant fluid level.Confirm that there are no coolingsystem leaks and that fluid is at therecommended level.
Battery
•Check and recharge as necessary. Keepconnections clean.
•If storing your vehicle for more than 30days without recharging the battery,we recommend that you disconnectthe battery cables to maintain batterycharge for quick starting.
Note:It is necessary to reset memoryfeatures if battery cables are disconnected.
Brakes
•Make sure the brakes and parking brakerelease fully.
Tires
•Maintain recommended air pressure.
Miscellaneous
•Make sure all linkages, cables, leversand pins under your vehicle are coveredwith grease to prevent rust.
•Move vehicles at least 25 ft (7.5 m)every 15 days to lubricate working partsand prevent corrosion.
Removing Vehicle From Storage
When your vehicle is ready to come out ofstorage, do the following:
•Wash your vehicle to remove any dirtor grease film build-up on windowsurfaces.
•Check windshield wipers for anydeterioration.
•Check under the hood for any foreignmaterial that may have collectedduring storage such as mice or squirrelnests.
•Check the exhaust for any foreignmaterial that may have collectedduring storage.
271
Expedition (TB7) Canada/United States of America, enUSA, Edition date: 03/2016, First Printing
Vehicle Care
Page 275 of 500
•Check tire pressures and set tireinflation per the Tire Label.
•Check brake pedal operation. Driveyour vehicle 15 ft (4.5 m) back andforth to remove rust build-up.
•Check fluid levels (including coolant,oil and gas) to make sure there are noleaks, and fluids are at recommendedlevels.
•If you remove the battery, clean thebattery cable ends and check fordamage.
Contact an authorized dealer if you haveany concerns or issues.
272
Expedition (TB7) Canada/United States of America, enUSA, Edition date: 03/2016, First Printing
Vehicle Care