2017 FORD EXPEDITION EL change wheel
[x] Cancel search: change wheelPage 282 of 500

A.P: Indicates a tire, designatedby the Tire and Rim Association,that may be used for service oncars, sport utility vehicles,minivans and light trucks.Note: Ifyour tire size does not begin witha letter this may mean it isdesignated by either the EuropeanTire and Rim TechnicalOrganization or the Japan TireManufacturing Association.
B.215: Indicates the nominalwidth of the tire in millimetersfrom sidewall edge to sidewalledge. In general, the larger thenumber, the wider the tire.
C.65: Indicates the aspect ratiowhich gives the tire's ratio ofheight to width.
D.R: Indicates a radial type tire.
E.15: Indicates the wheel or rimdiameter in inches. If you changeyour wheel size, you will have topurchase new tires to match thenew wheel diameter.
F.95: Indicates the tire's loadindex. It is an index that relates tohow much weight a tire can carry.You may find this information inyour owner’s manual. If not,contact a local tire dealer.
Note:You may not find thisinformation on all tires because itis not required by federal law.
G.H: Indicates the tire's speedrating. The speed rating denotesthe speed at which a tire isdesigned to be driven for extendedperiods of time under a standardcondition of load and inflationpressure. The tires on your vehiclemay operate at differentconditions for load and inflationpressure. These speed ratings mayneed to be adjusted for thedifference in conditions. Theratings range from 81 mph(130 km/h) to 186 mph(299 km/h). These ratings arelisted in the following chart.
Note:You may not find thisinformation on all tires because itis not required by federal law.
mph ( km/h)Letterrating
81 (130)M
87 (140)N
99 (159)Q
106 (171)R
112 (180)S
118 (190)T
124 (200)U
130 (210)H
149 (240)V
279
Expedition (TB7) Canada/United States of America, enUSA, Edition date: 03/2016, First Printing
Wheels and Tires
Page 286 of 500

C.80: Indicates the aspect ratiowhich gives the tire's ratio ofheight to width. Numbers of 70 orlower indicate a short sidewall.
D.D: Indicates a diagonal type tire.
R: Indicates a radial type tire.
E.16: Indicates the wheel or rimdiameter in inches. If you changeyour wheel size, you will have topurchase new tires to match thenew wheel diameter.
Location of the Tire Label
You will find a Tire Labelcontaining tire inflation pressureby tire size and other importantinformation located on the B-Pillaror the edge of the driver's door.See Load Carrying (page 196).
Inflating Your Tires
Safe operation of your vehiclerequires that your tires areproperly inflated. Remember thata tire can lose up to half of its airpressure without appearing flat.
Every day before you drive, checkyour tires. If one looks lower thanthe others, use a tire gauge tocheck pressure of all tires andadjust if required.
At least once a month and beforelong trips, inspect each tire andcheck the tire pressure with a tiregauge (including spare, ifequipped). Inflate all tires to theinflation pressure recommendedby Ford Motor Company.
You are strongly urged to buy areliable tire pressure gauge, asautomatic service station gaugesmay be inaccurate. Fordrecommends the use of a digitalor dial-type tire pressure gaugerather than a stick-type tirepressure gauge.
Use the recommended coldinflation pressure for optimum tireperformance and wear.Under-inflation or over-inflationmay cause uneven treadwearpatterns.
WARNING
Under-inflation is the mostcommon cause of tire failuresand may result in severe tirecracking, tread separation orblowout, with unexpected loss ofvehicle control and increased riskof injury. Under-inflation increasessidewall flexing and rollingresistance, resulting in heatbuildup and internal damage tothe tire. It also may result inunnecessary tire stress, irregularwear, loss of vehicle control andaccidents. A tire can lose up tohalf of its air pressure and notappear to be flat!
Always inflate your tires to theFord recommended inflationpressure even if it is less than themaximum inflation pressureinformation found on the tire. TheFord recommended tire inflation
pressure is found on the SafetyCompliance Certification Label or
283
Expedition (TB7) Canada/United States of America, enUSA, Edition date: 03/2016, First Printing
Wheels and Tires
Page 287 of 500
Tire Label (affixed to either thedoor hinge pillar, door-latch post,or the door edge that meets thedoor-latch post, next to thedriver's seating position), or TireLabel located on the B-pillar orthe edge of the driver's door.Failure to follow the tire pressurerecommendations can causeuneven treadwear patterns andadversely affect the way yourvehicle handles.
Note:Do not reduce tire pressureto change the ride characteristicsof the vehicle. If you do notmaintain the inflation pressure atthe levels specified by Ford, yourvehicle may experience a conditionknown as shimmy. Shimmy is asevere vibration and oscillation inthe steering wheel after the vehicletravels over a bump or dip in theroad that does not dampen out byitself. Shimmy may result fromsignificant under-inflation of thetires, improper tires (load range,size, or type), or vehiclemodifications such as lift-kits. Inthe event that your vehicleexperiences shimmy, you shouldslowly reduce speed by either liftingoff the accelerator pedal or lightlyapplying the brakes. The shimmywill cease as the vehicle speeddecreases.
Maximum Inflation Pressure isthe tire manufacturer's maximumpermissible pressure and thepressure at which the maximum
load can be carried by the tire. Thispressure is normally higher than
the manufacturer’s recommendedcold inflation pressure which canbe found on the SafetyCompliance Certification Label(affixed to either the door hingepillar, door-latch post, or the dooredge that meets the door-latchpost, next to the driver's seatingposition), or Tire Label located onthe B-pillar or the edge of thedriver's door. The cold inflationpressure should never be set lowerthan the recommended pressureon the Safety ComplianceCertification Label or Tire Label.
When weather temperaturechanges occur, tire inflationpressures also change. A 10°F(6°C) temperature drop cancause a corresponding drop of 1psi (7 kPa) in inflation pressure.Check your tire pressuresfrequently and adjust them to theproper pressure which can befound on the Safety ComplianceCertification Label or Tire Label.
To check the pressure in yourtire(s):
1. Make sure the tires are cool,meaning they are not hot fromdriving even a mile.
284
Expedition (TB7) Canada/United States of America, enUSA, Edition date: 03/2016, First Printing
Wheels and Tires
Page 302 of 500

Tire Change Procedure
WARNINGS
Only use replacement tires andwheels that are the same size, loadindex, speed rating and type (suchas P-metric versus LT-metric or all-seasonversus all-terrain) as those originallyprovided by Ford. The recommended tireand wheel size may be found on either theSafety Compliance Certification Label(affixed to either the door hinge pillar,door-latch post, or the door edge thatmeets the door-latch post, next to thedriver’s seating position) or the Tire Labelwhich is located on the B-Pillar or edge ofthe driver’s door. If this information is notfound on these labels then you shouldcontact your authorized dealer as soon aspossible. Use of any tire or wheel notrecommended by Ford can affect thesafety and performance of your vehicle,which could result in an increased risk ofloss of vehicle control, vehicle rollover,personal injury and death. Additionally theuse of non-recommended tires and wheelscould cause steering, suspension, axle,transfer case or power transfer unit failure.If you have questions regarding tirereplacement, contact your authorizeddealer as soon as possible.
When one of the front wheels is offthe ground, the transmission alonewill not prevent the vehicle frommoving or slipping off the jack.
To help prevent the vehicle frommoving when you change a tire, besure to place the transmission in park(P), set the parking brake and block (inboth directions) the wheel that isdiagonally opposite (other side and end ofthe vehicle) to the tire being changed.
Never get underneath a vehicle thatis supported only by a jack. If thevehicle slips off the jack, you orsomeone else could be seriously injured.
WARNINGS
Do not attempt to change a tire onthe side of the vehicle close tomoving traffic. Pull far enough off theroad to avoid the danger of being hit whenoperating the jack or changing the wheel.
Always use the jack provided asoriginal equipment with your vehicle.If using a jack other than the oneprovided as original equipment with yourvehicle, make sure the jack capacity isadequate for the vehicle weight, includingany vehicle cargo or modifications.
Disable the power running boardsbefore jacking, lifting, or placing anyobject under the vehicle. Never placeyour hand between the power runningboard and the vehicle as extended powerrunning boards will retract when the doorsare closed. Failure to follow theseinstructions may result in personal injury.
Failure to follow these instructionswhen using the spare tire carriercould cause loss of the wheel andtire and lead to personal injury: Only usethe spare tire carrier to stow the tire andwheel combination specified on the TireLabel or Safety Compliance CertificationLabel on the B-Pillar or the edge of thedriver door. Other tire and wheelcombinations could cause the carrier tofail if it does not fit securely or is too heavy.Do not use impact tools or power toolsoperating over 200 RPM, which may causewinch malfunction and prevent a securefit. Override the winch at least three times(there will be an audible click each time)to ensure a tight secure fit of the wheel andtire.
Note:Passengers should not remain in thevehicle when the vehicle is being jacked.
299
Expedition (TB7) Canada/United States of America, enUSA, Edition date: 03/2016, First Printing
Wheels and Tires
Page 304 of 500
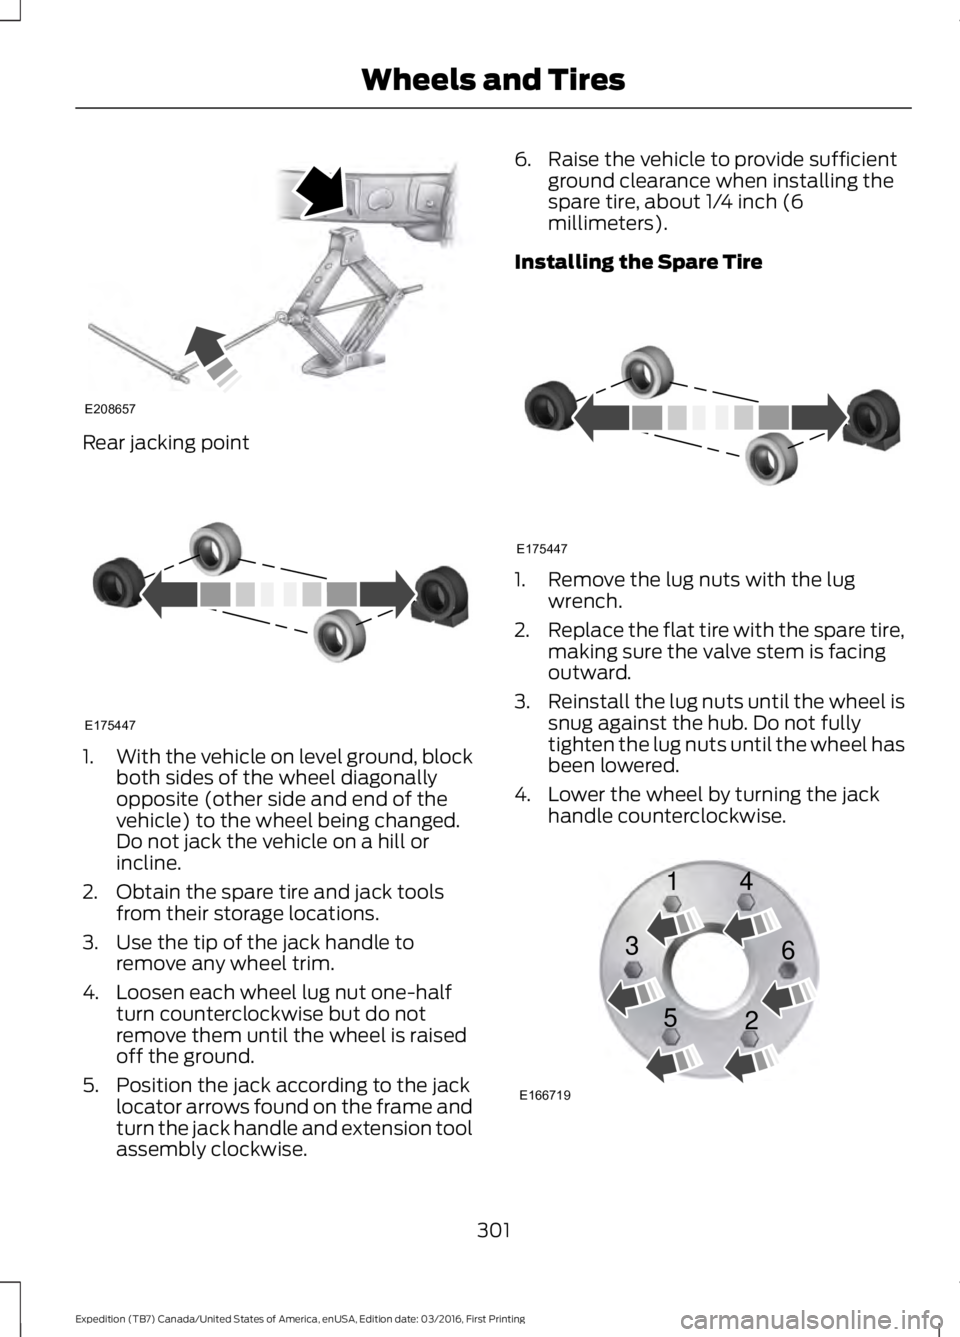
Rear jacking point
1.With the vehicle on level ground, blockboth sides of the wheel diagonallyopposite (other side and end of thevehicle) to the wheel being changed.Do not jack the vehicle on a hill orincline.
2. Obtain the spare tire and jack toolsfrom their storage locations.
3. Use the tip of the jack handle toremove any wheel trim.
4. Loosen each wheel lug nut one-halfturn counterclockwise but do notremove them until the wheel is raisedoff the ground.
5. Position the jack according to the jacklocator arrows found on the frame andturn the jack handle and extension toolassembly clockwise.
6. Raise the vehicle to provide sufficientground clearance when installing thespare tire, about 1/4 inch (6millimeters).
Installing the Spare Tire
1. Remove the lug nuts with the lugwrench.
2.Replace the flat tire with the spare tire,making sure the valve stem is facingoutward.
3.Reinstall the lug nuts until the wheel issnug against the hub. Do not fullytighten the lug nuts until the wheel hasbeen lowered.
4. Lower the wheel by turning the jackhandle counterclockwise.
301
Expedition (TB7) Canada/United States of America, enUSA, Edition date: 03/2016, First Printing
Wheels and TiresE208657 E175447 E175447 E166719
1
3
5 4
6
2
Page 451 of 500
At every oil change interval as indicated by the information display*
Inspect the steering linkage, ball joints, suspension, tire-rod ends, driveshaft and U-joints.
Inspect the wheels and related components for abnormal noise, wear, looseness ordrag.
* Do not exceed one year or 10000 miles (16000 kilometers) between service intervals.** Reset the Intelligent Oil-Life Monitor after engine oil and filter changes.
Other maintenance items 1
Replace engine air filter.Every 30000 miles (48000km)
Change engine coolant.2At 100000 miles (160000km)
Replace spark plugs.Every 100000 miles(160000 km)Inspect accessory drive belt(s).3
Change automatic transmission fluid.
Every 150000 miles(240000 km)
Change front axle fluid (Four-wheel drive vehicles).
Change rear axle fluid.
Change transfer case fluid (Four-wheel drive vehicles).
Replace accessory drive belt(s).
1 Perform these maintenance items within 3000 miles (4800 kilometers) of the lastengine oil and filter change. Do not exceed the designated distance for the interval.2 Initial replacement at six years or 100000 miles (160000 kilometers), then every threeyears or 50000 miles (80000 kilometers).3 After initial inspection, inspect every other oil change until replaced.
448
Expedition (TB7) Canada/United States of America, enUSA, Edition date: 03/2016, First Printing
Scheduled Maintenance
Page 452 of 500
SPECIAL OPERATING
CONDITIONS SCHEDULED
MAINTENANCE
If you operate your vehicle primarily in anyof the following conditions, you need toperform extra maintenance, as indicated.If you operate your vehicle occasionallyunder any of these conditions, it is notnecessary to perform the extramaintenance. For specificrecommendations, see your dealershipservice advisor or technician.
Perform the services shown in thefollowing tables when specified or within3,000 mi (4,800 km) of the messageappearing in the information displayprompting you to change your oil.
•Example 1: The message comes on at28,751 mi (46,270 km). Perform the30,000 mi (48,000 km) automatictransmission fluid replacement.
•Example 2: The message has notcome on, but the odometer reads30,000 mi (48,000 km) (for example,the Intelligent Oil-Life Monitor wasreset at 25,000 mi (40,000 km)).Perform the engine air filterreplacement.
Towing a trailer or using a car-top carrier
Change engine oil and filter as indicated by the informationdisplay and perform services listed in the Normal Sched-uled Maintenance chart.
As required
Inspect and lubricate U-joints (if equipped with greasefittings).Inspect frequently, serviceas required
See axle maintenance items under Exceptions.
Change transfer case fluid (Four-wheel drive vehicles).Every 60,000 mi(96,000 km)Replace spark plugs.
Extensive idling or low-speed driving for long distances, as in heavy commercial use
Change engine oil and filter as indicated by the informationdisplay and perform services listed in the Normal Sched-uled Maintenance chart.
As required
Replace engine air filter.Inspect frequently, serviceas required
Change transfer case fluid (Four-wheel drive vehicles).Every 60,000 mi(96,000 km)Replace spark plugs.
449
Expedition (TB7) Canada/United States of America, enUSA, Edition date: 03/2016, First Printing
Scheduled Maintenance
Page 453 of 500
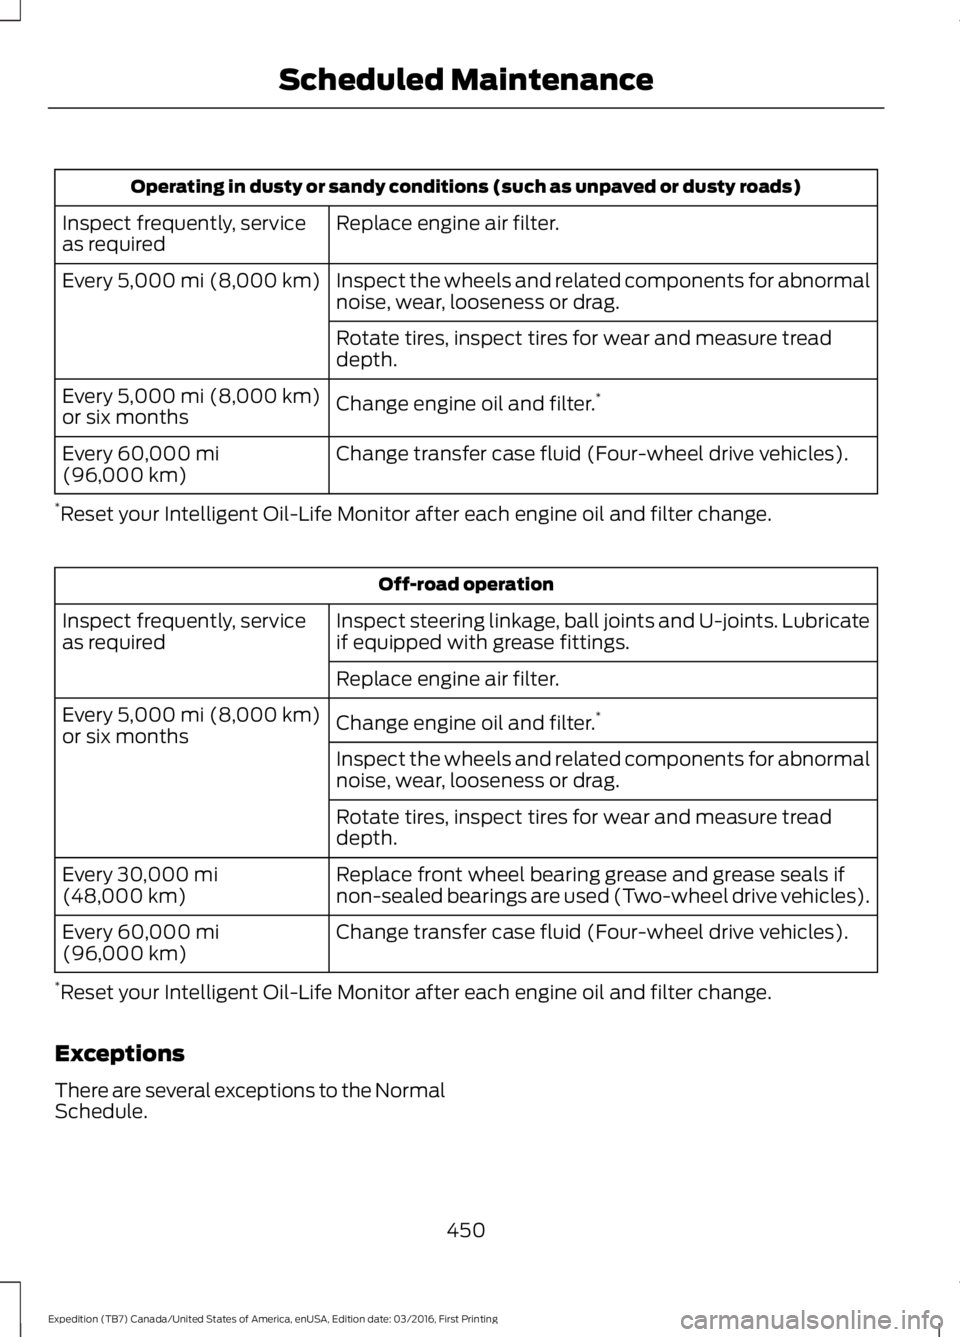
Operating in dusty or sandy conditions (such as unpaved or dusty roads)
Replace engine air filter.Inspect frequently, serviceas required
Inspect the wheels and related components for abnormalnoise, wear, looseness or drag.Every 5,000 mi (8,000 km)
Rotate tires, inspect tires for wear and measure treaddepth.
Change engine oil and filter.*Every 5,000 mi (8,000 km)or six months
Change transfer case fluid (Four-wheel drive vehicles).Every 60,000 mi(96,000 km)
*Reset your Intelligent Oil-Life Monitor after each engine oil and filter change.
Off-road operation
Inspect steering linkage, ball joints and U-joints. Lubricateif equipped with grease fittings.Inspect frequently, serviceas required
Replace engine air filter.
Change engine oil and filter.*Every 5,000 mi (8,000 km)or six monthsInspect the wheels and related components for abnormalnoise, wear, looseness or drag.
Rotate tires, inspect tires for wear and measure treaddepth.
Replace front wheel bearing grease and grease seals ifnon-sealed bearings are used (Two-wheel drive vehicles).Every 30,000 mi(48,000 km)
Change transfer case fluid (Four-wheel drive vehicles).Every 60,000 mi(96,000 km)
*Reset your Intelligent Oil-Life Monitor after each engine oil and filter change.
Exceptions
There are several exceptions to the NormalSchedule.
450
Expedition (TB7) Canada/United States of America, enUSA, Edition date: 03/2016, First Printing
Scheduled Maintenance