Page 133 of 264
IN AN EMERGENCY
A punctured tyre or a burnt-out bulb?
At times, a problem may interfere with
our journey.
The pages on emergencies can help
you to deal with critical situations
independently and with calm.
In an emergency we recommend that
you call the freephone number found in
the Warranty Booklet.
It is also possible to call the national or
international universal freephone
number to search for the nearest Fiat
Dealership.HAZARD WARNING LIGHTS.....132
BULB REPLACEMENT........132
REPLACING FUSES..........142
CHANGING A WHEEL.........148
FIX&GO AUTOMATIC KIT.......152
JUMP STARTING............155
FUEL CUT-OFF SYSTEM.......157
TOWING THE VEHICLE........159
131
Page 134 of 264
HAZARD WARNING
LIGHTS
CONTROL
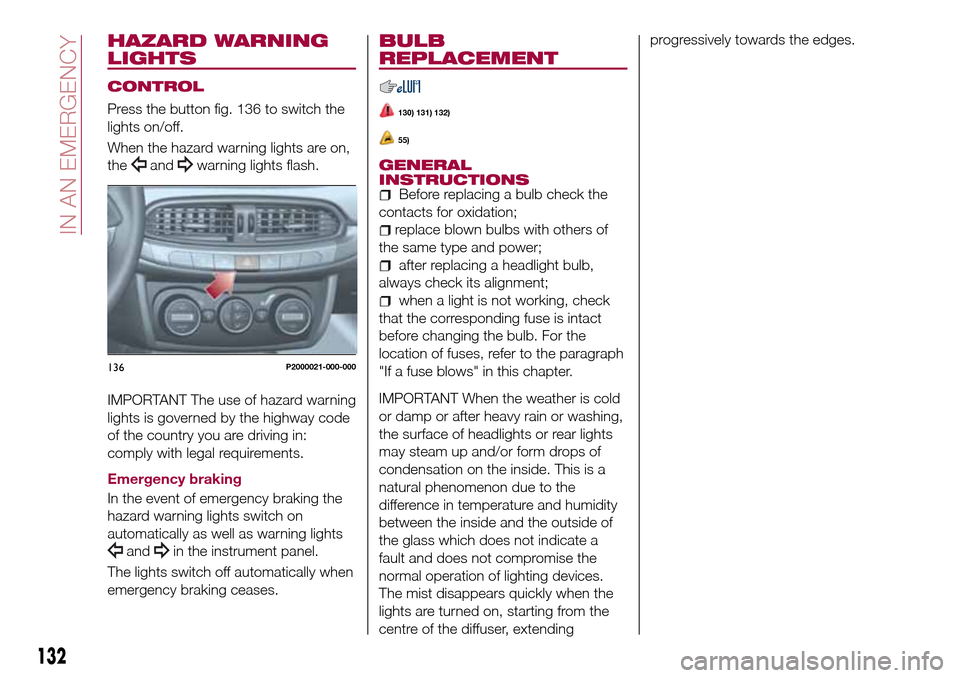
Press the button fig. 136 to switch the
lights on/off.
When the hazard warning lights are on,
the
andwarning lights flash.
IMPORTANT The use of hazard warning
lights is governed by the highway code
of the country you are driving in:
comply with legal requirements.
Emergency braking
In the event of emergency braking the
hazard warning lights switch on
automatically as well as warning lights
andin the instrument panel.
The lights switch off automatically when
emergency braking ceases.
BULB
REPLACEMENT
130) 131) 132)
55)
GENERAL
INSTRUCTIONS
Before replacing a bulb check the
contacts for oxidation;
replace blown bulbs with others of
the same type and power;
after replacing a headlight bulb,
always check its alignment;
when a light is not working, check
that the corresponding fuse is intact
before changing the bulb. For the
location of fuses, refer to the paragraph
"If a fuse blows" in this chapter.
IMPORTANT When the weather is cold
or damp or after heavy rain or washing,
the surface of headlights or rear lights
may steam up and/or form drops of
condensation on the inside. This is a
natural phenomenon due to the
difference in temperature and humidity
between the inside and the outside of
the glass which does not indicate a
fault and does not compromise the
normal operation of lighting devices.
The mist disappears quickly when the
lights are turned on, starting from the
centre of the diffuser, extendingprogressively towards the edges.
136P2000021-000-000
132
IN AN EMERGENCY
Page 136 of 264
Light bulbs Type Power Figure reference
Daytime running lights (DRL) (versions with polyelliptical
headlights)LED – –
Front side lights/Daytime running lights (DRL) (versions with
bi-parabolic headlights)H15 15W 4
Main beam headlights (versions with polyelliptical headlights) H7 55W 3
Main beam headlights (versions with bi-parabolic headlights) H15 55W 4
Dipped headlights H7 55W 3
Front direction indicators PY21W 21W 2
Side direction indicators WY5W 5W 1
Number plate W5W 5W 1
Rear side/brake light P21W 21W 2
Rear direction indicators PY21W 21W 2
Reversing light W16W 16W 1
3rd stop LED – –
Fog lights H11 55W 4
Rear fog light W16W 16W 1
Front ceiling light C5W 5W 1
Front roof lights (sun visors) C5W 5W 1
Rear ceiling light C5W 6W 1
Luggage compartment light W5W 5W 1
Glove compartment light W5W 5W 1
134
IN AN EMERGENCY
Page 137 of 264
REPLACING AN
EXTERNAL BULB
Versions with polyelliptical
headlights
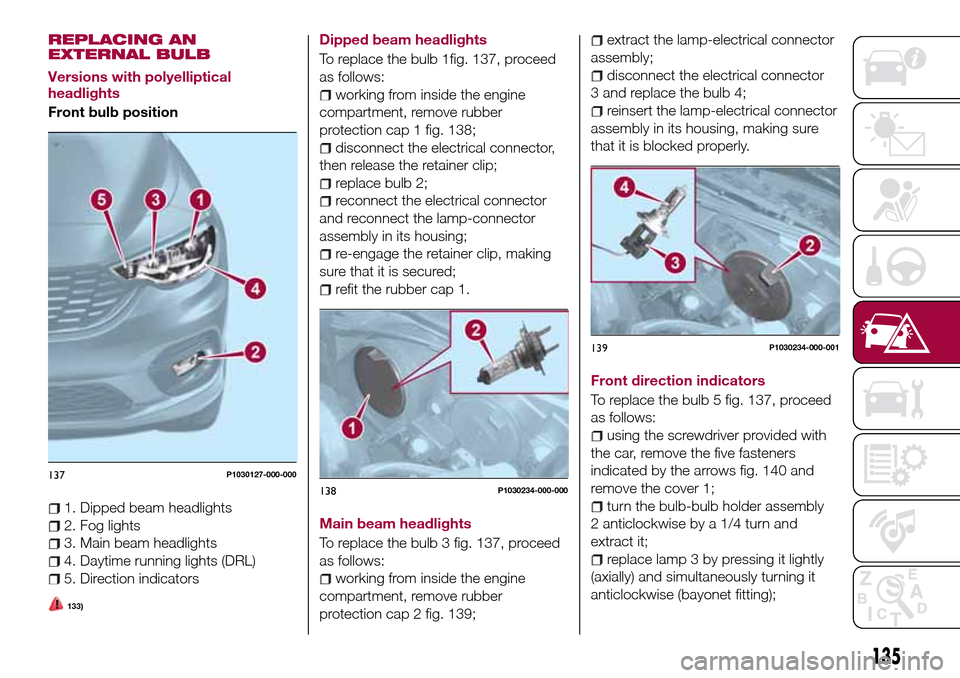
Front bulb position
1. Dipped beam headlights
2. Fog lights
3. Main beam headlights
4. Daytime running lights (DRL)
5. Direction indicators
133)
Dipped beam headlights
To replace the bulb 1fig. 137, proceed
as follows:
working from inside the engine
compartment, remove rubber
protection cap 1 fig. 138;
disconnect the electrical connector,
then release the retainer clip;
replace bulb 2;
reconnect the electrical connector
and reconnect the lamp-connector
assembly in its housing;
re-engage the retainer clip, making
sure that it is secured;
refit the rubber cap 1.
Main beam headlights
To replace the bulb 3 fig. 137, proceed
as follows:
working from inside the engine
compartment, remove rubber
protection cap 2 fig. 139;
extract the lamp-electrical connector
assembly;
disconnect the electrical connector
3 and replace the bulb 4;
reinsert the lamp-electrical connector
assembly in its housing, making sure
that it is blocked properly.
Front direction indicators
To replace the bulb 5 fig. 137, proceed
as follows:
using the screwdriver provided with
the car, remove the five fasteners
indicated by the arrows fig. 140 and
remove the cover 1;
turn the bulb-bulb holder assembly
2 anticlockwise by a 1/4 turn and
extract it;
replace lamp 3 by pressing it lightly
(axially) and simultaneously turning it
anticlockwise (bayonet fitting);
137P1030127-000-000
138P1030234-000-000
139P1030234-000-001
135
Page 138 of 264
reinsert the bulb-bulb holder
assembly in its housing, then turn the
assembly 2 clockwise, making sure that
it is blocked.
Front fog lamps
To replace the bulb 2 fig. 137, proceed
as follows:
steer the vehicle wheels inwards;
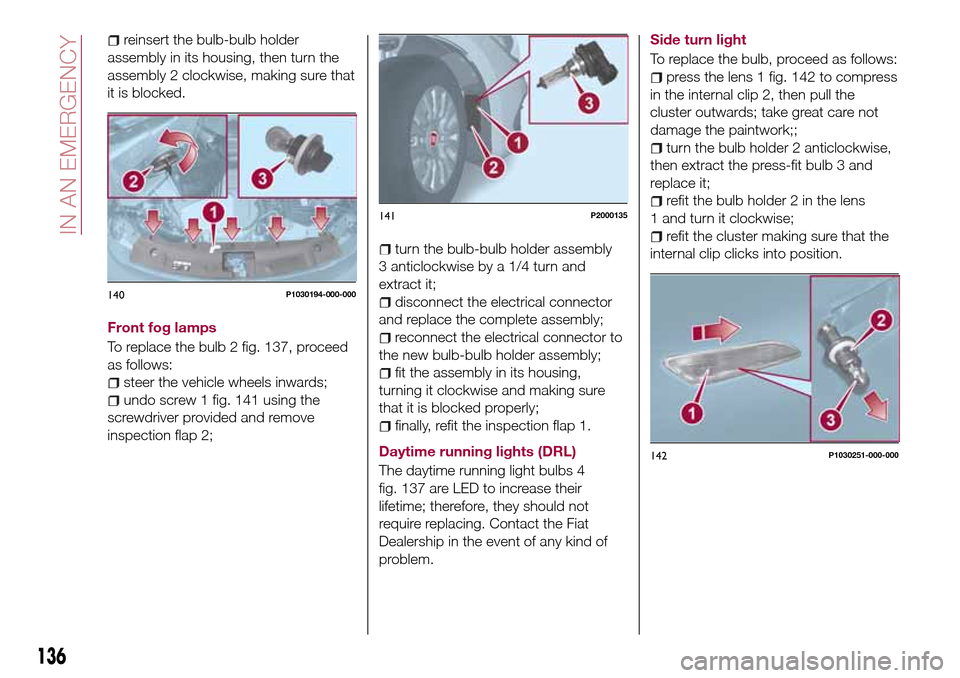
undo screw 1 fig. 141 using the
screwdriver provided and remove
inspection flap 2;
turn the bulb-bulb holder assembly
3 anticlockwise by a 1/4 turn and
extract it;
disconnect the electrical connector
and replace the complete assembly;
reconnect the electrical connector to
the new bulb-bulb holder assembly;
fit the assembly in its housing,
turning it clockwise and making sure
that it is blocked properly;
finally, refit the inspection flap 1.
Daytime running lights (DRL)
The daytime running light bulbs 4
fig. 137 are LED to increase their
lifetime; therefore, they should not
require replacing. Contact the Fiat
Dealership in the event of any kind of
problem.Side turn light
To replace the bulb, proceed as follows:
press the lens 1 fig. 142 to compress
in the internal clip 2, then pull the
cluster outwards; take great care not
damage the paintwork;;
turn the bulb holder 2 anticlockwise,
then extract the press-fit bulb 3 and
replace it;
refit the bulb holder 2 in the lens
1 and turn it clockwise;
refit the cluster making sure that the
internal clip clicks into position.
140P1030194-000-000
141P2000135
142P1030251-000-000
136
IN AN EMERGENCY
Page 139 of 264
Versions with bi-parabolic
headlights
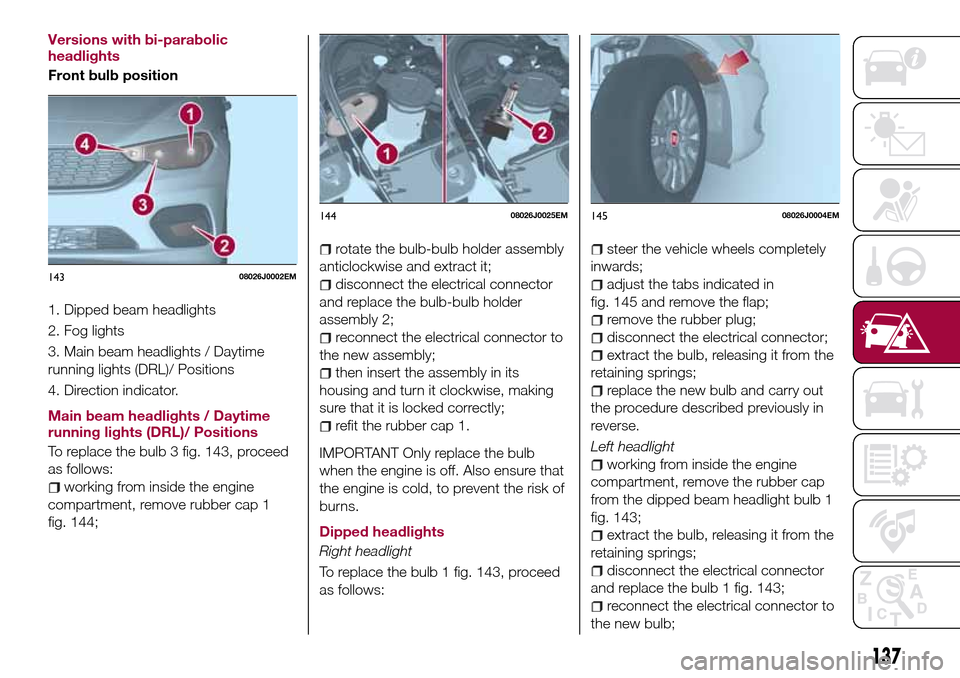
Front bulb position
1. Dipped beam headlights
2. Fog lights
3. Main beam headlights / Daytime
running lights (DRL)/ Positions
4. Direction indicator.
Main beam headlights / Daytime
running lights (DRL)/ Positions
To replace the bulb 3 fig. 143, proceed
as follows:
working from inside the engine
compartment, remove rubber cap 1
fig. 144;
rotate the bulb-bulb holder assembly
anticlockwise and extract it;
disconnect the electrical connector
and replace the bulb-bulb holder
assembly 2;
reconnect the electrical connector to
the new assembly;
then insert the assembly in its
housing and turn it clockwise, making
sure that it is locked correctly;
refit the rubber cap 1.
IMPORTANT Only replace the bulb
when the engine is off. Also ensure that
the engine is cold, to prevent the risk of
burns.
Dipped headlights
Right headlight
To replace the bulb 1 fig. 143, proceed
as follows:
steer the vehicle wheels completely
inwards;
adjust the tabs indicated in
fig. 145 and remove the flap;
remove the rubber plug;
disconnect the electrical connector;
extract the bulb, releasing it from the
retaining springs;
replace the new bulb and carry out
the procedure described previously in
reverse.
Left headlight
working from inside the engine
compartment, remove the rubber cap
from the dipped beam headlight bulb 1
fig. 143;
extract the bulb, releasing it from the
retaining springs;
disconnect the electrical connector
and replace the bulb 1 fig. 143;
reconnect the electrical connector to
the new bulb;
14308026J0002EM
14408026J0025EM14508026J0004EM
137
Page 140 of 264
reposition the assembly in the seat;
refit the rubber cap.
IMPORTANT Only replace the bulb
when the engine is off. Also ensure that
the engine is cold, to prevent the risk of
burns.
Front direction indicators
To replace the bulb 4 fig. 143, proceed
as follows:
using the screwdriver provided with
the car, remove the fasteners indicated
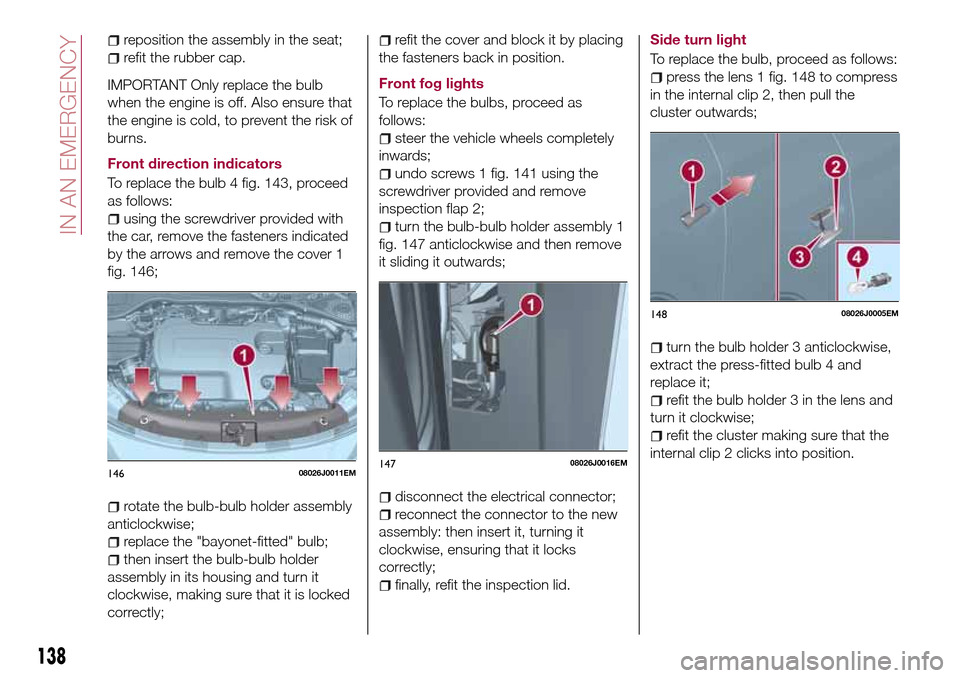
by the arrows and remove the cover 1
fig. 146;
rotate the bulb-bulb holder assembly
anticlockwise;
replace the "bayonet-fitted" bulb;
then insert the bulb-bulb holder
assembly in its housing and turn it
clockwise, making sure that it is locked
correctly;
refit the cover and block it by placing
the fasteners back in position.
Front fog lights
To replace the bulbs, proceed as
follows:
steer the vehicle wheels completely
inwards;
undo screws 1 fig. 141 using the
screwdriver provided and remove
inspection flap 2;
turn the bulb-bulb holder assembly 1
fig. 147 anticlockwise and then remove
it sliding it outwards;
disconnect the electrical connector;
reconnect the connector to the new
assembly: then insert it, turning it
clockwise, ensuring that it locks
correctly;
finally, refit the inspection lid.Side turn light
To replace the bulb, proceed as follows:
press the lens 1 fig. 148 to compress
in the internal clip 2, then pull the
cluster outwards;
turn the bulb holder 3 anticlockwise,
extract the press-fitted bulb 4 and
replace it;
refit the bulb holder 3 in the lens and
turn it clockwise;
refit the cluster making sure that the
internal clip 2 clicks into position.
14608026J0011EM14708026J0016EM
14808026J0005EM
138
IN AN EMERGENCY
Page 141 of 264
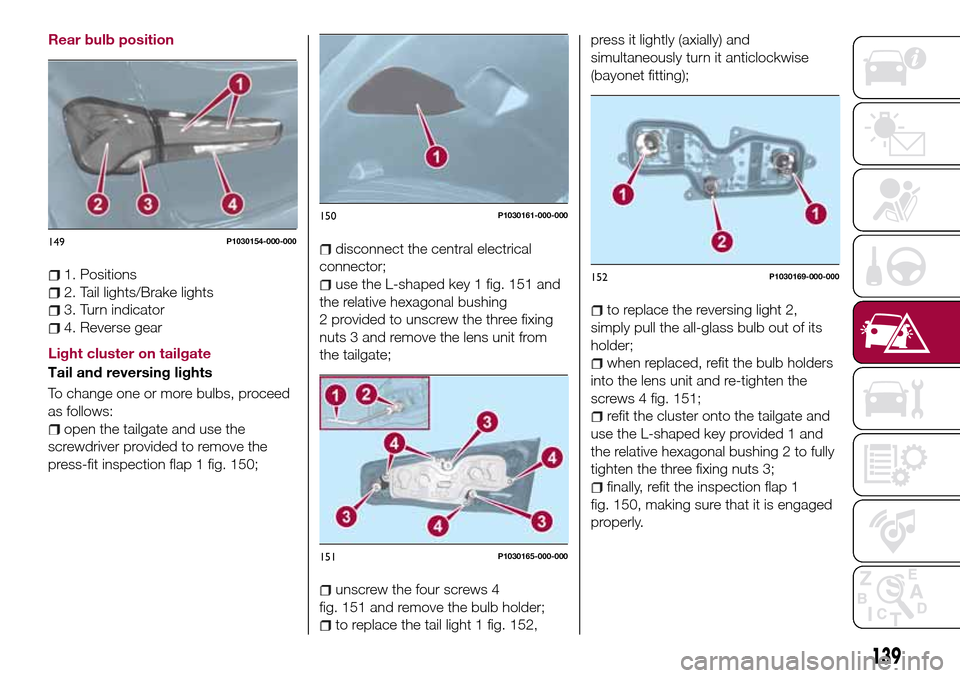
Rear bulb position
1. Positions
2. Tail lights/Brake lights
3. Turn indicator
4. Reverse gear
Light cluster on tailgate
Tail and reversing lights
To change one or more bulbs, proceed
as follows:
open the tailgate and use the
screwdriver provided to remove the
press-fit inspection flap 1 fig. 150;
disconnect the central electrical
connector;
use the L-shaped key 1 fig. 151 and
the relative hexagonal bushing
2 provided to unscrew the three fixing
nuts 3 and remove the lens unit from
the tailgate;
unscrew the four screws 4
fig. 151 and remove the bulb holder;
to replace the tail light 1 fig. 152,press it lightly (axially) and
simultaneously turn it anticlockwise
(bayonet fitting);
to replace the reversing light 2,
simply pull the all-glass bulb out of its
holder;
when replaced, refit the bulb holders
into the lens unit and re-tighten the
screws 4 fig. 151;
refit the cluster onto the tailgate and
use the L-shaped key provided 1 and
the relative hexagonal bushing 2 to fully
tighten the three fixing nuts 3;
finally, refit the inspection flap 1
fig. 150, making sure that it is engaged
properly.
149P1030154-000-000
150P1030161-000-000
151P1030165-000-000
152P1030169-000-000
139