2017 FIAT TIPO 5DOORS STATION WAGON display
[x] Cancel search: displayPage 233 of 264
expiry of the servicing interval. Press the
"my:Car" button to interact with the
application.
The display will show a screen with the
"care:Index" section, which provides all
the detailed information about the
status of the vehicle. Press the "Active
warnings" button to show (if present)
the details of the vehicle's faults which
caused a warning light to switch on.
SETTINGS
Press thebutton on the front panel
to display the main "Settings" menu.
NOTE The menu items displayed vary
according to the versions.
The menu includes the following items:
Display;
Units;
Voice commands;
Clock & Date;
Safety / Assistance;
Lights;
Doors & Locks;
Vehicle Shutdown Options;
Audio;
Phone / Bluetooth;
Configurat. SiriusXM (where
provided);
Radio Setup;
Restore settings
Safety/Assistance(where provided)
This function can be used to carry out
the following adjustments:
"Rear View camera"(where
provided): this function can be used to
carry out the following adjustments:
- "Active Guidelines" (where provided):
permits the activation of dynamic grids
that indicate the route of the vehicle on
the display.
- "Rit. telec. - "Rear View cam.delay"
(where provided): permits a delay in the
disappearance of images from the
camera when reverse is disengaged.
"Frnt Coll. Warning"(where
provided): this function can be used to
select the Full Brake Control system
intervention mode.
The options available are:
- "Off": the system is deactivated;
- "Only warning": the system intervenes
only by providing the driver with an
acoustic warning (where provided);
- "Only active braking": the system
intervenes by activating automatic
braking (where provided);
- "Warning + active braking": the
system intervenes by providing the
driver with an acoustic warning and
activating automatic braking.
"Fwd Coll. Sensitivity"(where
provided): this function can be used toselect the "readiness" of the system to
intervene, on the basis of distance from
the obstacle.
The options available are "Near",
"Med", "Far".
"Park Assist"(where provided): this
function can be used to select the type
of warning provided by the Park Assist
system.
The options available are:
- "Sound Only": the system warns the
driver that an obstacle is present
through acoustic warnings only, via the
speakers in the vehicle.
- "Sound & Display": the system warns
the driver that an obstacle is present
through acoustic (via the speakers in
the vehicle) and visual (on the
instrument panel) warnings.
"Front Park Assist vol."(where
provided): this function can be used to
select the volume of the acoustic
warnings provided by the front Park
Assist system.
"Rear Park Assist vol."(where
provided): this function can be used to
select the volume of the acoustic
warnings provided by the rear Park
Assist system.
"Park Assist vol."(where provided):
this function can be used to select the
volume of the acoustic warnings
provided by the Park Assist system.
231
Page 234 of 264

"Lane Assist Warning"(where
provided): this function can be used to
select the LaneAssist system
intervention "readiness".
"Lane Assist Strength"(where
provided): this function can be used to
select the force to apply to the steering
wheel to put the vehicle back in the
lane through the electric steering
system, in the event of Lane Assist
system intervention.
"Blind Spot Alert"(where provided):
this function can be used to select the
type of warning ("Sound Only" or
"Sound & Display") to indicate the
presence of objects in the blind spot of
the door mirror.
"Rain sensor"(where provided): this
function can be used to activate/
deactivate the automatic operation of
the wipers in the event of rain.
"Brakes"(where provided): this
function can be used to select the
following submenus:
- "Brake Service" (where provided):
allows you to activate the procedure for
carrying out braking system servicing;
- "Auto Park Brake" (where provided):
allows you to activate/deactivate the
automatic park brake engagement.
NAVIGATION(UConnect™ 5" Nav LIVE only)
Programming a route
WARNING In the interest of safety and
to reduce distractions while you are
driving, you should always plan a route
before you start driving.
Using the destination search function, it
is possible to find and reach your
destinations in different ways: searching
for a specific address, a partial address,
a specific type of location (for example
a service station or a restaurant), a
postal code, a POI (Point Of Interest)
near your current position (for example,
a restaurant with the search type set to
"nearby"), a pair of latitude and
longitude coordinates, or by selecting a
point on the map.
Select “Search” in the Main menu and
set the search for a destination.
While entering the information, the list
displays the corresponding addresses
and POIs in two separate lists. The
corresponding address and city are
displayed in the Address list and the
POI, the type of POIs and the locations
are displayed in the Point of Interest
lists.
To plan a route towards the destination,
select the “Guide” button.
A route is planned and you are guidedto your destination, using spoken
instructions and on-screen directions.
VOICE COMMANDS
NoteFor languages not supported by
the system, voice commands are not
available.
To use the voice commands, press the
button on the steering wheel ("Voice"
button) and say out loud the command
you want to activate.
Global
The following voice commands can be
given after pressing the
button on
the steering wheel:
Help
Cancel
Repeat
Voice Prompts
Phone
The following voice commands can be
given after pressing the
button on
the steering wheel:
Call
Dial
Redial
Call back
Last calls
Outgoing calls
Missed calls
Incoming calls
Contacts
Search
232
MULTIMEDIA
Page 235 of 264
Show SMS
Send an SMS
Show messages
Radio
The following voice commands can be
given after pressing the
button on
the steering wheel:
Tune to FM "frequency"
Tune to AM "frequency"
Tune to "radio name" FM
Tune to "radio name"
Media
The following voice commands can be
given after pressing the
button on
the steering wheel:
Play song...
Play album…
Play artist…
Play genre…
Play playlist…
Play podcast…
Play audiobook…
Select the source...
Display...
Navigation (Uconnect™ 5" Nav LIVE
only)
The following voice commands can be
given after pressing the
button on
the steering wheel:
Increase zoom
Decrease zoom
2D mode
3D mode
Add this position
Drive Home
Navigate going through home
Clear route
233
Page 237 of 264
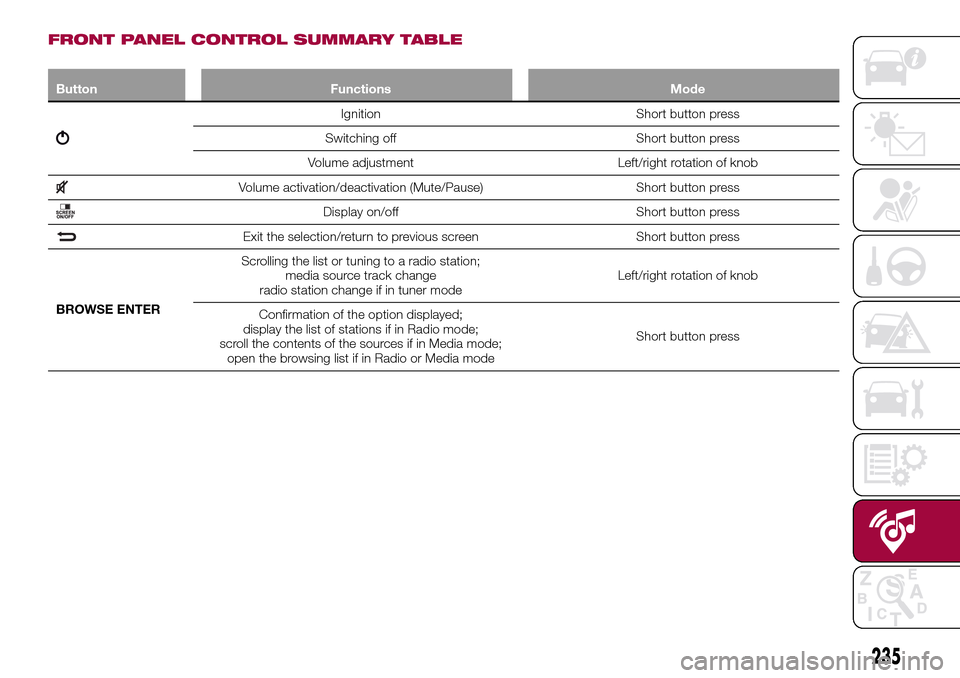
FRONT PANEL CONTROL SUMMARY TABLE
Button Functions Mode
Ignition Short button press
Switching off Short button press
Volume adjustment Left/right rotation of knob
Volume activation/deactivation (Mute/Pause) Short button press
Display on/off Short button press
Exit the selection/return to previous screen Short button press
BROWSE ENTERScrolling the list or tuning to a radio station;
media source track change
radio station change if in tuner modeLeft/right rotation of knob
Confirmation of the option displayed;
display the list of stations if in Radio mode;
scroll the contents of the sources if in Media mode;
open the browsing list if in Radio or Media modeShort button press
235
Page 238 of 264
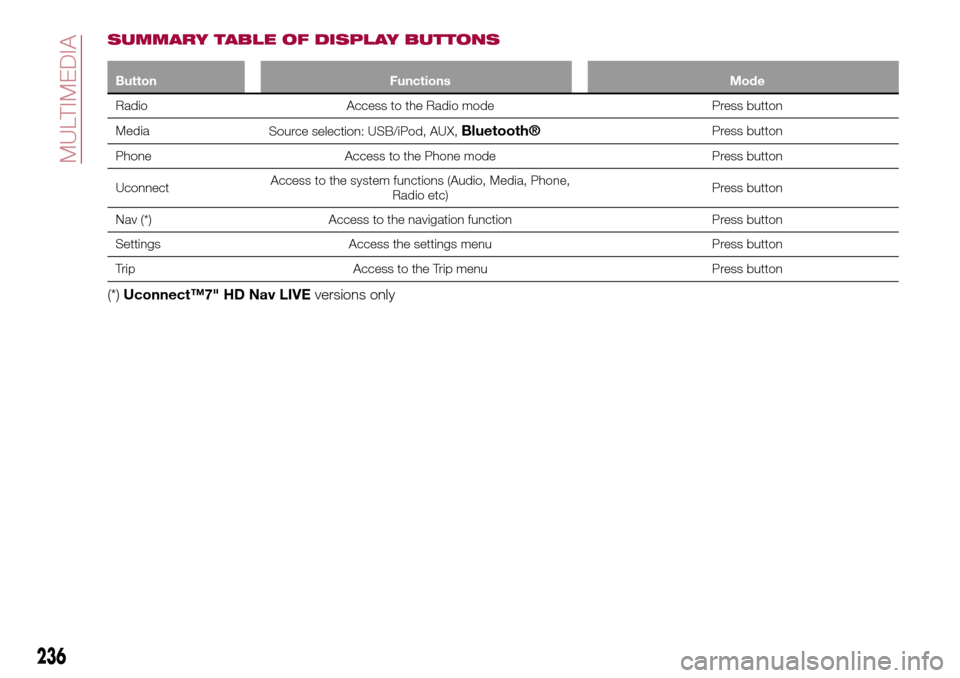
SUMMARY TABLE OF DISPLAY BUTTONS
Button Functions Mode
Radio Access to the Radio mode Press button
Media
Source selection: USB/iPod, AUX,
Bluetooth®Press button
Phone Access to the Phone mode Press button
UconnectAccess to the system functions (Audio, Media, Phone,
Radio etc)Press button
Nav (*) Access to the navigation function Press button
Settings Access the settings menu Press button
Trip Access to the Trip menu Press button
(*)Uconnect™7" HD Nav LIVEversions only
236
MULTIMEDIA
Page 240 of 264
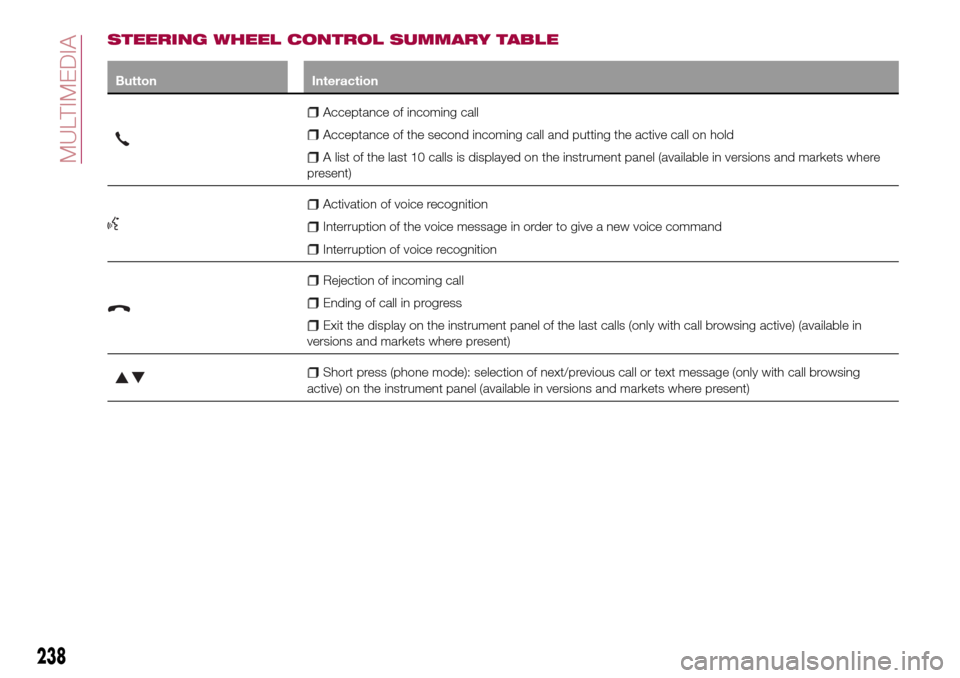
STEERING WHEEL CONTROL SUMMARY TABLE
Button Interaction
Acceptance of incoming call
Acceptance of the second incoming call and putting the active call on hold
A list of the last 10 calls is displayed on the instrument panel (available in versions and markets where
present)
Activation of voice recognition
Interruption of the voice message in order to give a new voice command
Interruption of voice recognition
Rejection of incoming call
Ending of call in progress
Exit the display on the instrument panel of the last calls (only with call browsing active) (available in
versions and markets where present)
Short press (phone mode): selection of next/previous call or text message (only with call browsing
active) on the instrument panel (available in versions and markets where present)
238
MULTIMEDIA
Page 242 of 264
SWITCHING THE SYSTEM
ON/OFF
The system is switched on/off by
pressing the
button/knob.
Turn the button/knob clockwise to
increase the radio volume or
anticlockwise to decrease it. The
electronic volume adjustment control
rotates continuously (360°) in both
directions, without stop positions.
RADIO MODE
After the desired radio station is
selected, the following information is
shown on the display:
At the top: the list of radio stations
stored (preset) is displayed; the station
being listened to is highlighted.
At the centre: the name of station
being listened too is displayed.
On the left side: the "AM", "FM",
"DAB” (for versions/markets, where
provided) buttons to select the desired
frequency band are displayed (the
button corresponding to the selected
band is highlighted);
On the right: display of the following
buttons:
"Info": additional information on the
source being listened to;
"Map": navigation map view
(Uconnect™7" HD Nav LIVEversions
only).At the bottom: display of the following
buttons:
“Browse": list of the radio stations
available;
/selection of the
previous/next radio station;
“Tune” : manual radio station tuning;
"Audio": access to the "Audio
settings" screen.
Audio menu
To access the "Audio" menu press the
Audio" button located at the bottom of
the display.
The following adjustments can be
carried out using the "Audio" menu:
“Balance & Fade" (left/right and
front/rear audio balance adjustment);
"Equalizer" (where provided);
“Speed Adj Volume" (speed-
dependent automatic volume control);
"Loudness" (where provided);
“AUX Volume Offset” (only active if an
AUX device is inserted);
“AutoPlay”;
"Auto-On Radio".
MEDIA MODE
Press the "Media" button to select the
desired audio source among those
available: USB/iPod,
Bluetooth®,
AUX.
IMPORTANT Applications used on
portable devices may be notcompatible with theUconnect™
system.
After Media mode is selected, the
following information is shown on the
display:
At the top: information on the track
being played and the following graphic
buttons:
"Repeat": to repeat the track being
played;
“Shuffle": to play the tracks in
random order;
Track progress and duration.
In the middle: information on the track
being played.
On the left: display of the following
buttons:
Selected device or audio source;
"Select device": select the required
audio source.
On the right: display of the following
buttons:
"Info": additional information on the
track being played;
"Tracks": list of available tracks.
"Map": navigation map view
(Uconnect™7" HD Nav LIVEversions
only).
At the bottom: information on the
track being played and the following
graphic buttons:
“Bluetooth”: for a Bluetooth(R) audio
source, opens the list of devices;
240
MULTIMEDIA
Page 243 of 264
“Browse” for a USB source, opens
browsing;
/: select previous/next
track;
: pause track being played;
"Audio": access to the "Audio
settings" screen.
Track selection
The “Tracks” function allows you to
open a window with the list of tracks
being played.
The choices available depend on the
device connected. For example, on a
USB/iPod device you can also scroll
through the list of artists, genres and
albums available on the device
depending on the information present
on the tracks using the BROWSE
ENTER button/knob or by means of the
egraphic buttons.
Within each list, the "ABC" button
allows the user to skip to the desired
letter in the list.
NOTE This button might be disabled for
some
Apple®devices.
NOTE The BROWSE ENTER button
does not allow any operation on an
AUX device.
Bluetooth® SOURCE
This mode is activated by pairing a
Bluetooth®device containing music
tracks with the system.
PAIRING A Bluetooth®
AUDIO DEVICE
To pair aBluetooth®audio device,
proceed as follows:
activate theBluetooth®function on
the device;
press the “Media” button on the
display;
press the "Select device" button;
select theBluetooth®Media
source;
press the "Add device" button;
search forUconnect™on the
Bluetooth®audio device (during the
pairing stage a screen is displayed
showing the progress of the operation);
when requested by the audio device,
enter the PIN code shown on the
system display or confirm on the device
the PIN displayed;
if the pairing procedure is completed
successfully, a screen is displayed.
Answer "Yes" to the question to pair the
Bluetooth®audio device as favourite
(the device will have priority over all
other devices to be paired
subsequently). If "No" is selected, the
priority is determined according to the
order of connection. The last device
connected will have the highest priority;
an audio device can also be paired
by pressing the "Phone" graphic button
on the display and by selecting
"Settings" or, from the "Settings" menu,
selecting "Phone/Bluetooth".
IMPORTANT If theBluetooth®
connection between mobile phone and
system is lost, consult the mobile
phone handbook.
USB/iPod SOURCE
To activate the USB/iPod mode insert
the corresponding device (USB or iPod)
in the USB port located in the central
console.
When a USB/iPod device is inserted
with the radio on, it starts to play the
tracks on the device if the “AutoPlay” is
set to ON in the “Audio” menu.
The Radio may change the track being
played by modifying the name-device in
the Bluetooth settings of the telephone
(where provided), if the device is
connected via USB after the Bluetooth
connection.
AUX SOURCE
To activate AUX mode, insert an
appropriate device in the AUX socket
on the vehicle.
When a device is inserted using the
AUX output socket the system starts
reproducing the AUX source
connected, if it is already being played.
Adjust the volume using the
button/knob on the front panel or
using the volume adjustment control on
the connected device.
241