2017 FIAT TIPO 5DOORS STATION WAGON window
[x] Cancel search: windowPage 177 of 264

ENGINE OIL
154)
65)
Check the oil level a few minutes (about
5) after the engine has stopped, with
the vehicle parked on level ground.
Check that the oil level is between the
MIN and MAX references on the
dipstick.
If the level of the oil is close to or below
the MIN mark, add oil via the filler fitting
until the MAX mark is reached.
Take out the engine oil dipstick, clean it
with a lint-free cloth and reinsert it.
Extract it again and check that the level
is between the MIN and MAX marks on
the dipstick.
Engine oil consumption
66)
3)
The maximum engine oil consumption
is usually 400 grams every 1000 km.
When the car is new, the engine needs
to be run in; therefore the engine oil
consumption can only be considered
stabilised after the first 5000 - 6000 km.
IMPORTANT After adding or changing
the oil, let the engine turn over for a few
seconds and wait a few minutes after
turning it off before you check the level.ENGINE COOLANT FLUID
155)
67)
If the level is too low, unscrew the cap
of reservoir 4 and add the fluid
described in the "Technical
Specifications" chapter.
WINDSCREEN / REAR
WINDOW WASHING FLUID
156) 157)
If the level is too low, raise the reservoir
cap 3 and add the fluid described in the
"Technical Specifications" chapter.
BRAKE FLUID
158) 159)
68)
Check that the fluid is at the max. level.
If the fluid level in the reservoir is too
low, undo the reservoir cap 1 and add
the fluid described in the "Technical
Specifications" chapter.
IMPORTANT Carefully clean the cap of
the reservoir and the surrounding
surface. Take great care to ensure that
impurities do not enter the reservoir
when the cap is opened.
For topping-up, always use a funnel
with integrated filter with mesh equal to
or lower than 0.12 mm.
IMPORTANT Brake fluid is hygroscopic
(i.e. it absorbs moisture). For this
reason, if the vehicle is mainly used in
areas with a high degree of
atmospheric humidity, the fluid should
be replaced at more frequent intervals
than specified in the "Scheduled
Servicing Plan".
BATTERY
160) 161) 162)
68)
4)
The battery does not require the
electrolyte to be topped up with distilled
water.
A periodic check carried out at a Fiat
Dealership is, however, necessary to
check efficiency.
Replacing the battery
If necessary, replace the battery with
another original battery with the same
specifications. Follow the battery
Manufacturer’s instructions for
maintenance.
175
Page 181 of 264
AIR FILTER
163)
Replacing the air cleaner
See the "Scheduled servicing plan" for
the correct servicing intervals.
It is advisable to replace it with a
genuine spare part, specifically
designed for this vehicle.
AIR CONDITIONING
SYSTEM MAINTENANCE
75) 76)
To ensure the best possible
performance, the air conditioning
system must be checked and undergo
maintenance at a Fiat Dealership at the
beginning of the summer.
WINDSCREEN / REAR
WINDOW WIPERS
164)
Periodically clean the windscreen and
rear window and rubber profile of the
windscreen/rear window wiper blades,
using a sponge or a soft cloth and a
non-abrasive detergent. This eliminates
the salt or impurities accumulated when
driving.
Prolonged operation of the windscreen
window wipers with dry glass may
cause the deterioration of the blades, in
addition to abrasion of the surface of
the glass. To eliminate the impurities onthe dry glass, always operate the
windscreen/rear window washers.
In the case of very low outdoor
temperatures (below 0 °C), ensure that
the movement of the rubber part in
contact with the glass is not
obstructed, before activating the
windscreen/rear window wiper. Use a
suitable deicing product to release it if
required.
Do not use the windscreen wipers to
remove frost or ice.
Also avoid contact of the rubber profile
of the blades with petroleum derivatives
such as engine oil, petrol, etc.
IMPORTANT The envisaged life of the
windscreen and rear window wiper
blades varies according to the usage
frequency. In any case, it is advisable to
replace the blades approximately once
a year. When the blades are worn,
noise, marks on the glass or streaks of
water may be noticed. In the presence
of these conditions, clean the wiper
blades or, if necessary, replace them.
IMPORTANT Driving with worn
windscreen/rear window wiper blades
is a serious hazard, because visibility is
reduced in bad weather.
Raising the windscreen wiper
blades ("Service position" function)
The "Service position" function allows
the driver to replace the windscreen
wiper blades more easily, protecting
them from snow.
Function activation
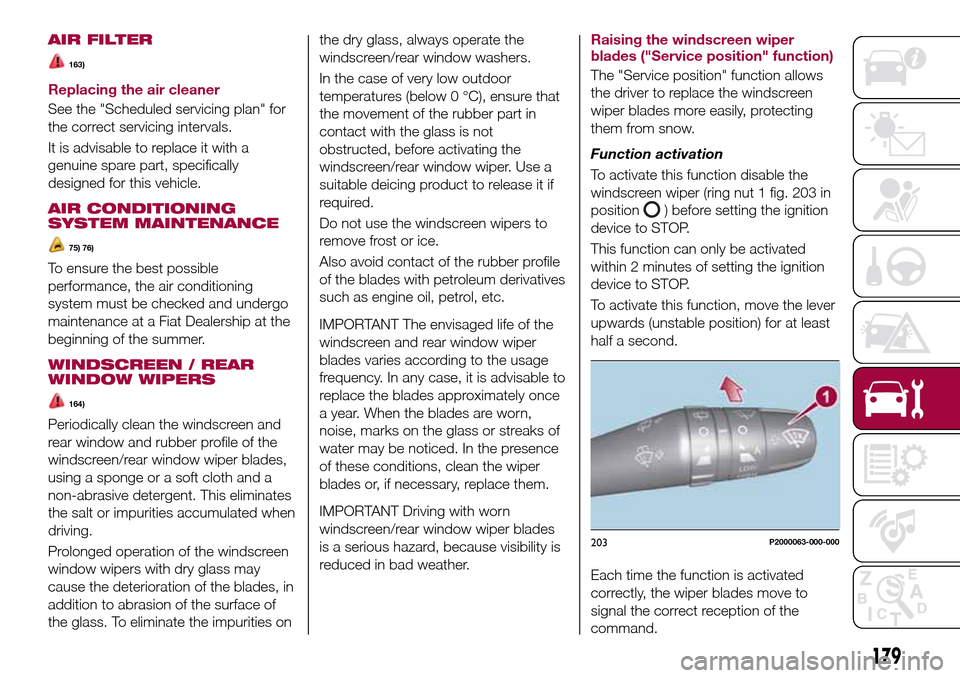
To activate this function disable the
windscreen wiper (ring nut 1 fig. 203 in
position
) before setting the ignition
device to STOP.
This function can only be activated
within 2 minutes of setting the ignition
device to STOP.
To activate this function, move the lever
upwards (unstable position) for at least
half a second.
Each time the function is activated
correctly, the wiper blades move to
signal the correct reception of the
command.
203P2000063-000-000
179
Page 182 of 264
The command can be repeated up to a
maximum of the three times. The fourth
repetition of the command deactivates
the function.
If, after using the function, the ignition
device is set back to MAR with the
blades in a position other than rest
position (at the base of the windscreen),
they will only return to rest position
following a command given using the
stalk (stalk upwards, into unstable
position) or when a speed of 5 km/h is
exceeded.
Function deactivation
The function is deactivated if:
2 minutes have passed since the
ignition device was set to STOP;
the ignition device is set to MAR and
the blades are in rest position;
the command for the function is
repeated four times.
Replacing the windscreen wiper
blades
Proceed as follows:
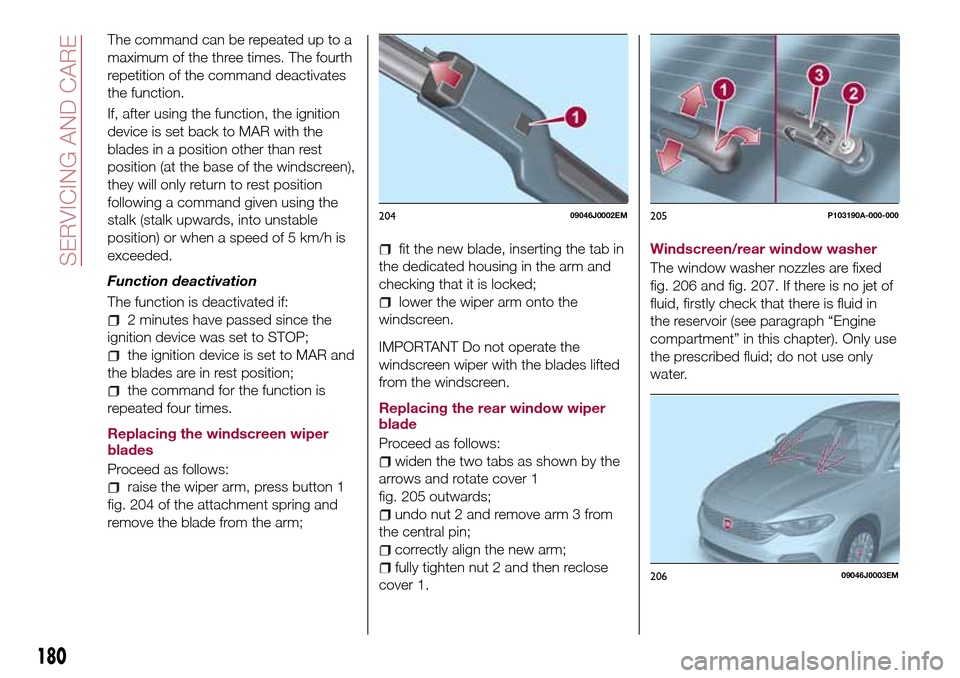
raise the wiper arm, press button 1
fig. 204 of the attachment spring and
remove the blade from the arm;
fit the new blade, inserting the tab in
the dedicated housing in the arm and
checking that it is locked;
lower the wiper arm onto the
windscreen.
IMPORTANT Do not operate the
windscreen wiper with the blades lifted
from the windscreen.
Replacing the rear window wiper
blade
Proceed as follows:
widen the two tabs as shown by the
arrows and rotate cover 1
fig. 205 outwards;
undo nut 2 and remove arm 3 from
the central pin;
correctly align the new arm;
fully tighten nut 2 and then reclose
cover 1.Windscreen/rear window washer
The window washer nozzles are fixed
fig. 206 and fig. 207. If there is no jet of
fluid, firstly check that there is fluid in
the reservoir (see paragraph “Engine
compartment” in this chapter). Only use
the prescribed fluid; do not use only
water.
20409046J0002EM205P103190A-000-000
20609046J0003EM
180
SERVICING AND CARE
Page 183 of 264
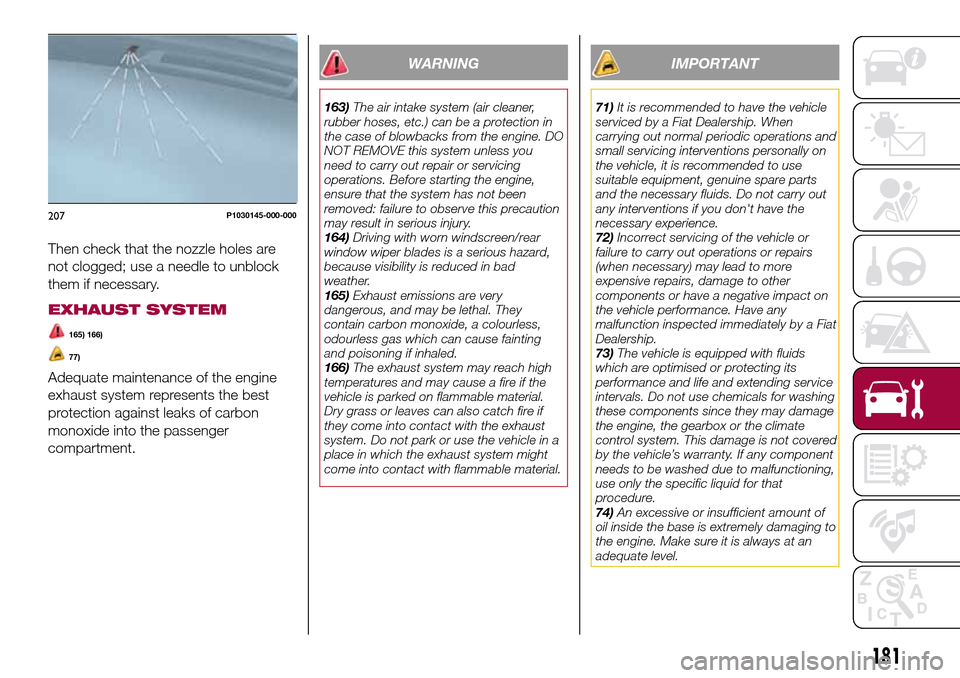
Then check that the nozzle holes are
not clogged; use a needle to unblock
them if necessary.
EXHAUST SYSTEM
165) 166)
77)
Adequate maintenance of the engine
exhaust system represents the best
protection against leaks of carbon
monoxide into the passenger
compartment.
WARNING
163)The air intake system (air cleaner,
rubber hoses, etc.) can be a protection in
the case of blowbacks from the engine. DO
NOT REMOVE this system unless you
need to carry out repair or servicing
operations. Before starting the engine,
ensure that the system has not been
removed: failure to observe this precaution
may result in serious injury.
164)Driving with worn windscreen/rear
window wiper blades is a serious hazard,
because visibility is reduced in bad
weather.
165)Exhaust emissions are very
dangerous, and may be lethal. They
contain carbon monoxide, a colourless,
odourless gas which can cause fainting
and poisoning if inhaled.
166)The exhaust system may reach high
temperatures and may cause a fire if the
vehicle is parked on flammable material.
Dry grass or leaves can also catch fire if
they come into contact with the exhaust
system. Do not park or use the vehicle in a
place in which the exhaust system might
come into contact with flammable material.
IMPORTANT
71)It is recommended to have the vehicle
serviced by a Fiat Dealership. When
carrying out normal periodic operations and
small servicing interventions personally on
the vehicle, it is recommended to use
suitable equipment, genuine spare parts
and the necessary fluids. Do not carry out
any interventions if you don't have the
necessary experience.
72)Incorrect servicing of the vehicle or
failure to carry out operations or repairs
(when necessary) may lead to more
expensive repairs, damage to other
components or have a negative impact on
the vehicle performance. Have any
malfunction inspected immediately by a Fiat
Dealership.
73)The vehicle is equipped with fluids
which are optimised or protecting its
performance and life and extending service
intervals. Do not use chemicals for washing
these components since they may damage
the engine, the gearbox or the climate
control system. This damage is not covered
by the vehicle’s warranty. If any component
needs to be washed due to malfunctioning,
use only the specific liquid for that
procedure.
74)An excessive or insufficient amount of
oil inside the base is extremely damaging to
the engine. Make sure it is always at an
adequate level.
207P1030145-000-000
181
Page 186 of 264
Windows
Use specific detergents and clean
cloths to prevent scratching or altering
the transparency.
IMPORTANT Wipe the rear window
inside gently with a cloth following the
direction of the filaments to avoid
damaging the heating device.
Front headlights
Use a soft cloth soaked in water and
detergent for washing cars.
IMPORTANT Never use aromatic
substances (e.g. petrol) or ketones (e.g.
acetone) for cleaning the plastic lenses
of the headlights.
IMPORTANT When cleaning with a
pressure washer, keep the water jet at
least 20 cm away from the headlights.
Engine compartment
At the end of every winter, wash the
engine compartment thoroughly, taking
care not to aim the jet of water directly
at the electronic control units or at the
windscreen wiper motors. Have this
operation performed at a specialised
workshop.
IMPORTANT The washing should take
place with the engine cold and the
ignition device in the STOP position.
After the washing operation, make surethat the various protections (e.g. rubber
caps and guards) have not been
removed or damaged.
IMPORTANT
79)In order to preserve the aesthetic
appearance of the paint abrasive products
and/or polishes should not be used for
cleaning the vehicle.
80)Avoid washing with rollers and/or
brushes in washing stations. Wash the
vehicle only by hand using neutral pH
detergents; dry it with a wet chamois
leather. Abrasive products and/or polishes
should not be used for cleaning the car.
Bird droppings must be washed off
immediately and thoroughly as the acid
they contain is particularly aggressive.
Avoid (if at all possible) parking the vehicle
under trees; remove vegetable resins
immediately as, when dried, it may only be
possible to remove them with abrasive
products and/or polishes, which is highly
inadvisable as they could alter the typical
opaqueness of the paint. Do not use pure
windscreen washer fluid for cleaning the
front windscreen and rear window; dilute it
min. 50% with water. Only use pure screen
washer fluid when strictly necessary due to
outside temperature conditions.
IMPORTANT
5)Detergents pollute the environment. Only
wash your vehicle in areas equipped to
collect and treat wastewater from this type
of activity.
184
SERVICING AND CARE
Page 243 of 264
“Browse” for a USB source, opens
browsing;
/: select previous/next
track;
: pause track being played;
"Audio": access to the "Audio
settings" screen.
Track selection
The “Tracks” function allows you to
open a window with the list of tracks
being played.
The choices available depend on the
device connected. For example, on a
USB/iPod device you can also scroll
through the list of artists, genres and
albums available on the device
depending on the information present
on the tracks using the BROWSE
ENTER button/knob or by means of the
egraphic buttons.
Within each list, the "ABC" button
allows the user to skip to the desired
letter in the list.
NOTE This button might be disabled for
some
Apple®devices.
NOTE The BROWSE ENTER button
does not allow any operation on an
AUX device.
Bluetooth® SOURCE
This mode is activated by pairing a
Bluetooth®device containing music
tracks with the system.
PAIRING A Bluetooth®
AUDIO DEVICE
To pair aBluetooth®audio device,
proceed as follows:
activate theBluetooth®function on
the device;
press the “Media” button on the
display;
press the "Select device" button;
select theBluetooth®Media
source;
press the "Add device" button;
search forUconnect™on the
Bluetooth®audio device (during the
pairing stage a screen is displayed
showing the progress of the operation);
when requested by the audio device,
enter the PIN code shown on the
system display or confirm on the device
the PIN displayed;
if the pairing procedure is completed
successfully, a screen is displayed.
Answer "Yes" to the question to pair the
Bluetooth®audio device as favourite
(the device will have priority over all
other devices to be paired
subsequently). If "No" is selected, the
priority is determined according to the
order of connection. The last device
connected will have the highest priority;
an audio device can also be paired
by pressing the "Phone" graphic button
on the display and by selecting
"Settings" or, from the "Settings" menu,
selecting "Phone/Bluetooth".
IMPORTANT If theBluetooth®
connection between mobile phone and
system is lost, consult the mobile
phone handbook.
USB/iPod SOURCE
To activate the USB/iPod mode insert
the corresponding device (USB or iPod)
in the USB port located in the central
console.
When a USB/iPod device is inserted
with the radio on, it starts to play the
tracks on the device if the “AutoPlay” is
set to ON in the “Audio” menu.
The Radio may change the track being
played by modifying the name-device in
the Bluetooth settings of the telephone
(where provided), if the device is
connected via USB after the Bluetooth
connection.
AUX SOURCE
To activate AUX mode, insert an
appropriate device in the AUX socket
on the vehicle.
When a device is inserted using the
AUX output socket the system starts
reproducing the AUX source
connected, if it is already being played.
Adjust the volume using the
button/knob on the front panel or
using the volume adjustment control on
the connected device.
241
Page 259 of 264

INDEX
ABS (system)...............73
Active Grille Shutter............49
Active safety systems...........73
Adaptive cruise control.........116
Airbag
Front airbags.............101
Side bags...............105
Airbag (SRS supplementary
restraint system)...........101
Automatic climate control system.......................31
Automatic light control..........23
AUX source.............228 ,241
Battery..................175
Battery recharging............177
Bluetooth® source........227 ,241
Bodywork (cleaning and
maintenance).............183
Bonnet....................33
Carrying children safely.........88
Changing a wheel............148
Checking levels..............170
Child protection systems........88
Child safety device............14
Climate control...............29
CO2 emissions..............208
Control buttons..............54
Control panel and on-board
instruments...............51CONTROLS
Controls on the front panel. . . .222
Controls on front panel.........234
Daytime running lights (DRL)......23
Daytime running lights (DRL) (bulb
replacement)..............136
Dimensions................195
Dipped headlights.............23
Dipped headlights (bulb
replacement)..............135
Direction indicators............25
Display....................54
Doors.....................14
Double load compartment (TIPO
STATION WAGON version)......38
Driving assistance systems.......76
DTC (system)................73
Electric power steering.........34
Electric windows..............33
Electronic Cruise Control........114
Engine...................188
marking................187
Engine compartment..........170
Engine compartment (washing). . . .184
Engine oil (consumption)........175
Engine oil (level check).........175
ERM (system)................74
ESC (system)................73
External lights...............23
Fiat Code (system)............13
Fix&Go Automatic kit..........152
Flashing the headlights..........24
Fluids and lubricants..........202
Front ceiling light..............26
Front fog light (bulb replacement) . .136
Front fog lights...............24
Front panel control summary
table...................235
Front seat electric heating........16
Front seats (manual adjustments) . . .16
Fuel consumption............206
Fuel cut-off system...........157
Full Brake Control (system).......76
Fuse boxes................142
Fuses (replacement)...........142
GSI (Gear Shift Indicator)........54
Hazard warning lights.........132
Emergency braking.........132
Head restraints...............20
Headlight alignment corrector.....24
Headlights..................40
Headlights (cleaning)..........184
Heavy-duty use of the vehicle
(scheduled servicing)........169
HHC (system)................74
Identification data
chassis marking...........187
engine marking............187
Page 261 of 264
Steering wheel...............21
Steering wheel controls.........237
Stop/Start system............111
TC (system)................74
Technical data..............187
Third brake light (bulb
replacement)..............140
Toolbox...................36
Towing the vehicle............159
Towing trailers..............127
Trip Computer...............58TSC (system)................75
Tyres (inflation pressure)........192
Uconnect 3” Radio...........213
Uconnect 5” LIVE — Uconnect 5”
Nav LIVE................222
Uconnect 7" HD LIVE - Uconnect
7" HD Nav LIVE............234
Use of the Owner Handbook.......3
Using the transmission.........111
Vehicle changes/alterations.......4
Version with LPG system........41
Warning lights and messages.....59
Weights..................197
Wheels...................190
Wheels and tyres.............182
Window bag...............105
Windows (cleaning)...........184
Windscreen wiper
replacing wiper blades.......180
Windscreen/rear window wiper....26