2017 FIAT TIPO 4DOORS Buttons on steering wheel
[x] Cancel search: Buttons on steering wheelPage 10 of 240

INSTRUMENT PANEL
1. Adjustable side air diffusers 2. Left stalk: direction indicators, main beam headlights, flashings 3. Instrument panel
4. Steering wheel controls 5. Right stalk: windscreen wiper / windscreen washer, setting of the rain sensor sensitivity level
6.Uconnect™7. Control buttons 8. Passenger front airbag (where provided) 9. Adjustable central air diffusers
10. Glove compartment 11. Climate controls 12. Buttons on the central console: seat heating, USB port + AUX plug
panel, socket/cigarette lighter 13. Ignition device 14. Driver front airbag 15. Steering wheel controls 16. Control panel:
front fog lights (where present), rear fog lights, headlight alignment adjustment, iTPMS reset, ESC OFF (where present).
1P03036J001
8
KNOWING YOUR CAR
Page 11 of 240

Right hand drive versions
1. Adjustable side air diffusers 2. Right stalk: windscreen wiper/windscreen washer, setting of the rain sensor sensitivity
level 3. Instrument panel 4. Steering wheel controls 5. Left stalk: direction indicators, main beam headlights, flashings
6.Uconnect™7. Control buttons 8. Passenger front airbag (where provided) 9. Adjustable central air
diffusers 10. Glove compartment 11. Climate controls 12. Buttons on the central console: seat heating, USB port + AUX
plug panel, socket/cigarette lighter 13. Ignition device 14. Driver front airbag 15. Steering wheel controls 16. Control
panel: front fog lights (where present), rear fog lights, headlight alignment adjustment, iTPMS reset, ESC OFF (where present).
2PDX6J008H
9
Page 20 of 240
Removal
Proceed as follows to remove the head
restraint:
raise the head restraint to its
maximum height;
press buttons 1 and 2 fig. 15 at the
side of the two supports, then remove
the head restraint.
For versions with folding rear backrests,
use the release device to fold the
backrests approx. 45 degrees to make
it easier to remove the head restraints.
IMPORTANT Always reposition the
head restraints if they have been
removed before starting to drive
normally.
WARNING
16)Head restraints must be adjusted so
that the head, rather than the neck, rests
on them. Only in this case they can protect
your head correctly. Any removed head
restraints must be repositioned correctly, in
order to protect the occupants in the event
of impact: follow the instructions above.
STEERING WHEEL
17) 18)
ADJUSTMENTS
The steering wheel can be adjusted
both in height and axially.
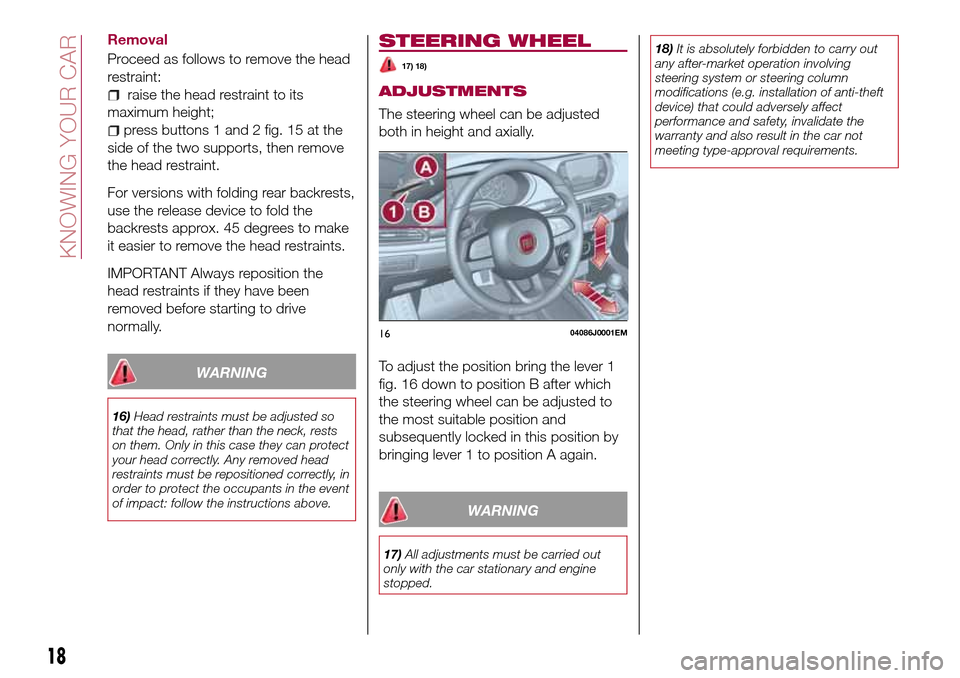
To adjust the position bring the lever 1
fig. 16 down to position B after which
the steering wheel can be adjusted to
the most suitable position and
subsequently locked in this position by
bringing lever 1 to position A again.
WARNING
17)All adjustments must be carried out
only with the car stationary and engine
stopped.18)It is absolutely forbidden to carry out
any after-market operation involving
steering system or steering column
modifications (e.g. installation of anti-theft
device) that could adversely affect
performance and safety, invalidate the
warranty and also result in the car not
meeting type-approval requirements.
1604086J0001EM
18
KNOWING YOUR CAR
Page 24 of 240
Deactivation
Keep the left stalk in main beam
headlights flashing position for a few
seconds or turn the key to MAR
position or wait until the period
previously set has ended.
MAIN BEAM HEADLIGHTS
With ring nut in position, push the
stalk forward toward the dashboard
(stable position). The
warning light
switches on in the instrument panel.
They are switched off by pulling the
stalk towards the steering wheel.
Flashing the headlights
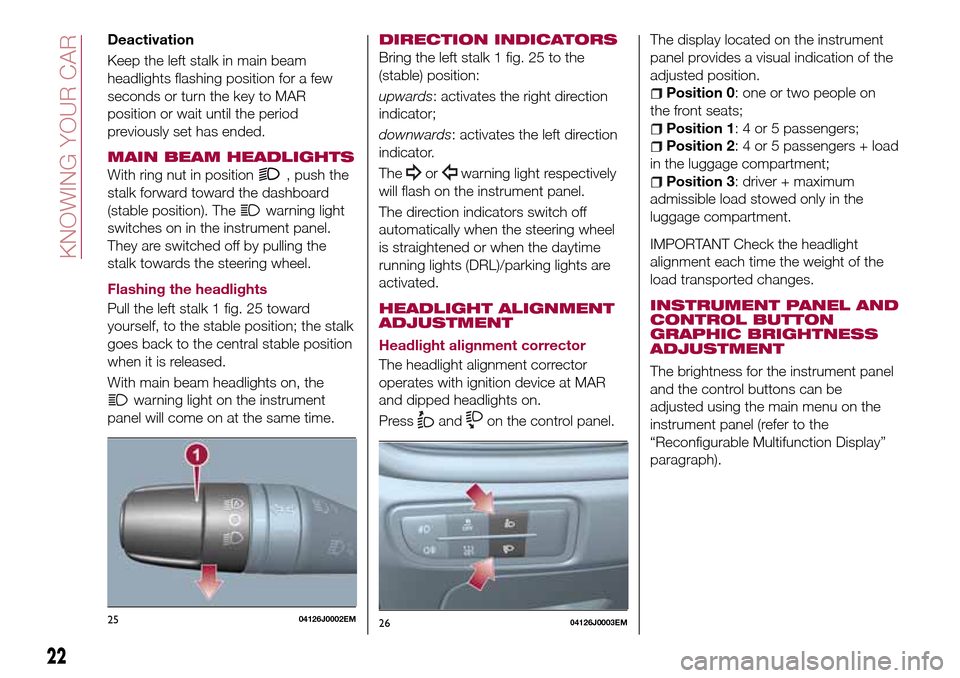
Pull the left stalk 1 fig. 25 toward
yourself, to the stable position; the stalk
goes back to the central stable position
when it is released.
With main beam headlights on, the
warning light on the instrument
panel will come on at the same time.
DIRECTION INDICATORS
Bring the left stalk 1 fig. 25 to the
(stable) position:
upwards: activates the right direction
indicator;
downwards: activates the left direction
indicator.
The
orwarning light respectively
will flash on the instrument panel.
The direction indicators switch off
automatically when the steering wheel
is straightened or when the daytime
running lights (DRL)/parking lights are
activated.
HEADLIGHT ALIGNMENT
ADJUSTMENT
Headlight alignment corrector
The headlight alignment corrector
operates with ignition device at MAR
and dipped headlights on.
Press
andon the control panel.The display located on the instrument
panel provides a visual indication of the
adjusted position.
Position 0: one or two people on
the front seats;
Position 1: 4 or 5 passengers;
Position 2: 4 or 5 passengers + load
in the luggage compartment;
Position 3: driver + maximum
admissible load stowed only in the
luggage compartment.
IMPORTANT Check the headlight
alignment each time the weight of the
load transported changes.
INSTRUMENT PANEL AND
CONTROL BUTTON
GRAPHIC BRIGHTNESS
ADJUSTMENT
The brightness for the instrument panel
and the control buttons can be
adjusted using the main menu on the
instrument panel (refer to the
“Reconfigurable Multifunction Display”
paragraph).
2504126J0002EM2604126J0003EM
22
KNOWING YOUR CAR
Page 49 of 240
DISPLAY
DESCRIPTION
The vehicle is equipped with a display
that can show useful information to the
driver while driving.
GEAR SHIFT INDICATOR
The Gear Shift Indicator (GSI) system
advises the driver to change gear
through a special indication on the
display.
Through the GSI, the driver is informed
that the gear change will allow a
reduction in fuel consumption.
When the
icon appears on the
display, the GSI suggests switching to a
higher gear, while when the
icon is
displayed, the GSI suggests changing
to a lower gear.
The indication in the display remains
until a gear is shifted or the driving
conditions go back to a situation where
gearshifting is not required to improve
consumption.
MULTIFUNCTION
DISPLAY
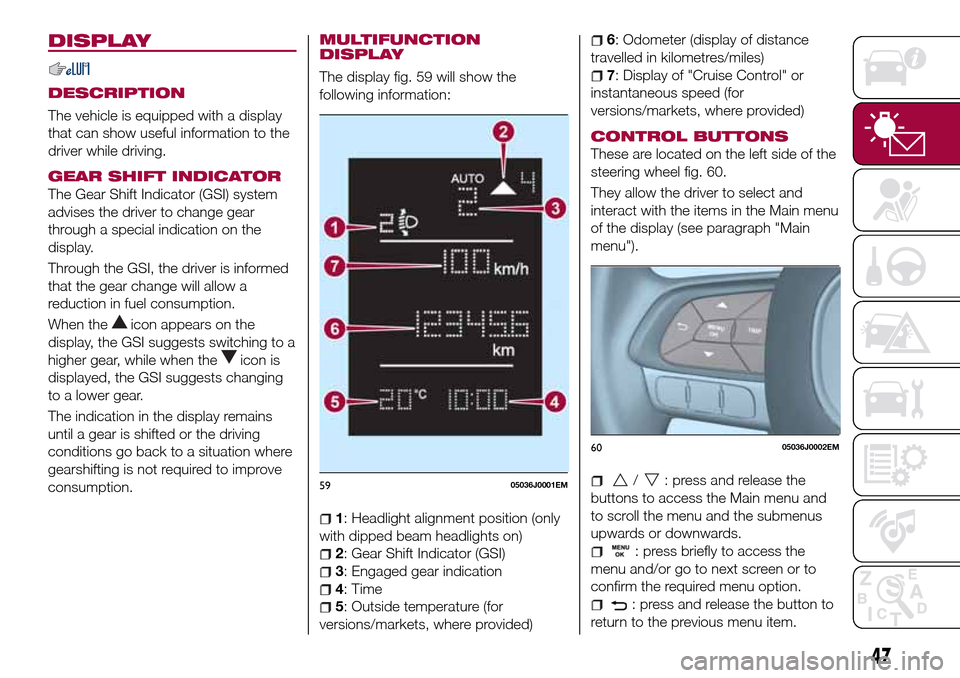
The display fig. 59 will show the
following information:
1: Headlight alignment position (only
with dipped beam headlights on)
2: Gear Shift Indicator (GSI)
3: Engaged gear indication
4: Time
5: Outside temperature (for
versions/markets, where provided)
6: Odometer (display of distance
travelled in kilometres/miles)
7: Display of "Cruise Control" or
instantaneous speed (for
versions/markets, where provided)
CONTROL BUTTONS
These are located on the left side of the
steering wheel fig. 60.
They allow the driver to select and
interact with the items in the Main menu
of the display (see paragraph "Main
menu").
/: press and release the
buttons to access the Main menu and
to scroll the menu and the submenus
upwards or downwards.
: press briefly to access the
menu and/or go to next screen or to
confirm the required menu option.
: press and release the button to
return to the previous menu item.
5905036J0001EM
6005036J0002EM
47
Page 51 of 240

CONTROL BUTTONS
These are located on the left side of the
steering wheel fig. 62.
They allow the driver to select and
interact with the items in the Main menu
of the display (see paragraph "Main
menu").
/: press and release the
buttons to access the Main menu and
to scroll the menu and the submenus
upwards or downwards.
/: press and release the
buttons to access the information
displays or the submenus of an item of
the Main menu.
OK: press this button to
access/select the info displays or the
submenus of an item of the Main menu.
Hold the button pressed for 1 second
to reset the displayed/selected
functions.
MAIN MENU
The Menu includes the following items:
TRIP
GSI
VEHICLE INFO
AUDIO (function available in versions
and markets where present)
PHONE (function available in versions
and markets where present)
NAVIGATION (function available in
versions and markets where present)
ALERTS
VEHICLE SETUP
Vehicle Setup
This menu item allows you to change
the settings for:
Display;
Units;
Clock & Date;
Security
Safety & Assistance;
Lights;
Doors & Locks.
Display
By selecting item "Display" you can
access the settings/information
regarding: " Display Settings”,
Language", "See phone" (available in
versions and markets where present),
"See navigation" (available in versions
and markets where present),
"Automatic reset Trip B", “Display
lighting”.Units
Select item "Units" to choose the unit of
measurement between: "Imperial",
"Metric", "Customised".
Clock & Date
Select item "Clock & Date" to make the
following adjustments: "Set time",
"Mode", "Set date".
Security
Select item "Security" to make the
following adjustments: “Passenger
AIRBAG” (where present), "Speed
buzzer", "Seat belt buzzer".
“Passenger AIRBAG" adjustment allows
you to activate/deactivate the
passenger airbag (where present):
Passenger's protection not active:
the
LED comes on constantly in the
instrument panel dashboard.
Safety & Assistance
Select item "Safety & Assistance" to
make the following adjustments: Rain
sensor, Warning volume, Park Assist,
Vol. Park Assist.
Lights
Select item "Lights" to make the
following adjustments: "Courtesy
lights", "Daytime running lights",
"Cornering lights", "Headlamp sensor",
"Follow me home".6205036J0004EM
49
Page 113 of 240
ACTIVATING THE DEVICE
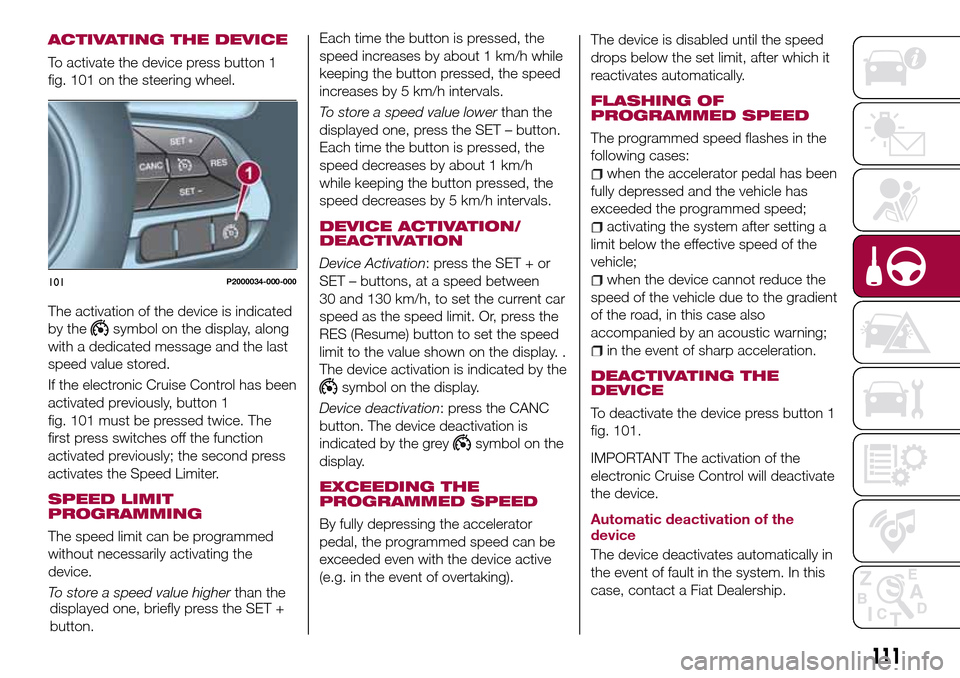
To activate the device press button 1
fig. 101 on the steering wheel.
The activation of the device is indicated
by the
symbol on the display, along
with a dedicated message and the last
speed value stored.
If the electronic Cruise Control has been
activated previously, button 1
fig. 101 must be pressed twice. The
first press switches off the function
activated previously; the second press
activates the Speed Limiter.
SPEED LIMIT
PROGRAMMING
The speed limit can be programmed
without necessarily activating the
device.
To store a speed value higherthan the
displayed one, briefly press the SET +
button.Each time the button is pressed, the
speed increases by about 1 km/h while
keeping the button pressed, the speed
increases by 5 km/h intervals.
To store a speed value lowerthan the
displayed one, press the SET – button.
Each time the button is pressed, the
speed decreases by about 1 km/h
while keeping the button pressed, the
speed decreases by 5 km/h intervals.
DEVICE ACTIVATION/
DEACTIVATION
Device Activation: press the SET + or
SET – buttons, at a speed between
30 and 130 km/h, to set the current car
speed as the speed limit. Or, press the
RES (Resume) button to set the speed
limit to the value shown on the display. .
The device activation is indicated by the
symbol on the display.
Device deactivation: press the CANC
button. The device deactivation is
indicated by the grey
symbol on the
display.
EXCEEDING THE
PROGRAMMED SPEED
By fully depressing the accelerator
pedal, the programmed speed can be
exceeded even with the device active
(e.g. in the event of overtaking).The device is disabled until the speed
drops below the set limit, after which it
reactivates automatically.
FLASHING OF
PROGRAMMED SPEED
The programmed speed flashes in the
following cases:
when the accelerator pedal has been
fully depressed and the vehicle has
exceeded the programmed speed;
activating the system after setting a
limit below the effective speed of the
vehicle;
when the device cannot reduce the
speed of the vehicle due to the gradient
of the road, in this case also
accompanied by an acoustic warning;
in the event of sharp acceleration.
DEACTIVATING THE
DEVICE
To deactivate the device press button 1
fig. 101.
IMPORTANT The activation of the
electronic Cruise Control will deactivate
the device.
Automatic deactivation of the
device
The device deactivates automatically in
the event of fault in the system. In this
case, contact a Fiat Dealership.
101P2000034-000-000
111
Page 213 of 240
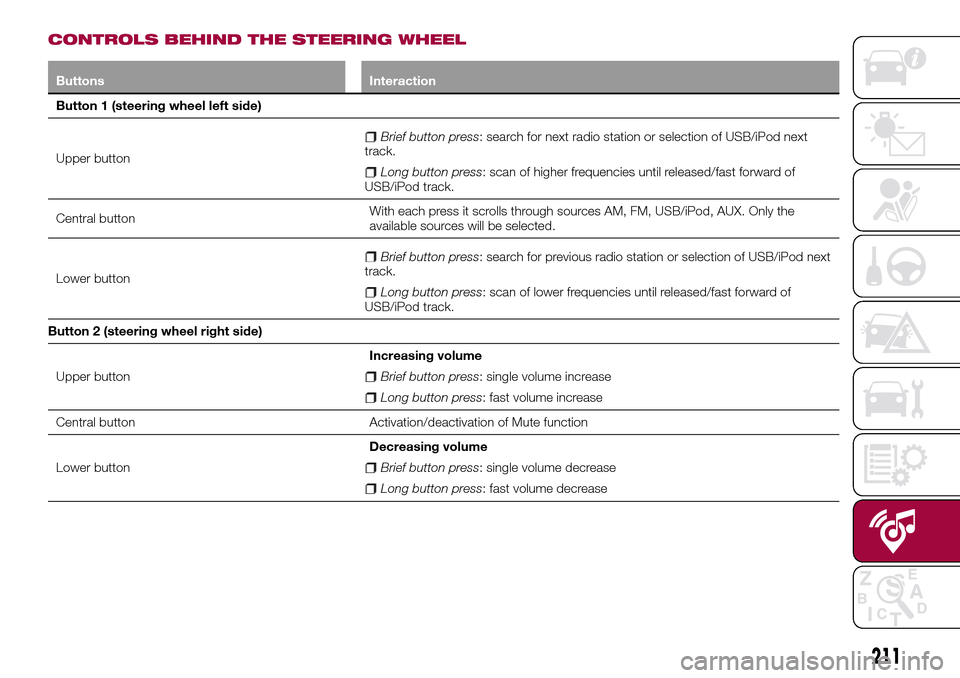
CONTROLS BEHIND THE STEERING WHEEL
Buttons Interaction
Button 1 (steering wheel left side)
Upper button
Brief button press: search for next radio station or selection of USB/iPod next
track.
Long button press: scan of higher frequencies until released/fast forward of
USB/iPod track.
Central buttonWith each press it scrolls through sources AM, FM, USB/iPod, AUX. Only the
available sources will be selected.
Lower button
Brief button press: search for previous radio station or selection of USB/iPod next
track.
Long button press: scan of lower frequencies until released/fast forward of
USB/iPod track.
Button 2 (steering wheel right side)
Upper buttonIncreasing volume
Brief button press: single volume increase
Long button press: fast volume increase
Central button Activation/deactivation of Mute function
Lower buttonDecreasing volume
Brief button press: single volume decrease
Long button press: fast volume decrease
211