2017 FIAT TIPO 4DOORS Break
[x] Cancel search: BreakPage 18 of 240
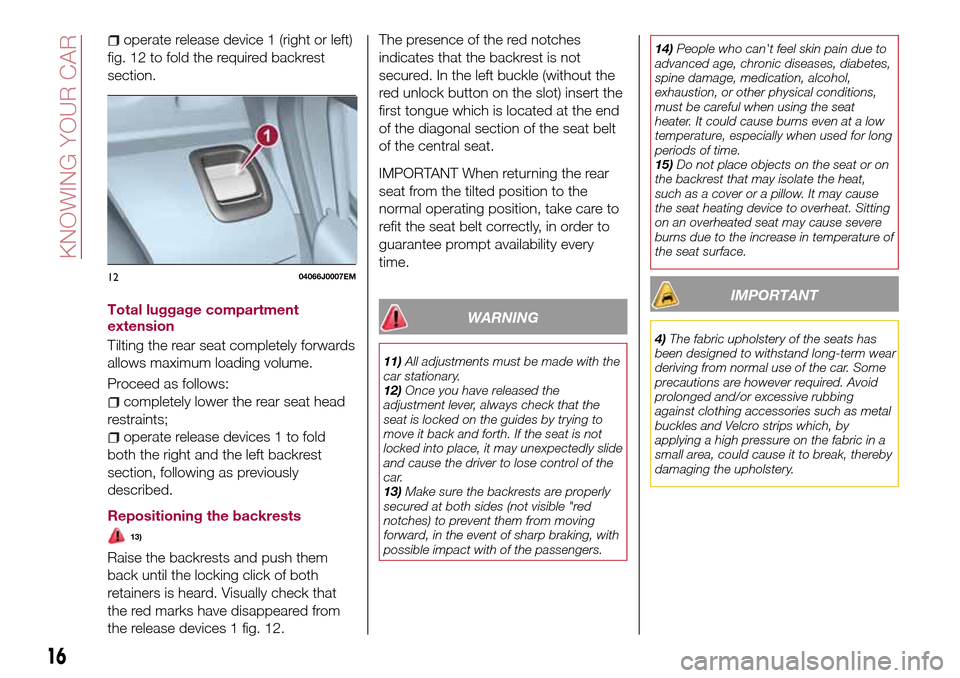
operate release device 1 (right or left)
fig. 12 to fold the required backrest
section.
Total luggage compartment
extension
Tilting the rear seat completely forwards
allows maximum loading volume.
Proceed as follows:
completely lower the rear seat head
restraints;
operate release devices 1 to fold
both the right and the left backrest
section, following as previously
described.
Repositioning the backrests
13)
Raise the backrests and push them
back until the locking click of both
retainers is heard. Visually check that
the red marks have disappeared from
the release devices 1 fig. 12.The presence of the red notches
indicates that the backrest is not
secured. In the left buckle (without the
red unlock button on the slot) insert the
first tongue which is located at the end
of the diagonal section of the seat belt
of the central seat.
IMPORTANT When returning the rear
seat from the tilted position to the
normal operating position, take care to
refit the seat belt correctly, in order to
guarantee prompt availability every
time.
WARNING
11)All adjustments must be made with the
car stationary.
12)Once you have released the
adjustment lever, always check that the
seat is locked on the guides by trying to
move it back and forth. If the seat is not
locked into place, it may unexpectedly slide
and cause the driver to lose control of the
car.
13)Make sure the backrests are properly
secured at both sides (not visible "red
notches) to prevent them from moving
forward, in the event of sharp braking, with
possible impact with of the passengers.14)People who can't feel skin pain due to
advanced age, chronic diseases, diabetes,
spine damage, medication, alcohol,
exhaustion, or other physical conditions,
must be careful when using the seat
heater. It could cause burns even at a low
temperature, especially when used for long
periods of time.
15)Do not place objects on the seat or on
the backrest that may isolate the heat,
such as a cover or a pillow. It may cause
the seat heating device to overheat. Sitting
on an overheated seat may cause severe
burns due to the increase in temperature of
the seat surface.
IMPORTANT
4)The fabric upholstery of the seats has
been designed to withstand long-term wear
deriving from normal use of the car. Some
precautions are however required. Avoid
prolonged and/or excessive rubbing
against clothing accessories such as metal
buckles and Velcro strips which, by
applying a high pressure on the fabric in a
small area, could cause it to break, thereby
damaging the upholstery.
1204066J0007EM
16
KNOWING YOUR CAR
Page 39 of 240
Active safety
The car has the same active safety
specifications as other versions.
Although the LPG system has
numerous safety features, it is advisable
to proceed as follows every time the
vehicle is not in use for a long period or
moved in an emergency as a result of a
breakdown or accident:
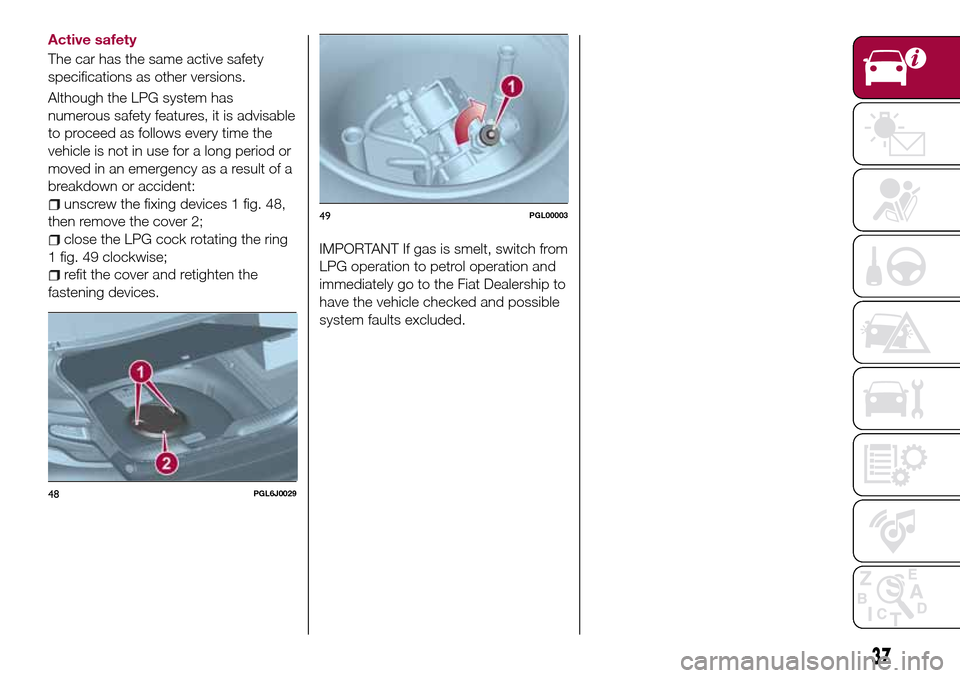
unscrew the fixing devices 1 fig. 48,
then remove the cover 2;
close the LPG cock rotating the ring
1 fig. 49 clockwise;
refit the cover and retighten the
fastening devices.
IMPORTANT If gas is smelt, switch from
LPG operation to petrol operation and
immediately go to the Fiat Dealership to
have the vehicle checked and possible
system faults excluded.
48PGL6J0029
49PGL00003
37
Page 42 of 240

12)When painting in an oven, the LPG tank
must be removed from the car and later
refitted by a Fiat Dealership. Although the
LPG system has numerous safety features,
it is advisable to proceed as follows every
time the vehicle is not in use for a long
period or moved in an emergency as a
result of a breakdown or accident: unscrew
the devices fastening the cover of the LPG
tank, then remove it. Close the LPG cock
rotating the ring nut clockwise (see
"Passive safety / active safety"). Refit the
cover and retighten the fastening devices.
13)When switching is requested, metallic
noise from the valves which pressurise the
circuit can be heard. For the switching logic
described above, a delay between the
valve ticking and the switching off of the
instrument panel indication is completely
normal.
14)Do not switch between the two
operating modes whilst starting the engine.15)In particular usage conditions, such as
starting and operation at low ambient
temperature or LPG supply with low
propane content, the system may switch
temporarily to petrol operation, without a
visual indication of switching on the
instrument panel. In the event of low LPG
levels in the tank or request for high
performance (e.g. overtaking, car fully
laden, steep hills) the system may
automatically switch to petrol operation to
guarantee the engine power requested; the
green warning light
on the instrument
panel switches on to indicate this. When
the above conditions are no longer present,
the system automatically restores LPG
operation; the green warning light
switches off. To achieve the automatic
switching described above, make sure that
there is always enough fuel in the petrol
tank.
16)It is strictly forbidden to use any
additive in the LPG. Periodically (at least
once every six months) it is advisable to let
the LPG in the tank run out and, at the first
refuelling, to check that it does not exceed
the maximum capacity of 42 litres (reserve
included) (with a tolerance of 1 litres
excess). If the level is above 42 litres
(reserve included) contact a Fiat Dealership
immediately.
17)Only use LPG for motor vehicles.
40
KNOWING YOUR CAR
Page 68 of 240
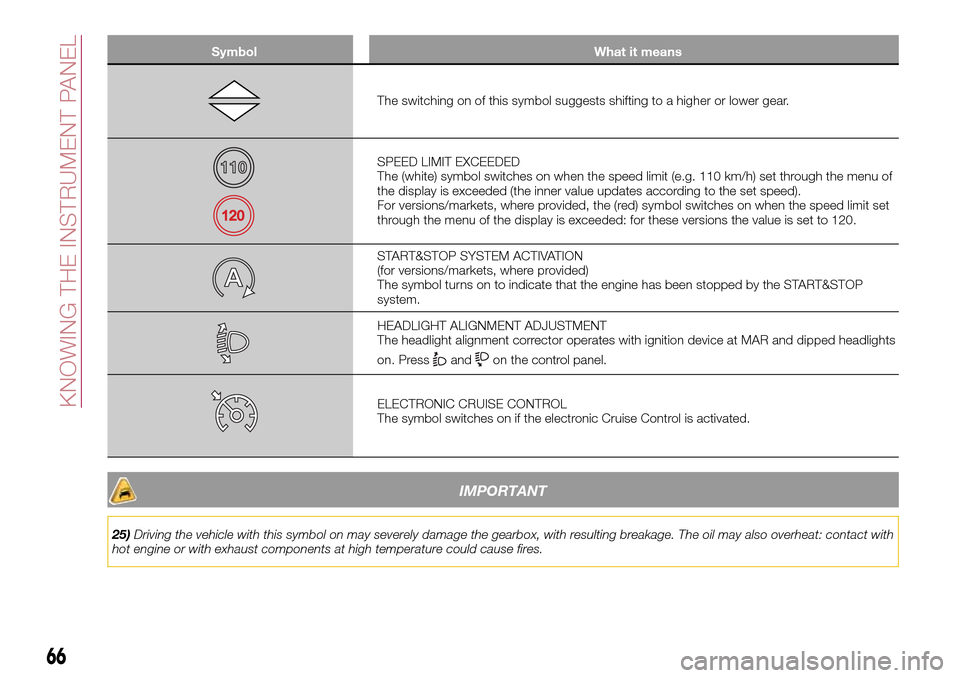
Symbol What it means
The switching on of this symbol suggests shifting to a higher or lower gear.
SPEED LIMIT EXCEEDED
The (white) symbol switches on when the speed limit (e.g. 110 km/h) set through the menu of
the display is exceeded (the inner value updates according to the set speed).
For versions/markets, where provided, the (red) symbol switches on when the speed limit set
through the menu of the display is exceeded: for these versions the value is set to 120.
START&STOP SYSTEM ACTIVATION
(for versions/markets, where provided)
The symbol turns on to indicate that the engine has been stopped by the START&STOP
system.
HEADLIGHT ALIGNMENT ADJUSTMENT
The headlight alignment corrector operates with ignition device at MAR and dipped headlights
on. Press
andon the control panel.
ELECTRONIC CRUISE CONTROL
The symbol switches on if the electronic Cruise Control is activated.
IMPORTANT
25)Driving the vehicle with this symbol on may severely damage the gearbox, with resulting breakage. The oil may also overheat: contact with
hot engine or with exhaust components at high temperature could cause fires.
66
KNOWING THE INSTRUMENT PANEL
Page 130 of 240
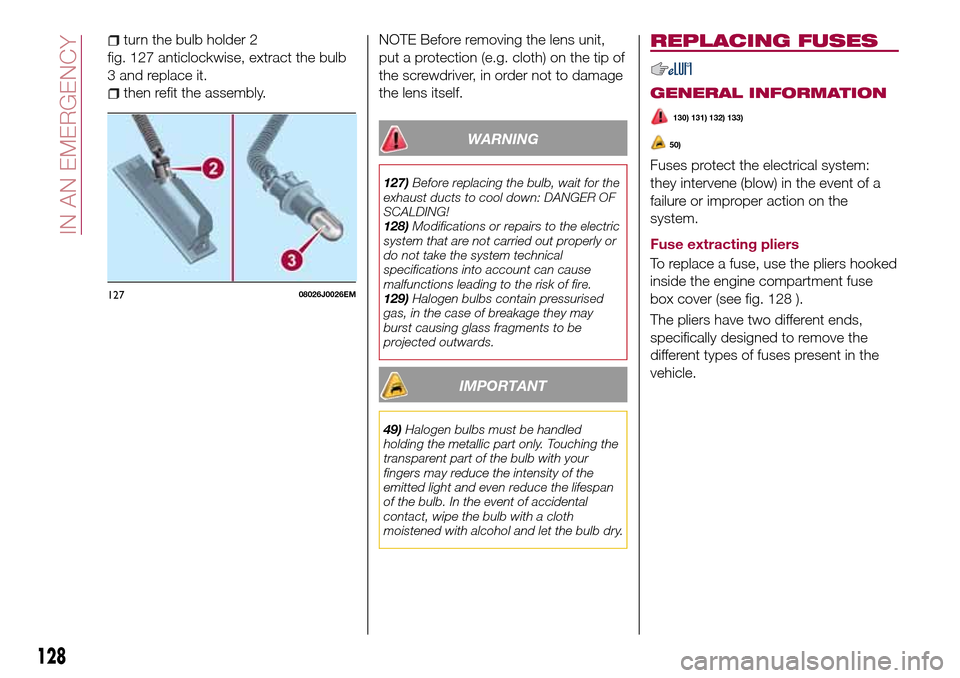
turn the bulb holder 2
fig. 127 anticlockwise, extract the bulb
3 and replace it.
then refit the assembly.NOTE Before removing the lens unit,
put a protection (e.g. cloth) on the tip of
the screwdriver, in order not to damage
the lens itself.
WARNING
127)Before replacing the bulb, wait for the
exhaust ducts to cool down: DANGER OF
SCALDING!
128)Modifications or repairs to the electric
system that are not carried out properly or
do not take the system technical
specifications into account can cause
malfunctions leading to the risk of fire.
129)Halogen bulbs contain pressurised
gas, in the case of breakage they may
burst causing glass fragments to be
projected outwards.
IMPORTANT
49)Halogen bulbs must be handled
holding the metallic part only. Touching the
transparent part of the bulb with your
fingers may reduce the intensity of the
emitted light and even reduce the lifespan
of the bulb. In the event of accidental
contact, wipe the bulb with a cloth
moistened with alcohol and let the bulb dry.
REPLACING FUSES
GENERAL INFORMATION
130) 131) 132) 133)
50)
Fuses protect the electrical system:
they intervene (blow) in the event of a
failure or improper action on the
system.
Fuse extracting pliers
To replace a fuse, use the pliers hooked
inside the engine compartment fuse
box cover (see fig. 128 ).
The pliers have two different ends,
specifically designed to remove the
different types of fuses present in the
vehicle.
12708026J0026EM
128
IN AN EMERGENCY
Page 143 of 240

IMPORTANT
54)Show the package and the label to the
personnel charged with handling the tyre
treated with the tyre repair kit.
55)Fix&Go provides a temporary repair,
therefore the tyre must be examined and
repaired by a specialist as soon as
possible. The sealing fluid is effective at
temperatures between -40°C and +50°C. It
is possible to repair tyres which have been
damaged on tread up to a diameter of
4mm; however, tyres damaged on their
side cannot be repaired. Before using
Fix&Go kit, ensure that the tyre isn't
excessively damaged and that the rim is in
good condition, otherwise do not use it and
contact a Fiat Dealership. Do not remove
foreign bodies from the tyre. Do not let the
compressor turned on for more than
20 consecutive minutes - overheating
hazard.
EMERGENCY
STARTING
If the battery is flat, a jump starting can
be performed using the battery and the
cables of another vehicle, or using an
auxiliary battery. In all cases, the battery
used must have a capacity equal to or
a little higher than the flat one.
56)
IMPORTANT NOTES
Do not use an auxiliary battery or any
other source of external supply with a
voltage above 12 V: the battery, the
starter, the alternator and the electrical
system of the vehicle could be
damaged.
Do not attempt jump starting if the
battery is frozen. The battery could
break and explode!
PREPARATION TO JUMP
STARTING
The vehicle battery is located in the
engine compartment, behind the left
light cluster.
141) 142) 143) 144)
IMPORTANT The positive terminal (+) of
the battery is shielded by a protective
element. Raise it to access the terminal.
Proceed as follows:
operate the parking brake, move the
lever to P (Park), for versions equipped
with automatic transmission (if present),
or neutral, for versions with manual
gearbox, then set the ignition device to
STOP;
switch off all the other electrical
devices in the vehicle;
should you be using the battery of
another vehicle, park the other vehicle
within the range of the cables used for
the connection, operate the parking
brake and ensure that its ignition is off.
IMPORTANT Never connect the
negative terminals of the two batteries
directly! If the auxiliary battery is
installed on another vehicle, check that
there is no accidental contact of metal
parts between the two vehicles, since
an earth connection may result, with
the risk of serious injury to any people
who may be nearby.
IMPORTANT If the procedure below is
carried out incorrectly, it can cause
severe injury to people or damage the
recharging system of one or both
vehicles. Carefully follow the
instructions given below.
141
Page 150 of 240
147)The brake servo and the
electromechanical power steering will not
work while the vehicle is being towed. You
will therefore need to apply more force on
the brake pedal and steering wheel. Do not
use flexible ropes when towing, and avoid
jerky movements. During towing, make
sure that the trailer hitch does not damage
any components it is touching. When
towing the car, you must comply with all
specific traffic regulations and adopt an
appropriate driving behaviour. Do not start
the engine while towing the car. Before
tightening the ring, clean the threaded
housing thoroughly. Make sure that the ring
is fully screwed into the housing before
towing the car.
148)The front and rear tow hooks should
be used only for emergencies on the road.
You are allowed to tow the vehicle for short
distances using an appropriate device in
accordance with the highway code (a rigid
bar), to move the vehicle on the road in
readiness for towing or transport via a
breakdown vehicle. Tow hooks MUST NOT
be used to tow vehicles off the road or
where there are obstacles and/or for
towing operations using cables or other
non-rigid devices. In compliance with the
above conditions, towing must take place
with the two vehicles (one towing, the other
towed) aligned as much as possible along
the same centre line.
148
IN AN EMERGENCY