2017 FIAT TIPO 4DOORS Light adjustment
[x] Cancel search: Light adjustmentPage 10 of 240

INSTRUMENT PANEL
1. Adjustable side air diffusers 2. Left stalk: direction indicators, main beam headlights, flashings 3. Instrument panel
4. Steering wheel controls 5. Right stalk: windscreen wiper / windscreen washer, setting of the rain sensor sensitivity level
6.Uconnect™7. Control buttons 8. Passenger front airbag (where provided) 9. Adjustable central air diffusers
10. Glove compartment 11. Climate controls 12. Buttons on the central console: seat heating, USB port + AUX plug
panel, socket/cigarette lighter 13. Ignition device 14. Driver front airbag 15. Steering wheel controls 16. Control panel:
front fog lights (where present), rear fog lights, headlight alignment adjustment, iTPMS reset, ESC OFF (where present).
1P03036J001
8
KNOWING YOUR CAR
Page 11 of 240

Right hand drive versions
1. Adjustable side air diffusers 2. Right stalk: windscreen wiper/windscreen washer, setting of the rain sensor sensitivity
level 3. Instrument panel 4. Steering wheel controls 5. Left stalk: direction indicators, main beam headlights, flashings
6.Uconnect™7. Control buttons 8. Passenger front airbag (where provided) 9. Adjustable central air
diffusers 10. Glove compartment 11. Climate controls 12. Buttons on the central console: seat heating, USB port + AUX
plug panel, socket/cigarette lighter 13. Ignition device 14. Driver front airbag 15. Steering wheel controls 16. Control
panel: front fog lights (where present), rear fog lights, headlight alignment adjustment, iTPMS reset, ESC OFF (where present).
2PDX6J008H
9
Page 24 of 240

Deactivation
Keep the left stalk in main beam
headlights flashing position for a few
seconds or turn the key to MAR
position or wait until the period
previously set has ended.
MAIN BEAM HEADLIGHTS
With ring nut in position, push the
stalk forward toward the dashboard
(stable position). The
warning light
switches on in the instrument panel.
They are switched off by pulling the
stalk towards the steering wheel.
Flashing the headlights
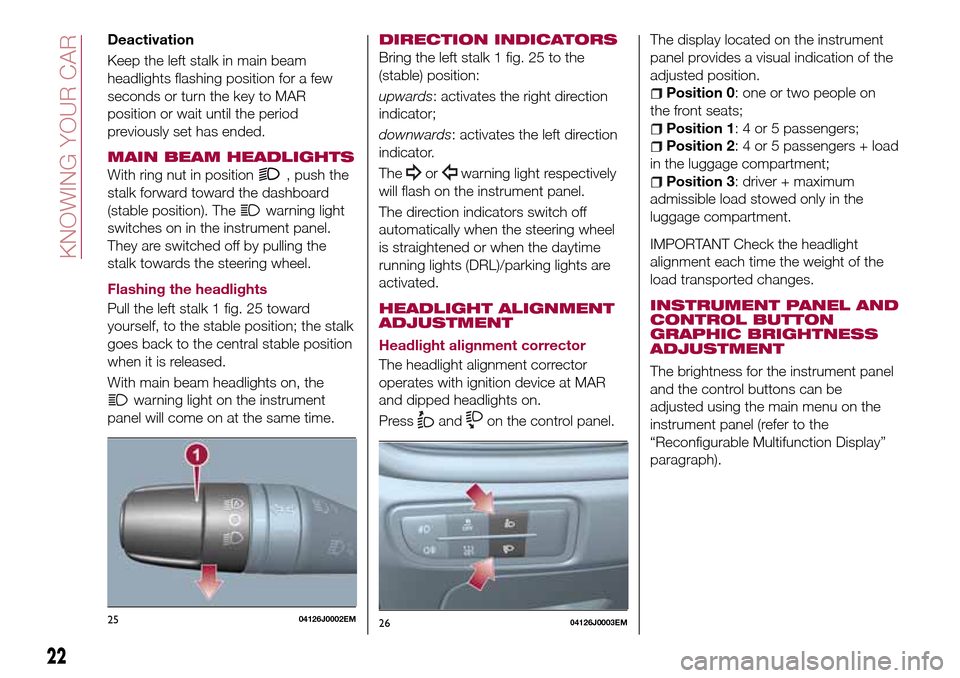
Pull the left stalk 1 fig. 25 toward
yourself, to the stable position; the stalk
goes back to the central stable position
when it is released.
With main beam headlights on, the
warning light on the instrument
panel will come on at the same time.
DIRECTION INDICATORS
Bring the left stalk 1 fig. 25 to the
(stable) position:
upwards: activates the right direction
indicator;
downwards: activates the left direction
indicator.
The
orwarning light respectively
will flash on the instrument panel.
The direction indicators switch off
automatically when the steering wheel
is straightened or when the daytime
running lights (DRL)/parking lights are
activated.
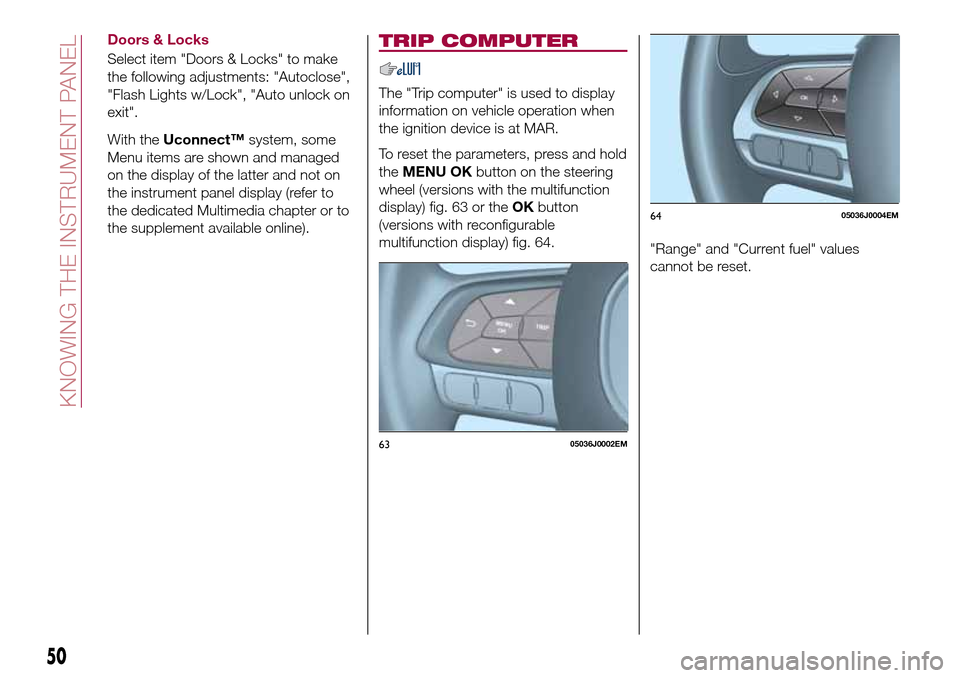
HEADLIGHT ALIGNMENT
ADJUSTMENT
Headlight alignment corrector
The headlight alignment corrector
operates with ignition device at MAR
and dipped headlights on.
Press
andon the control panel.The display located on the instrument
panel provides a visual indication of the
adjusted position.
Position 0: one or two people on
the front seats;
Position 1: 4 or 5 passengers;
Position 2: 4 or 5 passengers + load
in the luggage compartment;
Position 3: driver + maximum
admissible load stowed only in the
luggage compartment.
IMPORTANT Check the headlight
alignment each time the weight of the
load transported changes.
INSTRUMENT PANEL AND
CONTROL BUTTON
GRAPHIC BRIGHTNESS
ADJUSTMENT
The brightness for the instrument panel
and the control buttons can be
adjusted using the main menu on the
instrument panel (refer to the
“Reconfigurable Multifunction Display”
paragraph).
2504126J0002EM2604126J0003EM
22
KNOWING YOUR CAR
Page 51 of 240

CONTROL BUTTONS
These are located on the left side of the
steering wheel fig. 62.
They allow the driver to select and
interact with the items in the Main menu
of the display (see paragraph "Main
menu").
/: press and release the
buttons to access the Main menu and
to scroll the menu and the submenus
upwards or downwards.
/: press and release the
buttons to access the information
displays or the submenus of an item of
the Main menu.
OK: press this button to
access/select the info displays or the
submenus of an item of the Main menu.
Hold the button pressed for 1 second
to reset the displayed/selected
functions.
MAIN MENU
The Menu includes the following items:
TRIP
GSI
VEHICLE INFO
AUDIO (function available in versions
and markets where present)
PHONE (function available in versions
and markets where present)
NAVIGATION (function available in
versions and markets where present)
ALERTS
VEHICLE SETUP
Vehicle Setup
This menu item allows you to change
the settings for:
Display;
Units;
Clock & Date;
Security
Safety & Assistance;
Lights;
Doors & Locks.
Display
By selecting item "Display" you can
access the settings/information
regarding: " Display Settings”,
Language", "See phone" (available in
versions and markets where present),
"See navigation" (available in versions
and markets where present),
"Automatic reset Trip B", “Display
lighting”.Units
Select item "Units" to choose the unit of
measurement between: "Imperial",
"Metric", "Customised".
Clock & Date
Select item "Clock & Date" to make the
following adjustments: "Set time",
"Mode", "Set date".
Security
Select item "Security" to make the
following adjustments: “Passenger
AIRBAG” (where present), "Speed
buzzer", "Seat belt buzzer".
“Passenger AIRBAG" adjustment allows
you to activate/deactivate the
passenger airbag (where present):
Passenger's protection not active:
the
LED comes on constantly in the
instrument panel dashboard.
Safety & Assistance
Select item "Safety & Assistance" to
make the following adjustments: Rain
sensor, Warning volume, Park Assist,
Vol. Park Assist.
Lights
Select item "Lights" to make the
following adjustments: "Courtesy
lights", "Daytime running lights",
"Cornering lights", "Headlamp sensor",
"Follow me home".6205036J0004EM
49
Page 52 of 240

Doors & Locks
Select item "Doors & Locks" to make
the following adjustments: "Autoclose",
"Flash Lights w/Lock", "Auto unlock on
exit".
With theUconnect™system, some
Menu items are shown and managed
on the display of the latter and not on
the instrument panel display (refer to
the dedicated Multimedia chapter or to
the supplement available online).
TRIP COMPUTER
The "Trip computer" is used to display
information on vehicle operation when
the ignition device is at MAR.
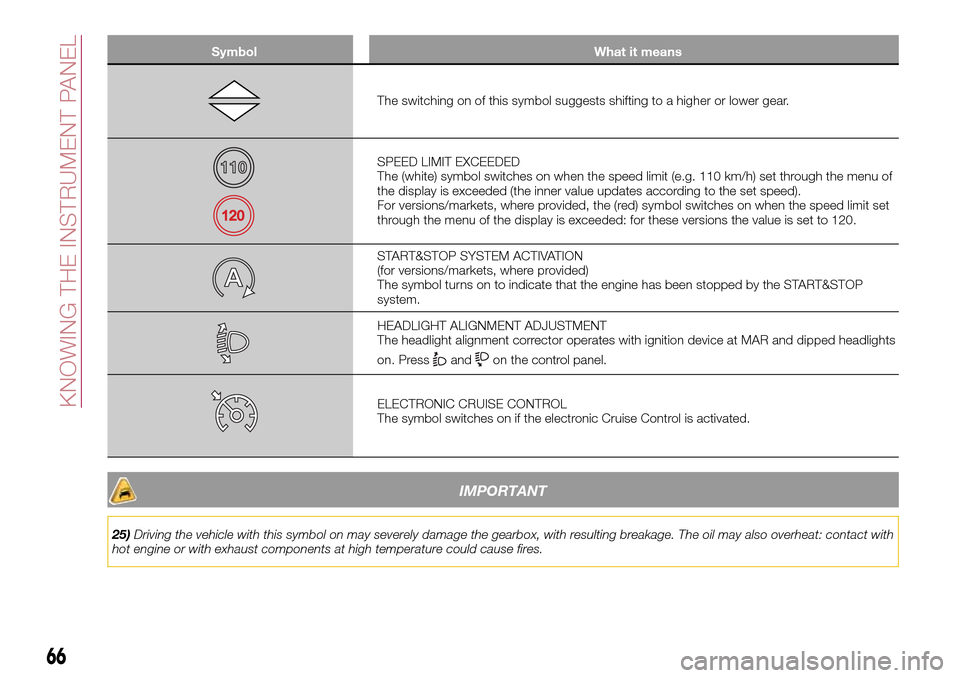
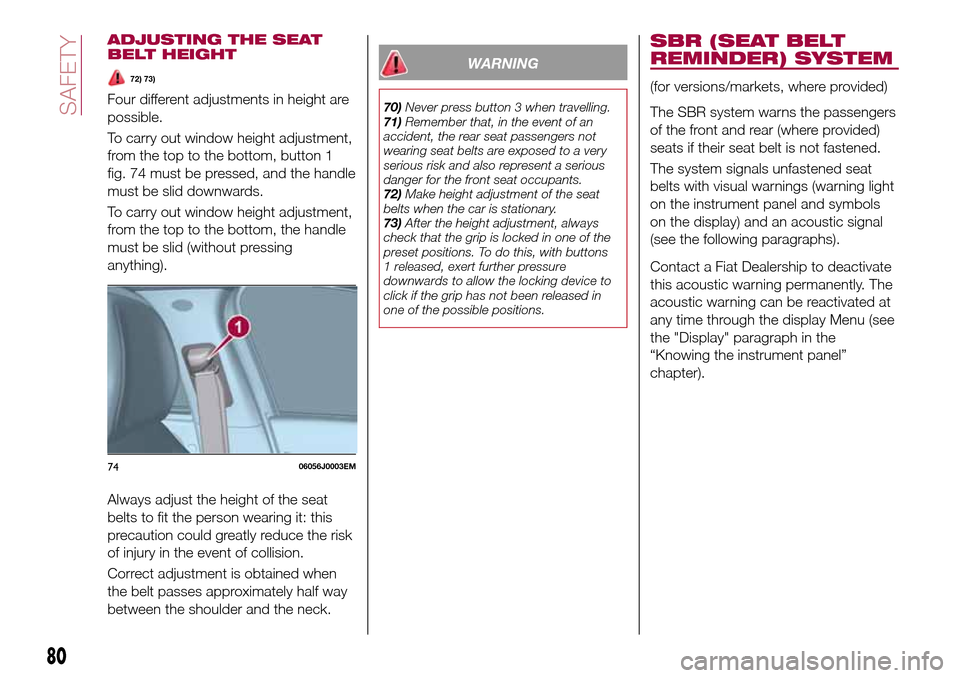
To reset the parameters, press and hold
theMENU OKbutton on the steering
wheel (versions with the multifunction
display) fig. 63 or theOKbutton
(versions with reconfigurable
multifunction display) fig. 64.
"Range" and "Current fuel" values
cannot be reset.
6305036J0002EM
6405036J0004EM
50
KNOWING THE INSTRUMENT PANEL
Page 68 of 240

Symbol What it means
The switching on of this symbol suggests shifting to a higher or lower gear.
SPEED LIMIT EXCEEDED
The (white) symbol switches on when the speed limit (e.g. 110 km/h) set through the menu of
the display is exceeded (the inner value updates according to the set speed).
For versions/markets, where provided, the (red) symbol switches on when the speed limit set
through the menu of the display is exceeded: for these versions the value is set to 120.
START&STOP SYSTEM ACTIVATION
(for versions/markets, where provided)
The symbol turns on to indicate that the engine has been stopped by the START&STOP
system.
HEADLIGHT ALIGNMENT ADJUSTMENT
The headlight alignment corrector operates with ignition device at MAR and dipped headlights
on. Press
andon the control panel.
ELECTRONIC CRUISE CONTROL
The symbol switches on if the electronic Cruise Control is activated.
IMPORTANT
25)Driving the vehicle with this symbol on may severely damage the gearbox, with resulting breakage. The oil may also overheat: contact with
hot engine or with exhaust components at high temperature could cause fires.
66
KNOWING THE INSTRUMENT PANEL
Page 82 of 240

ADJUSTING THE SEAT
BELT HEIGHT
72) 73)
Four different adjustments in height are
possible.
To carry out window height adjustment,
from the top to the bottom, button 1
fig. 74 must be pressed, and the handle
must be slid downwards.
To carry out window height adjustment,
from the top to the bottom, the handle
must be slid (without pressing
anything).
Always adjust the height of the seat
belts to fit the person wearing it: this
precaution could greatly reduce the risk
of injury in the event of collision.
Correct adjustment is obtained when
the belt passes approximately half way
between the shoulder and the neck.
WARNING
70)Never press button 3 when travelling.
71)Remember that, in the event of an
accident, the rear seat passengers not
wearing seat belts are exposed to a very
serious risk and also represent a serious
danger for the front seat occupants.
72)Make height adjustment of the seat
belts when the car is stationary.
73)After the height adjustment, always
check that the grip is locked in one of the
preset positions. To do this, with buttons
1 released, exert further pressure
downwards to allow the locking device to
click if the grip has not been released in
one of the possible positions.
SBR (SEAT BELT
REMINDER) SYSTEM
(for versions/markets, where provided)
The SBR system warns the passengers
of the front and rear (where provided)
seats if their seat belt is not fastened.
The system signals unfastened seat
belts with visual warnings (warning light
on the instrument panel and symbols
on the display) and an acoustic signal
(see the following paragraphs).
Contact a Fiat Dealership to deactivate
this acoustic warning permanently. The
acoustic warning can be reactivated at
any time through the display Menu (see
the "Display" paragraph in the
“Knowing the instrument panel”
chapter).
7406056J0003EM
80
SAFETY
Page 222 of 240

SWITCHING THE SYSTEM
ON/OFF
The system is switched on/off by
pressing the
button/knob.
Turn the button/knob clockwise to
increase the radio volume or
anticlockwise to decrease it.
RADIO MODE
After the desired radio station is
selected, the following information is
shown on the display:
At the top: the list of radio stations
stored (preset) is displayed; the station
being listened to is highlighted.
In the middle: display of the name of
the current radio station and the
buttons for selecting the previous or
next radio station.
At the bottom: display of the following
buttons:
"Browse": list of the radio stations
available;
"AM/FM", "AM/DAB", "FM/DAB":
selection of the desired frequency band
(button reconfigurable according to the
band selected: AM, FM or DAB);
"Tune" : manual radio station tuning
(not available for DAB radios);
"Info": additional information on the
source being listened to;
"Audio": access to the "Audio
setting" screen.Audio menu
To access the "Audio" menu press the
Audio" button located at the bottom of
the display.
The following adjustments can be
carried out using the "Audio" menu:
"Equalizer" (for versions/markets,
where provided);
"Balance/Fader" (left/right and
front/rear audio balance adjustment);
"Speed/Volume" (speed-dependent
automatic volume control);
"Loudness" (for versions/markets,
where provided);
"Auto-On Radio";
To exit the "Audio" menu, press the
/Done button.
MEDIA MODE
Press the "Source" button to select the
desired audio source among those
available: AUX, USB, iPod and
Bluetooth®.
Applications used on portable devices
may be not compatible with the
Uconnect™system
Track selection (browse)
Use this function to scroll through and
select the tracks on the active device.
The choices available depend on the
device connected.For example, on a USB/iPod device you
can also scroll through the list of artists,
genres and albums available on the
device depending on the information
present on the tracks using the
BROWSE ENTER button/knob.
Within each list, the "ABC" button
allows the user to skip to the desired
letter in the list.
NOTE This button might be disabled for
some
Apple®devices.
NOTE The BROWSE ENTER button
does not allow any operation on an
AUX device.
Press the BROWSE ENTER button to
activate this function on the source
being played.
Turn the BROWSE ENTER button/knob
to select the desired category and then
press the button/knob to confirm the
selection.
Press the
button to cancel the
function.
Bluetooth® SOURCE
This mode is activated by pairing a
Bluetooth®device containing music
tracks with the system.
220
MULTIMEDIA