2017 FIAT 500X interior lights
[x] Cancel search: interior lightsPage 11 of 284

GETTING TO KNOW YOUR CAR
In-depth knowledge of your new vehicle
starts here.
The booklet that you are reading simply
and directly explains how it is made and
how it works.
That’s why we advise you to read it
seated comfortably on board, so that
you can see immediately what is
described here for yourself.DASHBOARD...............10
THE KEYS.................11
IGNITION DEVICE............12
FIAT CODE.................14
ALARM...................14
DOORS...................15
SEATS....................18
HEAD RESTRAINTS...........21
STEERING WHEEL............22
REAR VIEW MIRRORS.........23
EXTERIOR LIGHTS............24
INTERIOR LIGHTS............28
WINDSCREEN/REAR WINDOW
WIPER...................29
CLIMATE CONTROL SYSTEM.....33
ELECTRIC WINDOWS..........37
ELECTRIC SUN ROOF.........38
BONNET..................40
BOOT....................41
9
Page 27 of 284

variations in outside lighting based on
the light sensitivity set in the display
Menu or theUconnect™system.
The higher the sensitivity, the lower the
amount of external light needed to
automatically switch the external lights
on.
Function activation
Turn the light switch ring nut to AUTO.
IMPORTANT The function can only be
activated with the ignition device at
MAR.
Function deactivation
To deactivate the function, turn the light
switch ring nut to a position other than
AUTO.
DIPPED BEAM
HEADLIGHTS
Turn the light switch ring nut to:
side lights, dipped beam headlights and
instrument panel will light up; the
warning light will come on on the
latter.
DAYTIME RUNNING
LIGHTS (DRL)
"Daytime Running Lights"
18) 19)
With the ignition device in the MAR
position and the light ring turned to the
Oposition, the daytime running lights
are automatically activated. The other
lights and interior lighting remain off.The daytime running lights are
temporarily deactivated when the
direction indicators are activated. When
the direction indicators are deactivated,
the daylight running lights are
reactivated.
FOG LIGHTS(where provided)
Press the
button to turn on the fog
lights with side lights and dipped beam
headlights on.
When the fog lights are on, the side
lights and number plate lights are also
on, while the daytime running lights are
off.
Press the button again or turn the
switch ring nut toOin order to switch it
off.
REAR FOG LIGHT(where provided)
The button that controls switching on
and off of the rear fog light is integrated
into the light switch.
Press the
button to turn on the rear
fog light with side lights and fog lights
on.
PARKING LIGHTSHEADLIGHTS OFF DELAY
(Follow me home)
Activation
With multifunction display and
Uconnect™3'': turn the ignition device
to STOP. Within 2 minutes, pull the left
stalk to headlight flashing mode: the
headlight off delay is activated for
30 seconds. The function can be
activated for 7 times in sequence, i.e.
up to a total of 210 seconds.
With reconfigurable multifunction
display and/orUconnect™5'': the
headlight off delay can be set (from 0,
30, 60 to 90 seconds) in the Menu.
If the headlight off delay is set to
0 seconds, it is possible to turn on the
lights for a predefined time of
30 seconds using the main beam
headlights stalk within 2 minutes after
stopping the engine. It is possible to
turn on the lights 7 times for up to
210 seconds.
25
These can be turned on by turning the
light switch ring to the
position.
The
warning light switches on in
the instrument panel.IMPORTANT NOTE Do not select this
light switch position when the car is
moving, but only to indicate that the car
is parked when prescribed by the
regulations in force in the country where
you are driving (Highway Code).
To turn the lights off, turn the light
switch ring to theOposition.
Page 30 of 284

WARNING
18)The daytime running lights are an
alternative to the dipped headlights for
driving during the daytime in countries
where it is compulsory to have lights on
during the day; where it is not compulsory,
the use of daytime running lights is
permitted.
19)Daytime running lights cannot replace
dipped beam headlights when driving at
night or through tunnels. The use of
daytime running lights is governed by the
highway code of the country in which you
are driving. Comply with legal
requirements.
INTERIOR LIGHTS
FRONT ROOF LIGHT
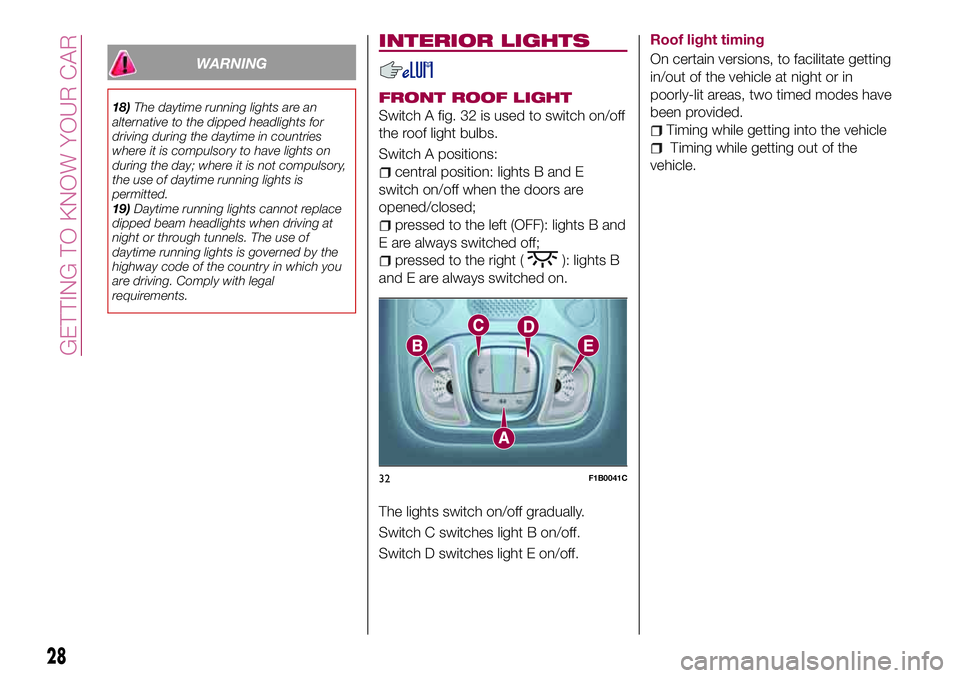
Switch A fig. 32 is used to switch on/off
the roof light bulbs.
Switch A positions:
central position: lights B and E
switch on/off when the doors are
opened/closed;
pressed to the left (OFF): lights B and
E are always switched off;
pressed to the right (): lights B
and E are always switched on.
The lights switch on/off gradually.
Switch C switches light B on/off.
Switch D switches light E on/off.Roof light timing
On certain versions, to facilitate getting
in/out of the vehicle at night or in
poorly-lit areas, two timed modes have
been provided.
Timing while getting into the vehicle
Timing while getting out of the
vehicle.
32F1B0041C
28
GETTING TO KNOW YOUR CAR
Page 43 of 284

BOOT
The boot unlocking is electrically
operated and is deactivated when the
vehicle is in motion.
OPENING
27)
Opening from the outside
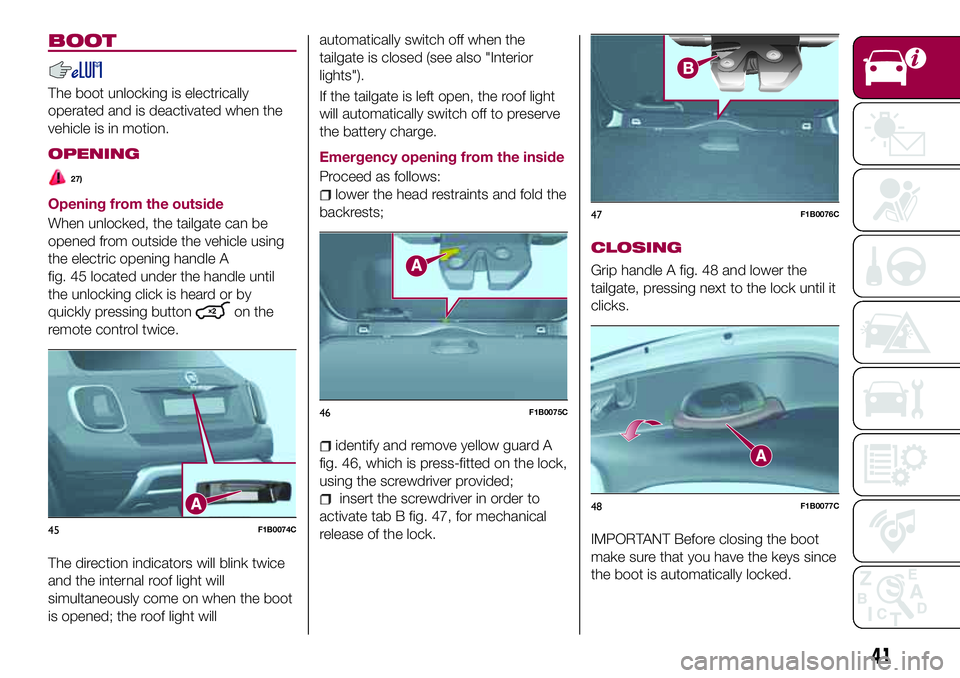
When unlocked, the tailgate can be
opened from outside the vehicle using
the electric opening handle A
fig. 45 located under the handle until
the unlocking click is heard or by
quickly pressing button
on the
remote control twice.
The direction indicators will blink twice
and the internal roof light will
simultaneously come on when the boot
is opened; the roof light willautomatically switch off when the
tailgate is closed (see also "Interior
lights").
If the tailgate is left open, the roof light
will automatically switch off to preserve
the battery charge.
Emergency opening from the inside
Proceed as follows:
lower the head restraints and fold the
backrests;
identify and remove yellow guard A
fig. 46, which is press-fitted on the lock,
using the screwdriver provided;
insert the screwdriver in order to
activate tab B fig. 47, for mechanical
release of the lock.
CLOSING
Grip handle A fig. 48 and lower the
tailgate, pressing next to the lock until it
clicks.
IMPORTANT Before closing the boot
make sure that you have the keys since
the boot is automatically locked.45F1B0074C
46F1B0075C
47F1B0076C
48F1B0077C
41
Page 49 of 284

MAIN MENU
The Menu includes the following items:
TRIP
MOOD SELECTOR (or DRIVE MODE
VEHICLE INFO
DRIVER ASSIST
AUDIO
PHONE
NAVIGATION
WARNINGS
VEHICLE SETTINGS
Vehicle setup (Change car settings)
This menu item allows you to change
the settings for:
"Display";
"Units";
"Clock & Date";
"Security"
"Security & Assistance";
"Lights";
"Doors & Locks".
Display
By selecting item "Display" you can
access the settings/information
regarding: "Language", "See phone",
"See navigation", "Automatic Trip B
reset", “Repeat Drive Mode” or
(where provided)."Units"
Select item "Units" to choose the unit of
measurement between: "Imperial",
"Metric", "Customised".
"Clock & Date"
Select item "Clock & Date" to make the
following adjustments: "Set time", "Time
format", "Set date".
"Security"
Select item "Security" to make the
following adjustments: "Passenger
AIRBAG", "Speed beep", "Seat belt
buzzer", "Hill Hold Control".
"Passenger AIRBAG" adjustment allows
you to activate/deactivate the
passenger airbag:
Passenger's protection active:
the
ONLED comes on constantly in
the instrument panel dashboard.
Passenger's protection not
active: the
OFFLED comes on
constantly in the instrument panel
dashboard.
"Security & Assistance"
For possible adjustments see
paragraphUconnect™in the
dedicated chapter."Lights"
Select item "Lights" to make the
following adjustments: "Interior Ambient
lighting", "Headlight sensor", "Follow
me", "Headlights while opening", "Auto
high beams", "Daytime Lights",
"Cornering lights".
"Doors & Locks"
Select item "Doors & Locks" to make
the following adjustments: "Autoclose",
"Aut. unl. on exit", "Flsh.Light w/Lock",
"Horn with Lock", "Horn with remote
start", "Remote unlock", "Door Unlock"
(versions with Keyless Entry), "Keyless
Entry".
NOTE With theUconnect™system,
some Menu items are shown and
managed on the display of the latter
and not on the instrument panel display
(refer to the Multimedia chapter or to
the supplement available online).
47
GSIfor some markets) (where provided) /
“Repeat Mood Selector” (for
some markets)
Page 113 of 284

STARTING THE
ENGINE
Before starting the engine, adjust the
seat, the interior rear view mirrors, the
door mirrors and fasten the seat belt
correctly.
Never press the accelerator pedal for
starting the engine.
If necessary, messages indicating the
starting procedure can be shown on
the display.
ENGINE STARTING
PROCEDURE
103) 104) 105) 106)
31) 32) 33) 34)
Versions with manual gearbox
Proceed as follows:
engage the electric parking brake
and place the gear lever in neutral;
bring the ignition device to MAR. On
Diesel versions, warning light
lights
up in the instrument panel: wait for the
warning light to switch off;
fully depress the clutch pedal
without touching the accelerator;
turn the ignition device to AVV and
release it as soon as the engine starts;
if the engine does not start within
10 seconds, bring the ignition deviceback to STOP and wait for
10-15 seconds before repeating the
starting procedure.
after the manoeuvre has been
repeated, if the problem persists,
contact a Fiat Dealership.
Versions with automatic
transmission
Proceed as follows:
engage the electric parking brake
and set the gear lever to P (Park) or N
(Neutral);
fully depress the brake pedal without
touching the accelerator;
set the ignition device to AVV;
if the engine does not start, bring
the ignition device back to STOP and
wait for 10-15 seconds before
repeating the starting procedure;
after the manoeuvre has been
repeated, if the problem persists,
contact a Fiat Dealership.
ENGINE STARTING
FAILURE
Starting the engine with electronic
key battery (Keyless Go) run down
or flat
If the ignition device does not respond
when the relevant button is pressed the
electronic key battery might be run
down or flat. Therefore, the system
does not detect the presence of the
electronic key on board the vehicle anddisplays a dedicated message. In this
case, rest the rounded edge of the
electronic key (the side opposite the
metal insert) on the ignition device and
press the button using the electronic
key. The ignition device is thus activated
and the engine can be started.
WARNING
103)Do not try to start the engine pouring
fuel or other flammable fluid inside the
throttle body air intake: this might damage
the engine and injury people nearby.
104)It is dangerous to run the engine in
enclosed areas. The engine takes in
oxygen and releases carbon dioxide,
carbon monoxide and other toxic gases.
105)The brake servo is not active until the
engine is started, so you would need to
apply much more force than usual to the
brake pedal.
106)Do not start the engine by pushing,
towing or driving downhill. These
manoeuvres may damage the catalytic
converter.
IMPORTANT
31)We recommend that during the initial
period, or during the first 1600 km, you do
not drive to full car performance (e.g.
excessive acceleration, long journeys at top
speed, sharp braking, etc.).
111
Page 190 of 284

BATTERY
177) 178) 179)
78)
6)
The battery does not require the
electrolyte to be topped up with distilled
water.
A periodic check carried out at a Fiat
Dealership is, however, necessary to
check efficiency.
Replacing the battery
If necessary, replace the battery with
another original battery with the same
specifications. Follow the battery
Manufacturer’s instructions for
maintenance.
USEFUL ADVICE FOR
EXTENDING THE LIFE OF
YOUR BATTERY
Useful advice for extending the life
of your battery
To avoid draining your battery and
make it last longer, observe the
following instructions:
when you park the vehicle, ensure
that the doors, tailgate and bonnet are
closed properly, to prevent any lights
from remaining on inside the passenger
compartment;
switch off all roof lights inside the
vehicle: the vehicle is however
equipped with a system which switches
all interior lights off automatically;
do not keep accessories (e.g. radio,
hazard warning lights, etc.) switched on
for a long time when the engine is not
running;
before performing any operation on
the electrical system, disconnect the
negative battery cable.
If, after purchasing the vehicle, you wish
to install electrical accessories which
require permanent electrical supply (e.g.
alarm, etc.) or accessories which
influence the electrical supply
requirements, contact a Fiat Dealership,
whose qualified staff will evaluate the
overall electrical consumption.
79)
IMPORTANT After the battery is
disconnected, the steering must be
initialised. The
warning light on the
instrument panel (or symbol on the
display) switches on to indicate this. To
carry out this procedure, simply turn the
steering wheel all the way from one end
to the other or drive in a straight line for
about a hundred metres.
IMPORTANT If the charge level remains
under 50% for a long time, the battery
is damaged by sulphation, reducing itscapacity and efficiency at start-up. The
battery is also more prone to the risk of
freezing (at temperatures of -10°C).
Refer to the "Vehicle inactivity"
paragraph in "Starting and driving"
chapter if the vehicle is left parked for a
long time.
WARNING
169)Never smoke while working in the
engine compartment: gas and inflammable
vapours may be present, with the risk of
fire.
170)Be very careful when working in the
engine compartment when the engine is
hot: you may get burned.
171)If the engine oil is being topped up,
wait for the engine to cool down before
loosening the filler cap, particularly for
vehicles with aluminium cap (where
provided). WARNING: risk of burns!
172)The cooling system is pressurised. If
the cap needs replacing, do so with
another original or the effectiveness of the
system may be compromised. Do not
remove the reservoir plug when the engine
is hot: you risk scalding yourself.
173)Do not travel if the windscreen
washer reservoir is empty: using the
windscreen washer is essential for
improving visibility. Repeated operation of
the system without fluid could damage or
cause rapid deterioration of some system
components.
188
SERVICING AND MAINTENANCE
Page 264 of 284

The available options are:
- "Sound Only": the system warns the
driver that an obstacle is present
through acoustic warnings only, via the
speakers in the vehicle;
- "Sound & Display": the system warns
the driver that an obstacle is present
through acoustic (via the speakers in
the vehicle) and visual (on the
instrument panel) warnings.
"Front Park Assist vol." (where
provided): allows you to select the
volume of the acoustic warnings for the
front Park Assist system;
"Rear Park Assist vol." (where
provided): allows you to select the
volume of the acoustic warnings for the
rear Park Assist system,
"Lane Assist Warning" (where
provided): allows you to select the Lane
Assist system intervention readiness;
"Lane Assist Strength" (where
provided): allows you to select the force
to apply to the steering wheel to put the
vehicle back in the lane through the
electric steering system, in the event of
Lane Assist system intervention.
"Side Assist" (where provided):
allows you to select the type of warning
from the Side Sensor system. The
options available are:
- "Off": the system is off;
- "Sound Only": the system warns thedriver that an obstacle is present
through acoustic warnings only, via the
speakers in the vehicle;
- "Sound & Display": the system warns
the driver that an obstacle is present
through acoustic (via the speakers in
the vehicle) and visual (on the
instrument panel) warnings.
"Side Assist volume" (where
provided): allows you to select the
volume of the acoustic warnings from
the Side Sensor system.
"Blind Spot Alert" (where provided):
this function can be used to select the
type of warning ("Sound Only" or
"Sound & Display") to indicate the
presence of objects in the blind spot of
the door mirror.
"Rain sensor" (where provided):
allows you to activate/deactivate the
automatic switching on of the wipers in
the case of rain.
"Brakes" (where provided): this
function can be used to select the
following submenus:
- "Brake Service" (where provided):
allows you to activate the procedure for
carrying out braking system servicing;
- "Electric Park Brake" (where
provided): allows you to activate/
deactivate the electric park brake
engagement.Lights (where provided)
This function can be used to carry out
the following adjustments:
"Interior lights" (where provided):
allows you to select the interior light
brightness;
"Headlamp sensor" (where provided):
adjustment of headlamp activation
sensitivity;
"Follow me" (where provided):
permits the setting of the headlamp
deactivation delay after switching off the
engine;
"Courtesy lights": activation/
deactivation of courtesy lights (where
provided);
"Day lights": activation/deactivation
of the daytime running lights (DRLs)
(where provided);
"Auto high beams" (where provided):
allows you to deactivate the main beam
headlights when approaching a vehicle
coming from the opposite direction;
"Flash Lights w/Lock" (where
provided): permits the activation of light
flashing when the doors are locked.
262
MULTIMEDIA