Page 30 of 284

WARNING
18)The daytime running lights are an
alternative to the dipped headlights for
driving during the daytime in countries
where it is compulsory to have lights on
during the day; where it is not compulsory,
the use of daytime running lights is
permitted.
19)Daytime running lights cannot replace
dipped beam headlights when driving at
night or through tunnels. The use of
daytime running lights is governed by the
highway code of the country in which you
are driving. Comply with legal
requirements.
INTERIOR LIGHTS
FRONT ROOF LIGHT
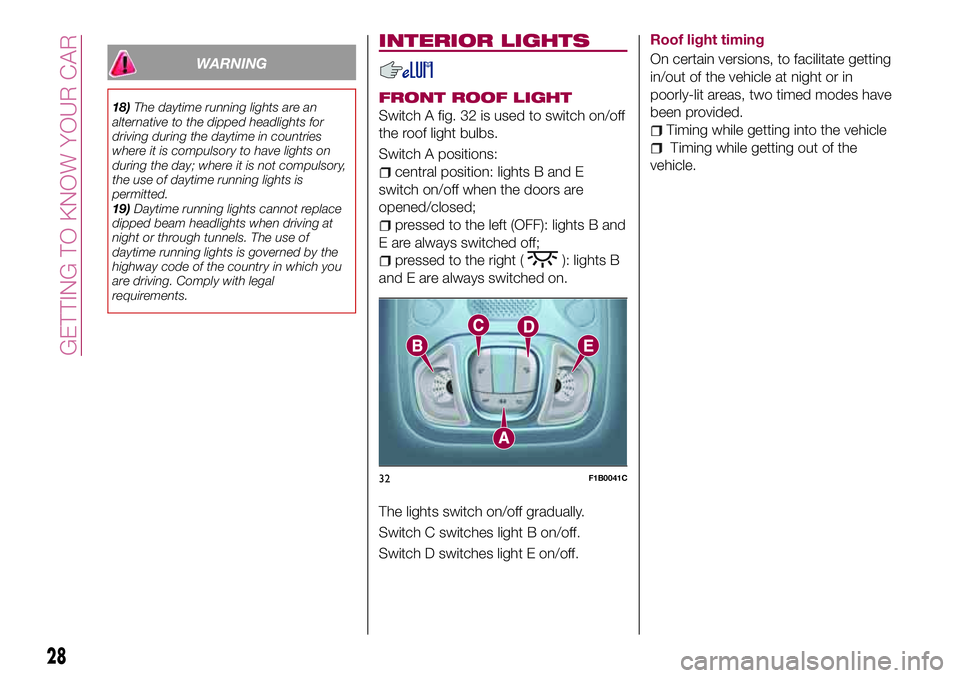
Switch A fig. 32 is used to switch on/off
the roof light bulbs.
Switch A positions:
central position: lights B and E
switch on/off when the doors are
opened/closed;
pressed to the left (OFF): lights B and
E are always switched off;
pressed to the right (): lights B
and E are always switched on.
The lights switch on/off gradually.
Switch C switches light B on/off.
Switch D switches light E on/off.Roof light timing
On certain versions, to facilitate getting
in/out of the vehicle at night or in
poorly-lit areas, two timed modes have
been provided.
Timing while getting into the vehicle
Timing while getting out of the
vehicle.
32F1B0041C
28
GETTING TO KNOW YOUR CAR
Page 64 of 284

Symbol What it means
POSSIBLE ICE ON ROAD
The symbol turns on when the outside temperature falls to or below 3°C.
IMPORTANT In the case of outside temperature sensor failure, the digits that indicate the value are
replaced by dashes.
SPEED LIMITER FAILURE
The symbol switches on in the case of failure of the Speed Limiter device. Contact a Fiat Dealership as
soon as possible to have the failure eliminated.
4x4 DRIVE SYSTEM FAILURE
The symbol turns on to indicate that there is a failure in the 4x4 drive system. Contact a Fiat Dealership as
soon as possible.
EXTERIOR LIGHTS FAILURE
The symbol switches on to indicate a failure on the following lights: daytime running lights (DRLs); parking
lights; side lights; direction indicators; rear fog light; reversing light; number plate lights; stop lights.
The failure may be caused by a blown bulb, a blown protection fuse or an interruption of the electrical
connection.
AUTOMATIC MAIN BEAM HEADLIGHTS FAILURE
The symbol switches on to report a failure of the automatic main beam headlights. Contact a Fiat
Dealership as soon as possible.
62
KNOWING THE INSTRUMENT PANEL
Page 144 of 284
IN AN EMERGENCY
A punctured tyre or a burnt-out bulb?
At times, a problem may interfere with
our journey.
The pages on emergencies can help
you to deal with critical situations
independently and with calm.
In an emergency we recommend that
you call the freephone number found in
the Warranty Booklet.
It is also possible to call the national or
international universal freephone
number to search for the nearest Fiat
Dealership.HAZARD WARNING LIGHTS.....143
REPLACING A BULB..........143
REPLACING FUSES..........149
CHANGING A WHEEL.........155
FIX&GO AUTOMATIC KIT.......159
EMERGENCY STARTING.......162
FUEL CUT-OFF SYSTEM.......163
AUTOMATIC TRANSMISSION -
LEVER UNLOCK............164
AUTOMATIC TRANSMISSION -
KEY REMOVAL.............165
DUAL CLUTCH AUTOMATIC
TRANSMISSION - LEVERS
UNLOCK.................166
DUAL CLUTCH AUTOMATIC
TRANSMISSION - KEY REMOVAL .167
TOWING THE VEHICLE........168
142
IN AN EMERGENCY
Page 145 of 284

HAZARD WARNING
LIGHTS
CONTROL
Press the fig. 112 button to switch the
lights on/off.
When the hazard warning lights are on,
the
andwarning lights flash.
IMPORTANT The use of hazard warning
lights is governed by the highway code
of the country you are driving in:
comply with legal requirements.
Emergency braking
In the event of emergency braking the
hazard warning lights switch on
automatically as well as the
and
warning lights in the instrument
panel.
The lights switch off automatically when
emergency braking ceases.
REPLACING A BULB
136) 137) 138)
65)
GENERAL
INSTRUCTIONS
Before replacing a bulb check the
contacts for oxidation;
replace blown bulbs with others of
the same type and power;
after replacing a headlight bulb,
always check its alignment;
when a light is not working, check
that the corresponding fuse is intact
before replacing the bulb. For the
location of fuses, refer to the paragraph
“Replacing fuses” in this chapter.
IMPORTANT When the weather is cold
or damp or after heavy rain or washing,
the surface of headlights or rear lights
may steam up and/or form drops of
condensation on the inside. This is a
natural phenomenon due to the
difference in temperature and humidity
between the inside and the outside of
the glass which does not indicate a
fault and does not compromise the
normal operation of lighting devices.
The mist disappears quickly when the
lights are turned on, starting from the
centre of the diffuser, extending
progressively towards the edges.
143
112F1B0185C
Page 146 of 284
TYPES OF BULBS
The vehicle is equipped with the following bulbs:
Glass bulbs (type A): they are press-fitted. Pull to extract.
Bayonet-type bulbs (type B): to remove them from their holder,
press the bulb and turn it anticlockwise, then extract it.
Tubular bulbs (type C): release them from their contacts to remove.
Halogen bulbs (type D): to remove the bulb, turn the connector to
the side and pull it out.
Halogen bulbs (type E): to remove the bulb, turn it anticlockwise.
Xenon gas discharge bulb (type F): to remove the bulb, contact a
Fiat Dealership.
144
IN AN EMERGENCY
Page 147 of 284
Light bulbs Type Power Figure reference
Front side lights/Daytime running lights (DRL) W21W 21W B
Rear side/brake light P21W 21W B
Main beam/dipped beam headlights (halogen) H4 60/55W D
Main beam/dipped beam headlights (Xenon gas discharge) D5S 25W F
Front direction indicators PY21W 21W B
Rear direction indicators P21W 21W B
Side direction indicators (on door mirror) WY5W 5W A
Third brake light LED – –
Number plate W5W 5W A
Fog lights H8 35W E
Rear fog light P21W 21W B
Reverse gear P21W 21W B
Front ceiling light C5W 5W A
Front ceiling lights (sun visors) C5W 5W A
Rear ceiling light (versions without sunroof) XENON 6W A
Rear ceiling lights (versions with sunroof) C5W 5W C
Boot ceiling lights W5W 5W A
Glove compartment light W5W 5W A
145
Page 148 of 284

REPLACING AN
EXTERNAL BULB
Dipped/main beam headlights
To replace the bulb, proceed as follows:
working from inside the engine
compartment, remove the rubber cap A
fig. 113, using the dedicated tab;
turn the bulb and bulb holder
assembly anticlockwise and then
remove it sliding it outwards;
disconnect the electrical connector B
and replace the bulb C.
then insert the bulb and bulb holder
assembly in its housing and turn it
clockwise, making sure that it is locked
correctly;
refit the rubber cap A.
IMPORTANT Only replace the bulb
when the engine is off. Also ensure that
the engine is cold, to prevent the risk of
burns.
Xenon gas discharge main
beam/dipped beam headlights
For replacing these bulbs, contact a
Fiat Dealership.
Side lights/daytime running lights
(DRL)
To replace the bulbs, proceed as
follows:
steer the car wheels completely
inwards;
undo screws A fig. 114 using the
screwdriver provided and remove
inspection flap B;
identify the side light/daytime running
light bulb;
turn the bulb and bulb holder
assembly anticlockwise and then
remove it sliding it outwards;
replace the bayonet-fitted bulb A
fig. 115;
finally, refit the inspection flap B
fig. 114, fully tightening fixing screws A.
Front direction indicators
To replace the bulbs, proceed as
follows:
steer the car wheels completely
inwards;
undo screws A fig. 114 using the
screwdriver provided and remove
inspection flap B;
identify the direction indicator bulb;
turn the bulb and bulb holder
assembly anticlockwise and then
remove it sliding it outwards;
replace the bayonet-fitted bulb A
fig. 115;
finally, refit the inspection flap B
fig. 114, fully tightening fixing screws A.
113F1B0146C
115F1B0253C
146
IN AN EMERGENCY
114F1B0147
Page 149 of 284

Fog lights
To replace the bulbs, proceed as
follows:
steer the car wheels completely
inwards;
undo screws A fig. 114 using the
screwdriver provided and remove
inspection flap B;
identify the fog light;
turn the bulb and bulb holder
assembly anticlockwise and then
remove it sliding it outwards;
disconnect the electrical connector;
replace the bulb-bulb holder
assembly B fig. 115;
reconnect the electrical connector to
the new bulb-bulb holder; then insert it
making sure it is locked correctly;
insert the assembly by turning it
clockwise and locking it correctly;
finally, refit the inspection flap B
fig. 114, fully tightening fixing screws A.Side turn light
IMPORTANT The procedure is
described by way of example only. It is
advisable to contact a Fiat Dealership
for bulb replacement.
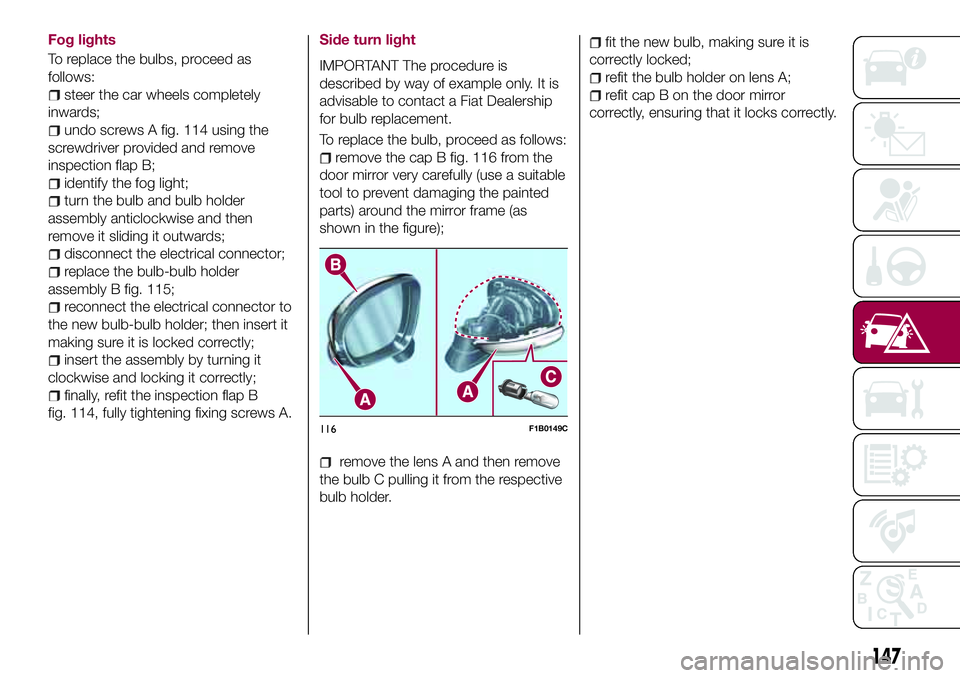
To replace the bulb, proceed as follows:
remove the cap B fig. 116 from the
door mirror very carefully (use a suitable
tool to prevent damaging the painted
parts) around the mirror frame (as
shown in the figure);
remove the lens A and then remove
the bulb C pulling it from the respective
bulb holder.
fit the new bulb, making sure it is
correctly locked;
refit the bulb holder on lens A;
refit cap B on the door mirror
correctly, ensuring that it locks correctly.
116F1B0149C
147