2017 FIAT 500L LIVING sensor
[x] Cancel search: sensorPage 70 of 240
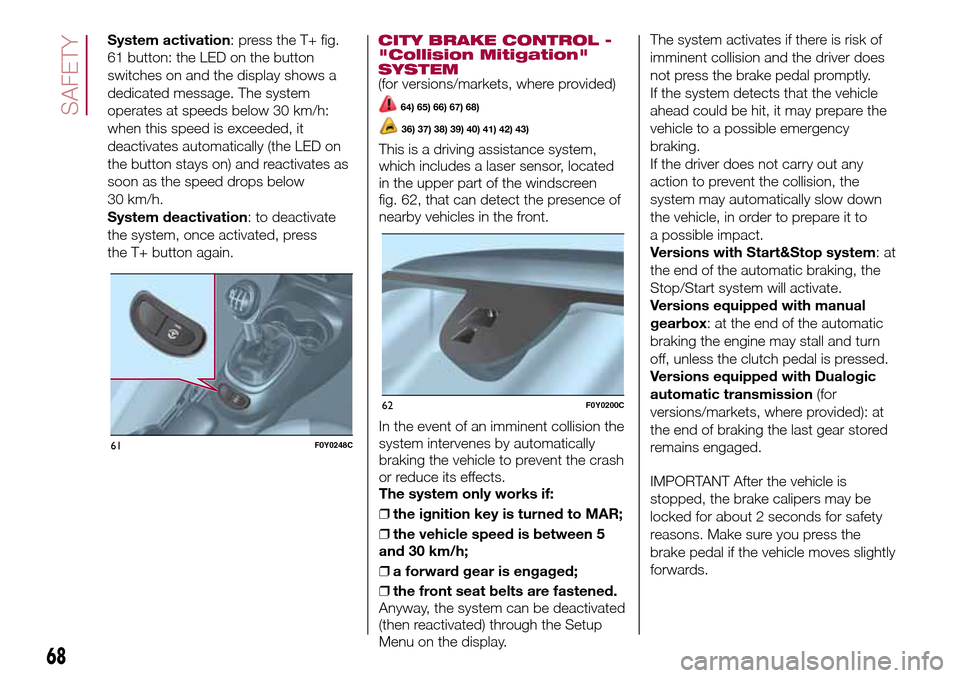
System activation: press the T+ fig.
61 button: the LED on the button
switches on and the display shows a
dedicated message. The system
operates at speeds below 30 km/h:
when this speed is exceeded, it
deactivates automatically (the LED on
the button stays on) and reactivates as
soon as the speed drops below
30 km/h.
System deactivation: to deactivate
the system, once activated, press
the T+ button again.CITY BRAKE CONTROL -
"Collision Mitigation"
SYSTEM
(for versions/markets, where provided)
64) 65) 66) 67) 68)
36) 37) 38) 39) 40) 41) 42) 43)
This is a driving assistance system,
which includes a laser sensor, located
in the upper part of the windscreen
fig. 62, that can detect the presence of
nearby vehicles in the front.
In the event of an imminent collision the
system intervenes by automatically
braking the vehicle to prevent the crash
or reduce its effects.
The system only works if:
❒the ignition key is turned to MAR;
❒the vehicle speed is between 5
and 30 km/h;
❒a forward gear is engaged;
❒the front seat belts are fastened.
Anyway, the system can be deactivated
(then reactivated) through the Setup
Menu on the display.The system activates if there is risk of
imminent collision and the driver does
not press the brake pedal promptly.
If the system detects that the vehicle
ahead could be hit, it may prepare the
vehicle to a possible emergency
braking.
If the driver does not carry out any
action to prevent the collision, the
system may automatically slow down
the vehicle, in order to prepare it to
a possible impact.
Versions with Start&Stop system:at
the end of the automatic braking, the
Stop/Start system will activate.
Versions equipped with manual
gearbox: at the end of the automatic
braking the engine may stall and turn
off, unless the clutch pedal is pressed.
Versions equipped with Dualogic
automatic transmission(for
versions/markets, where provided): at
the end of braking the last gear stored
remains engaged.
IMPORTANT After the vehicle is
stopped, the brake calipers may be
locked for about 2 seconds for safety
reasons. Make sure you press the
brake pedal if the vehicle moves slightly
forwards.
61F0Y0248C
62F0Y0200C
68
SAFETY
Page 71 of 240

Driving in special conditions
In certain driving conditions, such as,
for example: driving around a bend (see
fig. 63) / small vehicles and/or vehicles
not aligned with the driving lane (see fig.
64) / lane change by other vehicles
(see fig. 65) the system operation might
be unexpected or delayed. Pay the
utmost attention, keeping control of the
vehicle to drive in complete safety.
iTPMS (indirect Tyre
Pressure Monitoring
System)
(for versions/markets, where provided)
44) 45) 46) 47) 48) 49)
The iTPMS can monitor the tyre inflation
status through the wheel speed
sensors. The system warns the driver if
one or more tyres are flat by switching
on the warning light
on the
instrument panel and a warning
message on the display, along with an
acoustic signal.
If one tyre only is flat, the system can
indicate its position: it is in any case
recommended to check the pressure
on all four tyres.
This indication is displayed also when
turning the engine off and on again until
the "Reset" procedure is carried out.
"Reset" procedure
The iTPMS needs an initial "self-
learning" phase (with length dependingon the driving style and road conditions:
optimal conditions being driven on a
straight road at 80 km/h for at least 20
minutes) which starts when the "Reset"
procedure is carried out.
The "Reset" procedure must be carried
out:
❒each time tyre pressure is modified;
❒when even only one tyre is changed;
❒when tyres are rotated/inverted;
❒when the space-saver wheel is fitted.
Before carrying out the "Reset"
procedure, inflate the tyres to the rated
pressure values specified in the inflation
pressure table (see the "Wheels"
paragraph in the "Technical
specifications" chapter).
If the "Reset" procedure is not carried
out, in all above cases, the
warning
light may give false indications on
one or more tyres.
To carry out the "Reset" procedure,
with the vehicle stopped and the
ignition device at MAR, use the Setup
Menu as follows:
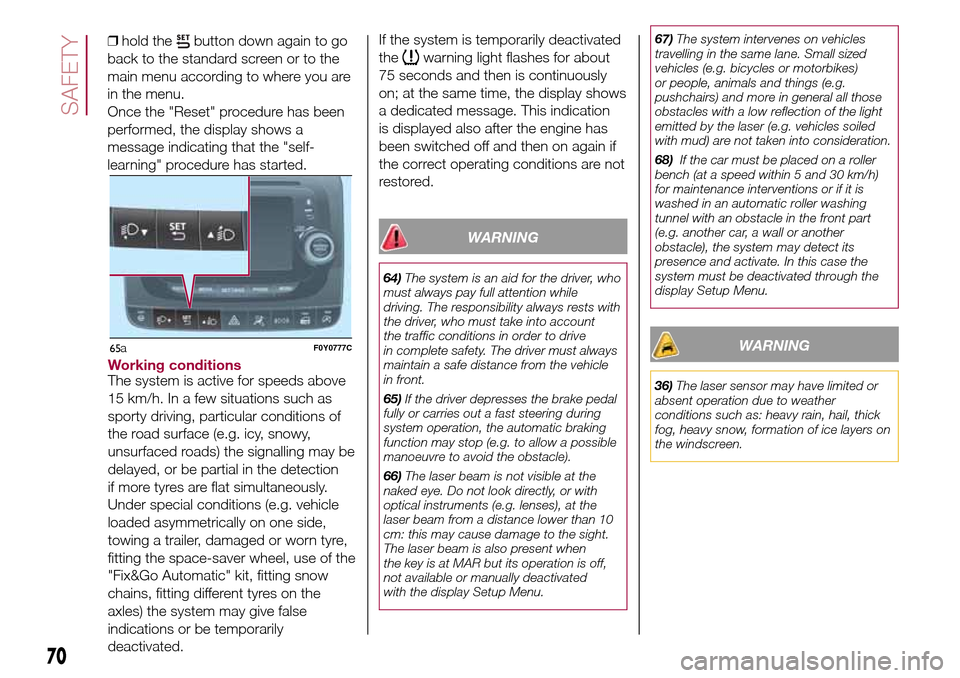
❒briefly press the
button fig. 65a:
the display will show "Reset";
❒press the
button or the
button to select ("Yes" or "No");
63F0Y0320C
64F0Y0321C
65F0Y0322C
69
❒briefly press thebutton: the
display will show "Confirm";
❒press the
button or the
button to select ("Yes" to "Reset"
or "No" to exit the screen);
Page 72 of 240
❒hold thebutton down again to go
back to the standard screen or to the
main menu according to where you are
in the menu.
Once the "Reset" procedure has been
performed, the display shows a
message indicating that the "self-
learning" procedure has started.
Working conditionsThe system is active for speeds above
15 km/h. In a few situations such as
sporty driving, particular conditions of
the road surface (e.g. icy, snowy,
unsurfaced roads) the signalling may be
delayed, or be partial in the detection
if more tyres are flat simultaneously.
Under special conditions (e.g. vehicle
loaded asymmetrically on one side,
towing a trailer, damaged or worn tyre,
fitting the space-saver wheel, use of the
"Fix&Go Automatic" kit, fitting snow
chains, fitting different tyres on the
axles) the system may give false
indications or be temporarily
deactivated.If the system is temporarily deactivated
the
warning light flashes for about
75 seconds and then is continuously
on; at the same time, the display shows
a dedicated message. This indication
is displayed also after the engine has
been switched off and then on again if
the correct operating conditions are not
restored.
WARNING
64)The system is an aid for the driver, who
must always pay full attention while
driving. The responsibility always rests with
the driver, who must take into account
the traffic conditions in order to drive
in complete safety. The driver must always
maintain a safe distance from the vehicle
in front.
65)If the driver depresses the brake pedal
fully or carries out a fast steering during
system operation, the automatic braking
function may stop (e.g. to allow a possible
manoeuvre to avoid the obstacle).
66)The laser beam is not visible at the
naked eye. Do not look directly, or with
optical instruments (e.g. lenses), at the
laser beam from a distance lower than 10
cm: this may cause damage to the sight.
The laser beam is also present when
the key is at MAR but its operation is off,
not available or manually deactivated
with the display Setup Menu.67)The system intervenes on vehicles
travelling in the same lane. Small sized
vehicles (e.g. bicycles or motorbikes)
or people, animals and things (e.g.
pushchairs) and more in general all those
obstacles with a low reflection of the light
emitted by the laser (e.g. vehicles soiled
with mud) are not taken into consideration.
68)If the car must be placed on a roller
bench (at a speed within 5 and 30 km/h)
for maintenance interventions or if it is
washed in an automatic roller washing
tunnel with an obstacle in the front part
(e.g. another car, a wall or another
obstacle), the system may detect its
presence and activate. In this case the
system must be deactivated through the
display Setup Menu.
WARNING
36)The laser sensor may have limited or
absent operation due to weather
conditions such as: heavy rain, hail, thick
fog, heavy snow, formation of ice layers on
the windscreen.
70
SAFETY
65F0Y0777Ca
Page 73 of 240
37)Sensor operation may also be
compromised by the presence of dust,
condensation, dirt or ice on the
windscreen, by traffic conditions (e.g.
vehicles that are driving not aligned with
yours, vehicles driving in a transverse
or opposite way on the same lane, bend
with a small radius of curvature), by road
surface conditions and by driving
conditions (e.g. off-road driving). Make sure
the windscreen is always clean. Use
specific detergents and clean cloths to
avoid scratching the windscreen. The
sensor operation may also be limited or
absent in some driving, traffic and road
surface conditions.
38)Projecting loads on the roof of the
vehicle may interfere with the correct
operation of the sensor. Before starting
make sure the load is correctly positioned,
in order not to cover the sensor operating
range.
39)If the windscreen must be replaced
due to scratches, chipping or breakage,
contact exclusively a Fiat Dealership.
Do not replace the windscreen on your
own, risk of malfunction! It is advisable to
replace the windscreen if it is damaged
in the area of the laser sensor.
40)Do not tamper with nor operate on the
laser sensor. Do not close the openings
in the aesthetic cover located under the
interior rear view mirror. In the event of
a sensor failure, contact a Fiat Dealership.
41)If you are driving on roads close to
trees with protruding branches it is
advisable to deactivate the system to
prevent the branches at the height of the
bonnet or the windscreen from interfering
with the system.42)Do not cover the operating range of the
sensor with stickers or other objects. Also
pay attention to other objects on the
bonnet (e.g. a layer of snow) and make
sure they do not interfere with the light
emitted by the laser.
43)If a trailer or a vehicle is towed, the
system must be deactivated with the
display Setup Menu.
44)If the system signals a pressure
decrease on a specific tyre, it is
recommended to check the pressure on all
four tyres.
45)iTPMS does not relieve the driver from
the obligation to check the tyre pressure
every month; it is not to be considered
a system to replace maintenance or a
safety system.
46)The iTPMS cannot indicate sudden tyre
pressure drops (for example when a tyre
bursts). In this case, stop the vehicle,
braking with caution and avoiding abrupt
steering.
47)The iTPMS only warns that the tyre
pressure is low: it is not able to inflate
them.
48)Insufficient tyre inflation increases fuel
consumption, reduces the tread duration
and may affect the capacity to drive safely.
49)Tyre pressure must be checked with
tyres cold. Should it become necessary for
whatever reason to check pressure with
warm tyres, do not reduce pressure even
though it is higher than the prescribed
value, but repeat the check when tyres are
cold.OCCUPANT
PROTECTION
SYSTEMS
The most important safety equipment
of the vehicle comprise the following
protection systems:
❒seat belts;
❒SBR (Seat Belt Reminder) system;
❒head restraints;
❒child restraint systems;
❒front airbags and side bags.
Read the information given the
following pages with the utmost care. It
is of fundamental importance that the
protection systems are used in the
correct way to guarantee the maximum
possible safety level for the driver and
the passengers.
For the description of the head restraint
adjustment see paragraph "Head
restraints" in chapter "Knowing your
vehicle".
71
Page 94 of 240
STARTING AND DRIVING
Let’s get to the core of the vehicle:
seeing how you can exploit all of its
potential to the full.
We’ll look at how to drive it safely in any
situation, so that it can be a welcome
companion, with our comfort and
our wallets in mind.STARTING THE ENGINE ................. 93
HANDBRAKE .................................. 94
USING THE MANUAL GEARBOX .... 95
USING THE DUALOGIC
GEARBOX....................................... 96
STOP/START SYSTEM ................... 98
CRUISE CONTROL (CONSTANT
SPEED REGULATOR) ..................... 99
SPEED LIMITER ..............................100
PARKING SENSORS.......................101
REAR VIEW CAMERA .....................103
TOWING TRAILERS ........................104
REFUELLING THE VEHICLE ...........105
92
STARTING AND DRIVING
Page 103 of 240
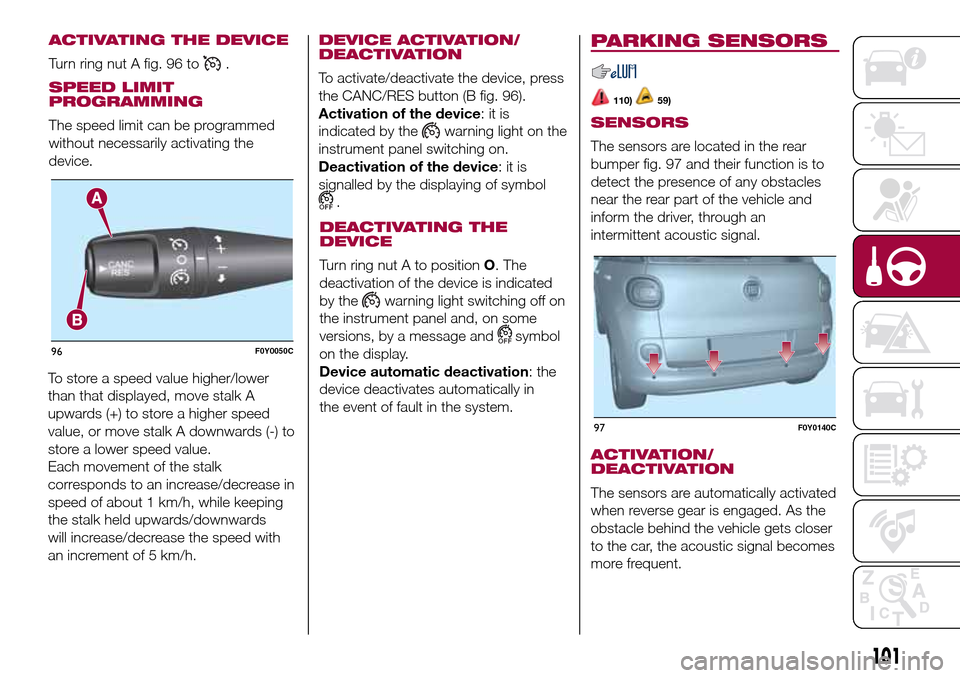
To store a speed value higher/lower
than that displayed, move stalk A
upwards (+) to store a higher speed
value, or move stalk A downwards (-) to
store a lower speed value.
Each movement of the stalk
corresponds to an increase/decrease in
speed of about 1 km/h, while keeping
the stalk held upwards/downwards
will increase/decrease the speed with
an increment of 5 km/h.
DEVICE ACTIVATION/
DEACTIVATION
To activate/deactivate the device, press
the CANC/RES button (B fig. 96).
Activation of the device:itis
indicated by the
warning light on the
instrument panel switching on.
Deactivation of the device:itis
signalled by the displaying of symbol
.
DEACTIVATING THE
DEVICE
Turn ring nut A to positionO. The
deactivation of the device is indicated
by the
warning light switching off on
the instrument panel and, on some
versions, by a message and
symbol
on the display.
Device automatic deactivation: the
device deactivates automatically in
the event of fault in the system.
PARKING SENSORS
110)59)
SENSORS
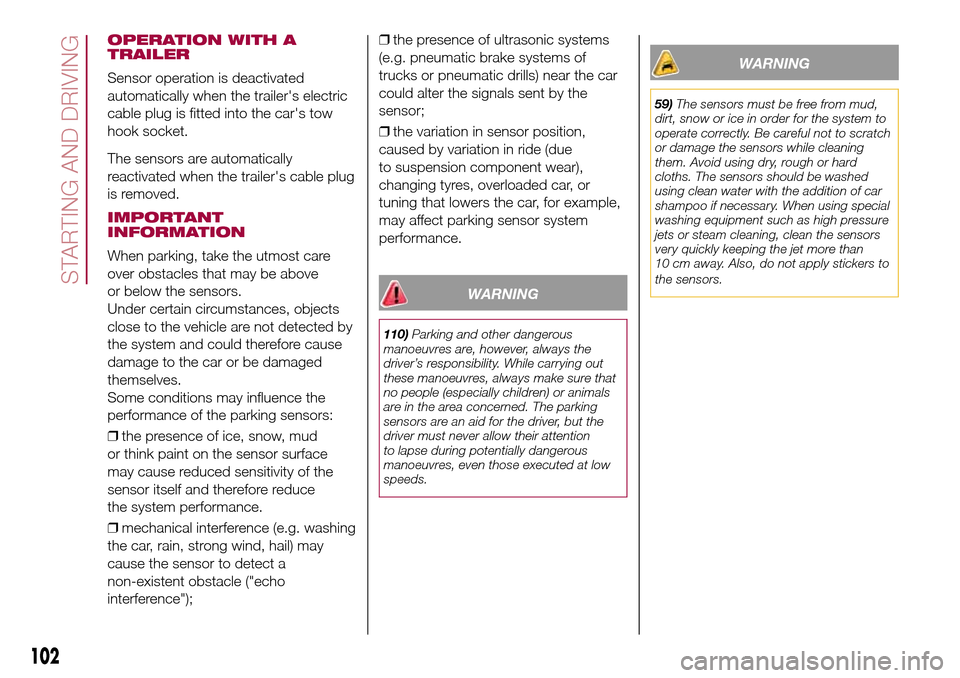
The sensors are located in the rear
bumper fig. 97 and their function is to
detect the presence of any obstacles
near the rear part of the vehicle and
inform the driver, through an
intermittent acoustic signal.
ACTIVATION/
DEACTIVATION
The sensors are automatically activated
when reverse gear is engaged. As the
obstacle behind the vehicle gets closer
to the car, the acoustic signal becomes
more frequent.
96F0Y0050C
97F0Y0140C
101
ACTIVATING THE DEVICE
Turn ring nut A fig. 96 to.
SPEED LIMIT
PROGRAMMING
The speed limit can be programmed
without necessarily activating the
device.
Page 104 of 240
OPERATION WITH A
TRAILER
Sensor operation is deactivated
automatically when the trailer's electric
cable plug is fitted into the car's tow
hook socket.
The sensors are automatically
reactivated when the trailer's cable plug
is removed.
IMPORTANT
INFORMATION
When parking, take the utmost care
over obstacles that may be above
or below the sensors.
Under certain circumstances, objects
close to the vehicle are not detected by
the system and could therefore cause
damage to the car or be damaged
themselves.
Some conditions may influence the
performance of the parking sensors:
❒the presence of ice, snow, mud
or think paint on the sensor surface
may cause reduced sensitivity of the
sensor itself and therefore reduce
the system performance.
❒mechanical interference (e.g. washing
the car, rain, strong wind, hail) may
cause the sensor to detect a
non-existent obstacle ("echo
interference");❒the presence of ultrasonic systems
(e.g. pneumatic brake systems of
trucks or pneumatic drills) near the car
could alter the signals sent by the
sensor;
❒the variation in sensor position,
caused by variation in ride (due
to suspension component wear),
changing tyres, overloaded car, or
tuning that lowers the car, for example,
may affect parking sensor system
performance.
WARNING
110)Parking and other dangerous
manoeuvres are, however, always the
driver’s responsibility. While carrying out
these manoeuvres, always make sure that
no people (especially children) or animals
are in the area concerned. The parking
sensors are an aid for the driver, but the
driver must never allow their attention
to lapse during potentially dangerous
manoeuvres, even those executed at low
speeds.
WARNING
59)The sensors must be free from mud,
dirt, snow or ice in order for the system to
operate correctly. Be careful not to scratch
or damage the sensors while cleaning
them. Avoid using dry, rough or hard
cloths. The sensors should be washed
using clean water with the addition of car
shampoo if necessary. When using special
washing equipment such as high pressure
jets or steam cleaning, clean the sensors
very quickly keeping the jet more than
10 cm away. Also, do not apply stickers to
the sensors.
102
STARTING AND DRIVING
Page 156 of 240
❒when finished, turn the charger off
before disconnecting the battery;
❒reconnect the negative battery
terminal.
VERSIONS WITH
Stop/Start SYSTEM
(for versions/markets, where provided)
To recharge, proceed as follows:
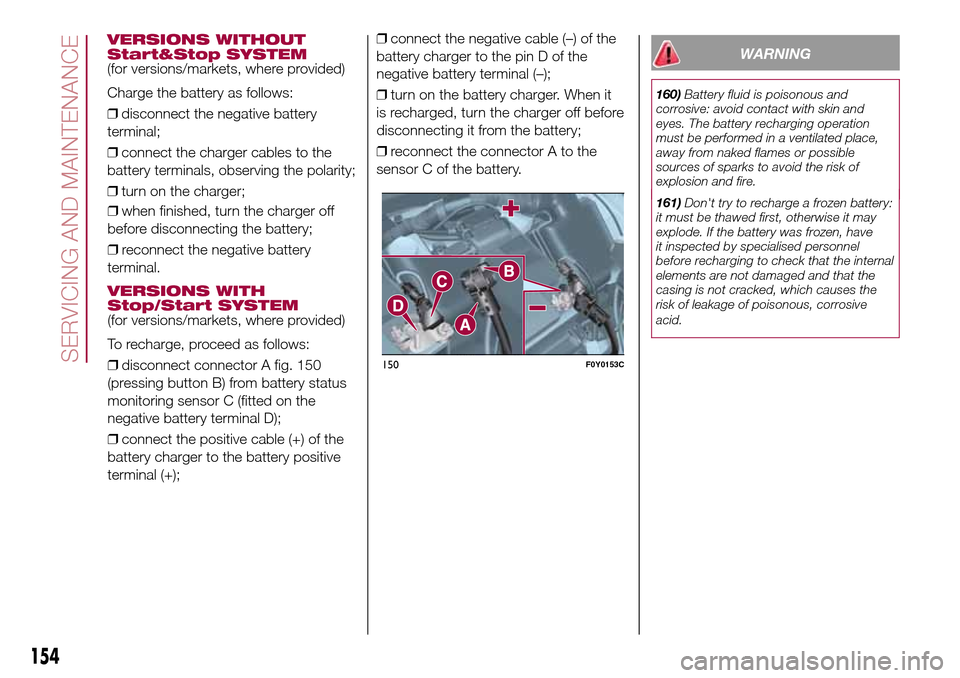
❒disconnect connector A fig. 150
(pressing button B) from battery status
monitoring sensor C (fitted on the
negative battery terminal D);
❒connect the positive cable (+) of the
battery charger to the battery positive
terminal (+);❒connect the negative cable (–) of the
battery charger to the pin D of the
negative battery terminal (–);
❒turn on the battery charger. When it
is recharged, turn the charger off before
disconnecting it from the battery;
❒reconnect the connector A to the
sensor C of the battery.
WARNING
160)Battery fluid is poisonous and
corrosive: avoid contact with skin and
eyes. The battery recharging operation
must be performed in a ventilated place,
away from naked flames or possible
sources of sparks to avoid the risk of
explosion and fire.
161)Don't try to recharge a frozen battery:
it must be thawed first, otherwise it may
explode. If the battery was frozen, have
it inspected by specialised personnel
before recharging to check that the internal
elements are not damaged and that the
casing is not cracked, which causes the
risk of leakage of poisonous, corrosive
acid.
150F0Y0153C
154
SERVICING AND MAINTENANCE
VERSIONS WITHOUT
Start&Stop SYSTEM
(for versions/markets, where provided)
Charge the battery as follows:
❒disconnect the negative battery
terminal;
❒connect the charger cables to the
battery terminals, observing the polarity;
❒turn on the charger;