Page 217 of 300

Mexico Market
Proceed as follows:
1. Pull over to a safe location and turn
on the vehicle’s hazard warning lights.
2. Verify that the valve stem (on the
wheel with the deflated tire) is in a
position that is near to the ground. This
will allow the tire service kit hoses to
reach the valve stem and keep the tire
service kit flat on the ground. This will
provide the best positioning of the kit
when injecting the sealant into the
deflated tire and running the air pump.
Move the vehicle as necessary to place
the valve stem in this position before
proceeding.
3. Shift the gear selector to Reverse (R)
for a manual transmission, and shift the
gear selector to Park (P) for an
automatic transmission.
4. Apply the parking brake with the
brake pedal depressed and turn off the
engine.
5. Unload passengers and cargo and
remove the tire service kit.6. Shake the tire sealant well. If the
bottle is shaken after the injection hose
is screwed on, tire sealant could spray
out from the injection hose. Tire sealant
contacting clothing or other objects
may be impossible to remove. Shake
the bottle before screwing on the
injection hose.
Note:
Do not shake the bottle
excessively. Otherwise, the sealant
could spray out of the injection hose,
and if the sealant contacts clothing or
other objects, you may not be able to
remove it.
The sealant hardens easily and
injecting it will be difficult under cold
weather conditions (32 °F (0 °C) or
below). Warm the sealant inside the
vehicle to facilitate injection.
7. Remove the cap from the bottle.
Screw on the injection hose with the
bottle's inner cap left on to break the
inner cap. 8. Remove the valve cap from the flat
tire. Push the back of a valve core tool
to the core of the tire valve and bleed
out all of the remaining air.
GUID-0802020203A003Attaching Injection Hose to SealantBottle
215
Page 222 of 300

4. Connect one end of a jumper cables
to the positive terminal on the
discharged battery.
5. Connect the other end to the
positive terminal on the booster battery.
6. Connect one end of the other
jumper cables to the negative terminal
of the booster battery.
7. Connect the other end to a good
engine ground of the vehicle with the
discharged battery (exposed metal part
of the engine) away from the battery
and the fuel injection system.
8. Start the engine of the booster
vehicle and run it a few minutes. Then
start the engine of the other vehicle.
9. Once the engine is started, remove
the jumper cables in the reverse
sequence.
10. Replace the positive terminal
cover. Make sure cover is secure.
Bump Starting
Never jump start the engine by pushing,
towing or coasting downhill.
Note:
You cannot start a vehicle with an
automatic transmission by pushing it.
Do not push-start a vehicle that has
a manual transmission. It can damage
the emission control system.
STARTING A FLOODED
ENGINE
If the engine fails to start, it may be
flooded (excessive fuel in the engine).
Follow this procedure:
1. If the engine does not start within
5 seconds on the first try, wait
10 seconds and try again.
2. Make sure the parking brake is on.
3. Depress the accelerator all the way
and hold it there.
4. Depress the clutch pedal (manual
transmission) or the brake pedal
(automatic transmission), then push the
push button start. If the engine starts,
release the accelerator immediately
because the engine will suddenly rev
up.
5. If the engine fails to start, crank it
without depressing the accelerator.
If the engine still does not start using
the above procedure, have your vehicle
inspected an Authorized Dealer.
OVERHEATING
Overheating
In any of the following situations, you
can reduce the potential for overheating
by taking the appropriate action.
On the highways — slow down.
In city traffic — while stopped, place
the transmission in NEUTRAL, but do
not increase engine idle speed.
Note: There are steps that you can
take to slow down an impending
overheat condition:
If your air conditioner (A/C) is on,
turn it off. The A/C system adds heat
to the engine cooling system and
turning the A/C off can help remove
this heat.
You can also turn the temperature
control to maximum heat, the mode
control to floor and the blower control
to high. This allows the heater core to
act as a supplement to the radiator
and aids in removing heat from the
engine cooling system.
220
IN CASE OF EMERGENCY
Page 225 of 300

4. Hook the towing rope to the tow
eye.
Caution!
Tow hooks are for emergency use only, to
rescue a vehicle stranded off road. Do not
use tow hooks for tow truck hookup or
highway towing. You could damage your
vehicle.
When using the tow eyes, always pull
the lead or chain in a straight direction
with respect to the eyelet. Never apply
a sideways force.
Note:Be careful not to damage the
towing eyelet and towing hook, vehicle
body, or transmission system when
towing under the following conditions:
Do not tow a vehicle heavier than
yours.
Do not suddenly accelerate your
vehicle as it will apply a severe shock
to the tow eye and towing hook or
rope.
Do not attach any rope other than
to the tow eye and towing hook.
EMERGENCY TOWING
TOWING DESCRIPTION
Proper lifting and towing are necessary
to prevent damage to the vehicle.
Government and local laws must be
followed.
A towed vehicle usually should have its
drive wheels (rear wheels) off the ground.
If excessive damage or other conditions
prevent this, use wheel dollies.
When towing with the rear wheels on the
ground, release the parking brake.
Caution!
DO NOT use sling-type equipment when
towing. When securing the vehicle to a
flatbed truck, do not attach to front or rear
suspension components. Damage to your
vehicle may result from improper towing.
If towing service is not available in an
emergency, the vehicle may be towed
with all four wheels on the ground using
the towing hook at the front of the
vehicle. Only tow the vehicle on paved
surfaces for short distances at low
speeds.
Follow these instructions when towing
the vehicle with all wheels on the
ground:
1. Shift to neutral (manual
transmission), or the N position
(automatic transmission).
2. Place the ignition to ACC.
3. Release the parking brake.
Note:
Remember that power assist for the
brakes and steering will not be available
when the engine is not running.
08060201-121-001Installing Front Towing Eye
08060201-122-001Installing Rear Tow Eye
223
Page 237 of 300

Overfilling the brake fluid reservoir can
result in spilling brake fluid on hot engine
parts, causing the brake fluid to catch fire.
Brake fluid can also damage painted and
vinyl surfaces, care should be taken to
avoid its contact with these surfaces.
Do not allow petroleum based fluid to
contaminate the brake fluid. Brake seal
components could be damaged, causing
partial or complete brake failure. This could
result in a collision.
Windshield And
Headlight Washer Fluid
Inspecting Washer Fluid Level
Inspect fluid level in the washer fluid
reservoir, open the cap and add fluid if
necessary.
Use plain water if washer fluid is
unavailable. But use only washer fluid in
cold weather to prevent it from freezing.
Automatic Transmission
Control Unit
The transmission oil level should only be
checked at your Authorized Dealer.
Battery Maintenance
To get the best service from a battery:
Keep it securely mounted.
Keep the top clean and dry.
Keep terminals and connections
clean, tight, and coated with petroleum
jelly or terminal grease.
Rinse off spilled electrolyte
immediately with a solution of water
and baking soda.
If the vehicle will not be used for an
extended time, disconnect the battery
leads and charge the battery every six
weeks.
Battery Replacement
Contact your Authorized Dealer to
purchase a replacement battery.
Warning!
Battery fluid is a corrosive acid solution
and can burn or even blind you. Do not
allow battery fluid to contact your eyes,
skin, or clothing. Do not lean over a battery
when attaching clamps. If acid splashes in
eyes or on skin, flush the area immediately
with large amounts of water. Refer to
“Jump-Starting” in “In Case Of Emergency”
for further information.
Battery gas is flammable and explosive.
Keep flame or sparks away from the
battery. Do not use a booster battery or
any other booster source with an output
greater than 12 Volts. Do not allow cable
clamps to touch each other.
Battery posts, terminals, and related
accessories contain lead and lead
compounds. Wash hands after handling.
07030901-121-001Windshield Washer Fluid Reservoir
235
Page 270 of 300
TRANSMISSION
EngineTraction TypeDescription
1.4 Turbo Multi Air 160HP R
WDManual/Automatic 6-speed manual(*) / 6-speed
Automatic Transmission(**)
(*) If equipped with manual transmission
(**) If equipped with automatic transmission
268
TECHNICAL SPECIFICATIONS
Page 275 of 300
Weights
Curb Weight: 2436 lbs (1105 kg) (if
equipped with manual transmission) /
2476 lbs (1123 kg) (if equipped with
automatic transmission).
273
Page 276 of 300
FLUID CAPACITIES
ItemCapacities
Fuel tank 11.9
(gallons) / 45 (liters)
Engine oil (without oil filter replacement) 3.3 (quarts) / 3.2 (liters)
Engine oil (with oil filter replacement) 4.0 (quarts) / 3.8 (liters)
Coolant (with manual transmission) 7.6 (quarts) / 7.2 (liters)
Coolant (with automatic transmission) 7.5 (quarts) / 7.1 (liters)
Manual transmission oil 2.2 (quarts) / 2.1 (liters)
Automatic transmission fluid 7.8 (quarts) / 7.5 (liters)
Rear differential oil 0.63 (quarts) / 0.6 (liters)
LSD oil 0.63 (quarts) / 0.6 (liters)
Brake fluid (& clutch fluid) 0.57 (quarts) / 0.55 (liters)
274
TECHNICAL SPECIFICATIONS
Page 277 of 300

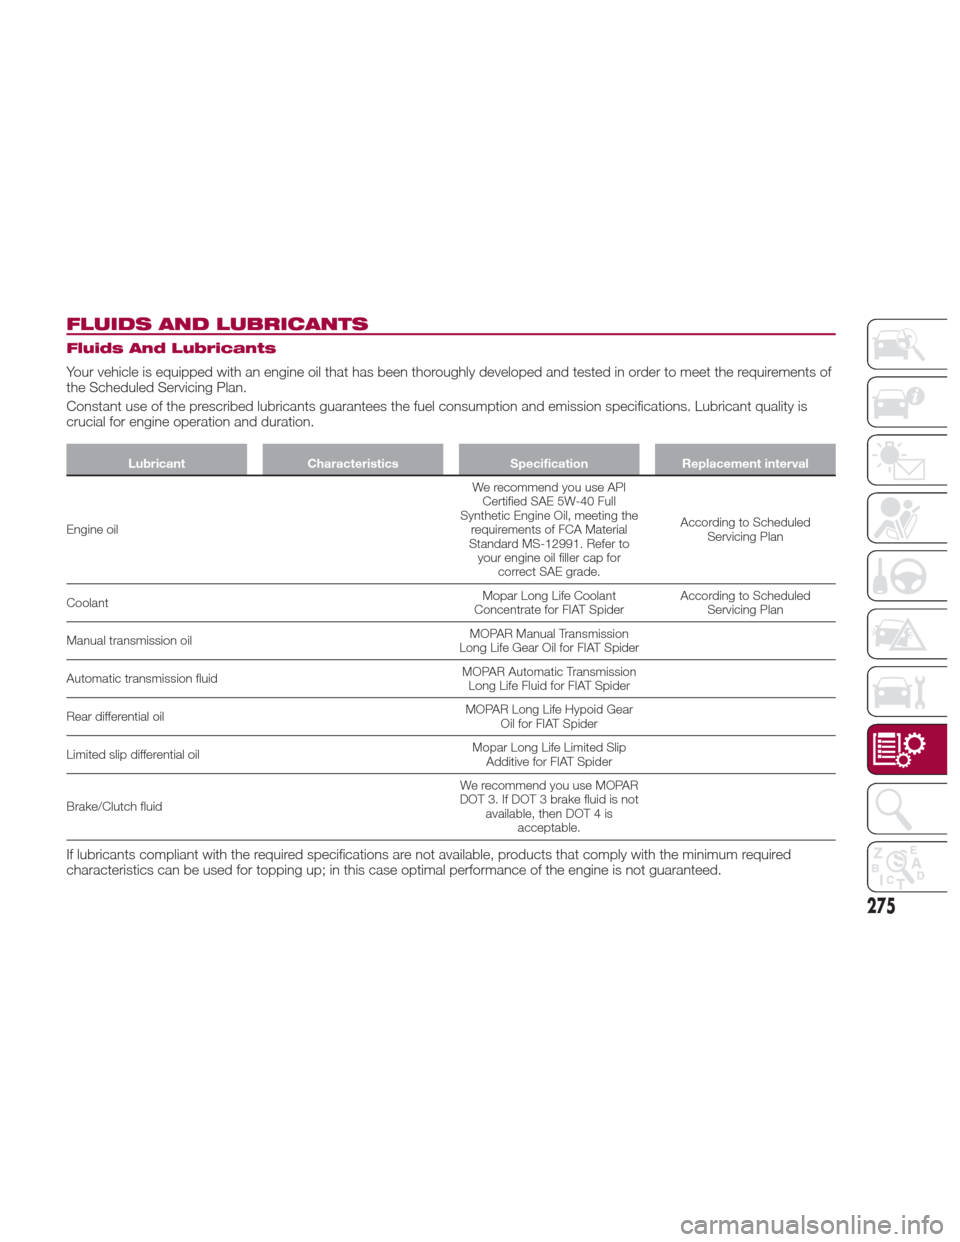
FLUIDS AND LUBRICANTS
Fluids And Lubricants
Your vehicle is equipped with an engine oil that has been thoroughly developed and tested in order to meet the requirements of
the Scheduled Servicing Plan.
Constant use of the prescribed lubricants guarantees the fuel consumption and emission specifications. Lubricant quality is
crucial for engine operation and duration.
LubricantCharacteristics SpecificationReplacement interval
Engine oil W
e recommend you use API
Certified SAE 5W-40 Full
Synthetic Engine Oil, meeting the requirements of FCA Material
Standard MS-12991. Refer to your engine oil filler cap for correct SAE grade. According to Scheduled
Servicing Plan
Coolant Mopar Long Life Coolant
Concentrate for FIAT Spider According to Scheduled
Servicing Plan
Manual transmission oil MOPAR Manual Transmission
Long Life Gear Oil for FIAT Spider
Automatic transmission fluid MOPAR Automatic Transmission
Long Life Fluid for FIAT Spider
Rear differential oil MOPAR Long Life Hypoid Gear
Oil for FIAT Spider
Limited slip differential oil Mopar Long Life Limited Slip
Additive for FIAT Spider
Brake/Clutch fluid We recommend you use MOPAR
DOT 3. If DOT 3 brake fluid is not available, then DOT 4 is acceptable.
If lubricants compliant with the required specifications are not available, products that comply with the minimum required
characteristics can be used for topping up; in this case optimal performance of the engine is not guaranteed.
275