2017 FIAT 124 SPIDER lock
[x] Cancel search: lockPage 218 of 300

Note:If there is air remaining in the
tire when the valve core is removed, the
valve core could fly out. Remove the
valve core carefully.
9. Turn the valve core counter
clockwise with the valve core tool and
remove the valve core. Note:
Store the valve core in a place
where it will not get dirty.
10. Insert the injection hose into the
valve. 11. Hold the bottom of the bottle
upright, squeeze the bottle with your
hands, and inject the entire amount of
tire sealant into the tire.
12. Pull out the injection hose from the
valve.
08020202-03A-004Valve And Valve Cover
5 — Valve Cap
6 — Tire Valve
08020202-03A-005Turn Valve Core Counterclockwise
08020202-03A-006Injection Hose Into Valve
08020202-03A-008Squeeze Sealant Into Tire
08020202-03A-007Turn Valve Core Clockwise to
Reinstall
216
IN CASE OF EMERGENCY
Page 219 of 300

13. Reinsert the valve core into the
valve and turn it clockwise to install.
Note:
The tire sealant cannot be reused.
If the tire sealant kit has been used, or
is expired, purchase new one at an
Authorized Dealer.
Do not throw away the empty tire
sealant bottle after use. Return the
empty tire sealant bottle to an
Authorized Dealer when replacing the
tire. The empty tire sealant bottle will
need to be used to extract and dispose
of the used sealant from the tire.
14. Install the injection hose to the tab
of the bottle to prevent leakage of any
remaining sealant.
15. Adhere the speed restriction sticker
to an area where it can be viewed easily
by the driver.
Warning!
Do not adhere the speed restriction sticker
to the padded area on the steering wheel.
Adhering the speed restriction sticker to
the padded area on the steering wheel is
dangerous because the air bag may not
operate (deploy) normally resulting in
serious injury. In addition, do not adhere
the sticker to areas where warning lights or
the speedometer cannot be viewed.
16. Pull out the air compressor hose
and the air compressor plug from the
air compressor.
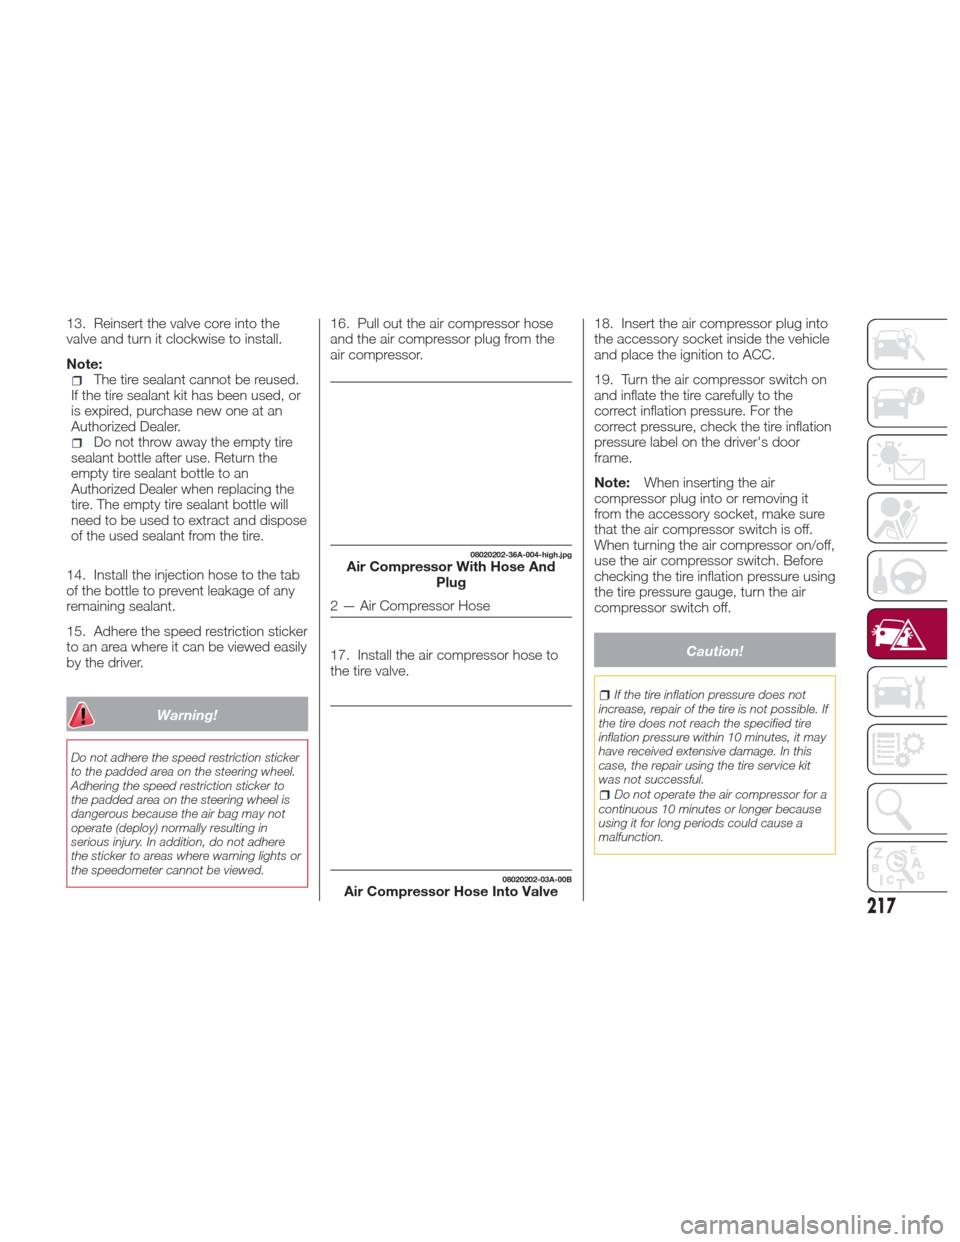
17. Install the air compressor hose to
the tire valve. 18. Insert the air compressor plug into
the accessory socket inside the vehicle
and place the ignition to ACC.
19. Turn the air compressor switch on
and inflate the tire carefully to the
correct inflation pressure. For the
correct pressure, check the tire inflation
pressure label on the driver's door
frame.
Note:
When inserting the air
compressor plug into or removing it
from the accessory socket, make sure
that the air compressor switch is off.
When turning the air compressor on/off,
use the air compressor switch. Before
checking the tire inflation pressure using
the tire pressure gauge, turn the air
compressor switch off.
Caution!
If the tire inflation pressure does not
increase, repair of the tire is not possible. If
the tire does not reach the specified tire
inflation pressure within 10 minutes, it may
have received extensive damage. In this
case, the repair using the tire service kit
was not successful.
Do not operate the air compressor for a
continuous 10 minutes or longer because
using it for long periods could cause a
malfunction.
08020202-36A-004-high.jpgAir Compressor With Hose And Plug
2 — Air Compressor Hose
08020202-03A-00BAir Compressor Hose Into Valve
217
Page 228 of 300

At least twice a year (for example,
every spring and fall) perform
inspection of:
Engine coolant
Engine oil
As explained in the “Introduction”
paragraph, several procedures can be
done only by a qualified service
technician with special tools.
For details, read the separate Warranty
Booklet provided with the vehicle. If you
are unsure about any servicing or
maintenance procedure, have it done
by an Authorized Dealer.
There are strict environmental laws
regarding the disposal of waste oil and
fluids. Please dispose of your waste
properly and with due regard to the
environment.
We recommend that you entrust the oil
and fluid changes of your vehicle to an
Authorized Dealer.
Periodic Checks
Every 620 miles (1,000 km) or before
long trips check and, if necessary, top
off:
Engine coolant level.
Brake fluid level.
Windshield washer fluid level.
Tire inflation pressure and condition.
Operation of lighting system
(headlights, direction indicators, hazard
warning lights, etc.).
Operation of windshield
washer/wiper system and
positioning/wear of windshield wiper
blades.
Every 1860 miles (3,000 km) check
and top off the engine oil level if
required.
Heavy-Duty Use Of The
Vehicle
If the vehicle is used under one of the
following conditions:
Dusty roads.
Short, repeated trips less than 4.4 -
5 miles (7-8km)atsub -zero outside
temperatures.
Engine idling for long periods of time
or driving long distances at low speeds
or long periods of inactivity. The following checks must be carried
out more often than indicated in the
Scheduled Servicing Plan:
Check front disc brake pad condition
and wear.
Check cleanliness of underhood area
and all door and trunk locks, cleanliness
and lubrication of linkage.
Visually inspect conditions of the:
engine, transmission, lines and hoses
(exhaust/fuel system/brakes) and
rubber elements (hoses/belts/etc.).
Check battery charge and battery
fluid level.
Visually inspect conditions of the
accessory drive belts.
Check and, if necessary, change
engine oil and replace oil filter.
Check and, if necessary, replace
cabin air filter.
Check and, if necessary, replace air
cleaner.
Severe Duty All Models
Change Engine Oil at 4,000 miles
(6,500 km) if the vehicle is operated in a
dusty and off road environment or is
operated predominately at idle or only
very low engine RPM’s. This type of
vehicle use is considered Severe Duty.
226
SERVICING AND MAINTENANCE
Page 231 of 300

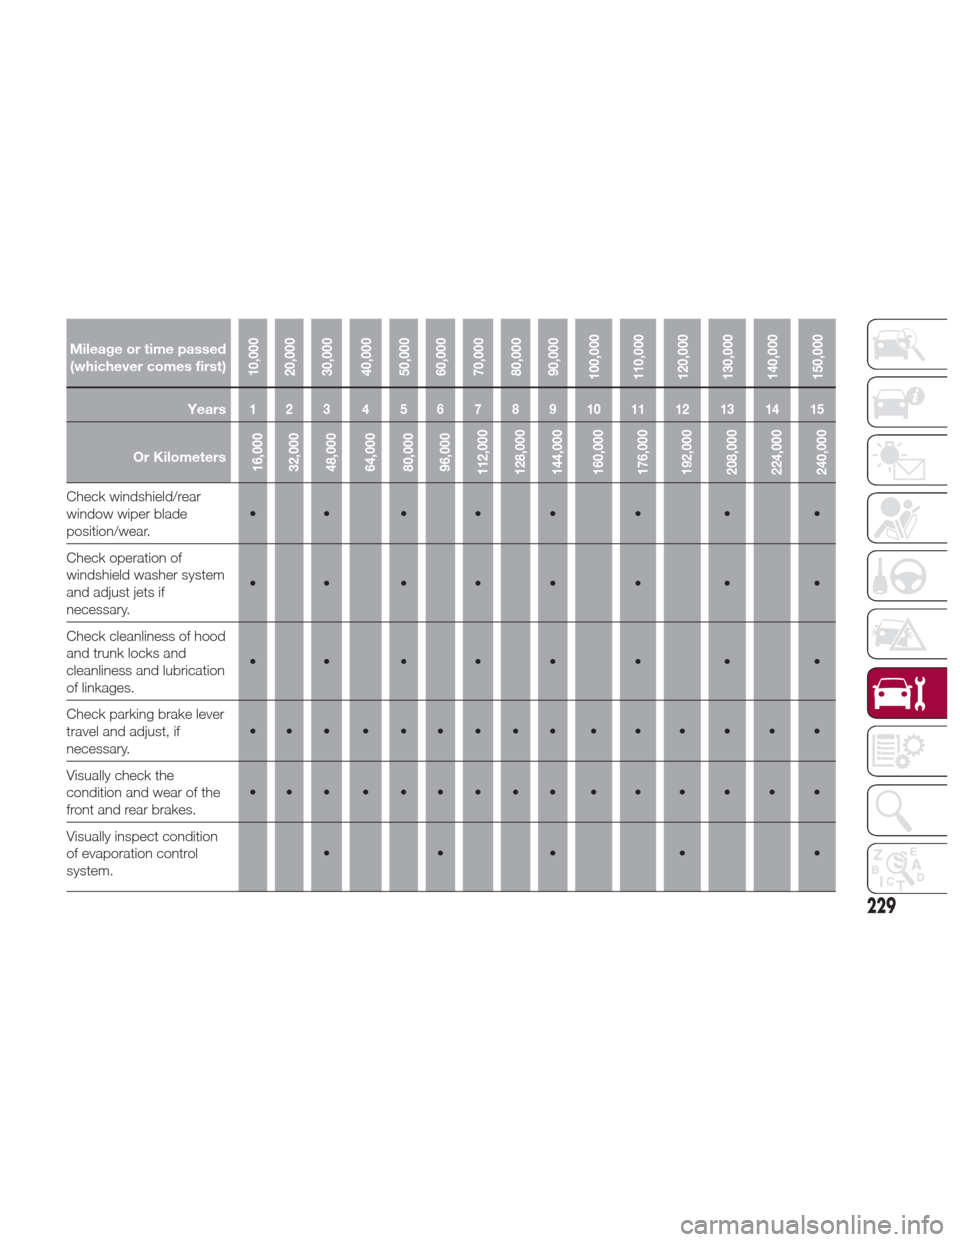
Mileage or time passed(whichever comes first)
10,000
20,000
30,000
40,000
50,000
60,000
70,000
80,000
90,000
100,000
110,000
120,000
130,000
140,000
150,000
Years123 456789101112131415
Or Kilometers16,000
32,000
48,000
64,000
80,000
96,000
112,000
128,000
144,000
160,000
176,000
192,000
208,000
224,000
240,000
Check windshield/rear
window wiper blade
position/wear. •• •• • • • •
Check operation of
windshield washer system
and adjust jets if
necessary. •• •• • • • •
Check cleanliness of hood
and trunk locks and
cleanliness and lubrication
of linkages. •• •• • • • •
Check parking brake lever
travel and adjust, if
necessary. •••••••••••••••
Visually check the
condition and wear of the
front and rear brakes. •••••••••••••••
Visually inspect condition
of evaporation control
system. ••• • •
229
Page 238 of 300

BATTERY
RECHARGING
BATTERY CHARGING
PROCEDURE
Warning!
Battery fluid is a corrosive acid solution
and can burn or even blind you. Do not
allow battery fluid to contact your eyes,
skin, or clothing. Do not lean over a battery
when attaching clamps. If acid splashes in
eyes or on skin, flush the area immediately
with large amounts of water. Refer to
“Jump-Starting” in “In Case Of Emergency”
for further information.
Battery gas is flammable and explosive.
Keep flame or sparks away from the
battery. Do not use a booster battery or
any other booster source with an output
greater than 12 Volts. Do not allow cable
clamps to touch each other.
Battery posts, terminals, and related
accessories contain lead and lead
compounds. Wash hands after handling.
Caution!
It is essential when replacing the cables
on the battery that the positive cable is
attached to the positive post and the
negative cable is attached to the negative
post. Battery posts are marked positive (+)
and negative (-) and are identified on the
battery case. Cable clamps should be tight
on the terminal posts and free of corrosion.
If a “fast charger” is used while the
battery is in the vehicle, disconnect both
vehicle battery cables before connecting
the charger to the battery. Do not use a
“fast charger” to provide starting voltage.
Charge battery as follows:
Before recharging the battery, turn off
all accessories and turn the engine off
by placing the ignition in the OFF mode.
Disconnect the negative battery cable.
Connect the charger cables to
the battery terminals, observing the
polarity (+,–).
Turn on the charger.
When finished, turn the charger off
before disconnecting the battery.
Reconnect the negative battery
terminal.
MAINTENANCE
PROCEDURES
The following pages contain
instructions on the required
maintenance from the technical
personnel who designed the vehicle.
In addition to these specific
maintenance instructions specified for
routine scheduled servicing, there are
other components which may require
periodic maintenance or replacement
over the vehicle’s life cycle.
Body Lubrication
Ensure that the locks and bodywork
junction points, including components
such as the seat guides, door hinges
(and rollers), trunk and hood are
periodically lubricated with lithium
based grease to ensure correct, silent
operation and to protect them from rust
and wear.
Thoroughly clean the components,
eliminating every trace of dirt and dust.
After lubricating, eliminate excess oil
and grease. Also pay particular
attention to the hood closing devices,
to ensure correct operation.
During operations on the hood, be sure
to perform with the engine cold, also
remember to check, clean and lubricate
the locking, release and safety devices.
Make sure the hood's secondary latch
keeps the hood from opening when the
primary latch is released.
236
SERVICING AND MAINTENANCE
Page 239 of 300

Lubricate the external lock cylinders
twice a year. Apply a small amount of
high-quality lubricant directly into the
lock cylinder. If necessary, contact your
Authorized Dealer.
Wiper Blades
Contamination of either the windshield
or the blades with foreign matter can
reduce wiper effectiveness. Common
sources are insects, tree sap, and hot
wax treatments used by some
commercial car washes.
If the blades are not wiping properly,
clean the window and blades with a
good cleaner or mild detergent; then
rinse thoroughly with clean water.
Repeat if necessary.
When the wiper lever is in the AUTO
position and the ignition is placed in the
ON mode, the wipers may move
automatically in the following cases:
If the windshield above the rain
sensor is touched.
If the windshield above the rain
sensor is wiped with a cloth.
If the windshield is struck with a hand
or other object.
If the rain sensor is struck with a
hand or other object from inside the
vehicle. Note:
Hot waxes applied by automatic car
washers have been known to affect
the wiper's ability to clean windows.
To prevent damage to the wiper
blades, do not use gas, paraffin, paint
thinner, or other solvents on or near
them.
Be careful not to pinch hands or
fingers as it may cause injury, or
damage the wipers. When washing or
servicing the vehicle, make sure the
wiper lever is in the OFF position.
Replacing Windshield Wiper Blades
When the wipers no longer clean well,
the blades are probably worn or
cracked. Replace them.
When raising both windshield wiper
arms, raise the driver's side wiper arm
first.
When lowering the wiper arms, slowly
lower the wiper arm from the
passenger's side first while supporting
it with your hand. Forcefully lowering
the wiper arms could damage the wiper
arm and blade, and may scratch or
crack the windshield.
Note: To prevent damage to the wiper
arms and other components, do not try
to sweep the wiper arm by hand. Blade Replacement
Proceed as follows:
1. Raise the wiper arm.
2. Open the clip and slide the blade
assembly in the direction of the arrow.
3. Tilt the blade assembly and remove
it from the arm.
07031101-36A-001Clip
07031101-36A-002Blade Assembly and Arm
237
Page 258 of 300

left running) this is particularly
important when clearing ice and snow.
Do not spray water in the engine
compartment. Otherwise, it could
result in engine-starting problems or
damage to electrical parts.
When washing and waxing the
vehicle, be careful not to apply
excessive force to any single area of
the vehicle hood. Otherwise, you could
dent the vehicle.
Do not use automatic car washing
machines and car washing devices
using high water pressure.
Make sure that the fuel door is
closed and lock the doors. Otherwise,
the fuel flap may be forcefully opened
by water pressure causing damage to
the vehicle or fuel door.
To minimize scratches on the vehicle's
paint finish:
Rinse off any dirt or other foreign
matter using lukewarm or cold water
before washing.
Use plenty of lukewarm or cold water
and a soft cloth when washing the
vehicle. Do not use a nylon cloth.
Rub gently when washing or drying
the vehicle.
Take your vehicle only to a car wash
that keeps its brushes well maintained.
Do not use abrasive cleansers or
wax that contain abrasives.
Caution!
Do not use steel wool, abrasive cleaners, or
strong detergents containing highly alkaline
or caustic agents on chrome plated or
anodized aluminium parts. This may
damage the protective coating; also,
cleaners and detergents may discolor or
deteriorate the paint.
Pay special attention to removing salt,
dirt, mud, and other foreign material
from the underside of the fenders, and
make sure the drain holes in the lower
edges of the doors and rocker panels
are clean.
Insects, tar, tree sap, bird droppings,
industrial fallout, and similar deposits
can damage the finish if not removed
immediately. When prompt washing
with plain water is ineffective, use a mild
soap made for use on vehicles.
Thoroughly rinse off all soap with
lukewarm or cold water. Do not allow
soap to dry on the finish.
After washing the vehicle, dry it with a
clean chamois to prevent water spots
from forming.
Waxing
Your vehicle needs to be waxed when
water no longer beads on the finish. Always wash and dry the vehicle before
waxing it. In addition to the vehicle
body, wax the metal trim to maintain its
lustre:
Use wax which contains no
abrasives. Waxes containing abrasive
will remove paint and could damage
bright metal parts.
Use a good grade of natural wax for
metallic, mica, and solid colors.
When waxing, coat evenly with the
sponge supplied or a soft cloth.
Wipe off the wax with a soft cloth.
Note: A spot remover to remove oil,
tar, and similar materials will usually also
take off the wax. Rewax these areas
even if the rest of the vehicle does not
need it.
Repairing Damage To
The Finish
Deep scratches or chips on the finish
should be repaired promptly. Exposed
metal quickly rusts and can lead to
major repairs.
Note:
If your vehicle is damaged and needs
metal parts repaired or replaced, make
sure the body shop applies corrosion
prevention materials to all parts, both
repaired and new. This will prevent
them from rusting.
256
SERVICING AND MAINTENANCE
Page 260 of 300

Caution!
Automatic and high-pressure car
washes are harmful to a convertible top.
Avoid them.
Do not spray water directly on the area
where the window glass and the
convertible top meet. This would probably
cause water to enter the interior.
Do not spray water directly on the seam
area of the body and the convertible top as
it could result in water penetrating the
interior.
Do not wipe the convertible top using
alcohol, chlorine bleach, or organic
solvents such as thinner, benzene, or
gasoline. Otherwise, they may cause
discoloration or stains.
Too much treatment on the convertible
top can be as damaging as too little. Follow
the manufacturer's directions. Do not over
do it!
Note:
Some leather treatment products
can ruin the convertible top's gloss. Be
careful of the one you choose.
Test on an inconspicuous, small
corner of the convertible top if you are
not sure.
Do not get any car wax on the
convertible top.
If you do, remove it with a good
leather cleaner or mild detergent
(about 5% solution).
Let the convertible top dry
completely before lowering after
applying treatment or dressing.
Drain Filter Cleaning
If leaves or other matter block the drain
filter, water may enter the vehicle. Clean
the drain filter at least once a year.
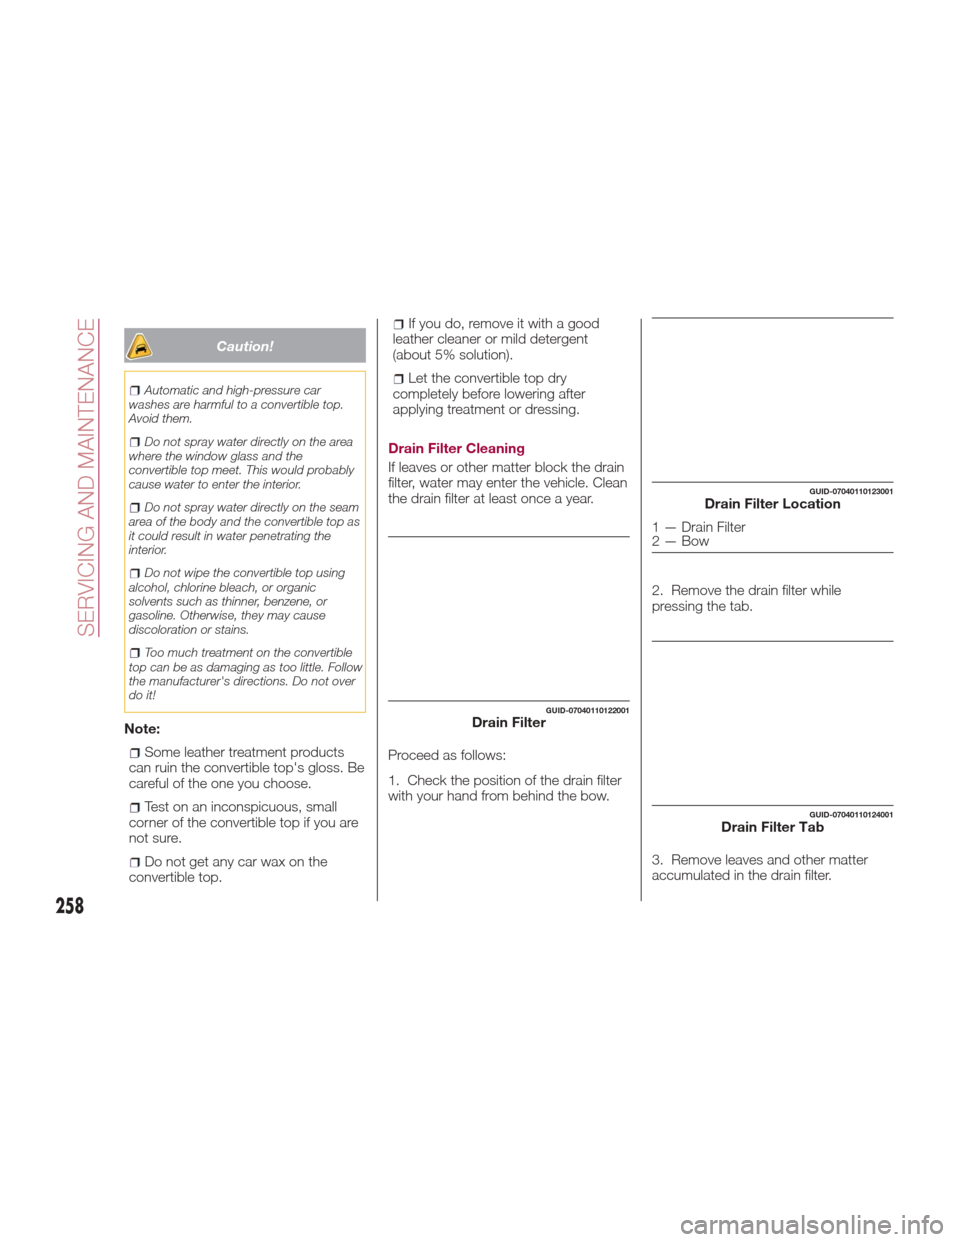
Proceed as follows:
1. Check the position of the drain filter
with your hand from behind the bow. 2. Remove the drain filter while
pressing the tab.
3. Remove leaves and other matter
accumulated in the drain filter.
GUID-07040110122001Drain Filter
GUID-07040110123001Drain Filter Location
1 — Drain Filter
2 — Bow
GUID-07040110124001Drain Filter Tab
258
SERVICING AND MAINTENANCE