2017 FIAT 124 SPIDER ABARTH tire pressure
[x] Cancel search: tire pressurePage 214 of 292

the vehicle is driven at a speed of
50 mph (80 km/h) or more, the vehicle
may vibrate.
Note:With TPMS system: if the tire is
not properly inflated, the
warning
light will illuminate.
After driving the vehicle for about
10 minutes or 3 miles (5 km), connect
the air compressor to the tire using
Step nine of the procedure, and check
the tire inflation pressure using the tire
pressure gauge on the air compressor.
If the tire inflation pressure is lower than
the specified tire inflation pressure, turn
the air compressor on and wait until it
reaches the specified tire inflation
pressure.
the Tire Service Kit is completed
successfully if the tire inflation pressure
does not decrease. Carefully drive the
vehicle to the nearest authorized dealer
immediately and have the flat tire
replaced. Replacement with a new tire
is recommended. If the tire is to be
repaired or reused, consult an
authorized dealer.
Note:
If an emergency flat tire repair has
been performed using the Tire Service
Kit, FCA recommends that the tire be
replaced with a new one as soon as
possible. If the tire is to be repaired or
reused, contact an authorized dealer.
The wheel can be reused if the
sealant adhering to it is removed.
However, replace the valve with a new
one.
Sealing A Tire With Tire
Service
Warning!
Do not attempt to seal a tire on the side
of the vehicle closest to traffic. Pull far
enough off the road to avoid the danger of
being hit when using the Tire Service Kit.
Do not use Tire Service Kit or drive the
vehicle under the following circumstances:
If the puncture in the tire tread is
approximately 1/4 inch (6 mm) or larger.
If the tire has any sidewall damage.
If the tire has any damage from driving
with extremely low tire pressure.
If the tire has any damage from driving
on a flat tire.
If the wheel has any damage.
If you are unsure of the condition of the
tire or the wheel.
Keep Tire Service Kit away from open
flames or heat source.
A loose Tire Service Kit thrown forward
in a collision or hard stop could endanger
the occupants of the vehicle. Always stow
the Tire Service Kit in the place provided.
Failure to follow these warnings can result
in injuries that are serious or fatal to you,
your passengers, and others around you.
Take care not to allow the contents of
Tire Service Kit to come in contact with
hair, eyes, or clothing. Tire Service Kit
sealant is harmful if inhaled, swallowed, or
absorbed through the skin. It causes skin,
eye, and respiratory irritation. Flush
immediately with plenty of water if there is
any contact with eyes or skin. Change
clothing as soon as possible, if there is any
contact with clothing.
Tire Service Kit Sealant solution contains
latex. In case of an allergic reaction or rash,
consult a physician immediately. Keep Tire
Service Kit out of reach of children. If
swallowed, rinse mouth immediately with
plenty of water and drink plenty of water. Do
not induce vomiting! Consult a physician
immediately.
212
IN CASE OF EMERGENCY
Page 217 of 292

13. Reinsert the valve core into the
valve and turn it clockwise to install.
Note:
The tire sealant cannot be reused.
If the tire sealant kit has been used, or
is expired, purchase new one at an
authorized dealer.
Do not throw away the empty tire
sealant bottle after use. Return the
empty tire sealant bottle to an
authorized dealer when replacing the
tire. The empty tire sealant bottle will
need to be used to extract and dispose
of the used sealant from the tire.
14. Install the injection hose to the tab
of the bottle to prevent leakage of any
remaining sealant.
15. Adhere the speed restriction sticker
to an area where it can be viewed easily
by the driver.
Warning!
Do not adhere the speed restriction sticker
to the padded area on the steering wheel.
Adhering the speed restriction sticker to
the padded area on the steering wheel is
dangerous because the air bag may not
operate (deploy) normally resulting in
serious injury. In addition, do not adhere
the sticker to areas where warning lights or
the speedometer cannot be viewed.
16. Pull out the air compressor hose
and the air compressor plug from the
air compressor.
17. Install the air compressor hose to
the tire valve. 18. Insert the air compressor plug into
the accessory socket inside the vehicle
and place the ignition to ACC.
19. Turn the air compressor switch on
and inflate the tire carefully to the
correct inflation pressure. For the
correct pressure, check the tire inflation
pressure label on the driver's door
frame.
Note:
When inserting the air
compressor plug into or removing it
from the accessory socket, make sure
that the air compressor switch is off.
When turning the air compressor on/off,
use the air compressor switch. Before
checking the tire inflation pressure using
the tire pressure gauge, turn the air
compressor switch off.
08020202-36A-004-high.jpgAir Compressor With Hose And Plug
2 — Air Compressor Hose
08020202-03A-00BAir Compressor Hose Into Valve
215
Page 218 of 292

Caution!
If the tire inflation pressure does not
increase, repair of the tire is not possible. If
the tire does not reach the specified tire
inflation pressure within 10 minutes, it may
have received extensive damage. In this
case, the repair using the tire service kit
was not successful.
Do not operate the air compressor for a
continuous 10 minutes or longer because
using it for long periods could cause a
malfunction.
Note: If the tire has been over
inflated, loosen the screw cap on the air
compressor and bleed some of the air
out.
20. When the tire inflates to the
specified tire inflation pressure, turn the
air compressor switch off, turn the
sleeve of the air compressor hose to
the left, and pull it out of the tire valve.
21. Install the tire valve cap.
22. Place the Tire Service Kit back into
its storage location.
23. Start driving immediately to spread
the sealant in the tire. Note:
Carefully drive the vehicle at a
speed of 50 mph (80 km/h) or less. If
the vehicle is driven at a speed of
50 mph (80 km/h) or more, the vehicle
may vibrate.
With TPMS system: if the tire is not
properly inflated, thewarning light
will illuminate.
After driving the vehicle for about
10 minutes or 3 miles (5 km), connect
the air compressor to the tire using
Step nine of the procedure, and check
the tire inflation pressure using the tire
pressure gauge on the air compressor.
If the tire inflation pressure is lower
than the specified tire inflation
pressure, turn the air compressor on
and wait until it reaches the specified
tire inflation pressure;
The emergency flat tire repair is
completed successfully if the tire
inflation pressure does not decrease.
Carefully drive the vehicle to the
nearest authorized dealer and have the
flat tire replaced. Replacement with a
new tire is recommended. If the tire is
to be repaired or reused, contact a
authorized dealer.
If an emergency flat tire repair has
been performed using the Tire Service
Kit, FCA recommends that the tire be
replaced with a new one as soon as
possible. If the tire is to be repaired or
reused, contact an authorized dealer.
The tire can be reused if the sealant
adhering to it is removed. However,
replace the valve with a new one.
Replacing The Bottle
Note: The tire sealant has a period of
effective use. Check the period of
effective use indicated on the bottle
labelanddonotuseitifithasexpired.
Have the tire sealant replaced at an
authorized dealer before the period of
effective use has expired.
Inspect the Tire Service Kit at regular
intervals as well as the operation of the
tire compressor.
216
IN CASE OF EMERGENCY
Page 226 of 292

At least monthly perform inspection
of:
Tire inflation pressures
At least twice a year (for example,
every spring and fall) perform
inspection of:
Engine coolant
Engine oil
As explained in the “Introduction”
paragraph, several procedures can be
done only by a qualified service
technician with special tools.
For details, read the separate Warranty
Booklet provided with the vehicle. If you
are unsure about any servicing or
maintenance procedure, have it done
by an Authorized Dealer.
There are strict environmental laws
regarding the disposal of waste oil and
fluids. Please dispose of your waste
properly and with due regard to the
environment.
We recommend that you entrust the oil
and fluid changes of your vehicle to an
Authorized Dealer.
Periodic Checks
Every 620 miles (1,000 km) or before
long trips check and, if necessary, top
off:
Engine coolant level.
Brake fluid level.
Windshield washer fluid level.
Tire inflation pressure and condition.
Operation of lighting system
(headlights, direction indicators, hazard
warning lights, etc.).
Operation of windshield
washer/wiper system and
positioning/wear of windshield wiper
blades.
Every 1860 miles (3,000 km) check
and top off the engine oil level if
required.
Heavy-Duty Use Of The
Vehicle
If the vehicle is used under one of the
following conditions:
Dusty roads.
Short, repeated trips less than 4.4 -
5 miles (7-8km)atsub -zero outside
temperatures.
Engine idling for long periods of time
or driving long distances at low speeds
or long periods of inactivity.
The following checks must be carried
out more often than indicated in the
Scheduled Servicing Plan:
Check front disc brake pad condition
and wear.
Check cleanliness of underhood area
and all door and trunk locks, cleanliness
and lubrication of linkage.
Visually inspect conditions of the:
engine, transmission, lines and hoses (exhaust/fuel system/brakes) and
rubber elements (hoses/belts/etc.).
Check battery charge and battery
fluid level.
Visually inspect conditions of the
accessory drive belts.
Check and, if necessary, change
engine oil and replace oil filter.
Check and, if necessary, replace
cabin air filter.
Check and, if necessary, replace air
cleaner.
Severe Duty All Models
Change Engine Oil at 4,000 miles
(6,500 km) if the vehicle is operated in a
dusty and off road environment or is
operated predominately at idle or only
very low engine RPM’s. This type of
vehicle use is considered Severe Duty.
224
SERVICING AND MAINTENANCE
Page 227 of 292

Scheduled Servicing Plan
Mileage or time passed(whichever comes first)
10,000
20,000
30,000
40,000
50,000
60,000
70,000
80,000
90,000
100,000
110,000
120,000
130,000
140,000
150,000
Years123 456789101112131415
Or Kilometers16,000
32,000
48,000
64,000
80,000
96,000
112,000
128,000
144,000
160,000
176,000
192,000
208,000
224,000
240,000
Check tire condition/wear
and adjust pressure, if
necessary, check TIREKIT
expiration date (if
provided). •••••••••••••••
Check operation of lighting
system (headlamps,
direction indicators, hazard
warning lights, luggage
compartment, passenger
compartment, glove
compartment, instrument
panel warning lights, etc.). •••••••••••••••
Check and, if necessary,
top up fluid levels
(brakes/hydraulic clutch,
windshield washer, battery,
engine coolant, etc.). •••••••••••••••
225
Page 239 of 292

RAISING THE
VEHICLE
If the vehicle needs to be raised, see an
authorized dealer which is equipped
with arm hoists or workshop lifts.
The vehicle’s lifting points are marked
on the side skirts with the
symbols.
WHEELS AND TIRES
Tire Safety Information
Tire safety information will cover
aspects of the following information:
Tire Markings, Tire Identification
Numbers, Tire Terminology and
Definitions, Tire Pressures and Tire
Loading.
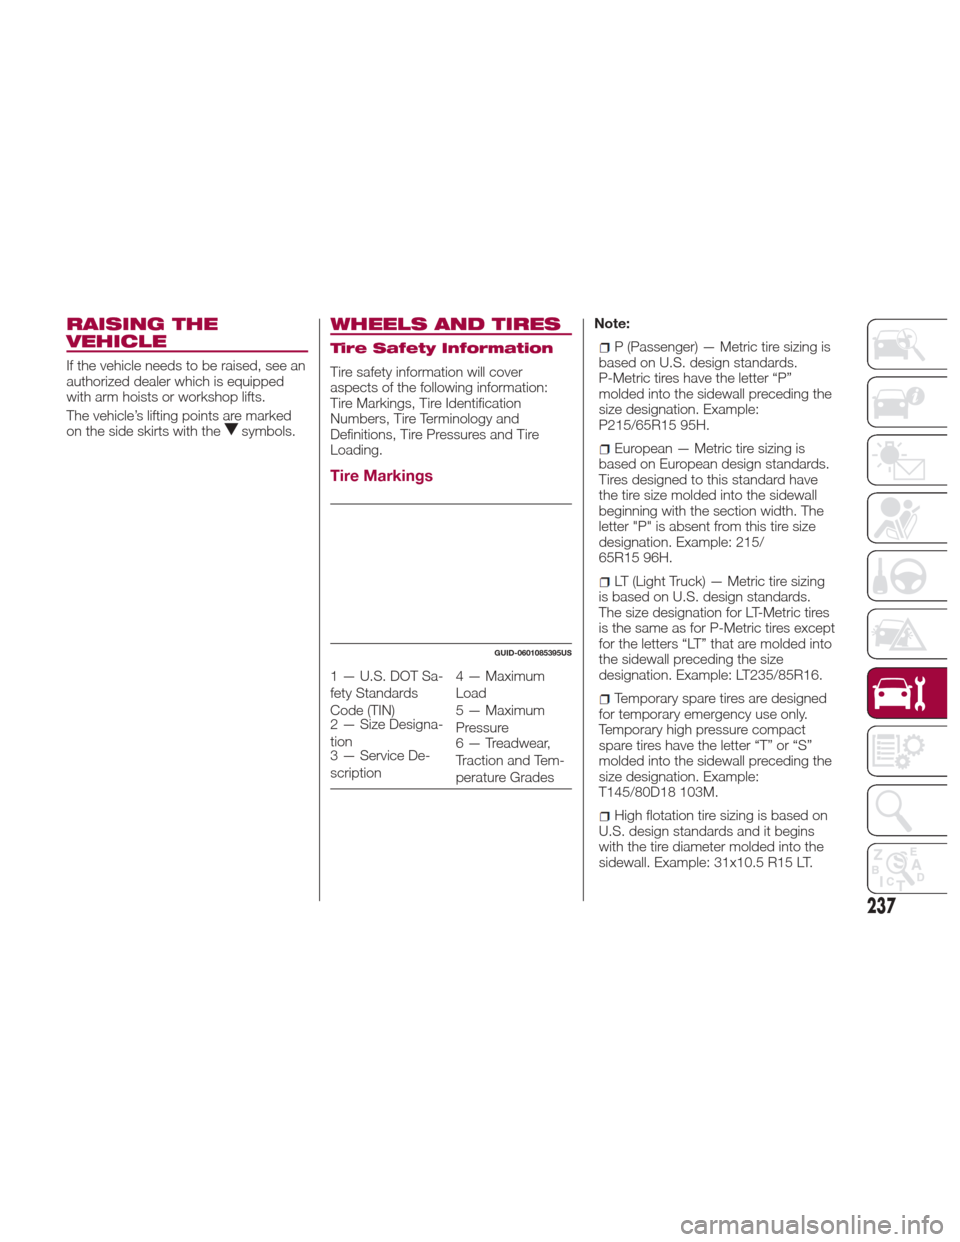
Tire Markings
Note:
P (Passenger) — Metric tire sizing is
based on U.S. design standards.
P-Metric tires have the letter “P”
molded into the sidewall preceding the
size designation. Example:
P215/65R15 95H.
European — Metric tire sizing is
based on European design standards.
Tires designed to this standard have
the tire size molded into the sidewall
beginning with the section width. The
letter "P" is absent from this tire size
designation. Example: 215/
65R15 96H.
LT (Light Truck) — Metric tire sizing
is based on U.S. design standards.
The size designation for LT-Metric tires
is the same as for P-Metric tires except
for the letters “LT” that are molded into
the sidewall preceding the size
designation. Example: LT235/85R16.
Temporary spare tires are designed
for temporary emergency use only.
Temporary high pressure compact
spare tires have the letter “T” or “S”
molded into the sidewall preceding the
size designation. Example:
T145/80D18 103M.
High flotation tire sizing is based on
U.S. design standards and it begins
with the tire diameter molded into the
sidewall. Example: 31x10.5 R15 LT.
GUID-0601085395US
1 — U.S. DOT Sa-
fety Standards
Code (TIN) 4 — Maximum
Load
2 — Size Designa-
tion 5 — Maximum
Pressure
3 — Service De-
scription 6 — Treadwear,
Traction and Tem-
perature Grades
237
Page 241 of 292

Tire Terminology And
Definitions
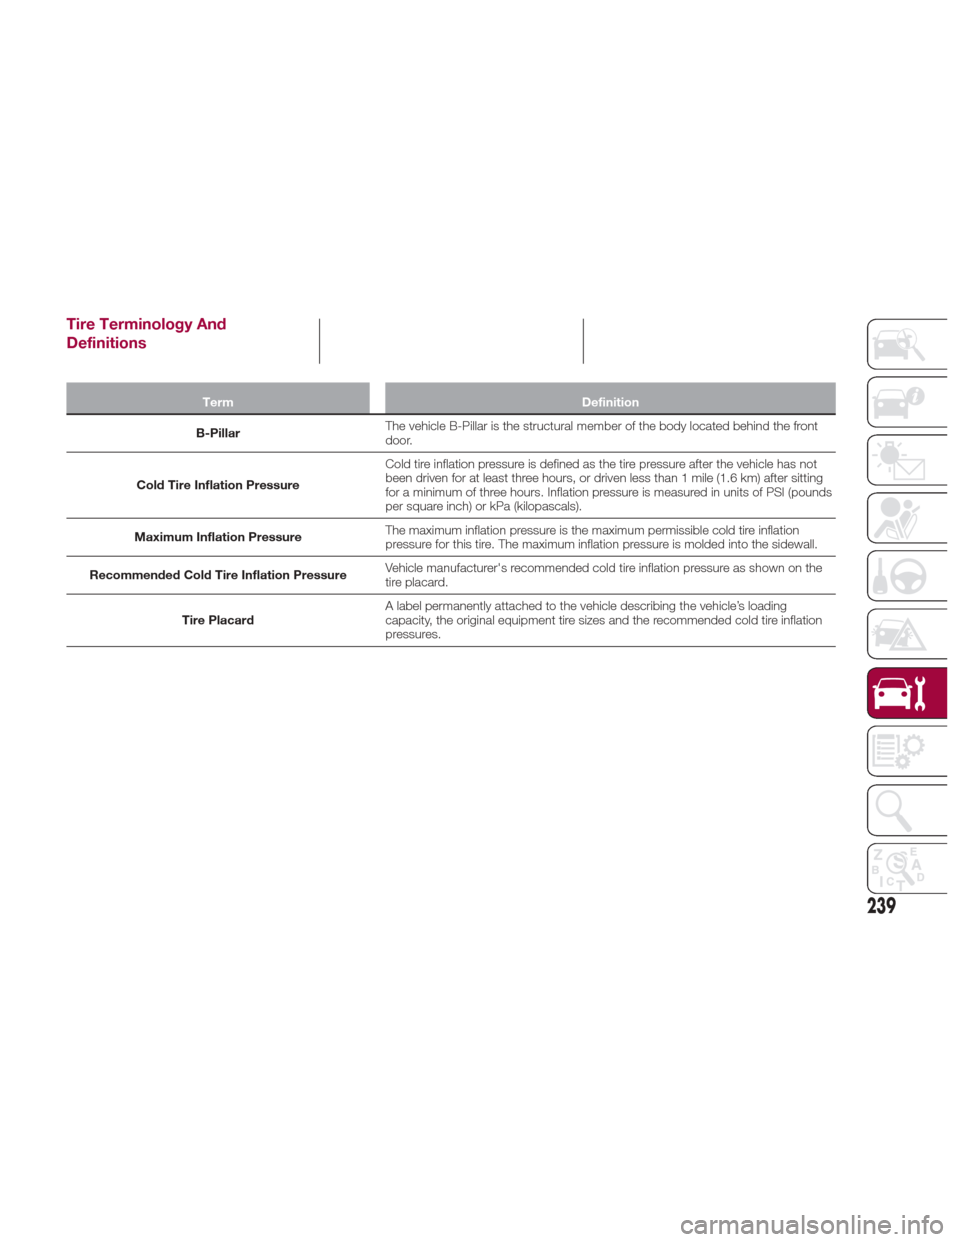
TermDefinition
B-Pillar The
vehicle B-Pillar is the structural member of the body located behind the front
door.
Cold Tire Inflation Pressure Cold tire inflation pressure is defined as the tire pressure after the vehicle has not
been driven for at least three hours, or driven less than 1 mile (1.6 km) after sitting
for a minimum of three hours. Inflation pressure is measured in units of PSI (pounds
per square inch) or kPa (kilopascals).
Maximum Inflation Pressure The maximum inflation pressure is the maximum permissible cold tire inflation
pressure for this tire. The maximum inflation pressure is molded into the sidewall.
Recommended Cold Tire Inflation Pressure Vehicle manufacturer's recommended cold tire inflation pressure as shown on the
tire placard.
Tire Placard A label permanently attached to the vehicle describing the vehicle’s loading
capacity, the original equipment tire sizes and the recommended cold tire inflation
pressures.
239
Page 242 of 292

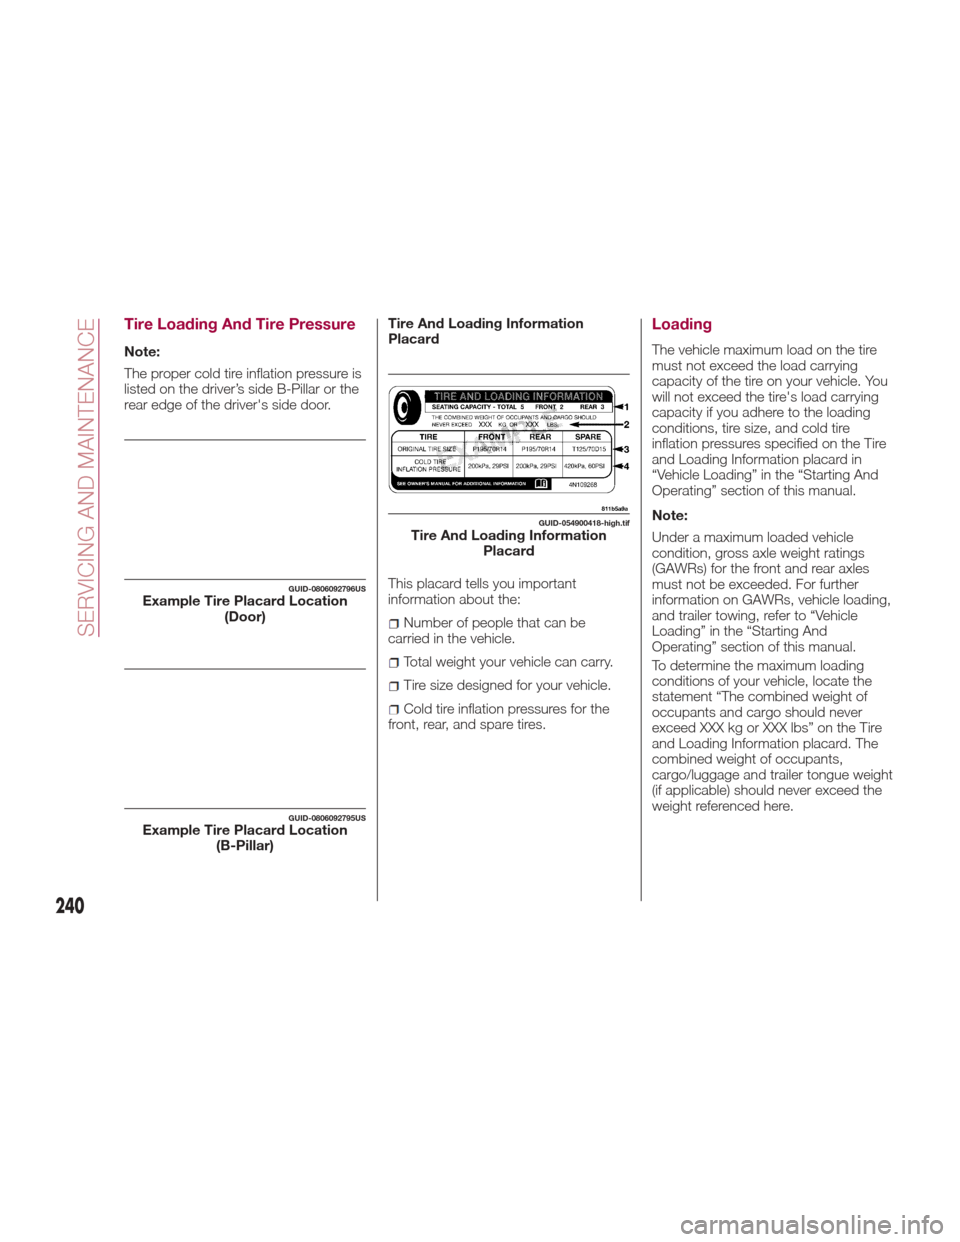
Tire Loading And Tire Pressure
Note:
The proper cold tire inflation pressure is
listed on the driver’s side B-Pillar or the
rear edge of the driver's side door.Tire And Loading Information
Placard
This placard tells you important
information about the:
Number of people that can be
carried in the vehicle.
Total weight your vehicle can carry.
Tire size designed for your vehicle.
Cold tire inflation pressures for the
front, rear, and spare tires.
Loading
The vehicle maximum load on the tire
must not exceed the load carrying
capacity of the tire on your vehicle. You
will not exceed the tire's load carrying
capacity if you adhere to the loading
conditions, tire size, and cold tire
inflation pressures specified on the Tire
and Loading Information placard in
“Vehicle Loading” in the “Starting And
Operating” section of this manual.
Note:
Under a maximum loaded vehicle
condition, gross axle weight ratings
(GAWRs) for the front and rear axles
must not be exceeded. For further
information on GAWRs, vehicle loading,
and trailer towing, refer to “Vehicle
Loading” in the “Starting And
Operating” section of this manual.
To determine the maximum loading
conditions of your vehicle, locate the
statement “The combined weight of
occupants and cargo should never
exceed XXX kg or XXX lbs” on the Tire
and Loading Information placard. The
combined weight of occupants,
cargo/luggage and trailer tongue weight
(if applicable) should never exceed the
weight referenced here.
GUID-0806092796USExample Tire Placard Location (Door)
GUID-0806092795USExample Tire Placard Location(B-Pillar)
GUID-054900418-high.tifTire And Loading InformationPlacard
240
SERVICING AND MAINTENANCE