2017 FIAT 124 SPIDER ABARTH headlights
[x] Cancel search: headlightsPage 46 of 292

and park off the road and remove the
snow and ice. After five minutes, turn
on the switch and the blades should
operate normally. If they do not resume
functioning, contact an authorized
dealer as soon as possible. Drive to the
side of the road and pull off the side of
the road to a safe location. Wait until
the weather clears before trying to drive
with the wipers inoperative.
Windshield Washer
Pull the lever toward you and hold it to
spray washer fluid.
With the wiper lever in the OFF,
intermittent position or AUTO position,
the wipers will operate continuously
until the lever is released.
Warning!
Sudden loss of visibility through the
windshield could lead to a collision. You
might not see other vehicles or other
obstacles. To avoid sudden icing of the
windshield during freezing weather, warm
the windshield with defroster before and
during windshield washer use.
If the fluid level is normal and the
washer does not work, contact an
authorized dealer.
With headlight washers
When the headlights are on, the
headlight washers operate
automatically once every fifth time the
windshield washer operates.CLIMATE CONTROL
SYSTEM
Operating Tips
The air conditioning system will only
operate with the engine running.
To prevent the battery from being
discharged while the engine is off, do
not leave the fan control dial on for
extended periods of time.
To improve system efficiency, clear all
obstructions (leaves, snow and ice)
from the hood and the air inlet in the
grille.
Use the air conditioning system to
defog the windows and dehumidify the
air.
Recirculation mode should be used
when driving through tunnels, while in a
traffic jam, or when you would like to
quickly cool the interior by shutting off
the exterior vents.
Use the outside air position for
ventilation or windscreen defrosting.
If the vehicle has been parked in direct
sunlight during hot weather, open the
windows to let warm air escape, and
then run the air conditioning system.
To keep the internal parts lubricated
and the system running smoothly, run
the air conditioner about 10 minutes at
least once a month.
04110109-115-001Windshield Washer Nozzles
44
GETTING TO KNOW YOUR VEHICLE
Page 81 of 292

Odometer / Trip
Computer
The display mode can be changed from
odometer to “Trip computer A” to “Trip
computer B” and then back to
odometer by pushing the selector while
one of them is displayed.
The selected mode will be displayed.
When the ignition is placed in the ACC
or OFF position, the odometer or trip
cannot be displayed. Pushing the
selector can switch the trip or reset it
for a ten-minute period in the following
cases:
After the ignition is cycled to OFF
from ON.
After the driver's door is opened. Odometer
The odometer records the total
distance the vehicle has been driven.
Trip Computer
The trip computer can record the total
distance of two trips. One is recorded in
“Trip A”, and the other is recorded in
“Trip B”.
For instance, “Trip A” can record the
distance from the point of origin, and
“Trip B” can record the distance from
where the fuel tank is filled.
When “Trip A” is selected, pushing the
selector again within one second will
change to “Trip B” mode. When “Trip A”
is selected, TRIP A will be displayed.
When “Trip B” is selected, TRIP B will
be displayed.
The trip computer records the total
distance the vehicle is driven until the
meter is again reset. Return it to “0.0”
by depressing and holding the selector
for one second or more.
Use this meter to measure trip
distances and to compute fuel
consumption.
Versions With Fiat Connect 7.0
:if
the fuel economy data is reset using the
fuel economy monitor or Trip A is reset
using the trip meter, the fuel economy
data and Trip A are reset simultaneously
when the fuel economy monitor with
the trip meter is on, .
Note: Only the trip records tenths of
miles (kilometers). Trip Computer Reset
The trip computer will be erased when:
The power supply is interrupted
(blown fuse or the battery is
disconnected).
The vehicle is driven over
9999.9 miles.
Speedometer
The speedometer indicates the speed
of the vehicle.
Instrument Panel
Illumination
When the position lights are turned on
with the ignition switched ON, the
brightness of the instrument panel
illumination is dimmed. When the
position lights are turned on, the
warning light in the instrument
cluster turns on (see “Headlights” in
“Getting To Know Your Vehicle”
chapter).
Brightness Adjustment
The brightness of the instrument panel
and dashboard illuminations can be
adjusted by rotating the knob:
The brightness decreases by
rotating the knob to the left. A beep
sound will be heard when the knob has
been rotated to the maximum dim
position.
05020102-121-001Abarth Instrument Cluster
1 — Trip Selector/Reset Button
79
Page 103 of 292

Green Warning Lights
Warning lightWhat it means
LEFT DIRECTION INDICATOR
The warning light turns on when the direction indicator control lever is moved downwards or,
together with the right direction indicator, when the hazard warning light button is pushed.
RIGHT DIRECTION INDICATOR
The warning light turns on when the direction indicator control lever is moved upwards or,
together with the left direction indicator, when the hazard warning light button is pushed.
SIDE LIGHTS AND DIPPED BEAM HEADLIGHTS
The warning light turns on when side lights or dipped beam headlights are turned on.
CRUISE CONTROL (IF EQUIPPED)
The warning light turns on when a cruising speed has been set.
KEY INDICATOR LIGHT
The warning light turns on when the engine is ready to start.
Warning light flashing
When the keyless START/STOP button is pushed from ON to ACC or OFF position, the warning
light may flash for approximately 30 seconds indicating that the remaining battery power of the
key is low. Replace with a new battery before the key becomes unusable.
101
Page 104 of 292

Blue warning light
Warning lightWhat it means
MAIN BEAM HEADLIGHTS
The warning light switches on when the main beam headlights are turned on.
LOW ENGINE COOLANT TEMPERATURE INDICATOR LIGHT
The light illuminates continuously when the engine coolant temperature is low and turns off after
the engine is warm.
If the low engine coolant temperature indicator light remains illuminated after the engine has
been sufficiently warmed up, the temperature sensor could have a malfunction. Contact an
Authorized Dealership.
102
GETTING TO KNOW YOUR INSTRUMENT PANEL
Page 110 of 292

ItemFeature Factory Setting Available Settings Settings Change
Method
123
Keyless Entry
System T
ime for locking door
automatically 30 seconds90 seconds/60 seconds/30
seconds A—X
Advanced
Keyless Entry
System Time for locking door
automatically 30 seconds90 seconds/60 seconds/30
seconds A—X
Auto-lock function
operation/non operational Off
On/OffA — X
Beep volume when locking/unlocking Off or Medium
High/Medium/Low/Off A D/E X
Illuminated Entry
System Time until interior lights turn
off after closing door 15 seconds60 seconds/30 seconds/15
seconds/7.5 seconds A—X
Time until interior lights turn off automatically when any
door is not closed completely 30 minutes 60 minutes/30 minutes/10 minutes A — X
Auto-Wiper
Control Operational/non-operational
OnOn/Off (**)A — X
Auto headlight off
(***) Time until headlights turn off 30 second 120 seconds/ 90 seconds/
60 seconds/ 30 seconds/Off (****) A—X
Auto-Light
Control Timing by which lights turn
on MediumHigh/Med. High/Medium/Med.
Low/Low A—X
Adaptive Front
Lighting System
(AFS) Operational/non-operational
(***) On
On/OffA — X
Lights-On
Reminder Warning beep volume HighHigh/Low/Off A — X
Coming Home
System Time until headlights turn off 30 seconds 120 seconds/90 seconds/60
seconds/30 seconds/Off A—X
108
GETTING TO KNOW YOUR INSTRUMENT PANEL
Page 186 of 292

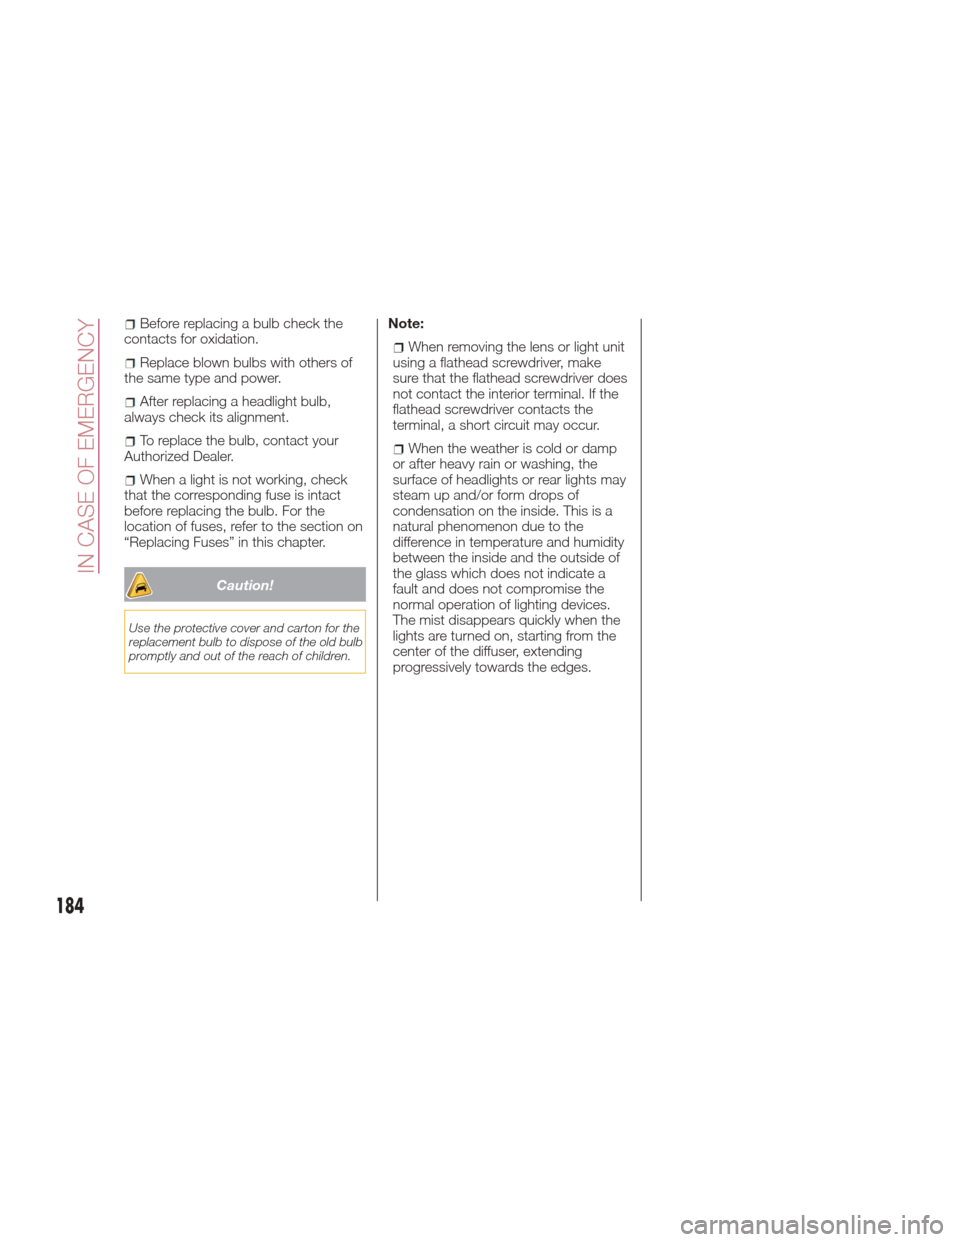
Before replacing a bulb check the
contacts for oxidation.
Replace blown bulbs with others of
the same type and power.
After replacing a headlight bulb,
always check its alignment.
To replace the bulb, contact your
Authorized Dealer.
When a light is not working, check
that the corresponding fuse is intact
before replacing the bulb. For the
location of fuses, refer to the section on
“Replacing Fuses” in this chapter.
Caution!
Use the protective cover and carton for the
replacement bulb to dispose of the old bulb
promptly and out of the reach of children.
Note:
When removing the lens or light unit
using a flathead screwdriver, make
sure that the flathead screwdriver does
not contact the interior terminal. If the
flathead screwdriver contacts the
terminal, a short circuit may occur.
When the weather is cold or damp
or after heavy rain or washing, the
surface of headlights or rear lights may
steam up and/or form drops of
condensation on the inside. This is a
natural phenomenon due to the
difference in temperature and humidity
between the inside and the outside of
the glass which does not indicate a
fault and does not compromise the
normal operation of lighting devices.
The mist disappears quickly when the
lights are turned on, starting from the
center of the diffuser, extending
progressively towards the edges.
184
IN CASE OF EMERGENCY
Page 187 of 292

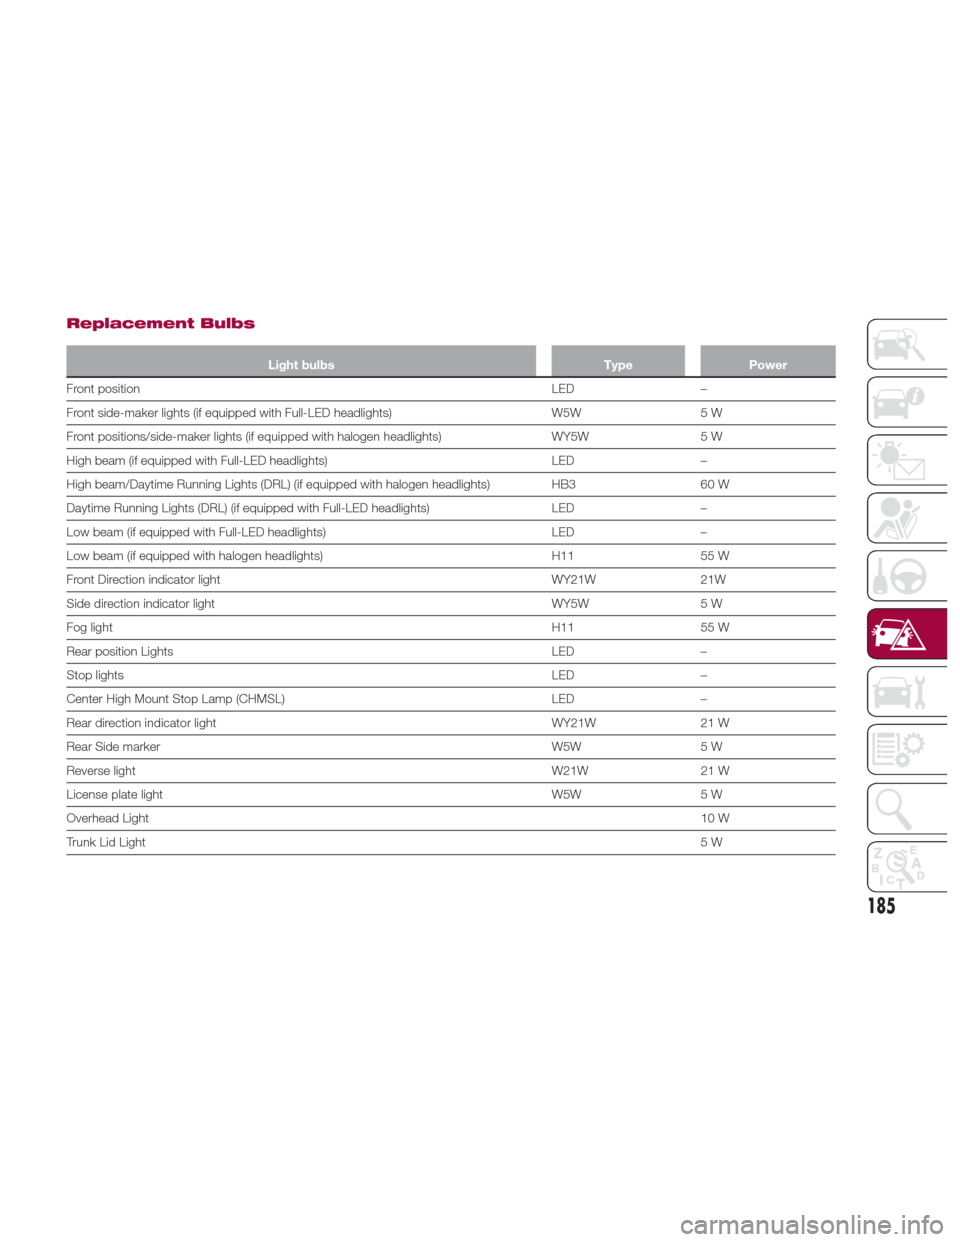
Replacement Bulbs
Light bulbsTypePower
Front position LED
–
Front side-maker lights (if equipped with Full-LED headlights) W5W5 W
Front positions/side-maker lights (if equipped with halogen headlights) WY5W5 W
High beam (if equipped with Full-LED headlights) LED–
High beam/Daytime Running Lights (DRL) (if equipped with halogen headlights) HB3 60 W
Daytime Running Lights (DRL) (if equipped with Full-LED headlights) LED–
Low beam (if equipped with Full-LED headlights) LED–
Low beam (if equipped with halogen headlights) H1155 W
Front Direction indicator light WY21W21W
Side direction indicator light WY5W5 W
Fog light H1155 W
Rear position Lights LED–
Stop lights LED–
Center High Mount Stop Lamp (CHMSL) LED–
Rear direction indicator light WY21W21 W
Rear Side marker W5W5 W
Reverse light W21W21 W
License plate light W5W5 W
Overhead Light 10 W
Trunk Lid Light 5W
185
Page 188 of 292

Light Bulbs
Front Lights
The bulbs are arranged as follows :Rear Lights
The bulbs are arranged as follows :
Replacing Exterior
Lights
Headlights (low beam)
(If Equipped with halogen bulb)
Proceed as follows:
1. If you are changing the right bulb,
start the engine, turn the steering wheel
all the way to the right, and turn off
engine. If you are changing the left bulb,
turn the steering wheel to the left.2. Make sure the ignition is placed in
the OFF mode, and the headlight
switch is off.
3. Remove the fasteners in the seven
locations and partially peel back the
mud guard
4. Turn the cover counterclockwise and
remove it, disconnect the connector
from the unit by pressing the tab on the
connector with your finger and pulling
the connector.
5. Turn the socket and bulb assembly
counterclockwise and remove it.
6. Disconnect the bulb from the
socket.
04110102-L38-008Head Lights
1 — High Beam with Daytime Running
Lights (DRL)/Position Light/Low
Beam/Side Marker
2 — Front Indicator Light
3 — Fog Light
04110102-L40-010Rear Lights
4 — Side Marker — If Equipped
5 — Position Light/Stop Light/Rear
Direction Indicator Light
6 — Reverse Light — If Equipped
7 — Third Stop Light
GUID-08020499000002Mud Guard
1 — Fasteners
2 — Mud Guard
186
IN CASE OF EMERGENCY