Page 149 of 510
NOTE:
•Only available with Navigation equipped vehicles.
• You can replace “Player” with “Radio,” “Navigation,”
“Phone,” “Climate,” “More” or “Settings.” •
Navigation commands only work if equipped with
Navigation.
• Available Voice Commands are shown in bold face and
shaded grey.
3
UNDERSTANDING THE FEATURES OF YOUR VEHICLE 147
Page 256 of 510
Display
After pressing the “Display” button on the touchscreen, the
following settings will be available:
Setting NameSelectable Options
Brightness +–
NOTE:
The “Brightness” setting can also be adjusted by selecting any point on the scale between the “+” and “–” buttons on
the touchscreen. Mode Day NightAuto
Language English FrançaisEspañol
NOTE:
When in the “Language” feature, you may select one of three languages for all display nomenclature, including the
trip functions and the navigation system (if equipped). Units US Metric
Voice Response Brief Long
Touchscreen Beep On Off
254 UNDERSTANDING YOUR INSTRUMENT PANEL
Page 265 of 510
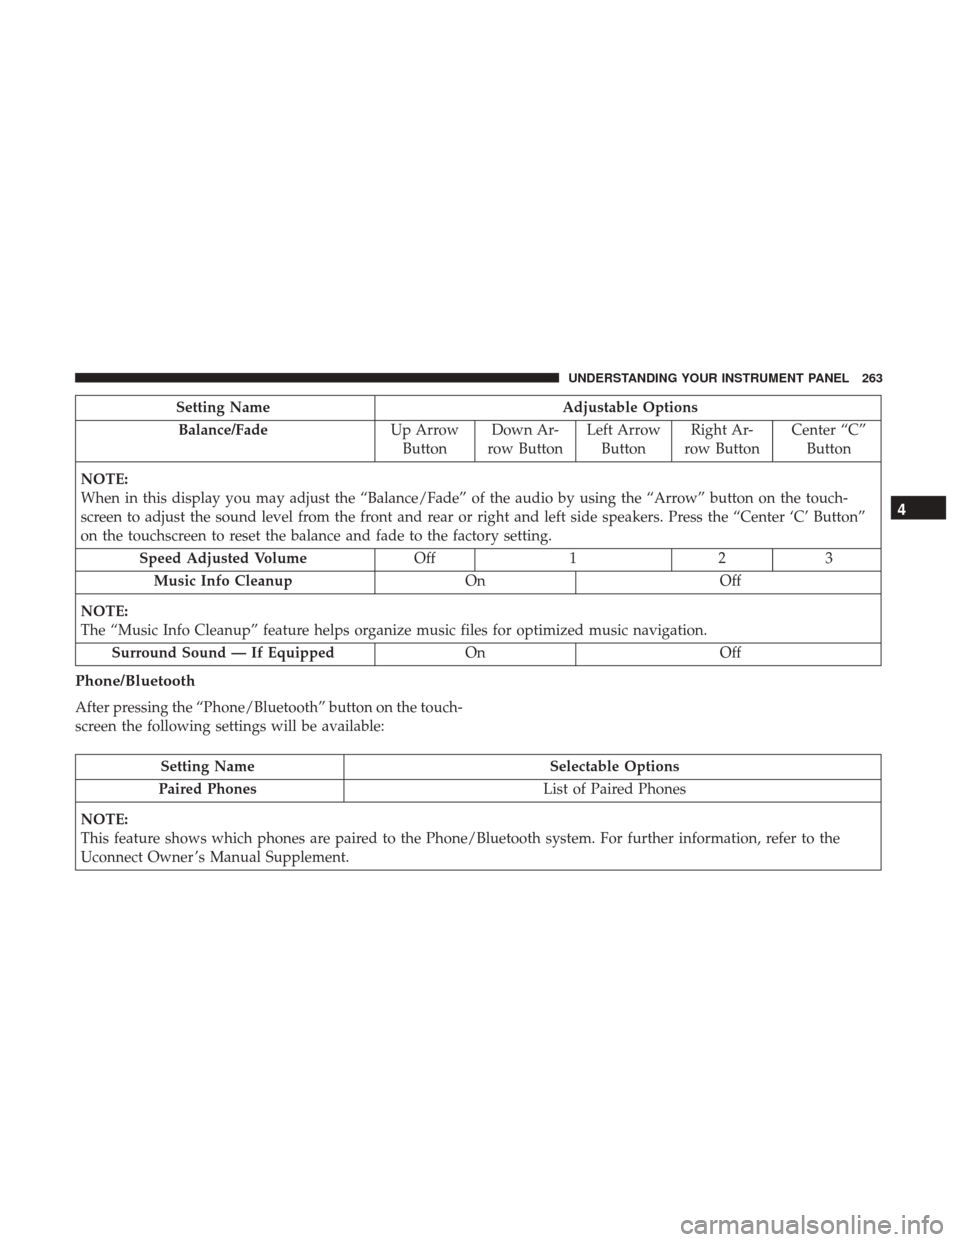
Setting NameAdjustable Options
Balance/Fade Up Arrow
Button Down Ar-
row Button Left Arrow
Button Right Ar-
row Button Center “C”
Button
NOTE:
When in this display you may adjust the “Balance/Fade” of the audio by using the “Arrow” button on the touch-
screen to adjust the sound level from the front and rear or right and left side speakers. Press the “Center ‘C’ Button”
on the touchscreen to reset the balance and fade to the factory setting. Speed Adjusted Volume Off123
Music Info Cleanup OnOff
NOTE:
The “Music Info Cleanup” feature helps organize music files for optimized music navigation. Surround Sound — If Equipped OnOff
Phone/Bluetooth
After pressing the “Phone/Bluetooth” button on the touch-
screen the following settings will be available:
Setting Name Selectable Options
Paired Phones List of Paired Phones
NOTE:
This feature shows which phones are paired to the Phone/Bluetooth system. For further information, refer to the
Uconnect Owner ’s Manual Supplement.
4
UNDERSTANDING YOUR INSTRUMENT PANEL 263
Page 268 of 510
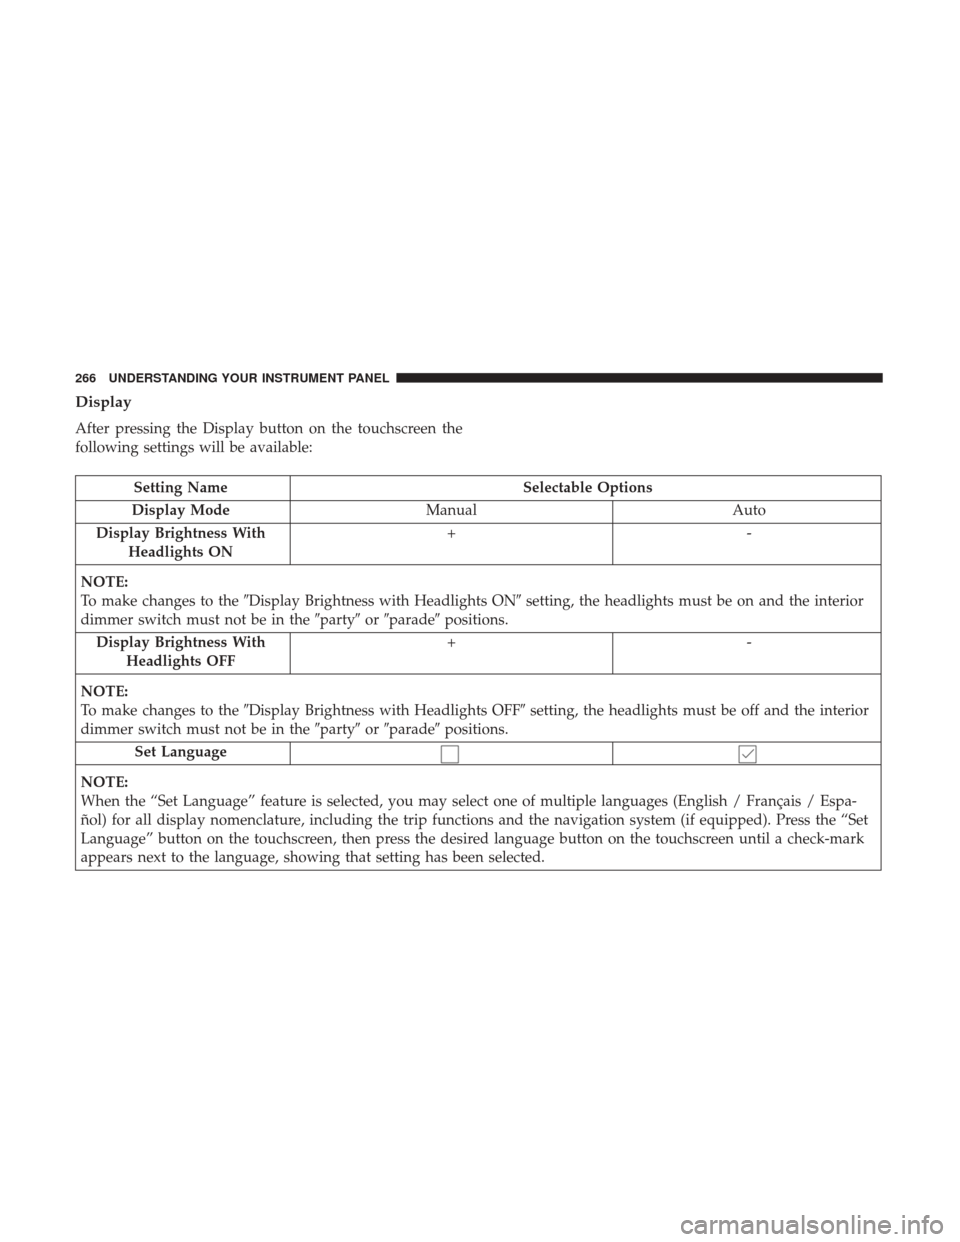
Display
After pressing the Display button on the touchscreen the
following settings will be available:
Setting NameSelectable Options
Display Mode Manual Auto
Display Brightness With Headlights ON +-
NOTE:
To make changes to the �Display Brightness with Headlights ON� setting, the headlights must be on and the interior
dimmer switch must not be in the �party�or�parade� positions.
Display Brightness With Headlights OFF +-
NOTE:
To make changes to the �Display Brightness with Headlights OFF� setting, the headlights must be off and the interior
dimmer switch must not be in the �party�or�parade� positions.
Set Language
NOTE:
When the “Set Language” feature is selected, you may select one of multiple languages (English / Français / Espa-
ñol) for all display nomenclature, including the trip functions and the navigation system (if equipped). Press the “Set
Language” button on the touchscreen, then press the desired language button on the touchscreen until a check-mark
appears next to the language, showing that setting has been selected.
266 UNDERSTANDING YOUR INSTRUMENT PANEL
Page 269 of 510
Setting NameSelectable Options
Units US Metric
Voice Response Length BriefDetailed
Touchscreen Beep
Navigation Turn-By-Turn In Cluster — If Equipped
NOTE:
When the “Navigation Turn-By-Turn In Cluster” feature is selected, the turn-by-turn directions will appear in the In-
strument Cluster Display as the vehicle approaches a designated turn within a programmed route. Fuel Saver Display In Clus- ter — If Equipped
NOTE:
The “Fuel Saver Display In Cluster” feature turns the “ECO” message on and off in the Instrument Cluster Display.
4
UNDERSTANDING YOUR INSTRUMENT PANEL 267
Page 280 of 510
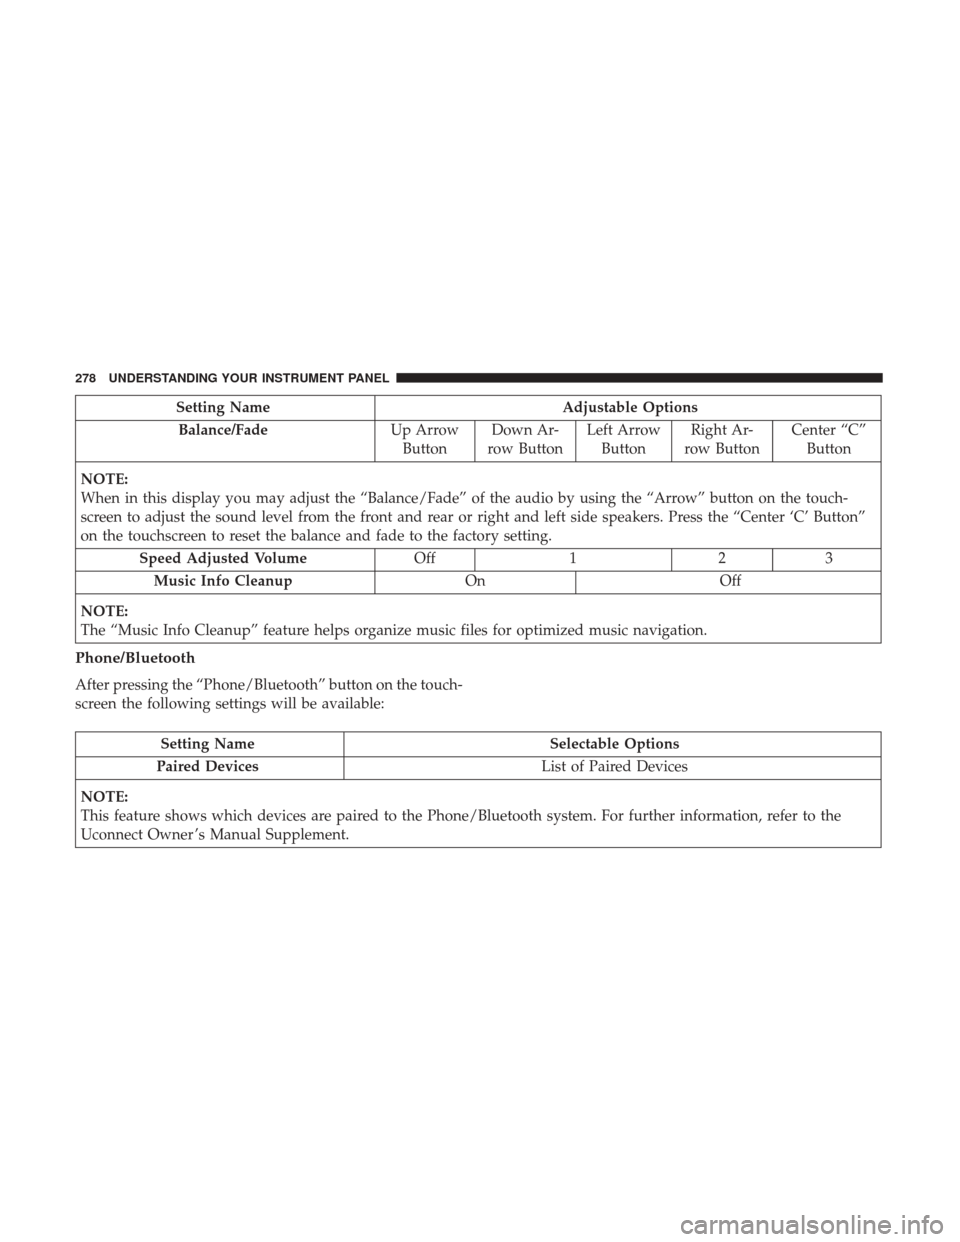
Setting NameAdjustable Options
Balance/Fade Up Arrow
Button Down Ar-
row Button Left Arrow
Button Right Ar-
row Button Center “C”
Button
NOTE:
When in this display you may adjust the “Balance/Fade” of the audio by using the “Arrow” button on the touch-
screen to adjust the sound level from the front and rear or right and left side speakers. Press the “Center ‘C’ Button”
on the touchscreen to reset the balance and fade to the factory setting. Speed Adjusted Volume Off123
Music Info Cleanup OnOff
NOTE:
The “Music Info Cleanup” feature helps organize music files for optimized music navigation.
Phone/Bluetooth
After pressing the “Phone/Bluetooth” button on the touch-
screen the following settings will be available:
Setting Name Selectable Options
Paired Devices List of Paired Devices
NOTE:
This feature shows which devices are paired to the Phone/Bluetooth system. For further information, refer to the
Uconnect Owner ’s Manual Supplement.
278 UNDERSTANDING YOUR INSTRUMENT PANEL
Page 292 of 510
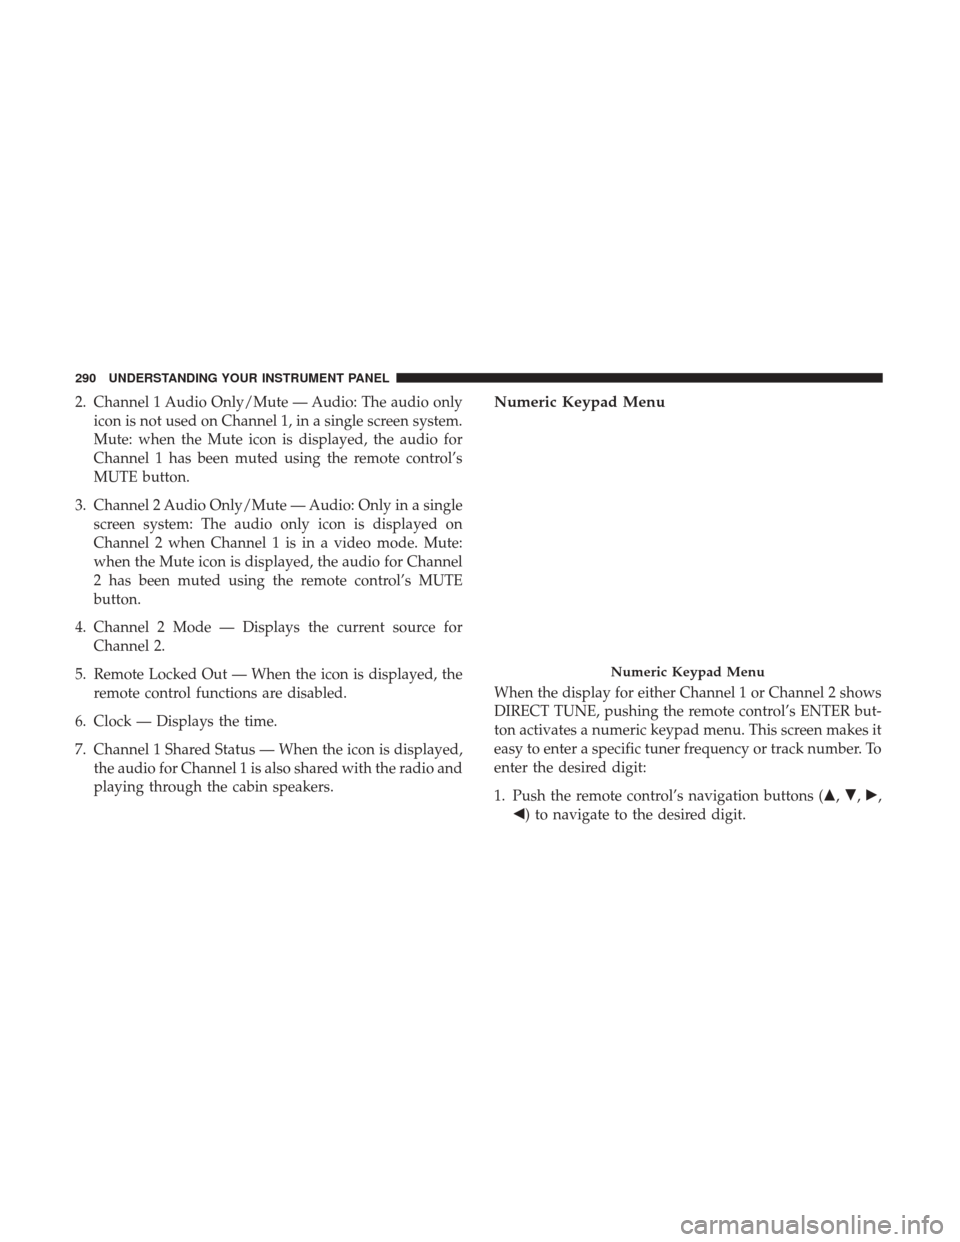
2. Channel 1 Audio Only/Mute — Audio: The audio onlyicon is not used on Channel 1, in a single screen system.
Mute: when the Mute icon is displayed, the audio for
Channel 1 has been muted using the remote control’s
MUTE button.
3. Channel 2 Audio Only/Mute — Audio: Only in a single screen system: The audio only icon is displayed on
Channel 2 when Channel 1 is in a video mode. Mute:
when the Mute icon is displayed, the audio for Channel
2 has been muted using the remote control’s MUTE
button.
4. Channel 2 Mode — Displays the current source for Channel 2.
5. Remote Locked Out — When the icon is displayed, the remote control functions are disabled.
6. Clock — Displays the time.
7. Channel 1 Shared Status — When the icon is displayed, the audio for Channel 1 is also shared with the radio and
playing through the cabin speakers.Numeric Keypad Menu
When the display for either Channel 1 or Channel 2 shows
DIRECT TUNE, pushing the remote control’s ENTER but-
ton activates a numeric keypad menu. This screen makes it
easy to enter a specific tuner frequency or track number. To
enter the desired digit:
1. Push the remote control’s navigation buttons (�, �,�,
�) to navigate to the desired digit.
Numeric Keypad Menu
290 UNDERSTANDING YOUR INSTRUMENT PANEL
Page 293 of 510
2. When the digit is highlighted, push the remote control’sENTER button to select the digit. Repeat these steps
until all digits are entered.
3. To delete the last digit, navigate to the Del button and push the remote control’s ENTER button.
4. After all of the digits are entered, navigate to the Go button and push the remote control’s ENTER button.
Station List Menu
When listening to Satellite audio, pushing the remote
control’s MENU button displays a list of all available
channels. Navigate this list using the remote control’s
navigation buttons to find the desired station, push the
remote control’s ENTER button to tune to that station. To
jump through the list more quickly, navigate to the Page
Up and Page Down icons on the screen.
Disc Menu
When listening to a CD Audio or CD Data disc, pushing
the remote control’s MENU button displays a list of all
commands which control playback of the disc. Using the
options you can activate or cancel Random play.
Options Menu
When watching a video source (DVD Video with the disc
in Play mode, Aux Video, etc.), pressing the “Options”
button on the touchscreen activates the Options Settings
menu. From this menu you can adjust Audio, Subtitles,
Angle and Title.
Display Settings
When watching a video source (DVD Video with the disc
in Play mode, Aux Video, etc.), pushing the remote con-
trol’s SETUP button activates the Display Settings menu.
These settings control the appearance of the video on the
screen. The factory default settings are already set for
optimum viewing, so there is no need to change these
settings under normal circumstances.
4
UNDERSTANDING YOUR INSTRUMENT PANEL 291