2017 DODGE GRAND CARAVAN cooling
[x] Cancel search: coolingPage 95 of 530

Exhaust Gas
WARNING!
Exhaust gases can injure or kill. They contain carbon
monoxide (CO), which is colorless and odorless.
Breathing it can make you unconscious and can even-
tually poison you. To avoid breathing (CO), follow
these safety tips:
•Do not run the engine in a closed garage or in
confined areas any longer than needed to move your
vehicle in or out of the area.
• If you are required to drive with the trunk/liftgate/
rear doors open, make sure that all windows are
closed and the climate control BLOWER switch is set
at high speed. DO NOT use the recirculation mode.
• If it is necessary to sit in a parked vehicle with the
engine running, adjust your heating or cooling con-
trols to force outside air into the vehicle. Set the
blower at high speed.
The best protection against carbon monoxide entry into the
vehicle body is a properly maintained engine exhaust
system.
Whenever a change is noticed in the sound of the exhaust
system, when exhaust fumes can be detected inside the vehicle, or when the underside or rear of the vehicle is
damaged, have a competent mechanic inspect the complete
exhaust system and adjacent body areas for broken, dam-
aged, deteriorated, or mispositioned parts. Open seams or
loose connections could permit exhaust fumes to seep into
the passenger compartment. In addition, inspect the ex-
haust system each time the vehicle is raised for lubrication
or oil change. Replace as required.
Safety Checks You Should Make Inside The Vehicle
Seat Belts
Inspect the seat belt system periodically, checking for cuts,
frays, and loose parts. Damaged parts must be replaced
immediately. Do not disassemble or modify the system.
Front seat belt assemblies must be replaced after a collision.
Rear seat belt assemblies must be replaced after a collision
if they have been damaged (i.e., bent retractor, torn web-
bing, etc.). If there is any question regarding seat belt or
retractor condition, replace the seat belt.
Air Bag Warning Light
The Air Bag warning lightwill turn on for four to
eight seconds as a bulb check when the ignition is first
placed in the ON/RUN position. If the light is either not
on during starting, stays on, or turns on while driving, 2
THINGS TO KNOW BEFORE STARTING YOUR VEHICLE 93
Page 242 of 530

Refer to ”Instrument Cluster Display— If Equipped” in
this section for further information.
LoW tirE
When the appropriate condition exists, the odometer will
toggle between LoW and tirE for three cycles.
gASCAP
If the vehicle diagnostic system determines that the fuel
filler cap is loose, improperly installed, or damaged, a
“gASCAP” message will display in the odometer display
area. Tighten the fuel filler cap properly and push the STEP
button on the steering wheel to turn off the message. If the
problem continues, the message will appear the next time
the vehicle is started.
noFUSE
If the vehicle diagnostic system determines that the Igni-
tion Off Draw (IOD) fuse is improperly installed, or
damaged, a “noFUSE” message will display in the odom-
eter display area. Refer to “Fuses” in “Maintaining Your
Vehicle” for further information on fuses and fuse loca-
tions.CHAngE OIL
Your vehicle is equipped with an engine oil change indi-
cator system. The odometer display will toggle between
CHAngE
andOilfor approximately 12 seconds, after a
single chime has sounded, to indicate the next scheduled
oil change interval. The engine oil change indicator system
is duty cycle-based, which means the engine oil change
interval may fluctuate dependent upon your personal
driving style.
3. Speedometer
•Indicates vehicle speed.
4. Fuel Gauge •The pointer shows the level of fuel in the fuel tank
when the ignition switch is in the ON/RUN position.
•
The fuel pump symbol points to the side of the
vehicle where the fuel door is located.
5. Temperature Gauge
•The temperature gauge shows engine coolant tem-
perature. Any reading within the normal range indi-
cates that the engine cooling system is operating
satisfactorily.
• The gauge pointer will likely indicate a higher tem-
perature when driving in hot weather or up mountain
240 UNDERSTANDING YOUR INSTRUMENT PANEL
Page 243 of 530

grades. It should not be allowed to exceed the upper
limits of the normal operating range.
WARNING!
A hot engine cooling system is dangerous. You or
others could be badly burned by steam or boiling
coolant. You may want to call an authorized dealer for
service if your vehicle overheats. If you decide to look
under the hood yourself, see “Maintaining Your Ve-
hicle”. Follow the warnings under the Cooling System
Pressure Cap paragraph.
CAUTION!
Driving with a hot engine cooling system could dam-
age your vehicle. If the temperature gauge reads “H”
pull over and stop the vehicle. Idle the vehicle with the
air conditioner turned off until the pointer drops back
into the normal range. If the pointer remains on the
“H”, turn the engine off immediately and call an
authorized dealer for service.
WARNING AND INDICATOR LIGHTS
IMPORTANT:The warning / indicator lights switch on in
the instrument panel together with a dedicated message
and/or acoustic signal when applicable. These indications
are indicative and precautionary and as such must not be
considered as exhaustive and/or alternative to the infor-
mation contained in the Owner ’s Manual, which you are
advised to read carefully in all cases. Always refer to the
information in this chapter in the event of a failure indica-
tion.
All active telltales will display first if applicable. The
system check menu may appear different based upon
equipment options and current vehicle status. Some tell-
tales are optional and may not appear.
4
UNDERSTANDING YOUR INSTRUMENT PANEL 241
Page 329 of 530
NOTE:There is a difference in temperature (in any condi-
tions other than full cold or full hot), between the upper
and lower outlets for added comfort. The warmer air goes
to the floor outlets. This feature gives improved comfort
during sunny but cool conditions.
13. Panel Mode Button
Air is directed through the outlets in the instrument
panel. These outlets can be adjusted for direction,
and turned on or off to control airflow.
NOTE: For maximum airflow to the rear, the center instru-
ment panel outlets can be directed toward the rear seat
passengers.
Economy Mode
If ECONOMY mode is desired, push the A/C button to
turn off the indicator light and the A/C compressor. Rotate
the temperature control knob to the desired temperature.
Also, make sure to select only Panel, Bi-Level or Floor
modes.
Max A/C
For maximum cooling use the A/C and Recirculation
mode buttons at the same time.
Rear Manual Climate Control — If Equipped
The Rear Manual Climate Control system has floor air
outlets at the rear of the right side sliding door, and
overhead outlets at each outboard rear seating position.
The unit provides warm or cool air through the floor and
upper outlets.
The rear blower and temperature controls for the rear seat
passengers are located in the headliner, near the center of
the vehicle.
Rear Manual Climate Controls
1 — Rear Blower 3 — Rear Mode
2 — Rear Temperature 4 — Rear Climate Control Lock
4
UNDERSTANDING YOUR INSTRUMENT PANEL 327
Page 338 of 530
Rear Mode Control
•Headliner Mode
Air comes from the outlets in the headliner. Each of
these outlets can be individually adjusted to direct
the flow of air. Moving the air vanes of the outlets to one
side will shut off the airflow.
• Bi-Level Mode
Air comes from both the headliner outlets and the
floor outlets.
NOTE: In many temperature positions, the Bi-Level mode
is designed to provide cooler air out of the headliner
outlets and warmer air from the floor outlets.
• Floor Mode
Air comes from the floor outlets.
Operating Tips
NOTE: Refer to the chart at the end of this section for
suggested control settings for various weather conditions.
Summer Operation
The engine cooling system must be protected with a
high-quality antifreeze coolant to provide proper corrosion
protection and to protect against engine overheating. OAT
coolant (conforming to MS.90032) is recommended. Refer
to “Maintenance Procedures” in “Maintaining Your Ve-
hicle” for proper coolant selection.
Winter Operation
To ensure the best possible heater and defroster perfor-
mance, make sure the engine cooling system is functioning
properly and the proper amount, type, and concentration
of coolant is used. Refer to “Maintenance Procedures” in
“Maintaining Your Vehicle” for proper coolant selection.
Use of the air Recirculation mode during Winter months is
not recommended, because it may cause window fogging.
336 UNDERSTANDING YOUR INSTRUMENT PANEL
Page 420 of 530
Cooling System
To reduce potential for engine and transmission overheat-
ing, take the following actions:
City Driving
When stopped for short periods, shift the transmission into
NEUTRAL and increase engine idle speed.Highway Driving
Reduce speed.
Air Conditioning
Turn off temporarily.
RECREATIONAL TOWING (BEHIND MOTORHOME, ETC.)
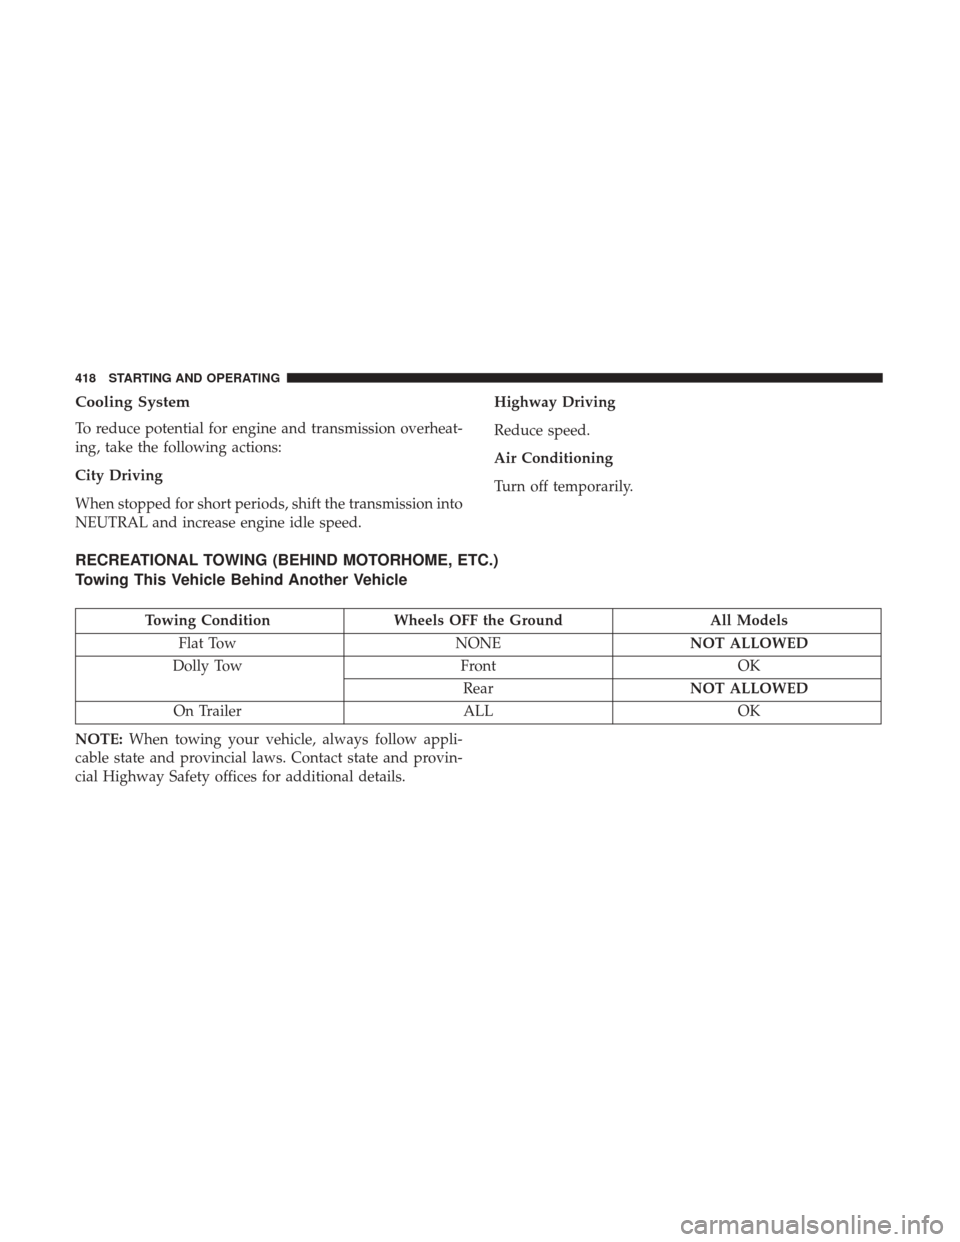
Towing This Vehicle Behind Another Vehicle
Towing Condition
Wheels OFF the Ground All Models
Flat Tow NONENOT ALLOWED
Dolly Tow FrontOK
Rear NOT ALLOWED
On Trailer ALLOK
NOTE: When towing your vehicle, always follow appli-
cable state and provincial laws. Contact state and provin-
cial Highway Safety offices for additional details.
418 STARTING AND OPERATING
Page 424 of 530
HAZARD WARNING FLASHERS
The Hazard Warning flasher switch is located in the lower
center area of the instrument panel.Push the switch to turn on the Hazard Warning
flasher. When the switch is activated, all directional
turn signals will flash on and off to warn oncoming traffic
of an emergency. Push the switch a second time to turn off
the Hazard Warning flashers.
This is an emergency warning system and it should not be
used when the vehicle is in motion. Use it when your
vehicle is disabled and it is creating a safety hazard for
other motorists.
When you must leave the vehicle to seek assistance, the
Hazard Warning flashers will continue to operate even
though the ignition is placed in the OFF position.
NOTE: With extended use, the Hazard Warning flashers
may wear down your battery.
IF YOUR ENGINE OVERHEATS
In any of the following situations, you can reduce the
potential for overheating by taking the appropriate action.
• On the highways — slow down. •
In city traffic — while stopped, place the transmission in
NEUTRAL, but do not increase engine idle speed.
NOTE: There are steps that you can take to slow down an
impending overheat condition:
• If your air conditioner (A/C) is on, turn it off. The A/C
system adds heat to the engine cooling system and
turning the A/C off can help remove this heat.
• You can also turn the temperature control to maximum
heat, the mode control to floor and the blower control to
high. This allows the heater core to act as a supplement
to the radiator and aids in removing heat from the
engine cooling system.
WARNING!
You or others can be badly burned by hot engine
coolant (antifreeze) or steam from your radiator. If you
see or hear steam coming from under the hood, do not
open the hood until the radiator has had time to cool.
Never try to open a cooling system pressure cap when
the radiator or coolant bottle is hot.
422 WHAT TO DO IN EMERGENCIES
Page 425 of 530
CAUTION!
Driving with a hot cooling system could damage your
vehicle. If temperature gauge reads “H”, pull over and
stop the vehicle. Idle the vehicle with the air condi-
tioner turned off until the pointer drops back into the
normal range. If the pointer remains on the “H”, turn
the engine off immediately, and call for service.
TIRE SERVICE KIT — IF EQUIPPED
Small punctures up to 1/4 inch (6 mm) in the tire tread can
be sealed with Tire Service Kit. Foreign objects (e.g., screws
or nails) should not be removed from the tire. Tire Service
Kit can be used in outside temperatures down to approxi-
mately -4°F (-20°C).
This kit will provide a temporary tire seal, allowing you to
drive your vehicle up to 100 miles (160 km) with a
maximum speed of 55 mph (90 km/h).
Tire Service Kit Storage
The Tire Service Kit is stowed behind the rear left side trim
panel in the rear cargo area.
Tire Service Kit Location
6
WHAT TO DO IN EMERGENCIES 423